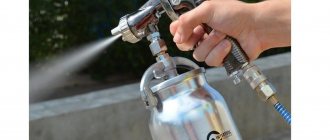
An airbrush (spray gun) is a hand-made tool whose main purpose is to spray liquid paint under the influence of compressed air. In fact, the airbrush can be powered by a very ordinary car pump or similar device. Using an airbrush, you can apply images to the surface of paper, fabric or metal products, which is often used by car owners.
This pneumatic tool makes it possible to draw thin and clear lines of almost any complexity and does not require special skills from the master - you get used to working with the device in a short time.
The airbrush looks like an ordinary fountain pen, to which a special container of paint is attached to the bottom or side, into which air is supplied under pressure using a pump or similar unit. Most vehicle owners who are keen on painting their iron horses prefer to purchase airbrushes in specialized stores.
However, few people know that assembling such a device with your own hands at home is also a completely feasible process.
Types of airbrushes
If you decide to make an airbrush with your own hands at home, you need, first of all, to decide what exactly you want from the tool. Its type and, accordingly, the materials that will be useful for its creation will depend on this. So, according to the type of mixing of air and paint flow inside the device. There are these types of airbrushes:
- with external mixing. This is the easiest type of airbrush to assemble and operate. It is precisely such devices that, as a rule, are assembled by hand (in this case, a part of an old vacuum cleaner or an ordinary ballpoint pen can be taken as a basis). This type of airbrush is intended mainly for painting large surfaces and is perfect for creating a background pattern on a car;
Airbrush with external mix
- with internal mixing . This is a more complex type of airbrush. Its peculiarity lies in the fact that the mixing of air with paint occurs directly inside the tool, the body of which is represented by a special spray head.
Airbrush with internal mixing
Based on the principle of controllability, all airbrushes are classified into the following categories:
- single action airbrushes. In such units, the paint pressure is controlled either through the air or through the paint channel. However, the most effective and economical are those airbrushes where control is carried out through an air channel;
Single action airbrush
- dependent double action airbrushes . They are also called automatic airbrushes. In them, control is carried out simultaneously through two channels (air and ink), but in most cases it is carried out automatically;
Double action airbrush, dependent
- independent double action airbrushes. In the vast majority of cases, this type of model is used exclusively by professionals, because during amateur painting of a vehicle, the function of full manual control over both flows, as a rule, is not needed.
Airbrush independent, double action
Based on the principle of paint supply, all airbrushes are classified as follows:
- devices on which the container with the coloring liquid is located on the side, top or bottom;
- devices into which paint is supplied under pressure.
Airbrush (spray gun) with different paint flow
Care instructions
If you follow the basic recommendations for caring for airbrushing, the image on your car will always look like new.
- To ensure that after washing the car there are no scratches left on the drawing, you need to use special car shampoos and soft rags. After rain or moisture, the area with the image must be thoroughly wiped, otherwise water will damage it.
- If drops of oil or gasoline get on the drawing, you need to wash them off immediately.
- Avoid mechanical damage.
In order to rinse the airbrush as thoroughly as possible from the remaining paint, you need to learn how to quickly disassemble and reassemble it. After finishing the work, wash the nozzles and other elements of the device thoroughly. Otherwise, the dried dye will completely ruin it.
Anyone can do airbrushing - just practice on foreign objects or undergo training. In addition, airbrushing is not only a beautiful activity, but also a profitable business.
What is needed to make an airbrush?
If you want to assemble a homemade airbrush with your own hands, you will need the following materials. They are cheap and easy to find in the regular market. So, you should have prepared:
- standard ballpoint pen with a refill inside;
- classic wine bottle stopper;
- medical syringe with a volume of 10 to 20 cubic millimeters;
- lighter;
- a marker of any catchy color, a stationery ruler;
- paper knife;
- drill;
- an awl or similar tool;
- glass bottle with lid;
- fine-grained sandpaper;
- hot melt adhesive.
When you have all of the above materials, you can safely begin assembling the airbrush with your own hands.
Useful tips
Every beginner in this business should first learn how to make simple monochromatic designs, lines and shapes with an airbrush. It is best to take special training courses that will show you how to properly handle such a device. After gaining sufficient experience, you will be able to create even very complex compositions.
A homemade airbrush will not only allow you to do a luxurious and quick manicure at home, but also save money on beauty salons.
Assembling a homemade airbrush
If you want to properly assemble a homemade airbrush with your own hands. You need to follow the following algorithm:
- Remove the core (paste) and completely clean it of the ink paste, the remains of which are certainly retained inside, even when the pen stops writing. First you need to remove the pen tip from the rod, on which the writing ball is located.
- Rinse the pen shaft thoroughly with warm water, solvent and alcohol-containing liquid. It should become absolutely transparent and clean.
- Take a 20-30 cc medical syringe and soften its tip (into which the needle is usually inserted) using heat treatment. This is where a lighter comes in handy (however, you should not overheat the syringe so that the plastic does not leak). This can also be done using any other heat source.
- While the nose of the syringe remains heated, it must be expanded with an awl to such a size that the removed ballpoint pen refill can fit into it.
- Make a small hole about 15 millimeters deep in the wine bottle cork. In this case, its horizontal and vertical walls should form a right angle. The width of the notch should be approximately two centimeters, and the height - one and a half.
- Mark the cork using a marker and cut out unused pieces using a utility knife. In this case, the height of the plug should be reduced so that a distance of 1 centimeter remains from its bottom wall to the horizontal edge of the previously made recess.
DIY airbrush
- After this, you need to make a couple of through holes with different diameters in the remaining part of the plug. The rod of the ballpoint pen will pass through the vertical one, and its body will pass through the horizontal one. It is better to first make these holes using an awl, and then drill them with a previously prepared drill with a drill of the appropriate diameter.
- The hole at the bottom of the outer body of a ballpoint pen is usually narrower than necessary, so it will need to be made a little wider. To do this you will need sandpaper. You need to rub until the diameter increases to 3 millimeters.
- Insert the body of the ballpoint pen through the horizontal hole in the cork. In this case, the tip should only peek out a little.
- Pass the pen shaft through the vertical hole and bring its upper end to the hole in the pen (it should only overlap it slightly).
- In fact, now the main working unit of your homemade airbrush can be considered completely ready. You just need to adjust the length of the rod so that it matches the height of the container in which the paint will be stored. It is necessary to ensure that the rod under no circumstances comes into contact with the bottom of the container. If it is a little longer than the bottle of paint itself, it’s not a problem. It can be cut with a knife at any time.
- Make a hole in the plastic lid of the prepared glass bottle, which will be the same diameter as the pen refill.
An easy way to make a convenient holder for storing a paint sprayer
Spray guns are indispensable tools for body repair or other types of painting work. Using a paint gun involves several different tasks, one of which is where a spray gun holder helps a lot. Using this simple device, you can carefully pour prepared paint into a container or leave the gun for storage. During breaks between jobs, the holder allows you to put the tool down without spilling paint or damaging it. Despite the convenience of the holder, many painters neglect to use it. They store the paint gun anywhere, during work they throw it into the first place they come across and pour paint, holding the tool with their knees. As a result, the work becomes sloppy, inconvenient, and the gun often breaks or simply becomes clogged. To avoid this, just buy a holder or make it yourself. How to do this is described in the material under consideration.
Selecting a device design
Before you start making the device at home, you should decide what kind of airbrush design is needed - with external or internal paint mixing.
External mixing airbrushes have a tank with a tube coming out of it. The latter is located opposite the tube through which air is supplied. As a result, the paint flowing from the tank tube is blown away by the air flow.
In devices without a spray gun, the dye is mixed with air inside the housing and blown out through a nozzle.
Stand for spray gun: types and DIY production
There are many small nuances designed to simplify the painting process, which include the use of a regular holder for a spray gun. This simple device, installed in a convenient place, can save you a little time and add confidence to your work process. In this topic, we will demonstrate what holders for spray guns and airbrushes can be, and also present 2 detailed instructions for the manufacture of this equipment, with photos and video materials.
Airbrush from a syringe and pen with internal paint mixing
To make your own airbrush, you will need items such as a syringe, a ballpoint pen (with an empty refill), a blood transfusion system and a glue gun. The manufacturing process of the device without an external paint sprayer is as follows.
- Take a ballpoint pen and remove the refill from it.
- It is necessary to remove the ball from the writing part (tip) of the refill. To do this, just make a few movements with the tip on the sandpaper, after which the ball will fall out of it. If there is ink in the rod, you first need to disconnect the writing part and blow it out of the tube. It is also recommended to flush the tube with water or solvent using a syringe.
- After curing the ball, the tip should be well polished and burrs should be removed, both from the outside and inside the hole, by clamping the rod in a vice.
- After polishing, remove the tip from the plastic tube using pliers.
- The next step will require making a hole in the side of the tip. This is easy to do with a triangular file.
- After making a hole, remove any burrs around the hole and remove any small shavings from the inside of the element that formed during the grinding process.
- Insert the tip into the plastic rod.
- Next, you should cut off a small part of the handle body 35 mm long. Make a mark in the desired location and cut off part of the tube using a hacksaw.
- Clamp the sawn-off part of the handle body in a vice in a vertical position.
- Using a triangular file, make a cut in the end of the tube, as shown in the following photo.
- Insert the rod into the tube and make sure the cut is deep enough. The hole in the side of the tip should be open.
- Now the rod can be shortened so that it, together with the tip, has a length of about 40 mm.
- After shortening the rod to the required length, you will need to insert a needle into its writing part.
- Since the syringe needle is too long, it needs to be shortened. This can be done using wire cutters. But after shortening, the cut area needs to be ground down a little so that the hole in the needle opens.
- Next, the shortened needle must be inserted into the side hole of the writing part of the rod.
- In order for the needle to pass through the entire tip, it must be slightly bent.
- Insert the bent needle into the side hole so that it extends 1 mm from the tip (nozzle) and is located strictly along its src=»https://tehnika.expert/wp-content/uploads/2018/06/image014-2. png" class="aligncenter" width="600″ height="449″[/img]
- Next, you should take the tube from the IV and connect it to the rod.
- Place the clamp on the dropper, moving it all the way to the handle body.
- To continue, you will need to make a small part from the top of the handle body. Cut the tube where the thread is. The part should be about 20 mm long.
- A hole must be made in the cap, which has an internal thread.
- Screw the cap onto the tube.
- Place the assembled elements on the dropper and push them all the way.
- At the next stage, all elements must be fixed with a glue gun, that is, the airbrush must be completely assembled.
- After the glue has hardened, connect the syringe to the needle. In this case, it will serve as a container for paint. This concludes the production of the airbrush.
Fill the syringe with paint and place it on the resulting mini airbrush. Move the clamp wheel in the opposite direction relative to the syringe (all the way), thereby squeezing the dropper tube. Connect the free end of the dropper to the compressor hose and perform a test spray of paint. To start spraying, just turn the clamp wheel forward a little so that air flows through the dropper in the direction of the nozzle. After simple experiments with the pressure in the system and the thickness of the paint, your homemade airbrush will be ready for use.
You need to make cutouts in the plastic bottle that match the shape of the airbrush.
DIY spray gun holder
- Metal rod Ø 5-8 mm, about 100 cm long. You can use reinforcement.
- Perforated mounting bracket (reinforced)
- Pipe Ø 76 mm, for cutting 4-5 mm rings. If there is none, you can bend the rings from the same metal rod.
- Pipe Ø from 32 mm, for sawing out the handle stop.
- The manufacturing process begins with the preparation of rings that will hold the spray gun tank and the filter above it. This is done with an ordinary grinder with a metal cutting disc.
- It is necessary to cut out approximately 1/5 of the circle in the rings, giving them the shape of the letter “c”, so that the spray gun tank can be placed in them.
- From a smaller pipe with a diameter of 32 mm or more, we need only one short piece 2 cm long, which must be divided lengthwise into 2 equal parts. Only one part is needed for the holder, so you can put the second one aside.
- Let's move on to making the frame. To do this, take a rod and cut it into 2 pieces: 45 cm and 32 cm. On the long one we mark 6 cm from one edge, and on the short one 7 and 11 s at different ends (we will bend in these places). The larger bend is approximately 45°, the smaller one is 90° from the 7 cm mark, and about 105° at 11 cm. You can bend the rod by holding it in a vice, inserting it into a small pipe or any other strong groove.
- We weld the long piece to the back of the construction angle so that the bent part is located on top in the forward direction. To the bottom, we fix the obtuse angle of the short segment so that the opposite angle rests against the long rod.
- We weld rings and a stop for the handle onto the assembled frame.
- To prevent the spray gun holder from scratching the tank, you can wrap the ring with electrical tape or put soft women's curlers on it.
Airbrush with external paint mixing from cork and ballpoint pen
The easiest way is to make an airbrush yourself if its design involves the presence of an external paint sprayer, that is, during operation of the device, external mixing of air with paint will occur. Below is a drawing according to which you can make a device for spraying paint in just a few minutes.
The airbrush is made as follows.
- Remove the refill from the ballpoint pen and blow the ink out of it, after first removing the writing part.
- Take a wine cork and draw a line through its center.
- You should also draw 2 segments, starting from the previous line, on both sides of the cork. The length of the segments should be 15 mm.
- Connect 2 vertical lines and cut out the outlined part of the cork to make a corner.
- Next, cut off the excess part of the cork so that you get a stand 8-10 mm high.
- Drill or pierce a hole in the stand with a sharp object into which the rod will be inserted.
- Also drill a hole of a suitable diameter for the body of the ballpoint pen.
- Cut a small part of the stand as shown in the following photo.
- Since the hole in the pen body through which the writing part of the rod comes out has a small diameter, it needs to be widened to 2-3 mm using sandpaper.
- Insert the prepared handle body into the corner made of cork.
- Also insert a rod into the bottom of the stand.
- Place the rod on the paint container and determine its length (it should reach the bottom, but not touch it).
- Cut off the excess part of the rod with a utility knife.
- In the lid of the paint container, drill a hole of a size corresponding to the diameter of the ballpoint pen refill.
- Apply glue to the lid using a glue gun, insert the rod into the hole and fix the stand in the desired position.
Making a scoop for adding paint.
To make it I used: a container that will serve as a scoop (in my case it’s a baby food dispenser spoon), a nail, an electric alligator clip and again the same hose from the windshield washer.
Everything here is generally banal and simple.
This is (in my opinion) the most necessary thing when working with an airbrush. And without any special investment!
If anyone has any other ideas on this topic, write, we will implement them.
Passenger car lovers try to do everything to make their four-wheeled friend stand out among other vehicles. Some people prefer cool tuning, while others use an airbrush to decorate the surfaces of a car body. It is not always possible to use a purchased airbrush device, which requires an air blower to operate. A homemade installation, which under pressure forms a stream of sprayed paint, will allow you to create a beautiful, vibrant, original drawing.
Additional detail
A useful addition to an airbrush is always a stand. It can also be done at home.
It is good to use a regular office clip as a stand. There is always the opportunity to modify it or make a new one yourself.
There are different options for improvement. For example, attach aluminum wire, springs and stoppers from medical bottles to the clamp. The wire must be thick and strong, since the axis of the device is made from it, which is fixed with a nut, a special rocker arm for the airbrush is attached to it on top, and dropper tubes are attached to the points of contact with it . This is a fairly durable device that securely holds even a large device.
One of the most affordable options for making a stand from scratch:
It is possible to use lining as the main material:
- cut off a piece (length about 17 cm);
- saw along;
- make holes for bolts and nuts;
- pull the wire, clamp it with pieces of the slats;
- To prevent it from scratching the airbrush, prime and tighten the hose from the dropper.
A self-made or purchased stand must meet certain requirements:
- firmly attached to the table;
- Installation is simple and quick, does not take time away from the painting process itself;
- be low so that you can add paint at any time;
- The airbrush should be easy to install and remove, so that these actions eventually become automatic.
In practice, a homemade airbrush turns out to be no worse than one bought in a store. In addition, there is almost no need to spend money on materials, and the result is almost complete cost savings.
Preparation before applying the design is the main part of the airbrushing process.
Preparation before drawing
After choosing a design and creating a sketch, you should begin to directly prepare the surface for airbrushing. Many people often neglect this process, or vice versa - they completely remove all the paintwork. At this stage, it is important to find a middle ground.
Why do you need to prepare the surface?
It's simple, when painting it is important that the paint sticks to the surface and the resulting pattern does not peel off over time. The service life of the resulting airbrush will depend on how well you prepare the surface.
For example, when applying airbrushing to a car, it is important to make the surface matte. We can achieve a matte effect using adhesive tape and abrasive papers, creating mini scratches on the surface, to which the paint material will cling when applied. There are several surface preparation methods:
- Dry using an abrasive sponge and abrasive paper.
- Using abrasive sandpaper for wet application;
- All operations are performed using mat paste and Scotch-Brite.
Receiver selection
You will need to install a receiver into the overall structure. The best option would be a hydraulic accumulator from some kind of pump. The recommended volume for this is about 30 liters. An emergency release valve and a pressure gauge with a pressure switch can be added to the kit for such a tank. The valve will be needed if the automatic system fails. You can set the pressure manually. There is a special handle for this.
Option for assembling a homemade airbrush
Installation of such a kit must be carried out using adapters and fittings purchased in advance. Additionally, a check valve must be installed at the inlet of the receiver.
Sealing will be ensured by high-quality clamps and oil-resistant connecting hoses. During operation, gasket sealant and fuel filters will be in demand. It is also advisable to update the oil in the compressor. This is done using a tube, the output sealed end of which must be opened. After replacement, the pipe is again blocked using sealant.
We bolt a receiver tank, a repaired compressor, a starting relay and an oil separator regulator onto a plywood sheet or chipboard board. Filters are installed on the inlet pipe, between the compressor and the receiver. A check valve is also mounted at the inlet, and a relay is placed below to turn it on.