When processing a car body to create a uniformly smooth surface, it is almost impossible to do without a primer. Correctly selected acid, epoxy or acrylic primer for a car creates additional protection, eliminates dents and irregularities, and ensures a tight fit of paintwork materials. The most popular due to its ease of use and quick-drying properties is acrylic. However, other types of primers have their own advantages and applications.
Automotive primers and their application.
Primer is a special composition that is applied to the surface of the car before applying the paintwork.
The soil has a high content of pigments. The main function of the primer is to improve adhesion (adhesion) with the subsequent layer of paintwork. When repairing a car body, they usually prime the putty repair area, which also has fragments of the old paintwork. Pure metal also needs to be primed. Thus, auto enamel is applied to the primer or to the old paintwork (provided that the old coating is compatible with the applied enamel).
Soils have different compositions and, depending on this, have different properties.
Anti-corrosion (“acid”) primer:
It is applied to clean metal and protects it from corrosion. This is a primary primer and must be coated with a secondary primer, that is, putty or paint cannot be applied to it immediately. It is always recommended to cover the “bare” metal with an anti-corrosion “acid” primer. If the metal of the new body panel is coated with high-quality factory primer, then “acidic” primer is not used.
Epoxy primer
Epoxy primer is intended for anti-corrosion protection of metal surfaces. Just like acidic soil, it is primary. For further painting of the surface, it must be covered with secondary primer. It is worth mentioning here that epoxy primer sprayed onto a flat (without minor defects) surface can be painted even without sanding paper. But this can be done before it has completely hardened, several hours after priming. If the primer has hardened, it must be treated with sanding paper and primed with acrylic primer. Then dry the acrylic primer, sand it for painting and then you can paint.
Epoxy primer contains special resins and special active additives that prevent the development of corrosion processes on the metal surface. It dries quickly and after curing becomes resistant to mechanical and temperature influences. The surface covered with this primer, even without applying paint and varnish materials, is well protected from corrosion.
Epoxy primer after application forms a dense film that does not have pores.
The disadvantage is the long drying time. At a temperature of +20 °C it averages 12 hours. An increase in drying temperature leads to uneven polymerization of soil layers and leads to the appearance of defects.
Two-component pore-filling primer:
This primer is most often used before painting a car. Porosity-filling primer can be applied in a thick layer. It fills the pores that remain on the putty, as well as the marks left by sanding paper.
However, you need to remember that the putty surface must be prepared for priming according to all the rules and the risks from sanding should not be too large. If you fill too deep scratches with this soil, then after some time, after drying, the soil will sag and all defects will be visible.
One-component nitro primer:
Apply before painting with alkyd or nitro enamels. This primer is not compatible with acrylic car enamels or metallic paints. The main advantage is that it dries very quickly.
One-component acrylic primer:
It is convenient to use as it comes in an aerosol package. But it is also sold in regular containers.
Sufficiently high quality soil. Dries quickly and is easy to use. Compatible with almost all types of paints.
Primers for plastic:
When repairing plastic, special primers are used to increase adhesion. If you are painting new plastic, then after priming with a special primer you can immediately apply paint.
Application of primer:
Before spraying, the primer must be thoroughly mixed, and in some cases, if necessary, diluted with a thinner to a working viscosity. When diluting different soils, you need to check the instructions for each specific product.
It is forbidden to dilute with solvents to the working viscosity; only thinners must be used.
Next, it is important to filter the soil.
For application, primer spray guns with a nozzle of 1.5 - 2.0 mm are usually used. Apply 1 – 2 layers. If desired, you can apply more layers, taking into account the fact that in preparation for painting, part of the primer will be sanded off. But you need to remember that it is not recommended to apply a layer that is too thick, especially since it will not dry well. Each layer must be applied after the previous one has dried. Interlayer drying time is approximately 10 – 15 minutes.
Preparing the surface for applying primer: - clean from dust; — before priming, plastic parts must be wiped with an antistatic agent; - degrease the surface.
Ground grinding:
When sanding dry before painting, use P400. When preparing with water, P800 is used. In areas of panels that have a complex shape, as well as in hard-to-reach places, you can use Brite tape.
Should I work dry or with water? Water is a source of corrosion, and some primers are designed for dry sanding only. The advantage of working with water is the absence of dust. Also convenient to use sanding paper. It clogs less and if it does clog, just rinse it with water. When working dry, you can use a sander to speed up the work. And, most importantly, the risk of corrosion is reduced.
A reasonable solution can be considered dry sanding using water in inconvenient places. Bumpers can be easily sanded with water, making sure to dry thoroughly before painting.
It is better to use a primer color similar to the color of the applied paint. This will make it easier to cover the repair area. You can also tint the primer to match the color of the paint.
A light gray color can be considered universal; it will match any paint color.
The best primary acid soils
Among single-component acid primers that do not require the addition of catalysts, experts highlight Mobihel Primer 1K. It is convenient and easy to apply. Used for priming on steel, galvanized and aluminum. Has a short drying time. Estimated price 950-1 thousand rubles. for 1 l.
In two-component ones, a hardener is added, often included with the main mixture. Widespread:
- NOVOL Protect 340 Wash Primer - used on ferrous and non-ferrous metals. Hardens quickly. Does not require sanding, but acrylic processing is required. Sold together with hardener. Average prices: 500 rub. per set 0.2+0.2 l; 1.9-2 thousand rubles. — 1+1 l.
- Radex CR 1+1 Activator - applied to any metal surface. Recommended for repairing new cars. The price for a set of 2 cans ranges from 2 thousand rubles. up to 2.5 thousand rubles.
Features of selection and application
If you are wondering which primer you can choose for a car and you are interested in how long it can be stored at home, then carefully study the videos presented on thematic sites.
Priming the underbody and body of the car before painting it prevents the occurrence of rust and corrosion on the surface of these parts, after which reliable adhesion and rapid “adhesion” of acrylic paint to the surface being treated is ensured. Today the market is overflowing with various products for body repair, including two-component putties, which can be epoxy or polyester.
Before using putty, prepare the surface (matt it and clean it from corrosion). At the beginning of mixing the putty, a pink hardener from a tube is added to it; its proportion should be 1:20. After this, the resulting mass must be diluted with a small spatula until a homogeneous consistency appears.
Advantages and disadvantages
Aerosol soil, like any other product, has its advantages and disadvantages. If we talk about the advantages of the spray, we can highlight the following factors:
- simplicity and ease of use;
- compactness;
- even smooth coating;
- the possibility of smooth transitions during local processing;
- lack of preliminary preparation of material for work.
Primer BLACK 400 ml aerosol
The disadvantages of the spray include 2 factors: low productivity and the ability to use only a fluid consistency. To paint the entire car, it is unlikely that you will be comfortable working with spray cans - it is troublesome, time-consuming and ineffective. It is much more rational to prepare a large container of a two-component product and use a pneumatic gun. But the aerosol is indispensable for local types of car repairs. If you are painting over a scratch, scuff or chip, the aerosol option is much more convenient. It is more efficient and will help to better process the desired area.
Sometimes liquid fluid mixtures are not suitable for treating a car body - they flow down the metal without giving the effect of a durable protective film. An aerosol auto primer will also not work for you here—you’ll have to buy viscous mixtures in cans.
Primer for cars in a can
Popular manufacturers of primers for painting
The leading positions in surveys and ratings belong to foreign companies, among which the products of widely advertised brands stand out:
- Hi-Gear;
- Liqui Moly;
- Dynacoat;
- Mobihel;
- NOVOL;
- Duxone;
- ABRO.
Domestic manufacturers, distinguished by high-quality products and gaining fame in the country, are represented by the following companies:
- “Russian Paints” (Yaroslavl);
- Moscow LLC "Empresa-M";
- LLC "KhimTorgProekt" from St. Petersburg.
The main types of soils used for car repairs
- Epoxy type - anti-corrosion primer for cars. This type of mixture provides an excellent protective coating for steel due to the fact that it contains high quality resins and additives. This primer can be used for various types of vehicles. Paint can be applied directly to such primer. You can use it with the wet-on-wet method. It can also be used with hardener H 5950 or H 5960 from Novol.
- Reactive anti-corrosion primer based on polyvinyl resins. It can be used on a variety of materials. This versatility is explained by excellent adhesion quality and increased corrosion resistance. The material is applied in a very thin layer, but at the same time has good resistance to environmental influences
- Acrylic primers for cars with one component. They are sprayed using a special gun. The material provides adhesion to a metal substrate; it does not have anti-adhesion properties. Mainly used for leveling surfaces. Dries quickly.
- Two-component primer contains acrylic resins. It has a high degree of viscosity and provides a large coating thickness. Masks significant defects. It has excellent adhesion properties to various materials and has a high degree of corrosion resistance. Excellent insulation of polyester putties and acrylic paints. Since a mixture of white and black is mixed, you can achieve the desired shade, and this is important when choosing paint colors.
- A one-part plastic primer can also be applied using a paint gun. It increases the adhesive properties of primers, acrylic and polyurethane varnishes.
There are primers of various colors that allow you to save paint. Acrylic types are used together with special acrylic thinners. It is important to remember that it is better to use solvents from well-known brands.
Do not forget that when carrying out body work it is necessary to use things such as a respirator and gloves, which will help minimize unpleasant phenomena.
What is the soil for?
Automotive primer (from German der Grund - “soil”, “base”) is a specialized viscous mixture that tends to harden and acts as an intermediate layer between metal and paint.
It performs a preparatory function and solves the following tasks:
- ensuring the anti-corrosion resistance of the body and parts, protecting them from moisture and rust;
- improving the adhesive properties of the surface when applying paint and varnish;
- elimination of dents, cracks and chips during cosmetic repairs of the car;
- increasing the service life of car enamel, its strength and preservation of appearance;
- creating a flat surface for painting a car, which ensures good quality of work performed.
The chemical industry produces and markets a large number of base mixtures, differing in composition, number of components and purposes of use. They are sold in liquid and paste form, packaged in cans or aerosol cans.
Based on their protective properties, all types of primers can be divided into 4 groups:
- Passivating. Used for processing the bottom, sills and wings. The surface treated with this composition is impervious to water and air.
- Protective. Slow down the spread of the lesion in case of damage to the paintwork.
- Phosphating. As a result of their use, the surface layer of the metal is corroded and a protective film is formed due to the formation of poorly soluble substances.
- Modifiers. They are applied directly to rust, preventing the spread and increasing resistance to its reappearance. For the protective reaction to occur effectively, a temperature of at least +15°C is required.
Types of primers for cars: primer, filler
To carry out body repair work, the same types of primers are used as in industrial enterprises during the production of a car. In general, there are 2 main types of mixtures:
- Primary or primer is used to protect the metal from the corrosion process and at the same time ensure reliable adhesion to the paint.
Primary primer - primer
- A secondary type of primer or filler is used to level out minor unevenness in the surface that will subsequently be painted. This allows you to create a uniform, smooth substrate. Fillers, in turn, are divided into sandable (most often used for body elements with defects that need to be hidden) and non-sandable (suitable for new and non-defective elements).
Secondary primer - filler
Today's range of formulations allows you to purchase a primer that has the properties of both a primer and a filler. For example, REOFLEX PRIMER FILLER (450-600 rubles).
Basic Concepts
Acrylic primer is a special mixture that contains acrylic and a certain amount of hardener. Depending on the number of elements, the soil can be one- or two-component.
A similar material is used to fill pores, and also as a protective layer when covering wood.
In some cases, it acts as a substrate for the main paint. The thickness of application of these solutions depends on the material being coated (50-100 microns or more). The amount of filler allows you to change the characteristics of the soil, which can be either adhesive or filling.
One of the most popular products on the market is Reoflex, which is used as a leveler. It can be applied to both wet and dry, pre-cleaned surfaces.
Dilute the mixture
Acrylic primers are component compositions. The technology of their dilution depends on this. For such purposes, experts recommend using several substances:
- The optimal thinner will be a special acrylic mixture that is compatible with a particular brand. Often, such solutions are recommended by the manufacturers of these products.
- Water. This mixture can only be used in cases where the soil contains a similar component. Water-acrylic mixtures are often diluted.
Some users recommend using a special thinner 647. But this issue is controversial, since the use of this product depends on the properties of the selected primer.
The amount of thinner often does not exceed 25% of the total volume of the mixture. Please note that it is important here to also consider the amount of hardener that is added to the solution when mixing.
You can find out the exact proportions and recommended solvent on the packaging. It is important to follow all basic recommendations to obtain high-quality and durable protection.
How to dilute acrylic primer
Many materials used in the external environment are susceptible to various factors. One of the methods of protection is to cover them with special solutions.
For such purposes, painting primers are increasingly being used, which reduce the risk of destruction or corrosion on the surface of the product. You can learn more about the characteristics of these products on specialized websites.
Recommended sealer primers
A group of sealers (insulators) is designed to eliminate the possibility of contact of conflicting materials. The most effective for this purpose are viscous epoxies, which create a dense protective layer.
Acrylic primers designed for wet-on-wet work also have insulating properties. They are used either as a direct substrate for painting, or with the subsequent addition of filler.
Preparing the car for priming
In order to prime a car, it is necessary to place it in a clean room with the proper level of ventilation. If you plan to apply the primer locally, then all nearby parts of the body to which the composition will not be applied must be covered with paper and secured with masking tape.
Then prepare a spray gun (spray gun) for the primer composition. It is advisable not to save on this instrument, although it will not be cheap - from about 10,000 rubles.
Depending on the volume of work, you need to choose one of two types of spray guns:
- For full priming, it is better to use a gun with a nozzle diameter of 1.8-2.0 mm. It is more versatile, and if there is no budget or other possibilities, it is better to purchase such a device.
- For partial and spot priming, a spray gun with a nozzle diameter of 1.3-1.4 mm is more suitable.
Applying acrylic primer to a car
Acrylic primer is applied to:
- fill pores;
- create a protective layer;
- slightly level the surface, giving it greater smoothness;
- create a base for the paint.
The thickness of acrylic primer application can range from 50 to more than 100 microns.
Depending on the number of elements, the primer can be one-component or two-component .
The first is applied in a thin layer and is mainly used for applying to new parts before painting. This ensures improved adhesion and rust protection.
A two-component primer is more versatile and suitable for any work on the body.
It is necessary to strictly observe the proportions when diluting the primer
In addition, only thinner is added to a one-component primer (approximately 1 part thinner to 5 parts primer). No hardener is added. In a two-component mixture, you need to first add a hardener and then a thinner (usually 1 part hardener and 1 thinner to 4 parts primer).
How to dilute automotive acrylic primer
These mixtures contain many elements. And it is from the final composition of a particular primer from a particular manufacturer that you need to select a substance that can subsequently be used to dilute the primer. There are only two best options:
- Water - but only if it is one of the components of the acrylic primer itself. The packaging should then bear the inscription “water-acrylic”. If the old primer has hardened to a solid mass, then the water needs to be heated almost to boiling water.
- Special acrylic thinners are an excellent option for thinning. It is recommended to select them of the same brand as the soil itself.
Most often it is recommended to maintain the following proportion - 4:1 with the addition of a thinner. For more detailed information, please refer to the instructions on the product label.
For example, the label of Novol Protect 300 4+1 MS primer says that for 4 parts primer you need to take 1 part hardener and 25%-35% thinner.
It is important to understand that acrylic fillers remain in an unchanged state for 30-60 minutes, which is how long after mixing they will be ready for use. This time must be taken into account when stirring the primer and applying it.
The resulting composition is applied using a spray gun. But before you fill the mixture into the device, it must be filtered (for example, through nylon or a double layer of gauze). This is done in order to cut off all large fractions that could clog the pneumatic sprayer.
How to apply filler - tips and tricks
The following sequence of actions must be followed:
- If small smudges or other minor defects have formed, then after drying they can be easily leveled by sanding.
- The primer must be applied in a thin, even layer.
In order to get the desired effect, apply 2 or 3 layers of acrylic primer. Between each application you need to wait about 20-40 minutes. At this time, evaporation of particles occurs. But you should be very careful, since the required evaporation period depends to a large extent on the ambient temperature, as well as on the thickness of the applied layer, the composition of the primer and its proportions, the type of surface being treated, and many other factors.- To achieve a uniform, smooth effect with a minimum amount of smudges formed, it is necessary to cover the surface using cross movements.
- It is the pneumatic sprayer that allows you to achieve a more even and uniform surface, compared to using a brush.
- After the last acrylic layer of primer has been applied, it is necessary to wait for 20-40 minutes first, and then increase the temperature in the room where the car is parked. This will speed up the drying time of the soil and its hardening.
- At the final stage, after complete drying, the surface is sanded. Sanding can be done mechanically or manually, and can also be done dry or wet.
How to apply primer - tips and tricks
Primers are mainly needed to enhance adhesion between the substrate and the paint. The principle of working with it is somewhat simpler:
- Before opening the primer, you need to shake it well.
- You should try to make the applied layer as thin as possible, applying a minimum amount of composition. For work, you can use a brush or swab.
- After applying the layer and before painting, you need to wait 5-10 minutes (check the packaging for the exact time) until the primer dries completely.
- Before applying paint, you need to make sure that the primer layer is smooth, even and free of any contamination.
- If the surface has pores or minimal roughness, a second coat of primer can be applied in the same way as the first.
What is automotive primer
Automotive primer is a whole segment of products used for application to the cleaned surface of a vehicle body.
Primer for painting a car is applied as a base, which can be sanded, and only then a ball of sealant is used.
Automotive primer for metal, or rather a high-quality product, does not belong to the budget segment, but savings may be the reason to repeat the painting. Therefore, it is better to immediately settle on the most suitable high-quality product.
Automotive putty is distinguished by its dense structure and its water resistance. It is applied as a protective ball against oxidation. Before use, combine with hardener and apply several balls to the body. To work, you need to purchase a spray gun. The epoxy primer coat is applied first. This guarantees optimal adhesion to metal elements. It will be an excellent base for applying subsequent layers.
How to apply primer before painting a car
Preparing the car
The work must be carried out in a clean and dry garage; there should be no dust or other dirt in it. It is important that the room has good lighting and ventilation.
Once the room is ready, you can begin preparing the machine:
- it is thoroughly washed, removing all, even hard-to-reach, contaminants;
- remove old paintwork;
- those areas where corrosion has appeared must be thoroughly sanded;
- After this, the working surface is degreased using anti-silicone.
You should take care of doors and windows. All areas of the machine that are not primed must be covered with thick polyethylene or paper, securing them with masking tape to prevent the composition from getting on the rubber gaskets.
When the car is ready, you need to take care of the correct preparation of the equipment and composition for the primer.
Features of do-it-yourself priming
If you plan to prime the car exclusively with your own hands, then first of all you need to take care of your own protection, using a special suit. Mask and safety glasses.
The primer is carried out in several stages. The first time it is applied in a very thin layer and allowed to dry completely. The secondary layer is laid at least 2 times, each time waiting until the previous layer has completely dried.
Whether all layers have dried or not must be checked according to the instructions; it indicates how long it will take for the composition to completely harden. After this you can start sanding. It is performed either with regular sandpaper or with a special machine. After each pass, you need to remove the resulting dust, and check the result by touch - the surface of the car must be absolutely smooth, without scratches or unevenness. Only in this case will the paint lie flat and have good adhesion to the body.
Treatment
The soil can be treated either dry or with water. It should be remembered here that soils partially absorb water, which over time leads to corrosion of the metal. Therefore, it is better to process dry. A special grinding machine can help with this. Under metallic, the body should be sanded with R-600 and R-800 sandpaper. But for ordinary acrylic, R-400 and R-500 will be enough.
What to do with new parts?
New parts need to be given extra attention, because they are covered with shipping primer (usually black). In order for the repair of the machine to be of high quality, the transport soil must be cleaned with R-240 sandpaper down to the metal. After this procedure, you can put 2-3 layers of soil. And after 10-15 minutes, show it with a primer or paint of the opposite color. The next day you can clean it up. During processing, development may show minor unevenness. In this case, you will need to re-prime the flaws or the entire part.
Do-it-yourself car priming is absolutely safe if you approach it correctly. The fact is that during any paintwork, including body priming, it is necessary to use personal protective equipment (respirator, gloves, suit). Primer vapors are very harmful to the body. Therefore, be attentive to your health.
Main stages of work
Briefly, the main stages of applying primer to a car will look like this:
- Prepare the car and garage for repair work.
- Stock up on the necessary tools and select a primer.
- Clean the surface from paint and rust residues, wash thoroughly and dry.
- Apply the selected primer in several layers and let them all dry thoroughly.
- Sand the body so that no scratches or irregularities are felt when touched.
- The car is ready for painting.
Immediately before you start painting the car, its surface will have to be degreased again for better adhesion to the metal.
Primer technology
Now let's take a closer look at this stage of work. First of all, you need to prepare the work area. If this is a garage, then it is desirable that it be clean, well lit, warm and have ventilation. This way, you can avoid installing additional heating sources in the form of IR heaters or the appearance of dust accumulations on the body.
The next step is to cover all untreated areas of the body where the material may get when applied with a spray gun, and also remove all plastic covers on the parts that will be repainted. Usually they cover everything with a film using masking tape, leaving only those areas of the metal surface to which the primer will be applied.
From materials and tools you will need:
- grinding machine with various replaceable abrasives.
- sandpaper.
- primer, solvent and hardener.
- spray gun and air compressor.
This is a basic set of equipment and consumables.
The next step is preparing the finished primer composition before painting the car. It is important to strictly follow the proportions indicated by the manufacturer of the material on the packaging. It is advisable to use the hardener and solvent of the same brand so that there are no problems with differences in composition. You can also use 646 as a solvent. To maintain proportions, you can use measuring containers; do not do everything by eye, especially if you are not an experienced painter. Next, the composition is filtered with special filters offered by manufacturers, otherwise you take gauze, fold it into 3 - 4 layers and run the finished primer composition through it. This is done to filter out various lumps and debris, which may subsequently clog the spray gun.
In most cases, 2 - 3 layers of primer are applied to the surface of the car body, this is enough to ensure good conditions before applying the main paint.
Many people are interested in the question: “How long does the primer dry before painting?” The answer depends on the type of material used. So, say, if a hardener is used, then a drying period of 10 - 15 minutes is allowed between layers, and the finishing layer is dried for about 18 - 20 hours. Without using a hardener, one layer of material will dry in 24 hours, but this approach is very rarely used, due to a large loss of time for work.
When choosing a primer color, people often look at the shade of the finishing paint. So, if these are light colors, then take white or combine white and the desired tone of paint. If the surface is black, then take a black tint accordingly. But there is also a universal color - this is a gray primer, it is used for surfaces of both light and dark tones.
Rating of the best paints for rust
The review includes Russian and foreign enterprises that have received positive feedback from consumers and experts.
When choosing which rust paint is better and compiling the rating, the following characteristics of the nominees were taken into account:
- Intended for use indoors and/or outdoors;
- Application temperature;
- Type of paint – ready-made solution or concentrate;
- Coverage requirements;
- Operating temperature;
- Method of application and required working tools – brush, roller, spray;
- Covering power;
- Color and gloss level;
- Packaging volume;
- Lifetime;
- Adhesion quality;
- Drying speed;
- No smell;
- Consumption;
- Storage conditions;
- Environmental safety of the composition.
When preparing the TOP, special attention was paid to the ratio of price and quality of products.
The best metal detectors
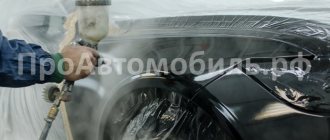
Primer application methods
Depending on the area of the surface to be treated, you can use either an aerosol primer or a spray gun. In the first case, we are talking about quick repair of minor damage, since the composition is one-component and quite liquid, it will have to be applied at least three times.
If a large area of the body is to be treated, then it is worth using a spray gun, with which two-component compounds are used, which harden quite quickly.
Priming a car yourself is not as difficult as it might seem at first glance. For the job to be successful, it is important to prepare the car and garage, stock up on the required amount of primer, prepare the tools and act slowly.
Layering process
The first layer of primer is usually applied in a thick enough layer to evenly cover the surface, and the material itself will fill all micro-irregularities and chips. Next, let it dry for about 10 – 15 minutes. If necessary, rub problem areas and apply a second layer. They wait for it to dry a little, if all is well, then leave it for about a day and move on to the final painting.
After drying, you need to clean the surface. It is not advisable to "wet sand" as some primers absorb moisture and this process can cause rust and blistering of the paint in the future. They are usually sanded with a machine. Preparation for acrylic is done using abrasives of grades R-400 and R-500, and for metallic grades R-600 and R-800.
If you decide to paint a new part that came from the factory, then you must remove the shipping black primer using a P-240 abrasive down to the metal. Subsequently, 2–3 layers of primer are applied. After a period of 15 - 20 minutes, a developer in the form of a contrast paint is applied to the part. The next day, while sanding, you can use the developer to see minor imperfections and eliminate them by applying an additional layer of material.
It is advisable to carry out all work in protective clothing and glasses, gloves, and a respirator. To avoid paint getting into your eyes or dust into your respiratory system.
Why is the primer additionally sanded? Since this is a binding layer, it has some roughness and bumpiness, and if applied unevenly, such places can form defects in the form of sagging or smudges. You need to work very carefully with a machine or manually using sandpaper, because you will be sanding a thin layer of primer paint; if gaps appear somewhere, they can be eliminated using primer in an aerosol can and spot painting. Sand with fine-grained abrasive P800 - P1000. If there are strong flaws indicated by the developer, then they are eliminated using locally applied finishing putty and primed again, achieving an ideal surface.
Here is a video with tips on applying primer before painting a car.
Composition and technical characteristics
The properties and characteristics of primers differ depending on the type and purpose of mixtures for cars. Based on the operating principle, the following types are distinguished:
Attention! All types of primers are not sufficiently resistant to changes in weather conditions, so be sure to apply varnish or paint on top.
Depending on the speed of drying, a distinction is made between a component mixture, which takes a long time to dry, and a two-component mixture, consisting of the main substance and a hardener; the time to reach the final consistency is much shorter. Also less commonly used are alcohol primers, which subsequently either damage the metal or are not easy to polish.
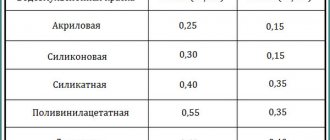
Consumption per 1 m2
The amount of material consumed during surface treatment varies depending on the type of primer for the car, but on average this figure ranges from 50 to 140 g/m2.
Tips for doing the job
On the Internet you can find videos and step-by-step photographs that clearly demonstrate the entire process of priming a car and applying paint yourself. In this case, a spray gun is used - a special tool used for painting various surfaces by spraying a dye.
A primer intended for processing metal and plastic, removing traces of rust, and providing anti-corrosion protection, differs in its composition and technical characteristics from primer compositions that are used for plastic or wood.
Automotive primer dries in a short period of time; it must be diluted with a solvent and hardener. It is better to adhere to the proportions indicated on the can and not try to independently choose a different ratio of components. The primer prepares the surface of metal or plastic for further painting using a spray gun and ensures high adhesion of the coating. In rare cases, the primer composition can be applied to the surface in an absolutely even layer and then wait until shrinkage occurs - a natural phenomenon that car enthusiasts encounter before painting their vehicle.
When a primer applied with a spray gun to the surface of a metal or plastic dries and begins to exhibit its rust-repellent properties, unevenness and roughness appear. After completing the work, you can compensate for these defects and make them invisible on metal and plastic by using sandpaper. You can find out how long it will take to wait for the applied composition to completely dry in the instructions for use, which are always included with the purchased primer mixture.
If the body or underbody of the vehicle is heavily corroded, then it makes sense to abandon the use of a modifier primer, since it is impossible to determine by eye how deep the rust has penetrated into the metal and then make sure that you have applied a sufficient amount of primer mixture that can transform the rust into persistent inert layer. Primers with anti-corrosion properties are never used for processing wooden parts.
Advantages and disadvantages
Although this material is not visible in the final result, it is one of the most important components when repairing a car. Therefore, a high-quality drug cannot cost little. Inexpensive substances subsequently shrink, after which dents can form on the body and damage paintwork materials. The next stage may be the occurrence of corrosion, after which all repair steps will have to be repeated again.
But when choosing a high-quality primer for a car, it will allow you to:
When carrying out the procedure of priming a car before painting it yourself, you should have:
Layers and drying time
So, how long does it take to dry the primer mixture, which is applied to plastic parts and requires the use of a spray gun? Unlike putty, the drying time of the primer mixture is on average 30 minutes. The putty sometimes takes a long time to dry - from 24 to 48 hours. Any qualified car service worker will confirm that it is better to use several types of primer before painting a vehicle. At the beginning of painting, it is recommended to apply a phosphating primer for cars or an acid primer, after which the best “adhesion” of the surface is ensured. It should be remembered that before applying the primary primer, you will need to clean the body and underbody of the car from dirt and degrease these parts using Anti-Silicone.
Secondary primer is applied in 2 or 3 layers. The use of a pneumatic spray gun can hardly be overestimated, because it allows you to hide irregularities and scratches on the surface of the body. Sometimes auto repair shops do this work so skillfully that sanding is not required before painting the car.
It doesn’t matter whether you decide to perform operations such as puttying, priming and painting the car yourself or whether you prefer to contact a car service. You can find out how long it will take for the applied compositions to dry and which acrylic paint is best to use for painting your car by studying special literature or thematic sites on the Internet.
Before you start painting your car, you should decide on the type of paint, the technology for applying it, and expert advice. The most important thing at all stages of the work is to strictly follow the instructions and follow the recommendations of specialists.
Sources:
https://kuzov.info/grunty/ https://autokuz.ru/materiali-instrument/gruntovka-dlya-avto.html https://okuzove.ru/materialy-i-instrument/gruntovka-dlya-avtomobilya-aerozol .html https://krasimauto.com/materialy-dlya-pokraski/klassifikatsiya-gruntovok-dlya-avtomobilya-chto-nuzhno-znat.html https://avtoskill.ru/remont-obsluzhivaniye/chem-razbavit-akrilovuyu-gruntovku -dlya-avto-mozhno-li-razbavlyat-vodoy-rastvoritelem.html https://www.stroim-2014.ru/chem-razbavit-akrilovyj-grunt/ https://autobryansk.info/chem-razvesti-akrilovyj- grunt.html https://kupolnie-doma.ru/info/chem-razbavit-akrilovyj-grunt-dlja-avto/ https://chevroletcars.ru/info/chem-razbavit-akrilovyj-grunt-dlja-avto/ https ://www.em-grand.ru/post-kak-pravilno-razvesti-gruntovku-dlya-pokraski-avto.html https://krasimauto.com/pokrasochnie-raboty/gruntovka-avto-pered-pokraskoj.html