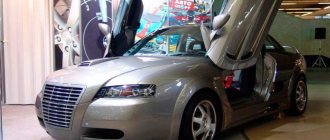
Replacing the entire torpedo or its lining may be necessary not only because you don’t like it, and that’s that. Although this option is not the last one on the list of reasons, since the designers did not show too much imagination when developing the instrument panel.
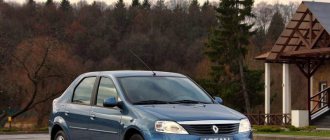
Panel trim for old VAZ 2110
But not all car owners know how to do the replacement themselves, and also how to make the dashboard on a VAZ 2110 look cooler and more modern, and not squeak like an old cart, although they would certainly like to learn this. Let's start with the question: why might this be needed at all?
Panel trim VAZ 2110 Kashtan
Methods and meaning of tuning the VAZ 2110 dashboard
Let's start, perhaps, with the benefits that an update or radical change in the appearance of the tidy can bring. To begin with, the panel on the top ten looks boring and even dull. 2114 is better in this regard. The readability of the instruments is, in principle, tolerable, but at night, not everyone is happy with the afterlife illumination, and during the day, the severity of the dials and the minimum of information are reminiscent of the times when electronic watches with Yellow Roses of Texas music were a miracle of cybernetics. Therefore, I would like to modernize the tidy of the dozens. Fortunately, there are more than enough funds for this.
The front panel, in principle, can carry much more functions than it currently carries, without surgical intervention. Information content, the presence of lights and color highlights will also not hurt the panel, so we will try to pay a little attention to each of the options so that tuning the VAZ 2110 dashboard, in addition to benefits, also brings aesthetic pleasure. However, you need to know and feel the limits when, in the pursuit of originality, the readability of the instruments disappears or a panel that is too colorful will automatically distract the driver from driving.
Tuning dashboard lighting, LEDs
Standard light bulbs that shook in car dashboards throughout the 20th century have been asking for a museum for a long time. LED light sources are firmly taking their place where it was previously impossible to do without incandescent lamps. Tidying is no exception. There is no need to teach anyone how to disassemble the instrument panel on a VAZ 2110, and we do not set such a goal.
The main thing is to be inspired by the idea you like, and then either make the instrument lighting yourself using a stock panel, or buy a model that you already liked. The photos of the dashboard lighting that we selected will not show even a tenth of what is offered by numerous studios and small-scale companies.
Steering wheel and its tuning
All experts and professionals believe that the safest is the stock steering wheel of the vehicle. It is this wheel that was developed by the manufacturer and it is this wheel that has passed the necessary tests in accordance with the design of the car. As a last resort, it is recommended to replace the steering wheel with a wheel from the same manufacturer, a newer model. In particular, comfortable and “grippy” steering wheels from the VAZ 2115, etc. are perfect for the VAZ 2109. On the other hand, if the owner wants more, then you can always purchase any “steering wheel” on the market, both from a renowned manufacturer and a steering wheel handicraft wheel.
VAZ 21093 interior tuning
Still, as mentioned above, the best option is to install a standard steering wheel with braiding, which we will analyze carefully. Needless to say, this steering wheel looks great and feels very comfortable in your hands, thanks to the increased thickness of the rim.
Braid
A leather steering wheel always looks amazing. It is always pleasant to the touch, looks presentable and expensive. In addition, the leather “breathes,” so to speak, which affects comfort while holding the steering wheel on long trips. Let's start wrapping the steering wheel with leather ourselves (this procedure is very expensive for craftsmen):
- First, we cover the steering wheel with cling film to make a stencil.
Cool tuning of the VAZ 21093 interior
- We wrap paper or better masking tape over the film.
- Draw the seams with a marker on the tape.
- We cut the tape along the markings, doing it very carefully.
- We remove the stencils, of which there are three.
- Cut out patterns from paper.
- In the leather blank, in places where seams are provided, add 5 mm (along the perimeter of the steering wheel rim, on the contrary, remove 2 mm).
- We sew the leather together, leaving a minimum amount of thread behind the seam, and cut off the rest.
- We sew a seam around the perimeter of the resulting workpiece.
Note. It is best to sew with synthetic threads, which provide strength and proper quality.
- We apply the leather blank to the steering wheel.
Note. To reduce the effect of protruding seams on the front side, grooves can be cut into the steering wheel underneath them.
- We thread the thread, like a lace in a shoe, using a needle.
- We pass the thread through the eyelets of the seams on different sides of the braid.
Note. It is not at all necessary to use glue, since the tightened braid is already securely fixed.
- We fix the thread at the end of the procedure.
- We put all the removed parts and elements back in place.
Replacing the steering wheel
If the steering wheel is replaced with a new one, the work process will look like this. Started:
- Disconnect the negative terminal from the battery.
- Remove the key from the ignition switch.
- Turn the steering wheel until the steering shaft locking lock engages.
- We apply the corresponding marks on the steering wheel and instrument panel.
- Take a screwdriver and pry off the horn cover trim.
- Then we remove it.
- Unscrew the two screws and remove the cover (use a curved screwdriver).
- Now you need to arm yourself with a 24mm socket and unscrew the nut that secures the steering wheel (we do not unscrew the nut completely, but several turns).
- We pull the steering wheel towards ourselves along the shaft splines.
Note. At this stage of work, a problem may arise related to removal. In this case, an assistant will help by applying light blows to the steering wheel with a hammer, always through a special drift.
- Unscrew the nut and remove the steering wheel.
- We transfer the marks from the old steering wheel to the new one.
- Installing a new steering wheel.
The above instructions are an easy tuning of the interior of a VAZ 2109. There is also a more complete one, where the carpet, gear knob, pedal attachments, buttons, etc. are subject to modernization with your own hands. In the process of work, you must definitely use video and photo materials. The price of tuning components is not high and modernization will not cost much.
Backlight color and intensity
The color of the backlight, as well as the intensity, also plays a big role not so much in the aesthetics of the panel’s perception, but in readability and ergonomics. A bright, annoying color will not only distract you from the road at night, but also cause fatigue. Your eyes will get tired very quickly, even if bright ruby or lemon are your favorite colors.
It is simply impossible to withstand them for a long time - the reaction speed drops, the eyes get tired and watery, and bright objects overboard can merge with the lighting of the tidy and go unnoticed. It's also worth thinking about glare. Few people initially pay attention to them, but constant bright glare points on all the windows will not immediately make driving comfortable.
Europanel for VAZ 2112 instead of the old one
Moderator: Rom80K
Re: Europanel on VAZ 2112 instead of the old one
Tell me kind people who have encountered this. VAZ2112 I am changing the old model panel to the euro one. Everything seems to be connected, all that remains is to connect the instrument panel wiring harness with the engine control harness. on the instrument panel harness there is a block with 13 wires, this is for the 1.6i engine, I have a 1.5i and the block from the engine has 8 wires and 1 separately (black and white). Not all wire colors match. QUESTION: Is it possible to select 8+1 from 13 wires and connect it to the engine block with 8 wires or is it more complicated?
For clarity, I showed it in the diagram.
Re: Europanel on VAZ 2112 instead of the old one
Re: Europanel on VAZ 2112 instead of the old one
Re: Europanel on VAZ 2112 instead of the old one
how much did you pay for?? sell it to me)) adapter blocks came with the panel.
Re: Europanel on VAZ 2112 instead of the old one
how much did you pay for?? sell it to me)) adapter blocks came with the panel.
there weren’t any pads (((they should be? I bought a new one in the store.. all the wiring is already screwed and prepared)) well, on the panel itself, but there weren’t any pads.. I took a new one 18900, the discount was 2 rubles
Added after 2 minutes 5 seconds: maybe there is a link to them or somewhere to look, and whether they should come with a new panel, if so, then you can come to the store, just the sales people assured me that everything will work out and there is no need to redo anything)) just before buying, I read everything about it, but I didn’t find it anywhere, apparently no one had any problems)) this forum found something similar to the truth here
Re: Europanel on VAZ 2112 instead of the old one
Re: Europanel on VAZ 2112 instead of the old one
Naturist wrote: https://photo.qip.ru/users/dd112/1289577/26837025/
Re: Europanel on VAZ 2112 instead of the old one
Naturist wrote: https://photo.qip.ru/users/dd112/1289577/26837025/
look carefully there are 2 more photos for connecting electrical equipment and installing the panel
Added after 1 minute 37 seconds :))
Re: Europanel on VAZ 2112 instead of the old one
Re: Europanel on VAZ 2112 instead of the old one
where did you get the idea that this is for the ignition?
Dashboard trim, is it worth it?
An effective and radical step that can completely change the design of the tidy, right down to the arrangement of devices on it. The trim is installed in the standard place of the tidy, and there are a ton of configuration options. You can use trendy digital displays, such as in Lambo or Ferrari. Whether it makes sense is up to you to decide; they look impressive, but overall they are perceived as a VAZ 2101 with the Volvo inscription and a diagonal molding on the grille.
A useful change would be to change the color of the odometer. You can’t really see it in the standard version during the day, and even less so at night. This is where a digital scale with sane backlight would be appropriate. The color of the lining can be chosen as contrasting - white or beige like Aston Martin or Maserati, or it can be made deep black with luminous numbers and symbols.
Crickets, cicadas and mice - breaking up the zoo
This beast will have to be fought hard. Besides the fact that the plastic on the ten panel is not of the highest quality, sometimes the assembly presents unexpected surprises. And then the trills, creaks, rustles and knocks begin. As part of tuning the front panel and instrument panel, it makes sense to pay attention to refining the plastic surfaces and joints. There will be less noise, and in addition, one can hope for more adequate operation of the stove air ducts and deflectors, since half of the warm air goes to heating the internal crickets.
The glove compartment creaks, and the fuse and relay blocks echo it. Therefore, it is worth buying some bitoplast or modelin. Muffled boxes and drawers will completely change the overall impression of the VAZ 2110 interior.
Tuning the interior of the VAZ 2109
The VAZ “nine”, despite its advanced age, is still popular to this day. There are many car owners who speak negatively about this car, but there are also those who like the model. The car is especially popular among young people and novice motorists. The affordable price allows you not only to purchase this car, but also to carry out various modifications. Tuning can affect both the exterior and the interior of the VAZ 2109. It is worthwhile to dwell on interior modifications in more detail, because it is in the cabin that the owner and passengers spend most of the time.
Improved instrument panel lighting
The standard lighting of the instrument panel of the VAZ “Nine” does not suit everyone, since the yellow glow is not only dim, but also does not give the tidy any expressiveness. To correct the situation, you have to resort to replacing standard lighting elements with modern LED ones. To upgrade the instrument cluster you need to prepare:
- diode strip of the desired glow color;
- soldering iron;
- wires;
- light bulb base;
- hot glue gun.
Direct modification consists of the following steps:
- Remove the shield from the torpedo.
- Disconnect the sockets with the light bulbs and remove the board, after which the glass with the visor is removed. To do this, press the corresponding latches.
- The diode strip and the base are connected by soldering.
- Using a gun, apply glue and fix the tape and wires to the cover.
- Reassemble the shield in the reverse order.
Free holes for the base must be sealed to prevent dust from entering.
Video: installing an LED strip in the instrument panel of a VAZ 2109
Refinement of instrument cluster scales
In addition to the lighting in the instrument panel, you can replace the scales, which will make the instrument more modern and readable. For tuning this unit, today a wide selection of linings are offered, which provide all the installation holes. After purchasing the overlays, you can begin upgrading:
- Remove the shield, and then the glass itself.
- Carefully remove the instrument arrows.
- Remove the standard trim from the shield.
- Secure the new trim with a glue gun.
- Install the arrows and assemble everything in the reverse order.
If the new scale is designed for clearance, then an LED element can be installed on each device, which will significantly transform the panel.
Dashboard upgrade
Often, interior tuning affects the dashboard, since the standard product does not have a very attractive appearance. Leather is mainly used to finish the panels. It is quite difficult to do quality work with your own hands. Therefore, it is better to entrust the reupholstery to professionals. The essence of modernization comes down to the following actions:
Sometimes owners of "nines" install panels from other cars, for example, from a BMW E30 or Opel Astra.
This procedure is not easy, since choosing the size and then adjusting the torpedo to its location is not easy. In addition, you will have to completely redo the mount. When installing a different panel, the instrument panel must also be replaced.
Interior reupholstery
Interior tuning is not complete without reupholstering interior elements. Factory-made plastic and fabric in the decoration do not evoke any emotions, they look gray and ordinary. Those car owners who want to add some zest and improve the interior decoration resort to replacing standard ones and using modern finishing materials. Among the most popular are:
- leather;
- Alcantara;
- eco leather;
- velours;
- carpet;
- vinyl.
Door panels
One of the elements that cannot be ignored is door cards. Typically, the “nine” panels are trimmed with fabric or made entirely of plastic.
To improve the elements, you need to select the desired finishing material and prepare the tools:
- scissors;
- marker;
- glue "Moment";
- screwdriver.
After the preparatory activities, perform the following steps:
- The panel is removed from the doors and the fabric insert is removed.
- Measure out the required piece of fabric and make markings.
- Degrease and apply glue in two layers with some exposure after the first.
- Apply the door card to the material according to the markings.
- Allow the glue to dry according to the instructions.
- Bend and stretch the material at the corners. To make the finish more pliable, you can use a hair dryer.
- The insert is finished in a similar way, using a material of a different color for contrast.
Noise insulation
An increase in the level of comfort, one way or another, is associated with a decrease in the level of vibrations and noise that enter the cabin from the outside from the wheels, engine, wind, etc. To carry out high-quality vibration and noise insulation, the entire body from the inside, i.e. the roof, is treated , doors, floor, trunk, engine shield. Today, the choice of materials for the purposes under consideration is quite wide, but from all the variety the following items can be distinguished:
- Vibroplast;
- Vizomat;
- Bitoplast;
- Splen;
- foam.
The following list of tools will be needed:
- construction hair dryer;
- cutter;
- roller
To begin work, it is necessary to completely disassemble the car interior, that is, remove the seats, front panel and all finishing materials. The old sound insulation is removed, the body in places of corrosion is cleaned and primed.
Motor baffle
Floor and arches
In continuation of vibration and noise insulation, the bottom of the cabin is treated:
Video: noise reduction of the “nine” interior
Roof
When treating a roof, Vibroplast is applied between the crossbars, for which the material is cut into pieces of the required size. Splen is applied over the vibration isolation, securing it with double-sided tape.
Doors
Although noise insulation on VAZ 2109 doors is present from the factory, it is in minimal quantities and there is no particular use from it. Doors are processed as follows:
Plastic elements
Interior elements made of plastic should also be treated with sound insulation:
- Dismantle all parts and linings.
- The part of the torpedo that touches the body is treated with 4 mm thick foam.
- The lower part of the dashboard, as well as the shelf of the storage compartment, the space for the speakers and the side panels of the panel are covered with Vizomat and Bitoplast.
- The visor of the instrument panel is treated with Visomat.
- To prevent metallic rattling of the latches, they are coated with sealant.
- The central panel is treated with the same materials as the torpedo.
- The inside of the glove box lid is covered with Vizomat, and the carpet is fixed underneath with double-sided tape.
- After all procedures, the salon is reassembled in the reverse order.
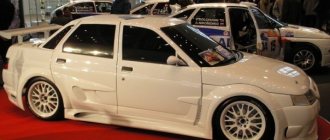
External tuning
The outer part is the first place where pumping of the VAZ-2110 begins. Tuning the external structure includes several elements, which we will dwell on in more detail:
- Bumpers. These decorative protective elements are subject to various modifications. Of course, there are two options for making these parts. Firstly, stamped. There are several types of tuning bumpers from different ones, "Bogdan". They are fairly standard and are not aimed at improving aerodynamic performance. Secondly, there is also an individual order. In this case, the tuning studio calculates the aerodynamic characteristics. And due to the bumper, the streamlining of the car improves and the resistance to the flow of oncoming air is reduced.
- Door sills, like bumpers, perform aerodynamic functions, which improves air flow.
- Wing. Its main function is to reduce the vehicle's ground clearance, which allows air to flow over the top of the car rather than under it.
- The hood air intake serves as an additional engine cooler. It gets very hot at high revs and speeds.
If disassembly is needed
Let us immediately note that if you have to replace the lining with a new one (the one you choose), then a complete disassembly may not be necessary for this.
1. The pad itself
2. Inserts for buttons, air ducts, instrument panel trim
But if noise insulation is planned due to the fact that the dashboard rattles when driving, then this cannot be avoided.
Disassembly work requires a lot of time and special scrupulousness. After all, if some fastening is spoiled or broken, then the new or tuned torpedo will not work as it should, it will creak and rattle unhappily while driving, spoiling the mood of the careless disassembler.
This material will help you quickly and accurately dismantle the dashboard: https://vazweb.ru/desyatka/salon/kak-razobrat-panel.html
Interior tuning
Internal tuning of the VAZ 2110 is a modification of the interior of the cabin. A special place in it is occupied by the reupholstery of the ceiling, pillars and seats. For those who like to drive, it is recommended to install Sparco or Tiro kits. They include not only seats, but also special seat belts, as well as a set of collapsible interior reinforcement bars.
Owners who have a VAZ-2110 do tuning mainly for themselves, that is, they do not take part in professional racing. Therefore, there is no point in installing kits in a salon that cost over $1,000. It’s easier to get by with standard seat upholstery in leather or Alcantara. Such a modification will cost approximately up to 30,000 rubles, depending on the studio and region.
Noise Removal
Basically, the panel rattles both due to improper installation and because the three parts that make it up touch each other, which causes creaks and rattles in the cabin.
That is why sound insulation is necessary, which the manufacturers did not take care of properly, and it is up to the owner to finalize it. Modelin can be used as sound insulation. They can paste over:
It is better to cover the back of the panel with bitoplast. There is advice - also use vibration material, but this is not necessary.
The remainder of the bitoplast can be placed at the bottom of the glove compartment. Now, sound insulation done by yourself will eliminate squeaks, and replacing the lining will be pleasing to the eye.
Source
"Heart" of the car
Some motorists decide to do engine tuning. The VAZ-2110 will be an excellent option for such experiments. By the way, this is done to increase the power of the machine. The main modifications made by professionals are the installation of a throttle, an ignition kit, installation of a new air filter system, and replacement of cooling elements. To improve the cooling system, it is optimal to replace the radiator, pipes, thermostat and water pump. A tuning kit from, for example, will cost the owner 22 thousand rubles. A new throttle will cost 5,500 rubles. The ignition kit is selected purely individually and depends on the wishes of the motorist.
Alternative optics
If you have a VAZ-2110 car, headlight tuning is carried out by replacing standard bulbs with alternative ones. This will not only improve the appearance of the car, but will also increase the illumination of the road. Thus, headlights are installed of drop, diffuse or beam type. All alternative optics look original. It will be a great addition to the external body kit that the VAZ-2110 has. Tuning the rear headlights is also accompanied by the replacement of these elements.
The best choice would be LED lights, which are perfectly visible at any time of the year and day. Daytime running lights are an addition to the car's optics. Tuning greatly improves the VAZ-2110 car. The photos presented in the article show a clear example of the installation of alternative and additional lighting elements.
With panel disassembly
The first stage is carried out according to the plan already described. Next, we proceed like this:
- We assemble the trim, installing our instrument cluster, air duct panels and those accessories included in the kit;
- At the base of the panel we carefully attach the wiring harness;
- We connect the wires from the Euro pad to this harness, tightening everything with mounting ties;
- We connect devices to the required buttons using connectors;
- We secure the cover with self-tapping screws.
This method, although it takes more time, provides high-quality sound insulation to eliminate all annoying squeaks.
We also recommend replacing light bulbs with high-quality analogues or LEDs. So, the updated panel will look even more solid.
Do-it-yourself modification
Any motorist wants to modify his car with his own hands. Those who succeed in this show ideal clear examples. They inspire others. What can you really improve in your garage if you have a standard set of tools and units for repairs? You can:
- Make body kits from fiberglass.
- Install new chassis and suspension elements.
- Replace the exhaust system.
- Modify the engine.
- Install wheels and tires.
- Install the acoustics and all accessories for it.
- Replace mirrors.
Wheels and tires
One of the essential attributes of car modification is the installation of wheels and tires. There are many varieties of them. A wide range will allow you to choose the best option for the VAZ-2110. The tuning, photos of which are presented in the article, makes it clear that motorists mainly choose chrome wheels and low-profile tires for this car.
The selection is carried out according to the technical characteristics of the fasteners. It depends on the number of bolts, the space between them, and clearance capabilities. Thus, the optimal sizes are 195/65R15 and 205/60 R14.
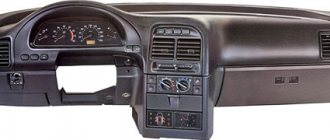
Instrument panel tuning
Some car owners dream of tuning the panel. The VAZ-2110 can be decorated simply incomparably. After all, such tuning is a type of interior modification. Many car enthusiasts simply cover the panel with leather. But there are also those who install the element from other cars. So, the VAZ panel with the Audi A4 1996 is ideal. Be sure to try it!
Instrument tuning (VAZ-2110) is standard - replacing the panel itself or installing new sports dials. The first option will allow you to see the control panel in a completely different way, since it is completely redone. Another way to tune the instrument panel is to install a light strip in the contours. This is now a fairly popular modification on foreign-made cars. This system is connected to the on-board network via a switch and fuse. The effect is amazing, especially in the dark. At the same time, battery consumption is minimal, since the light strip is made from low-power LEDs.
Tidy error codes
Standard errors in car self-diagnosis do not accurately indicate a breakdown. Due to the simplicity of the on-board computer, the device can only indicate the direction where to look for the problem. The decoding of standard errors looks like this:
- 0 – no errors detected – the system is in perfect order;
- 1-2 the voltage in the on-board network is exceeded or too low;
- 3 – malfunction of the float sensor in the gas tank;
- 4/5 malfunction in the antifreeze and ambient temperature sensor circuits, respectively;
- 6 – critical overheating of the power plant, it is necessary to wait for the antifreeze to cool down;
- 7 – not enough oil in the engine crankcase;
- 8 – the problem lies in the brake system;
- 9 – the battery is dead or the part is damaged;
- E – error in the firmware, EEPROM data packet is broken.
It should be taken into account that in some cases, the error code may be two-digit. For example, if 15 is displayed on the display, this may indicate the presence of breakdowns in circuits No. 7 and 8. Having found out what each error means, you can independently determine the source of the problem and correct the breakdown.
Author of the material: Borisov Maxim
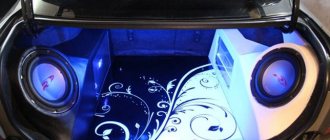
Acoustics
The last tuning option is to install acoustics. The car can accommodate up to 8 speakers. They are located in the following places: four in the doors, two on the rear shelf and the last 2 in the instrument panel. As in many other cars, the amplifier or subwoofer is installed in the trunk. Also, in some cases, you can mount an SD receiver there. Instead of a standard radio, a CD-DVD player is installed, which has a retractable screen. One common such acoustic player is Texet, which is easy to connect. In addition, in this case the price-quality ratio corresponds to reality. Although you can choose any other option at the discretion of the owner.
During installation, the wires are laid under the carpeted floor, and therefore they will be less exposed to external influences. In addition, they will not get in the way underfoot. Installation can be done either by yourself or by contacting audio professionals who can select equipment and install it.
The final stage of work
The high panel of the VAZ is dismantled carefully, since there are latches on the left that quickly break. After disconnecting the block from other elements, the entire instrument cluster is dismantled. The final step involves disconnecting the cable from the speedometer. If the Europanel is equipped with additional equipment, then you need to be even more careful. Tuning a torpedo involves disconnecting the block from the following units:
- on-board control system;
- ignition relay;
- remaining panel instruments;
- backlight lamps.
You will need to unscrew the screws for the lower fixation of the torpedo on both sides. Using a screwdriver, pull out the plug and unscrew the screws for the side fixation of the torpedo. The europanel is removed at the final stage. Installation of a new structure of this type is carried out in the reverse order. Upon completion of this procedure, the operation of the switches is checked.
Often, tuning a VAZ torpedo involves dismantling the plastic and removing the panel board. In this case, you will need the following tools and materials:
- soldering iron;
- europanel or insert;
- ultraviolet light bulb;
- wires;
- light bulbs;
- cartridges;
- glue;
- marker.
Initially, you will need to remove the old europanel, remove the glass and the existing edging. The insert and arrows are carefully pulled out. Particular attention should be paid to the new insert. It is recommended to make holes with some margin. This will prevent the arrows from sticking.
Further tuning is based on dismantling the standard backlight. This may break the plastic. Initially, the board is dismantled. Experts advise first drawing on paper the existing connection diagram and connections.
The standard lighting is replaced with neon lamps. Neon is glued to the panel. A plastic protection is fixed on top. In this case, you need to check whether this structure is securely held. The block with which the neon lighting is controlled should be glued to the europanel. To do this, you can use glue or double-sided tape.
Such tuning is easy to do with your own hands. An important point is the installation of the panel and the correct connection of its devices to the network. For this, auto mechanics recommend using books on repair and operation of the VAZ 21099.
We have previously published an article here. Now we are publishing similar material for owners of chisels with a high torpedo. If we take into account the sad fame of this torpedo as the most explosive, then it is quite easy to understand why the owners of these cars are ready to spend a lot of time just to silence it. Removing a high torpedo takes almost 2 times more steps than removing a low one...
As in the case of the low panel, we will perform work related to the electrical equipment of the machine, which means that the first thing we do is remove the terminals from the battery.
1. Remove the decorative steering wheel trim.
2. Unscrew the steering wheel mounting nut so that the end of the nut is flush with the end of the steering column shaft.
3. The steering wheel sits very tightly on the shaft splines, so do not immediately unscrew the wheel fastening nut: in the event of a sharp impact, the steering wheel jumping off the splines can cause injury. Mark the position of the steering wheel relative to the shaft.
4. Use sharp blows to knock the steering wheel off the steering shaft splines.
5. Completely unscrew the nut and remove the steering wheel.
6. Remove the six screws securing the lower steering column housing.
7. Remove the lower steering column cover and ignition switch trim.
8. Remove the upper steering column housing.
9. Loosen the bolt securing the base of the steering column switches.
10. Remove the base from the shaft and disconnect the two blocks with wires from the horn contacts.
11. Disconnect the block with wires from the windshield wiper and washer switch lever.
12. When disconnecting blocks with wires, we recommend marking them. This will avoid confusion during assembly and save your time.
13. Disconnect the block with wires from the turn signal and headlight switch lever.
14. Pull the carburetor choke handle towards you so that a draft appears, and remove the handle from it.
15. Remove the two screws securing the instrument panel console trim.
16. Remove the trim from the console.
17. Remove the cigarette lighter socket from the socket.
18. Remove the ashtray from its slot by pressing the cigarette extinguishing plate.
19. Remove the heater fan switch handle.
20. Remove the three heater control knobs by prying them up with a screwdriver.
21. Disconnect the wiring harness from the heater fan switch under the heater control panel.
22. Disconnect the two wires from the heater control panel backlight lamp contacts.
23. Remove the headlight hydraulic adjustment handle by pulling it towards you.
24. Remove the instrument cluster light switch handle.
25. Unscrew the nut securing the instrument cluster lighting switch.
26. Unscrew the nut securing the headlight hydraulic corrector.
27. Push the instrument cluster lighting switch and headlight hydraulic corrector inside the panel.
28. Remove the side nozzles on both sides of the instrument panel using a screwdriver.
29. Remove one screw securing the trim on both sides of the instrument panel.
30. Using a screwdriver, use a screwdriver to remove the exterior lighting switch from the panel.
31. Disconnect the block with wires from the exterior lighting switch. Push the block inside the instrument panel.
32. Using a screwdriver, use a screwdriver to remove the radio socket. If your vehicle is equipped with audio equipment, remove it first.
33. Remove the radio according to the manufacturer's instructions.
34, Remove the screw securing the instrument panel trim.
35. Insert two screwdrivers to pry open the plastic tabs.
36. Lift up the instrument panel trim.
37. Disconnect the block with wires from the cigarette lighter block.
38. Disconnect the block with wires from the cigarette lighter illumination block.
39. Disconnect the block with wires from the hazard warning switch illumination lamp.
40. Disconnect the block with wires from the hazard warning switch and finally remove the instrument panel trim.
41. Gently press down and remove the speaker trim on the left side of the instrument panel. Be careful - the latches break off easily.
42. Disconnect the block with wires from the heated tailgate glass switch.
43. Remove the block from the rear fog lamp switch.
44. Remove the two screws securing the instrument cluster.
45. Remove the instrument cluster from the panel, unscrew the fastening nut and disconnect the cable from the speedometer.
Warning
Disconnect the connectors from the additional equipment wires, if installed on your vehicle.
The standard interior of the VAZ 2109 is quite boring and unattractive. However, by resorting to tuning, you can not only transform it, but also increase the level of comfort by performing sound insulation, reupholstery, and also using modern lighting elements. If desired, everyone can modernize the interior to their own taste, embodying almost any idea.