Nowadays, almost all cars are painted with automotive paint called metallic. Previously, these were mainly acrylic single-layer coatings. Although at the moment they are also used, but more in other areas than in the automotive industry. Consequently, newbies have a lot of questions about metallic painting the body of their car. In this article I will try to describe very clearly and understandably the entire technology of painting with metallics, various nuances that must be taken into account when performing work.
Before we begin the technological process, let's look at what metallic car base paint is.
Necessary materials
The technology for painting a car with metallic paint is no different from painting a car with other types of paint. The process differs from conventional painting only in that metallic has a two-layer base, unlike standard painting. Find out which paint is the best for cars.
Basic basis
Applying the base
The base base is a nitro-based paint, which essentially imparts color and subsequently provides the desired effect. The base has no shine and does not have weather-resistant properties. Drying time between coats is approximately 20 minutes. It is important to apply the paint at a temperature of about 20 degrees, and if it is below 10 degrees, the drying time will deteriorate significantly and the quality of the base will not be as high.
Varnish
It is made on an acrylic base. This second layer is the most important when painting a car metallic. The varnish acts as a protection for the painted body. There are and are used two types of varnish for painting cars metallic:
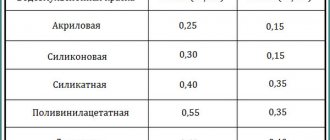
- MS varnish, called soft. It must be applied in three layers, and its distinctive features include ease of polishing. Disadvantages include lower efficiency and durability.
- Varnish NS. A solid version of varnish that can be applied in one and a half layers: light first and solid second. When painted, it leaves almost no smudges, is durable, but difficult to polish.
When painting a car metallic, traditional materials and painting equipment are used: spray gun, primers, putties, etc.
This is interesting: We install and connect the DVR ourselves
Metallic car painting materials
All that remains is a small matter: your desire to do and learn. What you want to do depends on you, but we will tell you the theoretical part of how to paint a car metallic.
Painting a car with your own hands, whether metallic or matte, is difficult and at the same time not. The technology of painting a car with a metallic paint is not much different from the technology of painting a car in general. In principle, the technology, materials and equipment for complete painting or local painting of the body after repairing chips or cracks are no different.
Metallic car painting technology differs from standard painting in that it has a two-layer base. Coating with base and varnish.
Basic basis (in car painter slang, simply “base”). The base is a nitro-based paint. In essence, it gives color and a metallic effect. The base has no shine and is not weatherproof. Drying time between base coats is usually 15-20 minutes. Very important! The base application temperature should be about 20 degrees. If the temperature is 5-10 degrees lower, the drying time will increase and the quality of the base will deteriorate.
Varnish . Made on acrylic base. The second in line, but first in importance, element of metallic car painting. The varnish performs the protective function of the paintwork of the body. There are and are used two types of varnish for metallic painting.
Varnish type MS . This varnish is considered a soft varnish. It requires application in 3 layers. It is good in that it is easy to polish the body, but as a disadvantage it is less economical for work and less durable.
Varnish type NS . This is a hard type of varnish. Only 1.5 layers of application are required. Slightly the first, and thoroughly the second. Gives less smudges when painting. Durable but difficult to polish.
Metallic car painting is done using traditional materials and equipment: putty, primer, spray gun, etc. All this remains the painter’s unchanged tools.
The technology for painting a car with metallic paint is completely identical to the technology for painting a car in standard colors. And it also includes: preparing the car for painting, priming, putty, preparing the area for painting and painting. Polishing the body after painting is a mandatory procedure. Do not forget that the process takes place in artisanal conditions and there will definitely be dust and dirt.
How to paint a car metallic: expert advice and video instructions
Unfortunately, any car paintwork loses its original appearance over time. The only way to improve it is by painting the body, which every car enthusiast can do, even a beginner.
Do-it-yourself metallic car painting and motorcycles
Today, cars are most often painted in one of two ways: metallic and acrylic. To save money, many car owners do it themselves. After all, the procedure for painting a car at a service station is quite expensive.
The technology of painting a car with metallic is undoubtedly more complex and requires special preparation, although painting with metallic is not particularly different from applying acrylic. But a number of nuances still exist. Only strict adherence to all stages of proper metallic car painting will allow you to obtain a high-quality result.
Also, before painting a car with a metallic paint, it is necessary to do a test painting of a separate part or element. And only then begin large-scale painting of the entire car.
Apply the base layer
Applying the base
Applying the base coat is the next important step in painting a car with metallic paint. This stage is recommended to be performed in strict accordance with the technology. In particular, you cannot save when choosing a solvent for enamel. It is better to select solvents according to the recommendations of enamels manufacturers. Light-colored metallics are the most sensitive to solvent effects. An unsuccessful choice of them leads to the fact that the metal shavings of the paint lie unevenly and form spots.
The next important point when choosing a solvent for enamel is the time of year and the temperature that needs to be maintained in the paint booth. There are certain recommendations in this regard:
- at low temperatures, quick-drying solvents are used;
- the solvent or elements to be painted must not be heated;
- The temperature of the solvent and the machine, as well as the temperature in the spray booth, must be the same.
Diluent
To thin metallic paint, a special base thinner must be used. Universal thinner for acrylic products or different solvents will not work. The evaporation rate of the thinner must correspond to the temperature in the workshop. A fast thinner will evaporate too quickly and the metallic particles will not have time to lay down as they should, which will give a lighter shade. If the thinner is too slow, the metallic particles will sink into the paint, making the paint shade darker. In addition, too slow a thinner can cause spots and streaks to appear, since metallic particles will float in the paint for a long time and are located randomly.
We apply auto enamel to the body
It is necessary to apply enamel to the car body in several layers, the number of which depends on the color of the paint and the quality of the preparatory work. The skill of the car painter plays an important role. Usually cars are painted in two layers.
Application of auto enamel
According to the technology, the first layer is made wetter - the presence of a small number of spots and stripes is allowed here. The main task at this stage is to hide the primer and give the painted surfaces a uniform appearance. When applying the first coat of metallic, be careful not to apply too much paint, otherwise smudges will form.
Before further painting the car metallic with your own hands, you need to allow the solvent to evaporate. According to painting technology, depending on the temperature in the painting chamber, drying can take from 10 to 30 minutes. Manufacturers indicate more accurate information on the packaging. Do not speed up drying by blowing air onto fresh layers of paint. Speeding up the process prevents the metal particles from being properly positioned in the enamel layer, which causes stains.
When the primer is visible under the first layer of enamel, the operation is repeated. After this, the primer usually completely covers the base.
The last layer of enamel is applied especially carefully and responsibly, since the appearance of the car after painting will depend on it. The important thing here is to avoid the formation of spots and streaks. The paint needs to be better diluted with a solvent and sprayed harder, and it is recommended to apply it from a greater distance. If you hold the spray gun too far away, the paint will dry out on the fly and form stains - this is also not good.
When the last layer of paint is completely dry, proceed to the final stage of work - applying a layer of varnish. According to the technology of painting a car metallic with your own hands, you cannot overdry the paint before applying a layer of varnish. It is highly not recommended to leave a painted car without varnish overnight, as overdrying the enamel will adversely affect the adhesion of the varnish to the painted surface.
Applying paint
The second step is to apply the base paint yourself:
- The enamel is applied in two or three layers, the number of which depends on the shade of the paint, so pay attention to the manufacturers' recommendations. Typically, metallic painting is done in two layers:
- the first layer is applied more densely; application in stripes or spots is allowed, since here you are pursuing one goal - high-quality coverage of the primer layer and the formation of a uniform color coating;
- then it is correct to wait about 30 minutes until the solvent evaporates; it is forbidden to speed up the process with air currents, everything should happen gradually and naturally, otherwise stains may appear;
- the last layer will make the coating extremely even, the paint is diluted more strongly with a special solvent, application is carried out from a greater distance than usual, the layer should be final and very light.
- Next, you need to wait for the paint to dry before applying varnish. According to the requirements for working with metallic paint, the applied metallic paint must not be over-dried, otherwise the varnish will have poor adhesion to the paint. Never leave a painted car for a long time without applying varnish.
Dyeing technology
Choosing a primer for paint
Among the various types of automotive primers, it is necessary to choose a filler primer or a so-called secondary primer, for example, acrylic, for paint. Secondary primers will provide excellent adhesion to previous paint layers and their protection. It should be noted that among the primers, two more types of primers can be distinguished - sandable and non-sandable, which literally means whether they need to be sanded with abrasives or not before painting. Non-sanding primers are applied using the wet-on-wet method and are especially useful when painting a perfectly smooth surface, for example, where there has been no straightening, leveling or putty work, or when applying primer to a new part. Among the advantages of such soils are the ability of the soil to spread over the surface and fast drying time. So you can start painting the primed surface in 20 minutes. Wet, non-sanding primer allows you to speed up the repair process and reduce costs by eliminating the stages of drying and grinding the surface. Sanding primers are traditional primers that are also used for final leveling of the repaired surface before the painting stage and require sanding with abrasives. Grinding primer is used, as a rule, in areas where putty is used, and it is this primer that is most often used by car enthusiasts.
Ground color
When choosing a car primer for painting, you need to take into account its color. The color of the vehicle primer is important. A correctly selected primer color that matches the paint tone as closely as possible will allow you to save on auto enamel by obtaining a complete color coverage without applying extra layers of paint. For light colors, such as white, yellow or red, white primers are used. For dark colors - respectively gray, for black and deep dark shades - black primers. There are also special primers with shades for rare colors such as red or yellow. In addition, primers of the same brand and type can be mixed with each other to achieve the desired shade of the “primer base”.
Application of primer
Regular sandable acrylic primer filler is typically applied in two thin coats, allowing approximately 10-15 minutes drying time between coats. Complete drying of the sanded primer occurs in approximately 2-3 hours. The primer can be applied using a spray gun with a large nozzle, or from a special aerosol can with ready-made primer (if we are talking about minor repairs using aerosol materials). It is important to achieve complete coverage of the lower layers with a new layer of applied primer and eliminate all “gaps”. If gaps are found after the soil has dried, it is necessary to go through this area again and eliminate it until a homogeneous, one-color coating is obtained. If a sandable primer is applied, then after it has completely dried, it is necessary to carry out grinding work and level it with an abrasive with a mark of P300-P400, then complete the grinding with a softer abrasive of P500-P600. After the grinding process, do not forget to thoroughly clean the surface from any dust, dry it completely, and degrease it. At this stage, the preparatory work has been completed and you can proceed directly to applying auto enamel. If a non-sanding primer was used, then after the material has dried, you can immediately begin painting.
Types of paint with metallic transition
Metallic paint is currently available in three main varieties:
- Three-layer;
- Double layer;
- Single layer.
Among these varieties, single-layer paint is very rarely used, since its high-quality application requires a certain high level of qualification, as well as some skill to paint a metallic car with a minimum visible transition.
Painting a car metallic makes it possible to correctly create quite complex effects with a smooth transition, for example, chameleon, mother-of-pearl and other shades. Such a paint coating is characterized by a change in color shade, which directly depends on the angle from which the view is taken. In this case, the technology of painting a car with metallic paint with a transition involves high-quality application of mother-of-pearl onto a base treated with toner.
As for two-layer paint, it, unlike a single-layer composition, has gained great popularity, as it is carried out with a smooth transition. The technology of painting a car using this transition method is simple and involves applying a composition such as a paint coating. According to the recommendation of experts, the paint should be applied to a surface that has been pre-treated with primer.
Preparatory work
Before you start painting metallic with your own hands, you need to make sure you have the necessary tools and consumables:
- car wash products;
- solvent for varnish and paint. Consider the fact that 20% of the mass of dissolved paint should be solvent. How to dilute the paint for painting a car is indicated on the can by the manufacturer;
- sandpaper for sanding;
- putty, primer. Remember: for 6 kg of paintwork you need to prepare 4 kg of primer;
- automotive paint;
- spray guns Why pistols? The thing is that when applying each of the materials: primer, putty and dye - with different viscosities, different spray guns, pistols or a special spray gun for metallic are used;
- individual protection means.
Areas of the car that will not be painted can be coated with an aqueous composition based on chalk, glycerin and dextrin, which can be easily removed with clean water after the work is completed and the varnish has completely dried.
metallic green
Use materials from only one manufacturer in order to prevent the effect of incompatibility of the chemical compositions of the primers, paints and varnishes used. If you apply paint to such an unstable primer layer, it may soon fall off.
Recommendations from experts regarding painting a car metallic with your own hands
Please note that when choosing metallic enamel, it is correct to follow only the manufacturers’ recommendations; the same applies to the choice of solvents for enamel. If the solvent is too aggressive or simply not intended for use with metallic, then the sparkling shavings may lie unevenly on the surface or even form spots. Light metallic shades are considered the most sensitive to this factor.
Also observe the temperature conditions for applying paint:
- if the ambient temperature is low, it is necessary to use quick-drying types of solvents;
- the temperature of the surface, solvent and environment should always be the same;
- Under no circumstances should the solvent or surface be heated.
Also ensure that you follow the recommendations of the manufacturers of the products you use; as a rule, all the details of application are outlined there, down to the thickness of each layer and the permissible spray distance.
Never violate the technology of working with metallic paint, observe the smallest requirements for cleaning the surface and applying paint. Also keep in mind that working with metallics involves painting in a special room; doing this outside is unacceptable.
Moscow Automobile and Highway State University, Moscow. Level of education: Higher. Faculty: AT. Specialty: Special engineer Cars and automotive industry. Experience in the automotive industry (master consultant...
Upon completion of work...
There is another important point in the work of a painter, which is usually not given due importance. This is washing the gun after working with metallic. If this operation is performed carelessly, then particles of “silver” may remain in the gun, which then either clog the nozzle and spoil the shape of the torch, or fly to the surface during the next painting.
Therefore, upon completion of work, take care of the cleanliness of the tool. Rinse the spray gun thoroughly with solvent and blow with compressed air. Don't waste your time and energy on this.
Sincerely admiring the shine of a freshly painted wing or hood, and even metallic, and even silver, and even without “apples”, and even... (sorry, I got carried away) you begin to experience the genuine joy of owning a car. It is so beautiful, shiny, smooth, fresh, inimitable, perfect, corrosion-resistant, on four wheels, five-speed gearbox... Sorry, we got carried away again...
Final coating with car varnish
The third and final stage is to distribute the varnish yourself:
- The varnish for this procedure must be diluted with a solvent and a fixative in the proportions specified by the manufacturer. Professionals change the concentration of the substance depending on the layer number - the first is the densest, then lighter ones.
- The varnish is applied in two or three layers, each of them is well dried. You can check the degree of drying only in an inconspicuous area; if the varnish sticks but does not smudge, then you can apply the next layer.
- After applying the last layer, the car must dry for at least a day.
Body preparation
You always need to follow the sequence of painting a car yourself, otherwise you can ruin everything. The first stage consists of the following processes, which must be performed in the specified sequence:
- Thorough washing and blowing of the car.
- If there are noticeable or serious scratches, you need to straighten and putty yourself, in this case:
- the color of the putty must be correctly matched to the color of the car, especially if it is yellow or red;
- Cover all areas of the body that will not be affected during processing with protective film, securing the edges with masking tape.
- Priming the work area. Follow the application technology indicated on the can. Do not forget to degrease the surface between changing processes and remove remaining dust with sticky wipes. It is necessary to degrease with anti-silicone agents; it is absolutely forbidden to touch the part with your hands.
Application of filler
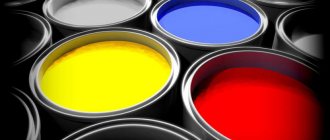
Which paint is better to choose?
Metallic paint can be of three types:
- single layer;
- two-layer;
- three-layer.
Single-layer paint is rarely used because applying it requires expert skills. Using three-layer paint, effects such as mother-of-pearl, chameleon, etc. are obtained. Three-layer painting technology includes the application of an additional layer of mother-of-pearl, which increases the cost of painting.
Two-layer paint is the most popular and widespread. The technology for applying such paint is much simpler than that of one- and three-layer coatings.
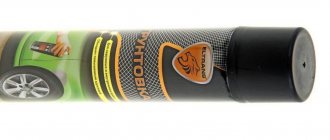
Metallic paint can be found in stores in several forms:
- Aerosol. In these cans, the paint is already mixed with varnish, which is an advantage for those who are painting for the first time. There are also cans in which the paint is separate from the varnish. This option is suitable for more experienced people, and the result of such painting will be of better quality.
- Acrylic paint. These paints have a number of advantages, such as adhesive properties and a large selection of shades. They do not harm human health, since they do not contain harmful solvents.
- Graphite metallic. These paints contain graphite powder, which makes the coating durable, resistant to corrosion, water and environmentally friendly.
The most popular two-layer metallic paint
- Powder formulations. Paints with this composition are beginning to gain more and more popularity due to their economical use, large number of shades and environmental safety.
- Automotive paints. This type of paint is the most popular at present. The dyeing process itself has certain difficulties. But if the paint and varnish material is applied correctly, the painted surface will be used for more than one year.
Protective means
Particle sizes that are harmful to human lungs range from 0.2 to 5 microns. The table to the right shows the sizes of typical particles suspended in the air. A mask is one of the most effective means to prevent the inhalation of such harmful particles.
Use of protective equipment
Color selection, surface preparation
- Mechanic's cap;
- Glasses;
- Mask with filter;
- Mechanic's uniform;
- Gloves that protect against exposure to solvents;
- Safety shoes.
Coloring
- Mask connected to the air duct;
- Mechanic's uniform;
- Gloves that protect against exposure to solvents;
- Safety shoes.
A gas mask is a protective device designed to protect the human respiratory system from the harmful effects of organic gases (air mixed with vapors of organic solvents). There are two types of masks: masks connected to an air line and masks equipped with filters.
The filter mask is equipped with a respiratory box to absorb organic gases.
Automotive base enamel, what's what.
Metallic paint is a one-component composition that does not require the addition of a special hardener. And diluted with a special thinner for metallics. They got their name from the aluminum powder they contain. These small particles reflect light and create different colors. At different viewing angles, color, hue, brightness, saturation may differ.
DIY metallic car painting
is quite complex and requires proper application. Since the ability of paint to reflect light largely depends on how it is applied to the surface being painted. If it is not applied evenly, then a painting defect “spotting or striping” may appear due to different layer thicknesses. This fact makes the metallic painting process very difficult, especially for beginners.
Metallic painting refers to two-layer coatings. Since a transparent varnish is applied on top, which adds shine and protection to the surface.
Base and metallic, what's the difference?
There is practically no difference here. The base paint is the “Base” to which metallic grain is added to obtain the necessary shades and tints. You've probably heard the expression "Clean base". This is a base paint without adding grain, such as the color: White Cloud, which is used to paint our VAZ, Priors, Grants, etc. Mobihel company. There are a large variety of shades, the most popular are: metallic gray, blue, green, gold, black, white, silver, graphite.
Spray gun settings before metallic painting
- A good paint gun with a consistent, even spray pattern plays an important role. To apply metallic paint, the spray gun nozzle must be the correct size. Typically the size used is 1.3 or 1.4 mm. The gun must be clean and produce a correctly shaped torch. It's best to do a test spray to make sure. If the torch does not spray evenly (more paint on top or bottom), then there is a high probability that there will be streaks when painting.
- It is very important to set up the spray gun correctly. Settings include torch size, air pressure and paint flow. You can read more about the settings in the article “setting up the spray gun”.
- The torch should be as large as possible. In some cases, when painting locally, the width of the torch can be reduced.
- If a pressure gauge with a regulator is connected to the spray gun, then you need to fully open the air supply on the spray gun, pull the trigger and set the desired pressure on the pressure gauge (usually 1.5 - 2 bar for HVLP spray guns).
- The pressure must be set depending on the viscosity of the paint. Thus, it is better to experiment, gradually increasing or decreasing the air supply and establishing the most acceptable pressure. You should get a good spray of paint, without dust or large droplets. If the air pressure is too high, there will be a lot of pollination. When dry paint hits the surface, the metal particles are positioned vertically and do not reorient to the desired position. With most colors, if the metallic particle arrangement is different from the original paint, the shade will look different. So, higher pressure makes the shade lighter. If the pressure is too low, the metallic particles will sink into the paint. In this case, more of the paint pigment will be visible than the metallic particles and the paint shade will appear darker than the original paint.
- It is better to set the paint supply to maximum and move the paint gun at a speed corresponding to the paint spray. If you don’t have the skill to paint quickly, then the paint supply needs to be reduced a little.
How to paint metallic?
Metallic paints contain aluminum particles (flakes), which give it a characteristic look and shine.
Metallic paints have a high binder content (a transparent base without pigment) so that the aluminum particles are visible and do not merge with the pigment. Because of this, the hiding power of such paints is worse. Some shades of metallic paints are the most difficult to paint. These shades include light “metallics”. When painting with such paint, if it is not sprayed correctly, defects such as “stripes” and “spots” may appear. The appearance of such defects is influenced by both the paint gun and incorrect spraying technique, as well as the quality of the paint.
In this article, we’ll look at how to paint metallic and what factors need to be taken into account to avoid defects.
Application process
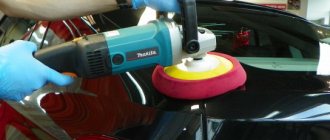
To paint a car with a high-quality metallic paint, you must have a good spray gun with an even and correct spray. A lot will depend on this. Gun settings are usually done at your own discretion. But you should remember that metallic painting does not require a lot of pressure, so for an Hvlp gun the average value is somewhere between 1-1.8 bar. Before applying, do a test color on some surface.
Metallic car painting
rarely occurs in one layer. Their number depends on the covering power of the material and the type of repair.
1. It is recommended to make the first layer not wet “greasy”. And the floor is dry and “dusty”. This way you can see whether everything is going well and whether there are any defects and avoid paint damage if there is rubbing down to the old paintwork material.
2. The second and subsequent ones are applied semi-wet, semi-glossy layer.
3. The main factor is interlayer drying. The next layer can be applied only after the previous one has completely matted. Do not rush; allow the solvents to evaporate from the material.
4. It is necessary to go between layers with a sticky napkin to remove accumulated pollen or small debris.
5. You should not move the spray gun in different directions back and forth. Your movements should be smooth and even. This way the paint will apply evenly and correctly and you will avoid over-spraying, dusting and differences in thickness.
Metallic paint should NEVER be applied in a wet, “greasy” layer. The surface will acquire an unsightly structure and defects such as stripes will appear.
But you also cannot apply all layers by spraying (dry). This way you will get a strong hedgehog
» rough surface like sandpaper. The varnish on such a base will not spread well and will have an unsightly shagreen pattern, and metallic grains can break through the varnish after drying.
Shagreen on the varnish also depends on how the base is applied; this point must be taken into account.
The metallic car painting technology ends with the application of varnish. The varnish must be applied over a completely matt base paint. Approximately 20-30 minutes, it all depends on the ambient temperature and the nuances of the work being carried out.
Technology
In enamels with a metallic effect, light reflection plays a vital role. As you know, these paints, in addition to color, also contain effective pigments - aluminum particles. They act as a kind of tiny mirrors that reflect the incident light, which gives the coating a sparkling effect.
Moreover, if you look at a metallic-painted part from different angles, you can clearly see that the intensity of this shine is not constant - it either decreases or increases. For example, we look at a car from a certain point at which the coating glows brightly and sparkles, then the car turns (the viewing angle changes) and the coating gradually darkens. These changes in hue, from light to dark and back again, are called the flop effect.
The main and most difficult task for a painter when working with metallics is to correctly “lay” the aluminum particles on the surface. Correctly means parallel to the substrate and to each other. If we can orient these particles in this way, the coating will then have optimal optical characteristics.
But if the “silver” lies chaotically in the paint layer, it will scatter light in different directions, which will lead to disruption of the flop effect, color distortion and the appearance of stripes and “clouds” characteristic of metallics.
As we already know, silver colors are especially capricious in this regard, since they contain almost no color pigments. Their color is provided almost exclusively by the aluminum grain, which is responsible for the flop effect. When working with such colors, the painter needs to be especially careful; he must clearly understand how aluminum particles behave in the paint layer.
Factors affecting metallics. Layer thickness and others
The orientation of aluminum particles is influenced by many factors. All these factors are in one way or another related to the rate of solvent evaporation and the depth of “burrowing” of the aluminum grain in the paint layer.
First of all, for uniform decomposition of the “silver”, it is necessary to avoid either applying the base too wet or too dry.
A layer that is too thick will contain more solvent, which will take longer to evaporate into the surface. Accordingly, a thick layer will remain liquid longer. In this case, the aluminum particles will “sink” into the bottom of the layer and be oriented vertically relative to the substrate before drying. A deeply sunken grain almost completely loses its ability to reflect the light falling on it, which leads to a distortion of color - it darkens.
And vice versa. If the paint is applied to the surface too dry, there is less solvent in such a layer, it evaporates faster, and the aluminum grains do not have time to sink to the “correct” depth and take the desired position in the paint layer. They remain on the surface of the layer, reflecting too much light, which leads to lightening of the coating and loss of color saturation. In addition, the base, which lies on the surface like a hedgehog, leads to increased consumption of varnish, its uneven shrinkage and a decrease in gloss after drying.
In both the first and second cases, the formation of stripes and “clouds” is also possible.
The thicker the metallic layer, the longer it will remain liquid, the deeper the grain will have time to sink into it and the darker the overall shade of the coating will be. And vice versa.
A properly applied metallic coat is a medium thickness coat, neither dry nor greasy. In such a layer, the aluminum grains lie at the required, standard depth, oriented parallel to the substrate. This ensures the best manifestation of the “flop effect”, color uniformity and good paint coverage are achieved.
All other factors, as well as the layer thickness factor, depend on the rate of solvent evaporation and the depth of occurrence of aluminum particles.
For example:
- When the recommended application pressure is exceeded, more solvent is “knocked out” from the paint torch, which means less of it will be transferred to the surface, it will evaporate faster, the grain will remain in the layer above, and the coating will acquire a lighter shade.
- The lower the viscosity of the applied paint, the thinner the layer and the faster its evaporation. Accordingly, in a shorter time the grain will have time to sink to a shallower depth, and the coating will be lighter.
- The higher the air temperature in the painting room, the higher the rate of evaporation of the solvent, and the lighter the shade of the coating will be.
- The greater the distance from the spray gun to the part to be painted, the less solvent is transferred to the surface. This means it will evaporate faster and the coating will look lighter.
- The faster the passes, the less solvent will be on the surface, and the lighter the coating will look.
- The faster the thinner is used, the higher the rate of its evaporation, which means the grain in the layer will remain higher and the coating will be lighter.
And so on.
Methods of influencing metallic shade. Understanding these relationships in practice can help level out small differences in shade and “stretch out” the color
The figure below schematically shows how the depth of aluminum particles affects the overall shade of the coating.
The diagram shows that with the correct arrangement of the grain, our eye perceives both the color of the coating, for which color pigments are responsible, and the grain, evenly distributed in the layer (Fig. A).
If the grain did not have time to sink to the required depth and remains in the upper part of the coating, it “blocks” the light from the color pigments, and our eye sees only the light reflected by the grain, which is why the coating is perceived as lighter (Fig. B).
The deeply sunken grain is covered with color pigments and almost does not reflect light, resulting in a darker shade of the coating (Fig. B).
Watch your hands! Application technique
When applying metallics, spray technique is critical. It is important to hold the spray gun correctly and maintain a uniform speed. If you stop moving for even a second and a layer of paint is sprayed thicker than next to it, streaks and “apples” cannot be avoided.
The gun must be held strictly at right angles to the surface to be painted. Otherwise, when tilted, in the upper and lower parts of the torch, the distance to the surface will be different, which means that in one place the layer will be thicker, in another - thinner.
Uneven thickness of the paint layer leads to different orientations of aluminum particles in different areas of the layer. This causes a defect that is usually called "clouds" or "apples"
Number of layers and interlayer drying
So, to achieve the best result, metallic painting should be done in uniform “semi-wet” layers: not dry, but not too wet. Number of layers?
Depends on the coverage of the base, but most often the classical technology is used: 2+1.
That is, two covering layers are applied (they can be applied a little more wetly), after which the so-called drip layer is sprayed (also spectacular, smoky, leveling, etc.) - it is needed to correct the shade and eliminate the “apple-appearance”.
The drip layer is applied as follows. We lower the inlet pressure on the gun to 1-1.5 atm. (with the trigger pressed and without changing the feed, or with a slightly increased feed) and after the last layer of the base has matted, from a slightly greater distance (approximately 30 cm) we spray a semi-wet drip layer. This layer, like “rain,” should gently and evenly cover the surface with droplets. After application, the resulting droplets will quickly stretch and the coating will become smooth.
Usually 2-3 layers of base are enough, but for poorly covering flowers, sometimes not only three, but even five layers are not enough. In this case, tinted soil will help, which needs to be taken care of in advance.
And don't forget about interlayer aging. Insufficient rest can cause cloudiness and other defects, so apply the next coat of base only after the previous one has become matte. Usually this is 5-10 minutes (at 20 °C).
Applying varnish
So, we have applied the base enamel, but, nevertheless, our car still looks pretty bad. To bring the matter to its logical conclusion, all that remains is to apply a clear varnish over the base. After this, the coating will not only become fabulously beautiful, but also resistant to external influences (the base itself is not weather-resistant).
Unlike the single-layer metallic paints of the first generation, modern “metallics” are a two-layer system: a clear varnish is applied over the base enamel
The main question is: how long before you can apply varnish?
Here it is important not to miss the moment, since the base enamel retains the ability to “absorb” subsequent layers not as much as desired, but for a strictly defined time. If this time is missed, the adhesion between the base and the varnish will be impaired, and during operation the varnish from the overdried base may peel off.
Sometimes painters make a grave mistake: they apply the base in the evening and apply varnish in the morning, arguing that the paint will probably dry out overnight. With metallics, this approach is completely wrong!
It is best to coat the base with varnish at normal temperatures after 15-20 minutes. This is optimal. During this time, the solvents will evaporate from the base, it will become dull and will be completely ready to accept the varnish.
But if you rush and varnish a still wet base layer, this can cause subsequent dulling of the paintwork, as well as the appearance of “clouds” (the grains seem to “stick together”, reflecting light unevenly). Therefore, in low temperature conditions, the exposure time must be increased (until the base is completely matte).
The maximum time during which the adhesion between the base and the varnish does not break is necessarily indicated in the technical documentation for a particular enamel. This time may vary for different manufacturers, but in general, practice shows that if we do not coat the base with varnish within an hour, maximum two, then we will no longer have maximum adhesion.
Therefore, if you are late, the base coat must be matted and repainted.
Read more about applying varnish here.
Before applying clear varnish, the base layer must be treated with a tack cloth to remove dust, dust and lint.
Silver paint, apple and stripes
Painting with silver, let's highlight this subsection and consider what problems may arise when applying silver and how to avoid them.
Painting a car with dark colors is much easier in terms of application. Even a less experienced painter can do this quite well. But painting with light silver metallics and some other colors, say golden, requires experience in applying such enamels. Many people have problems when working with silver.
The main defects that appear when painting with light metallics are: spots (apple-colored) and stripes. I think every novice painter has encountered this.
The main causes of apples and streaks when painting metallic are:
- Enamel is not thinned correctly
- Faulty spray gun (uneven spraying of material)
- Incorrect technique for working with a paint gun
As a result of all of the above, such defects occur.
Metallic, especially light colors, has the following properties: The “fatter” the layer, the darker the paint becomes and vice versa, the thinner (sprayed) the color changes in the other direction.
That is, you applied an uneven layer of silver, somewhere it’s thicker and somewhere drier, and this is what causes spots and stripes.
How to remove the apple-like appearance when painting metallic?
- It is necessary to have a working spray gun with an even spray of material
- Correct adjustment is also important, the material feed should be “medium”
- The distance to the surface to be painted should not be too close, at least 15 cm.
- Passes with a spray gun should be uniform and identical.
- Do not pour paint, layers should be semi-wet
- And the most important thing (decisive action) is SPRAY. Once the last layer has matted a little, spray on the finishing (leveling) layer. You can leave the feed as is or reduce it a little, raise the pressure a little, hold the spray gun much further at a distance of 30-40 cm and spray a light layer. Movements can be different diagonally, across or lengthwise.
Just don’t overdo it, there shouldn’t be too much pollination. All settings mentioned above can be changed (depending on the situation) with the exception of the distance to the part to be painted.
Knowing all these subtleties and nuances, painting a car body with metallic will become an easy task for you and all the work will be done efficiently and without defects.
Finally, a video about painting metallic red fenders and bumpers.
Metallic paint gun
For high-quality application of modern base enamels, spray guns with low air outlet pressure (HVLP or LVLP) are required. Cheap conventional pistols are not suitable for this. They have high pressure, which, although sometimes allows you to get a wide torch, when applied, “knocks out” a lot of solvent from the paintwork material, as a result of which the paint lies on the surface practically without it. On metallics this inevitably leads to streaking and clouding, especially on silver colours. Here, enjoy...
If we use more advanced spray guns of the HVLP or LVLP systems, the risk of such defects is significantly reduced. The low outlet pressure of these guns makes it possible to transfer enough solvent to the surface so that the metallic grains fit correctly.
Before painting, do not forget to make sure that the spray gun provides a sufficiently wide and uniform spray pattern over the entire width, and that the pattern of the spray pattern has the correct outline.
To apply base enamels, it is recommended to use a gun with a nozzle diameter of 1.3-1.4 mm. The air pressure must be accurately set directly on the gun (usually 2-2.2 bar) and not fluctuate during operation. The air must be cleaned of oil and moisture.
“Can you paint metallic?” In the 90s, this question was asked to any painter who came to get a job at a car service. Today, painters can easily cope with ordinary metallic paints, so new requirements are placed on their qualifications: for example, skills in working with light metallic paints.
Painting defects
Coating dirt (grain)
Dust or other foreign particles that adhere to the painted surface during painting, or immediately after painting, are called grains. Along with external sources of contaminants, these particles may be present in the paint itself.
Craters (pockmarks)
Depressions caused by oil or water being pushed out of the paint film, or voids caused by the inability of the paint to form a film against oil or water.
Shagreen (orange peel)
It is an uneven film that occurs when paint quickly cures before it levels out (spontaneous leveling movement of paint). The appearance of a defect is influenced by both the coating application mode and the film thickness.
Drips (sagging)
Drips are caused by excess paint running down and curing.
Wrinkling (swelling)
There are two types of wrinkling. One of them is caused by solvent penetrating from the fresh paint coating into the layer of old paint, which leads to internal deformation and the formation of wrinkles in the top layer. Another type of wrinkling occurs when the top layer of the coating and its expansions soften under the influence of heat, followed by shrinkage as it cools.
Effervescence (pores)
Groups of small holes called pores appear when the paint heats up quickly. If the painted surface dries and cures before the solvent evaporates, the remaining solvent breaks through the film, leaving pores.
Traces of putty
Occurs when putty appears on the surface of the coating. When the initial paint and filler swell differently, the solvent in the top paint layer causes wrinkling along the painted edges and traces of the putty appear.
Scratches from sanding
Scratches enlarge and appear on the surface of the top coat of paint as the topcoat solvent penetrates into the underlying layers.
Fade (absorption)
Occurs when the topcoat loses its gloss over time. If the bottom layer is porous, it will tend to absorb the paint, causing it to fade. In addition, fading will occur if the polish is applied before the paint film has completely dried.
Varnishing is the last stage of work
The technology of metallic car painting is such that it is extremely undesirable to overdry the dye before varnishing the surfaces. It is not recommended to leave an already painted car without applying varnish overnight. This is explained by the fact that overdried enamel will have poor adhesion to the varnish.
Before the application process, the varnish must be diluted with a fixative and solvent. Dilution proportions are indicated in the instructions by each manufacturer. Experienced car painters, during the initial varnishing, usually make the composition weaker than in subsequent stages.
Varnishing is done in 2-3 layers. Each of them must be completely dry. It should be noted that coating a car body with varnish is a simpler process compared to painting, but it will also require some skills from you.
It is not at all difficult to remove small shagreen by sanding and subsequent polishing, but removing varnish stains is much more difficult. Sometimes this requires removing an entire layer of varnish and applying it again.
Next
PaintingHigh quality hammer painting - beautiful and unusual