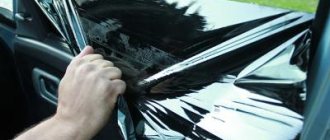
The process of painting a car is a rather complex specific task for specialists. If a special camera is used for this procedure, as well as high-quality equipment, paintwork defects are unlikely. But when working independently, various troubles often arise. After painting a car, unpleasant enamel stains may form, which are extremely difficult to remove. It is important to understand the reasons for their occurrence, as well as ways to combat such unpleasant effects. Today we will look at how to remove smudges of all types and sizes.
Some cars even leave the factory with such paint defects. Perhaps the factory used low-quality varnish, or the painting technology failed. Repeatedly in the reviews and comments of motorists there was evidence that the Largus bumper from AvtoVAZ often had smudges already in the cabin. Inside a car, such effects are completely natural. On the ceiling, for example, no one will clean up stains, since this place is invisible to the car owner.
Description of marriage
Varnish runs are when paint from the top area has moved down. It turned out that in one place the layer is too thin, and in another there is a clear excess, which is visible and “hurts the eye.” Not everyone clearly understands what shagreen is when painting. It is sometimes called automobile cellulite. Shagreen is a very common problem when priming or painting car parts with a toothbrush or airbrush. The paint falls on the body in small lumps instead of a smooth layer. This adds unacceptable roughness and spoils the appearance too much. Typical reasons are high spray pressure, too thick paint, quickly evaporating solvent. A little experience can also affect the appearance of this defect. Smudges and shagreen are related defects. They have a lot in common, a lot can be removed in one way. The main technology of work is based on the experience and handicraft developments of craftsmen. A serious automaker is not interested in this. It is more profitable for him when a person buys a new car.
How to prevent them from appearing
To prevent the formation of smudges on the surface of a car when painting, it is advisable to adhere to the following rules:
- Thoroughly degrease the body before applying the coating;
- choose the optimal thinner based on temperature conditions and repair area;
- maintain exact proportions when using solvent;
- adhere to the correct coating application technology, avoid local accumulations of the product and uneven application;
- do not make a large number of layers or their excessive thickness;
- follow the instructions for operating and setting up the spray gun;
- apply materials at the optimal temperature - it is about 20 degrees.
You can avoid the formation of defects by first carrying out a test staining on another surface. This will allow you to optimally configure the tool, acquire and hone your operating skills. It is important to pay attention to cleanliness, proper surface preparation and temperature conditions in the room.
Elimination methods
To combat this evil, sandpapers with small grain sizes were invented: 1500, 2000, 2500. Although they leave small scratches on the paintwork, they can then be easily removed with polish. First rough, then softer. Sanding is a monotonous and lengthy process. The temptation to take a larger skin will result in damage to the paintwork. You can carefully remove this tubercle with a special plane. But the risk of harm is also great.
There are several ways to remove shagreen after painting with your own hands. Shagreen in itself is not dangerous. She's just plain ugly. Thorough polishing cannot always remove it. You should lightly walk over the defective surface with fine sandpaper. If the defect is not significant, this will help. An overly expressive “image” is completely removed and the area is repainted.
There are ways to eliminate this defect. To do this, lightly sand the surface with very fine sandpaper and water. You need to add a drop of Fairy substance to the water. But it is better to remove the paint and repaint it again.
After painting, some defects may appear on the car.
Of course, if the car was painted by professionals, then all that remains is to present claims to them in time and get them to fix their defects themselves. It’s another matter if your favorite car was painted with your own hands, then paint smudges and other blemishes will also have to be removed yourself. To make your work easier, you need to know how to avoid them altogether or at least reduce them to a minimum. After all, all the unevenness of the paint coating arises due to violations of the technology when it is applied to the car body part to be painted. CONTENT:
1 The main causes of defects 2 Removing smudges: preparation and consumables 3 How to remove large smudges from a car 3.1 The procedure for removing dried smudges 3.2 Eliminating smudges using putty 3.3 Removing smudges with a cylindrical grinder 4 Removing minor smudges 5 Primer defects: removal methods
MAIN REASONS FOR DEFECTS
- use of low quality paint;
- unsuitable thinner or non-compliance with the proportions recommended by the manufacturer (smudges are formed due to too thin paint);
- poorly adjusted spray gun;
- the spray gun was at an angle or at too great a distance from the surface to be painted;
- dust ingress;
- non-compliance with the temperature conditions when storing paint or in the painting booth itself;
- the drying time for each layer of paint is insufficient;
- incorrect paint application technique (holding the spray gun in one place for a long time);
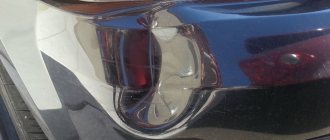
Smudges are often called any defects after painting a car. Smudges can form, for example, due to a speck of dust or some small insect stuck to a freshly painted car. In order not to repaint a body part, or even the entire car, it is useful to know how to correct painting flaws.
However, defects (smudges, graininess, shagreen, etc.) can be removed if they do not occupy too large an area. Otherwise, you will still have to paint the car again.
REMOVAL OF SPOILS: PREPARATION AND CONSUMABLES
Paint stains must be removed before applying the final varnish coating. To get rid of defects that spoil the appearance of your car that appear after a not very successful painting, you need to have on hand:
- Masking tape is always required when painting;
- a set of skins of different grain sizes (usually P800 and fine P2000 are used);
- soap solution or just water;
- a rubber or wooden block, which we wrap in sandpaper;
- thin and sharp blade;
- universal putty;
- polishing paste;
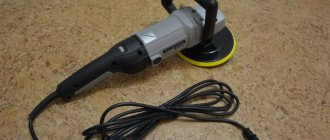
- polishing machine;
- wipers and a wiper brush (to remove dust generated during sanding).
back to contents
HOW TO REMOVE LARGE DRAFTS FROM A CAR It is recommended to begin removing smudges only after the paint layer has dried. Otherwise, cavities may form at the site of the torn drip, which in the future will cause peeling of the paintwork.
PROCEDURE FOR REMOVAL OF DRIED SPOILS
- The first step is to mark the boundaries of the treated area of the body using masking tape, which will not allow you to get carried away and damage the paint where there are no smudges at all;
- Using a sharp blade, you should very carefully cut off paint drips, starting from the top of the drops. (You don’t have to cut it, but just sand it right away);
- After this you can start sanding. They wrap the block with sandpaper P800 and begin to carefully sand the area of the leak. To improve glide and prevent paint from coming off, it is recommended to periodically dip the skin in a soapy solution or pour water over the area;
- As the smudge is grouted, the sandpaper is changed to a finer-grained one. Finish the treatment by sanding with P2000 sandpaper; After this, polish the part using a polishing machine.
ELIMINATING SMOKES USING PUTTY This method can be used in cases where it is necessary to remove smudges before the paint on the car has completely dried. The essence of the method is to apply (directly over the smudges) a very thin layer of universal putty. After the putty has dried (but no more than 15 minutes), you can begin sanding, similar to the first method.
Important! Universal putty hardens fairly quickly, so don't be too slow with sanding. Otherwise, when processing fully cured putty, it is very likely that the paint will be stripped down to the primer.
back to contents
REMOVAL OF DRAFTS WITH A CIRCULAR GRINDER It is possible to use special cylindrical grinders with various abrasives to remove drips that appeared after painting. True, working with them requires certain skills. After all, for example, as a result of using an unsuitable abrasive wheel when removing smudges, you can tear off almost all the paint on the treated area of the body, or even affect the primer.
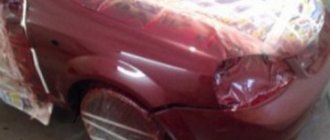
REMOVAL OF MINOR STRAIGHTS If the paint has leaked just a little, then getting rid of such flaws will be much easier. Especially if only a separate body part is painted. In this case, immediately after smudges are discovered, you can quickly turn the part over so that the paint, which has not yet completely dried, can spread evenly on its own. Very minor smudges can be masked by simply applying another layer of paint.
Work to eliminate paint defects is completed by surface treatment using special polishing pastes.
PRIMER DEFECTS If the manufacturers' recommendations are not followed, primer paints can also form smudges. If these deposits of primer are significant, then they must be removed, otherwise the unevenness will be noticeable even after applying the top paint coating. Smudges on the primer are eliminated using the same sandpaper of different grain sizes.
Moreover, it is even easier to remove defects with a primer than with paint. After all, minor roughness that may remain after sanding with sandpaper with a grit of P240 to P400 will subsequently be covered with paint. Therefore, you don’t have to waste time on very careful sanding with fine-grained sandpaper (mandatory for the top paint layer). If, after removing the primer drip with a blade, a small cavity forms, then you can not use putty, but simply apply an additional layer of the same primer.
back to contents
Post Views: 1,230
Process mechanization
A convenient device is a cutter for removing paint defects. The device is used for spot elimination of varnish unevenness and sagging. They can remove shagreen from varnish. This is a kind of cutter that removes everything unnecessary, including small varnish stains. The cutter has a correctly set, non-dull edge. It does not require sharpening, the tool is almost eternal. The ideal and smooth surface of the cutter produces a smooth surface of the varnish coating. The device is very convenient to use before polishing. This tiny device can fit in a child's palm.
Elimination of defects
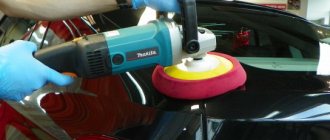
After the car is painted, the body surface must be sanded and polished. Using sanding, various defects caused during painting are eliminated:
- surface grain;
- shagreen;
- dull spots;
- smudges of varnish or paint.
Experts advise that defects in the paintwork should be completely eliminated not immediately after painting, but after about three or four weeks. The thing is that some defects may appear only after the paintwork has completely dried and settled on the surface of the body. Paint smudges can be eliminated by sanding the body surface using either a “dry” or “wet” method. After grinding, protective polishing is performed.
Subtleties of the process
Elimination of smudges should be carried out on a dry coating. If the paint is not completely dry, this can lead to separation of the bead along with the paint layer. Cavities and enamel detachment may occur. Place masking tape around the defect. Use a blade to cut off the influx, starting from the top to the base. Then they move on to sanding. To do this, wrap a rubber block in sandpaper and moisten it with a soap solution. Then they change the skin to a less grainy one. Too large smudges can be cut off while they are still wet. After removing the buildup, apply a thin layer of putty and after 20 minutes sand it using the technology described above. It is much easier to remove small smudges. If it is a small part, it can be turned over in the opposite direction to the direction of the leak. If the smudge is barely noticeable, you can touch it up a little.
Causes
Now we will highlight the most common causes of these “troubles”, namely:
- the spray gun was poorly configured or not at all ready for work;
- the paint used was of too low quality;
- dust got on the paint;
- incorrect proportions during dilution;
- too fast drying and subsequent re-application of paint;
- incorrect operation of the spray gun.
Quite often, leaks occur precisely because of dust (it is very difficult to find a place where it is completely absent). Often, experienced craftsmen know how to fix this “problem” even before the car has time to dry out.
The second most common mistake in the appearance of smudges is the insufficient level of knowledge of the technician. In any case, absolutely all stains, regardless of their complexity, can be removed. However, to avoid having to do this, either initially do not take on painting yourself, being unsure of your abilities, or do not trust the first best “garage”. It’s better to pay more once, but be sure of the quality and receive a guarantee for the work performed.
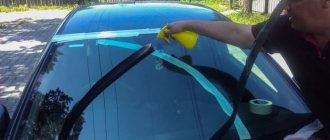
Washing out
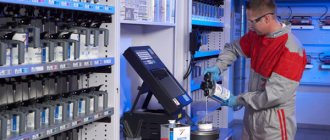
A number of other methods have been invented to eliminate varnish stains. Consider washout. You will need fine sandpaper (P2500 and P2000), putty, a vacuum cleaner and water. The treatment area is first thoroughly dried (an industrial hair dryer can be used). Then putty is applied to the stains. It will protect the varnish from damage. The putty layer is moistened with water and carefully polished with sandpaper (P2500). For a more accurate execution, you can wrap sandpaper around a flat block. Then they move on to fine sandpaper. This happens after the putty layer reaches the level. Work until the putty disappears. Final polishing again with P2500 sandpaper. At the end of the process, dust is sucked up with a vacuum cleaner and a layer of varnish is applied again.
Polishing
After leveling the surface, apply a small layer of 3m polishing paste to the paintwork, it is sold by weight and only a small amount is needed to polish it. Then we take the sander and start polishing, constantly moving the sander from side to side. Polishing should be done evenly, without holding the machine in one place for a long time.
Before polishing, all surfaces of the car body should be covered with a protective layer of special paper, glass, rubber seals and plastic parts, securing the paper with masking tape. You should also close all emblems, the holes in the radiator grille, turn signals and mudguards should be removed. If possible, the interior and engine compartment should be sealed; it is advisable to prevent dust from polishing from getting there.
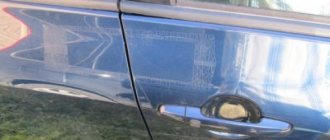
After painting, the paintwork becomes cloudy.
Hello everyone! Can anyone tell me what can be done? In general, I painted two doors, everything seems to be fine, but a month passed, I went to the car wash and washed it where I always washed before, but when I left, the doors that were painted became cloudy, the rest of the body is all shiny, if it sits for a day, maybe started to shine again, went in for polishing, everything shines well again, but after washing the doors became matte again. Can someone who understands this tell me what to do next, or can they re-varnish it? Thanks in advance everyone.
I hope the polishing was done with a polishing machine and not rubbed by hand? How long did the master spend on each door? Did the master dip sandpaper in water and scuff the doors before polishing it with a machine? Answer these questions first, please.
Yes, the car was polished with a machine, and as for the sandpaper, he sanded it with a 3000-m.
Damn, most likely there are no questions for the master, he did the polishing honestly. Then all that remains is a cloudy (or rather, most likely matte) varnish.
Have you painted for a long time (how many days have passed)? I mean, I read in the first message about a month before the first wash, how much time has passed from the moment of painting until today?
Last edited by bsb-s; 04/04/2016 at 18:09.
Jim-72, I didn’t wait for an answer from you to the last question, which could reduce the number of possible causes of your problem, because there could be a bunch of reasons, which is yours - it’s not clear: 1. A non-original hardener was poured into the varnish, or the hardener is too old, expired 2. The resin (varnish) itself is old and thick, and it was diluted beyond all possible tolerances (usually up to 15% of the total volume of varnish and hardener can be added), such as half 3. The varnish was diluted with a solvent incompatible with acrylic (especially some 646) 4. Did condensation (fine dew) form on the doors when painting? Did you paint in the heat or cold? And if it’s cold, then in the paint shop? And if in a paint shop, then “the iron has warmed up”? and in the painting room it was not +5 degrees, but at least 15? And in the paint shop there is probably a grated floor under which water runs (this leads to dew at the bottom of the machine)? You see, there are too many nuances in maintaining temperature and humidity, the questions can be continued. 5. How thick was the layer of putty applied and how well was the putty covered with primer? 6. Was the primer well dried before the base paint and varnish?
I’m afraid of the porous structure of the varnish film in your case, this may happen if the technology for preparing and painting the surface was violated (painted “for dew”; for a long time during drying, the solvent came out through the varnish, which was splashed from the heart or not; a lot of undried putty or drove into the slush on a putty but unpainted car, the putty, like a sponge, pulls water into itself, and then tries to release the water through the varnish)
In any case, you're still in trouble with painting. The varnish should gain final strength within 2 months. That's why I asked about the deadline. My advice is this: wait 2 months after painting, polish it with a machine, if the doors continue to become cloudy, repaint the doors. The true cause cannot now be determined, and there is no result yet. Wash the car in front of the painter who painted it, and show him his joint. If the painter is normal, he will fix it without a dispute at his own expense (well, with the possible exception of paint and varnish)
Damn, if the car is painted silver or near-silver, you won’t be able to get rid of it with just doors, the shade won’t match, you’ll have to blend it into adjacent parts. If the color is dark, it doesn’t matter, just repaint the doors and that’s it
Where do the drips come from?
The main reasons that the paint goes on unevenly is non-compliance with the painting rules. And this manifests itself in different ways.
Minor flaws:
Some defects can be corrected either immediately or without additional effort. So, if you are painting a separate element of the body and notice that the paint has flowed, you need to quickly turn it: the composition that has not yet dried will be evenly distributed over the surface.
If drips are detected after drying, but are very small (for example, they are not visually detected, but can be felt), another applied layer of paint can help out. Just this time, try to do everything as correctly as possible.
Let's sum it up
To properly remove smudges after painting a car, you will have to study technology and also take into account the individual characteristics of your situation. There are times when it is much easier to remove the old layer of varnish and completely repaint an area of the car. This will help you complete all tasks without much difficulty and carry out the work efficiently. But sometimes, even without such difficulties, you can complete all the tasks efficiently and restore the car.
It is worth using the most effective restoration method, which will also not be the most expensive. Sometimes, when painting on their own, they prefer to leave smudges without correcting them. But with this approach, the appearance of the car will be spoiled by a rather noticeable and unpleasant defect. Moreover, you can eliminate such troubles yourself and quite quickly.
Requirements for varnish coating
When the car is already painted, the owner can optionally use an additional, protective layer that does not have color. During the painting process, you must adhere to the following rules:
The solution turns out to be more liquid, making it more difficult to work with.
After completing the last stage of painting, initial drying lasts 40-50 minutes. After this period of time, the varnish dries initially. It will take another 4-6 hours for it to completely harden.
Types of automotive varnishes and features of their application
Manufacturers and their official representatives offer a wide range and different prices for car varnishes, so car enthusiasts can make the right choice for themselves. Considering the price-quality ratio, the most popular types of polyacrylates are acrylic car varnishes.
They are based on glyphthalic resins, due to which they save on solvents.
Polyacrylates come in two types:
- thermosetting (dry when exposed to high temperatures);
- thermoplastic (harden as a result of evaporation of the mixed solvent).