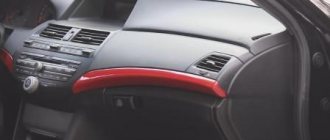
Lada 4×4 3D BadboY › Logbook › Cutting the rear arches of the Niva and installing Lapter bushwhackers
Continuing the epic with cutting the arches, which began in the last post about cutting the front arches, which contains the main explanations, in this post I want to show how the rear arches are made and draw attention to the intricacies of this process.
Stage 1: Marking and cutting the outer edge.
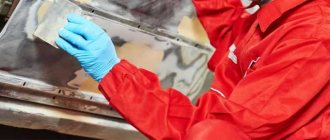
Just like with the front arches, we mark the cutting line in the middle of the edge of the wing, let me remind you that the width is about 1.5 cm. Next, we cut out the arch with a small grinder with a thin disk, do not press too deeply, so as not to cut through the inner wall of the arch, if someone does not knows that she is there. Then we bend the cut strip and carefully, using a grinder, cut it off from the edge of the inner wall and throw it in the trash. We get this uniform gap between the walls of the arch.
Step 2: Cutting the inside edge.
We take the inner edge, we simply cut it flush with the outer edge, thereby cutting off the bead from the inner edge, which acts as a stiffener.
Stage 3: Forming the bend of the edges and welding them.
From the beginning, we drill holes in the outer edge for spot welding of two edges, some weld the edge of the outer edge adjacent to the inner one with a continuous seam, in our opinion this is not correct and it is easier to bite through the special one. with a hole punch or drill through the metal and spot weld it like at the factory, naturally tapping both edges with a hammer for the tightest possible fit. Everyone knows about double metal and the impossibility of processing it inside the seam, but the same design was made from the factory, here we do not change anything, but simply treat it with anti-corrosion as much as possible.
Next, you need to form a bend line on the inner edge towards the outer arch. Shoe pliers with thin curved lips were used for shaping; they were quite convenient for breaking the inner arch! We begin from the side of the door to form an “envelope” of two arches, we do everything smoothly with a wave so that the metal stretches, first we bend the inner arch outward, tap it on it, we also break it inward and bend the outer arch, tap the layering and tack it by welding, and so the bend moves along the arch with a distance of approximately 4-5 welding points, the distance between the points is 3-3.5 cm.
Source
Lada 4×4 3D Adventure time ⌚ › Logbook › Installing plastic fender liners (lockers) on the Niva
This past holiday was dedicated to installing fender liners on the car. Back in the spring I bought a set of lockers for 1,500 rubles. A little expensive, but what can you do? The fender liners are good, the plastic is dense and at the same time quite elastic. Cheaper options were completely worthless.
Before installation, I washed the car at a car wash, asked to rinse the wheel arches thoroughly, but they still left dirt. I washed it myself. I removed all the dirt from all the cracks with the help of a brush, fingers and such and such a mother. =) I dried and treated the surface of the wheel arches with Movil.
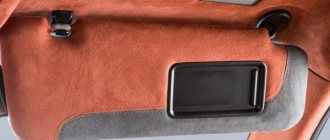
I installed the fender liners and they fit well. The rear left and front right tires are generally, I would say, ideal.
I drilled holes and screwed in screws about 10 cm apart. I did everything sequentially so that there were no wrinkles.
Some people think that plastic fender liners are evil, an unnecessary element, that arches rust and rot from drilled holes and screws. I have a different opinion on this. If the wheels are stock size and you don’t want to periodically treat the wheel arches, then installing fender liners is justified. With the wheel arch liners it’s quieter (I didn’t use a vibrator) and it’s easier to wash off the dirt. In addition, fender liners additionally protect the car body from dirt and sandblasting. On this car without fender liners, there was always a lot of dirt on the body and rear bumper, but with fender liners on the previous car there were no such problems.
Regarding the drilled holes. I tried to protect the metal from moisture. To do this, I coated the fender liners and arches with Movil. When you tighten the self-tapping screw, the fender liner is pressed tightly against the arch and the Movil preserves the hole with the self-tapping screw and does not allow moisture to pass through.
Yes, by the way, if the previous owners of the car had immediately installed the fender liners and done it well, then this would not have happened... An accumulation of dirt inside the wing.
Source
How to properly install fender trims on a Niva
One of the vulnerable parts of the car, along with the sills and fenders, are the wheel arches. Elements are constantly exposed to moisture and are the first to receive mechanical shocks from flying gravel and layered reagents in winter. Niva fender covers not only help prevent corrosion in vulnerable areas, but also improve the appearance of the car. Auto stores offer a wide selection of fenders of various configurations; you can make the fender yourself and install it in the garage in 40 minutes.
Installation
Before attaching the expanders you must:
- Drill 2-4 holes on the standing plates to attach them to the body;
- prepare gun grease for application to the holes in order to protect the body from corrosion;
- purchase a U-shaped cambric seal.
Next, you can begin installing extenders on your car:
- Plates with prepared holes are installed inside the rubber seal. If the plate is wide, it can be ground down a little.
- Before installing the rubber seal, you need to try it on. Mostly the length of the rubber base is a little longer, so it needs to be adjusted to size.
- Using self-tapping screws, we secure the product to the wheel arches. You may need the help of a second person during the fastening process.
- Each subsequent self-tapping screw must tighten the expander, because the quality of fixation of the expansion arches depends on this.
The main advantage of rubber arches is that after installation they can be painted. But in most cases this is not necessary, since the product emphasizes the base of the car and adds elegance to the Chevrolet Niva.
If you are planning to prepare your car for off-road use, then you have probably heard about fender flares. What they are and why they are installed will be discussed in this article.
In essence, everything is simple - expanders save your car from flying clods of earth when you drive through specific dirt. That is, they are designed to make your car cleaner, albeit to a minimum. Because when you skid in serious mud, the car will still be covered in clay.
To combat off-road conditions, they most often install wider tires than the standard ones, and therefore it turns out that they will seem to stick out from the side. And when the wheel slips, it begins to throw dirt on the doors and windows. And extenders are a must. The same is true if you cut the arches to install larger wheels - they will be wider anyway. But even when you turn the steering wheel to the side, the mud flaps will not help, the dirt will again fly onto the doors.
Overlay functions
Fenders or wheel arch extensions are arched, round, or less often square plates that are installed along the rim of the car's fender, protecting the edge. They are mounted on the body with self-tapping screws through special plates or with auto glue. 80% of the fastening of arches to the wings of the VAZ 2121 is carried out in standard places; the manufacturer produces repair inserts (arches) of the wing for all modifications of the VAZ, made of stainless chrome-plated steel. The purpose of the inner linings on the wheel arches:
For Niva, extensions are produced that protrude beyond the dimensions of the body. The elements are mounted on both cut and uncut standard elements. The additional purpose of the part is to protect the side windows from dirt and small stones when driving off-road.
Materials used for manufacturing:
It is recommended to mount the metal body kit only on self-tapping screws; plastic and polyethylene extenders are also installed on them, but through an additional plate or without it.
By appearance, tuning elements can be divided into categories:
Individual tuning will give the car originality and style. For Niva, extensions are not only a decorative element, but also a necessity, especially if the model is converted to run on wide-profile tires for off-road driving. If the tire protrudes beyond the dimensions of the car, then a regular factory arch will not protect the glass and body from the dirt that flies from under the wheels when driving off-road. Extenders in this case become a necessary safety element, providing the driver with maximum visibility of the road.
Fender Manufacturers
VAZ Niva is one of the classic models of the Volga Automobile Plant. These configurations provide two types of arch extensions: square and round. Round fenders, in turn, are divided into wide and narrow. There are more than 20 companies on the market that offer wheel arch extensions and protective edge trims made for a specific configuration.
Original Niva door trims complete with wheel arch extensions are offered by the AvtoVAZ workshop (Togliatti). The cost of a set of 6 arched parts is 1500 rubles. Fenders are made from ABS plastic; there are two types in the model range:
- shagreen, with a relief pattern, do not require painting;
- with a primed surface for painting.
The extensions completely follow the relief of the arch; the body does not require additional cutting. Tuning protects the fenders of an SUV from mechanical damage from gravel, prevents corrosion, and prevents the vehicle's windows from quickly becoming dirty.
The Tuningcars63 LLC company offers a set of square trims for the Niva costing from 2,300 rubles. Tuning elements are made of high-strength ABS plastic for painting and “shagreen” type. During installation there is no need to cut the arches; the fenders exactly follow the geometry of the body. Square plates act as tuning and protect the edge of the arch from mechanical damage.
Square pads do not protect the car from dirt if wheels with zero offset are installed, i.e. alloy wheels on wide tires.
The Tuning Auto company produces complete linings for Niva arches and doors. The cost of parts starts from 2000 rubles. Fenders and moldings are made of heat-resistant rubber, serve as a decorative element, and give the car a finished shape. You can purchase individual parts for square and round arches at a price of 600 rubles. a piece.
Today, under the FENDERS (LAPTER) brand, trims and extensions are produced for the entire VAZ model range. For the Niva, square and round plastic elements with a rubber seal and fasteners are offered. During installation, you will need to expand the arches and cut off the edges.
Features of the material
Most drivers choose plastic fender flaps for the Niva 2121. The material is highly durable and, when properly processed, the flare does not corrode and provides reliable protection.
The price of plastic wings for Niva Vis starts from 2,400 rubles. In 70% of variants, pickup trucks are sold already with overlays. Plastic parts are made of low-density polyethylene, and ABS is used for the wing. Main advantages:
The disadvantages of wings and extensions include the need for complete replacement under mechanical influence of medium force. If a dent forms on the steel plate after an impact due to careless parking, the plastic element will crack in this case.
Wheel hub spacers
Track wideners - wheel hub spacers
Wheel hub spacers make it possible to widen the track, which provides the SUV with some advantages. Namely:
- If an SUV is lifted and its center of gravity is higher than usual, there is always a risk of overturning or, simply, “making ears.” By widening the track with spacers, you can achieve better stability of the car and corner more sharply, take on more serious hills and not worry about capsizing;
- Wheel spacers for rims allow you to install larger diameter wheels without major changes to the SUV body. And if cutting arches doesn’t scare you, then spacers can come in handy in cases where the enlarged wheels touch any power units;
- The appearance of a car with a widened track becomes more aggressive and attractive, but this is not for everyone.
Track wideners - hub spacers
Wheel hub spacers also have disadvantages, not without them:
- The SUV will drive in its own track (the greater the likelihood of this, the thicker the wheel spacers). This means that the wheels will make their way through the mud on their own, and even when moving in a column, it will not be possible to use the common track - it will be more difficult to make your way through the mud, and the load on the engine will increase. But when installing tires of a serious size, this minus can be crossed out;
- With an extended track there will always be a risk of falling into the rut from heavy equipment or trucks. When ordinary cars are able to drive inside such a serious rut, an SUV with spacers will constantly slide into it and can eventually get seriously stuck (although here, of course, everything depends on the spacer between the steering wheel and the seat, that is, on the pilot and his skills);
- Installing spacers on the hub increases the load on the bearings, which can lead to rapid wear and failure. But there are no clear opinions here, since, naturally, no one has conducted full-fledged tests with open results. There is an opinion that if the hub bearing is already good in itself, then a spacer will not make it any worse. And if the bearing periodically still requires replacement, then with a spacer this replacement will become regular;
- Spacers on the hub can make the track wider by 8 centimeters, which quite naturally leads to the SUV being covered in mud. If you do not install wider arch extensions, then the car will tip over very quickly off-road. Although, for many this is not a serious disadvantage.
Track wideners - hub spacers
In addition, a very serious point needs to be highlighted separately - regardless of the quality of the hub spacer, there is always a risk that the wheel and it will simply fall off. And if this happens in the mud, then the problem can still be solved somehow, but if it happens on the highway or during high-speed traffic in the city, it can result in serious trouble.
It follows from this that if you install track wideners on an SUV, then either those of your own making (when you are exactly sure of what exactly you are making and from what), or from trusted companies and brands that have proven themselves well in this matter (not one and not two years in the spacer manufacturing business, but at least 8-10 years with good reviews for 95%). Now there are a lot of offers for spacers - track wideners for UAZ or Niva are sold almost everywhere. There are also plenty of offers for other SUVs, but given the simplicity of the manufacturing technology of this unit, in most cases the quality of the spacers leaves much to be desired.
Track wideners - hub spacers
And one more important point - it is recommended to install track wideners of the same thickness both forward and backward. It will be easier for the rear wheels to follow the track from the front ones and the overall aesthetic appearance of the car will be much more attractive.
If finances allow, then instead of track wideners it would be much more reasonable to install wheels with a negative offset - at least the reliability of such a direct connection of the wheel to the hub will be much better than a sandwich of a hub, wheel, spacer and two pairs of studs. This will not reduce the load on the bearings, but at least driving safety will be at a higher level. Although, on the other hand, if the spacers are really good, then you can drive hundreds of thousands of kilometers with them without any problems.
Installation
Manufacturers manufacture wheel arch linings for the Niva 2121 with the expectation that the driver will carry out the installation himself. The kit includes:
Each arched overlay must have a drawing inside indicating where and on which wing the part is attached. The extender is selected for a specific year of manufacture and modification of the Niva, this allows you to avoid additional work during installation, you will not need to cut the trim or drill additional holes for self-tapping screws on the body.
If square trims are installed, mudguards must be added to the tuning.
If the kit does not include a rubber seal or cambric, the part must be purchased separately. The length of the seal is calculated from the size of the arch. Installing the arch trim step by step:
If the fender is made of plastic and completely follows the geometry of the body, the kit does not include fixing plates. The part has holes for self-tapping screws. Before installation, the edge of the arch is treated with an anti-corrosion compound, this will prevent the spread of rust at the joints of the screws and the metal of the wing.
Making wheel arch extensions with your own hands
How to independently tune the trunk of a Niva and strengthen the body
To make your own wheel arch extensions, you will need:
- Foam for installation;
- Plasticine;
- Styrofoam;
- Special tools for carrying out the work itself.
Let's look at step-by-step instructions on how to make wheel arch extensions with your own hands:
- We will use a large wheel profile. Drivers willingly use it, since it is the most accessible and simplified way to raise the car to a certain height. In this situation, the distance between the ground and the raised car will increase significantly. Here, wheel arch extensions are necessary to protect the car body from dirt and other debris. There is a dependence of the expander size on the profile size. In this case, you must contact qualified specialists, since manufacturers do not equip the machine with such parts.
- If you use the services of a specialist, you will need a lot of money for this, so it is better to carry out all the technical steps yourself. The material is inexpensive, and doing the work itself is not difficult. There are many ways to increase the size of wheel arches. You can use any option. The simplest method is called "fender". This method involves the use of polystyrene foam, which must be used to cover the upper part of the arch. Before this, you need to thoroughly clean the area, cover it with a small layer of degreasing agent using microflex for fixation. Then you need to glue the foam itself over the arch.
- The foam must be made as smooth as possible using an electric knife. Utility knives and other sharp objects will not ensure a smooth foam surface. To achieve a good surface quality, it is recommended to make smooth movements until the surface takes on the desired appearance. Before completing the preparatory work, it is necessary to use sanding material with which the foam will be sanded. After this, the surface must be covered with resin, and then with fiberglass, when laying which no bubbles should remain inside.
- After all layers have dried, you should start puttingty. It is necessary to putty twice: the first time - the intermediate layer, and the second - the finishing layer. After finishing the putty work, when all problem areas are completely removed, it is necessary to prime the outside of the wheel arch and paint it in the color of the body. Before applying the final primer coat, it is necessary to cover the surface with construction tape to ensure protection. Nowadays, the use of plasticine to increase the wheel arch has become very relevant. The plasticine needs to be laid out in the place where the fenders will later be, and it is applied evenly to the construction tape. Special sculptural plasticine is perfect for these purposes. Before application, such plasticine must be heated to improve its plasticity properties. After aligning all the wheel arches, apply epoxy resin to the same area three times.
- It is permissible to use one layer of resin and the other of fiberglass. Plasticine itself is not the main means for expanding the wheel arch. Everything that was done above was only to create a form for future drainage. After all layers have dried, the arch must be removed from the surface of the body and completely freed from plasticine. To do this, you need a regular hair dryer or a “white spirit” solvent. There are also those who fill these molds with a product that contains a paint and varnish material called “gelcoat.” In the second case, you first need to carry out fine-tuning and cleaning, installing the body, and then putty twice, sand, prime and paint.
There is another way to create wheel arches, in which you need to use polyurethane foam. It is recommended to apply it to the place where the fenders will be located in the future, and then sand with an electric knife. Polyurethane foam is used on top of the wheel arches. In this case, it is necessary to blow foam on both sides.
Construction foam increases in size over time, so it should only be used this way. After drying, the surface should be sanded and covered with resin and fiberglass.
After all layers have dried, it is necessary to apply two layers of putty, sand, prime and paint the surfaces that were made by Fenders. This method is rarely used, because it is very difficult to use polyurethane foam, unlike using sculptural plasticine or polystyrene foam.
Installation recommendations
The original Niva Urban arch covers have a mudguard up to 50 mm wide. Before installation, the edge must be cleaned and primed. When installing, it is recommended to take into account the following nuances:
Arch covers are always used as an additional means of protecting body metal from gravel impacts and premature corrosion. Whether or not to install additional extensions to protect the sidewall from dirt is up to each driver to decide for himself.
Lada 4×4 3D Spirit of adventurism › Logbook › Installation of Lapter wheel arch extensions
As I already wrote in the description, even before buying the car I had a plan to modernize it. One of the points in it is appearance. And one of the sub-items is wheel arch extensions. I immediately decided that the car would be wider. And that I will use exactly these extenders. But more on that later. This is how I bought the car
And the first purchase (in addition to standard consumables) was a radiator grille from Niva Urban. But I bought it by chance - I saw it in a local store. There, the grille was sold without brackets, only plastic with an emblem. Upon arrival home, I went to install it, removed the old grille, tried this one on and realized that 4 attachment points were enough for it - in the corners. I screwed in 4 self-tapping screws - two into the old holes and two drilled new ones. (yes, by the way, two of these four screws were later lost somewhere and the grille holds up perfectly even on two, so I don’t see the point in the original fastening from Uraban. Here is a photo, as they say, before and after.
Well, now let's get back to the laptops. I bought them from a guy on Avito in Moscow, since the price was factory price, but I didn’t want to wait for it from Togliatti!
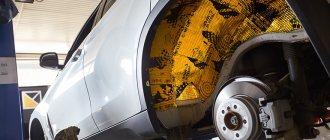
I bought it, tried it on and started installing it. Yes, by the way, I bought latpers for cut arches, since the plans included “bigger” wheels. There are no questions at all with the front ones - we remove the fender liner and cut the edge of the wing “in half”, then remove the paint from the edge (so that it doesn’t fly off when bent) and start knocking with a rubber hammer, gradually bending it inward and forming a new edge. Then we process everything, paint it, etc. Also, everything inside was sealed with seam sealant. And I started working on the rear arches - everything is more complicated here, since the arch is double. First we also cut half the edge. Just be careful, not deep, so as not to cut the inner wing. Then we bend the “excess” along the cutting line.
Next, cut off the inside of the arch.
And let's get to the hard part - you need to tap the inner wing to the outer one and weld them. I couldn’t bend a whole acre, so I made a lot of cuts in the inner arch to make it give in better. Then I welded the inner and outer arch, covered everything with seam sealant, painted it, etc... Naturally, during each stage I tried on the lapter so that it would fit tightly on all sides. When I finished working on the arches themselves, I started installing the plastic. I drilled pre-marked holes for screw rivets. I installed the rivets and screwed the lapter on, having previously installed a rubber seal on them. As a conclusion and a note to the manufacturer, the expanders still lack attachment points at the edges. There the lapter does not fit tightly. There are plans to eliminate this, but I have not yet decided how to fix it correctly. If someone encountered this problem and fixed it, please tell me how you did it?
The meaning of installing expanders
The Niva as an SUV is popular among hunters, fishermen, trialists and just travelers. For normal off-road driving, tires with a wide profile are almost always installed. Good cross-country ability has a significant disadvantage - dirt from under the wheels flies not into the arch and mudguards, but onto the body and windows. If the primer can be washed off, the paintwork will be mercilessly scratched by small stones. Reasons for installing arch extensions:
Some “kulibins” create expanders themselves from carbon fiber or special plasticine. If the owner of the Niva is not a jack of all trades, then it is better to buy factory parts. Moreover, there are many models and materials, and the price range is available for any budget. Types of arch extensions:
While rubber parts can be adjusted to fit any car, plastic and fiberglass are produced exclusively for a specific car model. These fenders come with fasteners that are designed for specific factory mounts. Therefore, installing an element from a Niva on a UAZ, for example, will not work normally.
The use of arch extensions on domestic cars
Most often, fenders are installed on SUVs, although sometimes you can find these elements on tuned passenger cars. Among the representatives of the Russian automobile industry, the most common car that is subjected to this type of modification is the VAZ-2121 Niva, as well as the VAZ-2123 Niva and Niva-Chevrolet. Having unique cross-country ability and reliability, these models have gained wide popularity among lovers of hunting, fishing and just travelers. In addition, these cars are easily amenable to any type of tuning. They are equipped with a variety of body kits, dog guards, winches, additional lights, etc.
Arch extensions were no exception. "Niva-Chevrolet", for example, looks much nicer with plastic fenders painted to match the body color. An aesthetic and non-aggressive appearance will not distinguish such a car from others in the city, and plastic protection will protect the arches from the harmful effects of road chemicals in winter. Large wheels with studded tires combined with rubber flares that contrast with the body color, on the contrary, will add aggression and brutality to the SUV.
Specifics of design and installation
Plastic and fiberglass models can be square or round with different stem widths. Square models require additional mudguards, but they have a more decorative effect. Round ones are more practical and perform maximum protective functions. Rigid fenders are secured with a threaded connection. In some cases, it will be necessary to trim the arch itself to install new wheels. Plastic extensions are easy to paint, allowing them to be given body color if desired.
Rubber fenders are easily adjusted to any car and have many options in width and shape. When purchased, the item looks like a solid tape made of frost-resistant rubber plus fasteners. Such expanders are significantly cheaper than plastic ones, and installation is simple. All you need to do is buy the required tape, cut it to the required length and secure it.
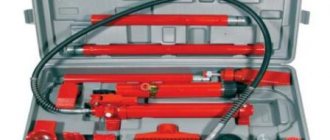
Rolling out arches in the field
We just found a topic based on your request: rolling out arches in the field - you are welcome. Let's look at ways to repair a car with your own hands, and also tell you about the causes of problems and fix them.
How to repair a car yourself at home. We will help you with repairs and repair the car yourself. We know how to restore a car with minimal investment. I have attached video instructions.
Views: 384039
Category: Car repair
Laughter in the topic: I was driving home from work, I see a car standing on the side of the road, next to it there is a girl whose tire has been punctured. I stop to help. I say: Me: Girl, let me help you. She: Are you married? Me: Yes She: No, I’ll go myself.
Published by Admin: at the request of Gianfrancoa
Car owner criticism: Reliability, efficiency, reasonable price.
Video: rolling out arches in the field
© Do-it-yourself car repair watch video The latest repair publications and instructions for repairing cars of different brands. Repairing a car with your own hands is becoming more interesting and easier. Our blog will show videos on car repair in an accessible way and tell you how to quickly repair a car. We wish you pleasant viewing!