How to turn on the fog lights
Thanks to design ingenuity, the fog lights in the Hyundai Solaris are turned on in a rather cunning way. So tricky that some owners of a newly purchased car don’t really know how to light them.
Not only is the light switch not so easy to find, but on some modifications of Solaris, reality does not coincide with theory. Moreover, on them even the fog light icon may be on another switch that does not turn on this light!
According to the instructions, the PTF can only be turned on when the side light is on. This is not difficult to do. Turn on the side lights, switch switch 1 (photo below) to the “fog lights” position.
Turning on the fog lights according to the instructions
But on some modifications this does not work! For example, in the video below, as we can see, the PTFs are turned on only after the head is turned on.
Option to enable PTF on some modifications of Hyundai Solaris
Important! In both options for turning on the fog lights, the ignition must be turned on.
Hyundai Solaris Hatchback › Logbook › High-quality LED lamps H27 in PTF Solaris dorestayl
Good day to all!
When buying a car from the previous owner, the PTF had factory lamps with a power of 27 W. There is not enough light and I decided to install 37.5 W lamps. But after a year of daily operation of these lamps (I drive with the lights and PTF on, so as not to burn out the lamps in the headlights), the PTF reflector began to burn out, i.e. became matte (lost the original specularity of the surface). To avoid completely burning the reflectors, I removed these lamps and replaced the factory 27 W lamps. I read a lot about LED lamps with H27 socket. I saw lamps like these from Luskel, how they shine and most importantly, they have GH. I ordered these LED lamps from Aliexpress. I ordered exactly this design, with this arrangement of chips, because... when installed, the light from them has a good effect and does not blind oncoming people:
How to replace a light bulb with your own hands
Now let's start replacing the light bulb in the Hyundai Solaris PTF. For this we need a Phillips screwdriver. We turn the steering wheel towards the headlight in which we are going to change the lamp until it stops. We unscrew the fixing screw of the piston securing the front part of the fender liner.
Removing the front fender liner mounting piston
In the same way, remove the piston securing the upper part of the fender liner.
Removing the middle piston
It remains to remove two more pistons: those that secure the fender liner to the bumper
Removing the fastenings of the fender liner to the bumper
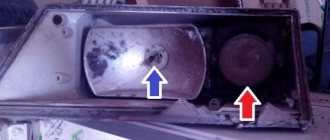
We will not completely remove the fender liner, but simply bend it back. In front of us is the rear part of the fog lamp with the lamp base sticking out of it.
Folding the fender liner allows access to the fog lamps
Turn the lamp counterclockwise and remove it from the headlight.
Removing the fog light bulb
Squeeze the two latches on the power supply and remove it from the lamp.
Removing the power supply from the fog light bulb
We take a new light bulb, put the socket on it, making sure that both latches work. We insert the light bulb into the headlight and fix it by turning it clockwise. We install the fender liner in place and secure it with pistons.
Expert opinionAlexey BartoshSpecialist in repair and maintenance of electrical equipment and industrial electronics.Ask an expert a questionImportant! During installation, do not touch the bulb cylinder. Otherwise, the device will burn out after an hour of operation. If we do touch the glass, we wipe it with a cloth soaked in alcohol.
How to change the low beam bulb on a Hyundai Solaris
When buying a fairly budget car, we by default agree that it needs to be modified and equipped. The rather good optics of the Hyundai Solaris were not matched by the best standard low/high beam lamps. The halogen lamp itself, in principle, shines quite well, but stock factory lamps often frustrate Solaris owners, especially during long night trips out of town.
How to change the low/high beam bulb on a Solaris
Practice shows that the low beam filament burns out more often than the high beam.
This is due to the fact that the low beam is used much more intensely. To save on lamps, you can install a set of LED daytime running lights. This is by the way, but changing a lamp on a Solaris is extremely easy, especially the right one.
This is done like this:
- Open the hood and remove the protective cover on the headlight unit. It turns counterclockwise and provides access to the H4 headlight lamp and the side light lamp. Remove the cover from the headlight unit.
- We find the terminal block and disconnect it from the lamp. Removing the power terminal from the low beam lamp.
- Now we find the spring retainer. It is movably fixed in the upper part of the cartridge, and its lower part must be disengaged from the reflector body. The spring is out of the way, the lamp is removed.
- We remove the old lamp from the socket and insert a new one. Under no circumstances should you touch the bulb of a new lamp with your hands. If we touched it with our fingers, we need to wipe the flask with alcohol. It is better to carry out the entire operation of installing the lamp while wearing fabric gloves.
- The headlight assembly is assembled in reverse order.
Removing the bulb from the left headlight is more difficult.
There may be difficulties with the left headlight. The fact is that immediately behind the headlight housing there is a fuse box, and behind it is a battery. Therefore, space is very limited.
Fuse block mounting bolt.
To avoid removing the fuses, you can use a surgical clamp as a manipulator, but in any case, the cover of the fuse box will have to be removed. Good luck to everyone and keep your headlights shining!
What kind of low beam lamps will we install?
The service life of the factory lamps on the Hyundai Solaris is also not outstanding, so after 20–30 thousand kilometers many people have to think about how to change the low and high beam bulbs.
Not so much “how”, but “what”, because the prices for H4 lamps are very different. First, let’s dot the i’s and figure out which lamps can be installed in the Hyundai Solaris optics in principle.
Types of lamps
Lamp H4 low and high beam.
By default, our car is equipped with a two-filament halogen lamp with an H4 standard base of 12 V and a power of 60W for high beam and 55W for low beam.
24-volt lamps with the same base can be more powerful - 75/70 W. The socket for this lamp is designated P43t. The complexity of the base and socket is due to the fact that each of the threads must be at a certain angle in relation to the diffuser and reflector. Only then will the light flux be directed and effective. In order not to confuse the position of the lamp during installation, there are tongues on the lamp base, and on the body of the headlamp there are recesses that need to be aligned and snapped into place.
LED lamps
Light from diode and regular halogen low beam lamps. Halogen on the left, diode on the right.
In general, diode lamps shine better. But they cost more.
Leaders of sells
For some of the popular lamps suitable for Hyundai Solaris, we have found current prices and brief descriptions for 2021:
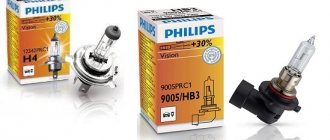
- The Osram H4 Night Breaker Unlimited lamp remains the best seller. Shines brightly and for a long time. Standard power, 60/55W, price around 1100 rubles per pair.
- Philips “Vision”, catalog number 12342PRC1, standard power, price about 600 rubles per pair. The flask is made using Philips Quartz Glass technology, which in theory should minimize the evaporation of tungsten from the filament in an environment of halogen gases.
- Philips "LongLife EcoVision", catalog number 12342LLECOC1. Inexpensive, average quality German lamp. The company guarantees operation for 100 thousand mileage. The price is about 500 rubles per pair.
- Koito H4 12V Whitebeam. Japanese expensive lamp. The reviews are very positive, but the price is quite high. For a pair they ask from 2100 to 2500 rubles, depending on the series.
User survey
There are more than five hundred models and series of lamps for our H4 base. Therefore, everyone can choose a pair according to their budget and personal preferences. All that remains is to change the bulbs in the headlights.
Possible faults - relays and fuses
Now let’s look at the two main faults that occur most often: relay failure and fuse blown. The second happens quite often, since when a halogen lamp burns out, there is usually an inrush of current, which blows the fuse.
If after replacing the light bulb the fog light does not work, first check the fuse. It is installed in the interior mounting block (there are two in total, the second under the hood), which is located on the left in the instrument panel and is closed with a decorative cover. The lid has a handle. We grab the handle and remove the lid.
Location of the interior mounting block
Here we are interested in fuse MF13 with a rating of 10 A. It is responsible for powering both fog lights.
Numbering and location of fuses in the mounting block
As for the relay that turns on the fog lights, it is located in the same mounting block, but on its other side. Its numbering according to the photo below is MK2.
Numbering and location of the relay in the mounting block
So we learned how to independently change the lamps in the fog lights of the Hyundai Solaris, and if necessary, we can replace the fuse responsible for the fog lights without outside help.
Features of installing PTF, front and rear lights on Hyundai Solaris
14.08.2019
Hyundai Solaris is a popular subcompact car produced by Hyundai Motors in the Russian Federation. The package was developed as an adaptive version of the Hyundai Accent for the Russian climate. Production was launched in 2010, and two generations of cars have been built in sedan and hatchback bodies.
The four-door sedan and five-door hatchback were produced in the Russian Federation until 2017 and each received two updates to the interior, power unit and body. For all assembly options, only one block headlights with halogen standard lamps were installed.
Dismantling and installation of headlights
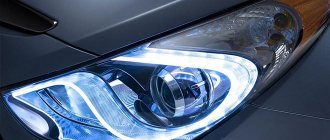
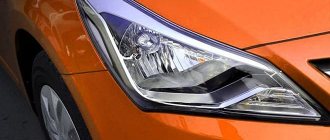
Reinstallation of the optics unit is associated with tuning options, replacement of the ceiling or lamp. The headlight of the Hyundai Solaris is located at the corners of the car and is made in an elegant drop shape. The quality of standard lights meets the driver’s needs 100%; thanks to their favorable location, it is possible to effectively adjust the geometry of the light beam. The light is controlled by switching sensors on the dashboard.
Manual configuration remains an important advantage. The headlight can be adjusted to specific operating conditions depending on the changed ground clearance. As the ground clearance decreases, the angle of illumination of the road changes. Manual adjustment allows you to obtain optimal illumination of the road and roadside in any conditions. Removal and installation of the front headlight in the sedan configuration is carried out in stages:
- Disconnect the negative terminal from the battery.
- Remove the front bumper.
- Rotate the turn signal socket and remove it from the housing.
- Release the latch and disconnect the connector.
- The headlight mounting location will open - unscrew the four bolts with a 10mm wrench.
- Release the latch.
- Remove the headlight unit.
- Rotate the dirt boot.
- Disconnect the wire block, press the lock and remove the lamp.
After the work has been completed - tuning, replacing a burnt-out lamp, installing optics are carried out in the reverse order.
The shape of the headlight unit in the restyled version of the Hyundai sedan and in the hatchback configuration differs from the first generation, the principle of dismantling remains the same.
There are two ways to remove the rear light on a Solaris:
- Remove the trim if large-scale repairs are being made to the adjacent part of the body.
- Open the pocket in the casing, through which access to the optics is provided.
To remove the taillight you will need a 10mm wrench and good eyesight. Dismantling is carried out step by step.
- Disconnect power from the battery.
- Remove the power plug from the headlight unit.
- Use a wrench to unscrew the nuts.
- Slowly pull the headlight towards you against the installed studs.
- Remove the seat from the piston that presses the block to the wing.
What lamps are installed in the PTF
The manufacturer equips the car with H27/2 . 27W lamp with a curved base. Only this lamp can be installed in the PTF on a Hyundai Solaris; lamps with a different or similar base will not fit. We also note that there are no more powerful H27 lamps.
Instead of conventional halogen ones, you can install LED lamps and use fog lights as daytime running lights. They will shine a bright white light, but will not illuminate the road.
You can also install xenon lamps , white. Such lamps will illuminate the road, but only in dry weather. For example, white xenon lamps:
- H27 Lighthouse Super White
- H27 MTF Palladium
- H27 EVO
How to choose quality lamps
The choice of low beam lamps for Hyundai Solaris is made according to the following criteria:
- Construction type. The best option is approved halogen lamps with an h4 base.
- Colorful temperature. It is recommended to use a sample with indicators of about 3500-4500 K. The harder the white light, the brighter it is, but in bad weather conditions this brightness will have the opposite effect and will form a bright spot around the car, impairing visibility.
- Price. In this matter, everyone is guided by their own capabilities. However, you should not chase low prices, since good products are never cheap.
How to replace PTF lamps yourself
So, remove or turn out the wheel and use a screwdriver to unscrew the clips securing the fender liner.
We also remove the clips securing the lower front fender liner to the front bumper and bend the fender liner back.
Now carefully turn the lamp counterclockwise and pull it out of the fog lamp.
We disconnect the power plug, take a new lamp, connect the plug to it and install it in the PTF. Turn it clockwise, check its functionality and screw the fender liner back on.
This completes the process of replacing the lamp in the PTF. If you have any questions, you can ask them in the comments.
Installation of PTF in classic/basic configuration
The connection of Hyundai Solaris fog lights in the classic or basic configuration is carried out a little differently. In this case, the “positive” wire must be left under the hood, and the wiring must be routed according to the instructions included with the headlight kit. The left switch on the panel in the cabin is also replaced with a new one so that it is possible to connect the PTF. After all the manipulations, 2 more cables will be added, responsible for the indication on the dashboard and the switch.
This is interesting: How to reset the service interval of a Renault Megane 2 car yourself
When connecting headlights, do not solder the contacts. If you use this method, the relay may fail on Solaris.
Purchase a fuse box in advance. It is worth adding a relay for smooth switching on of halogen headlights to the circuit; it will allow you to turn on the low beam with the fog lights. It will also make it possible to use running lights along with side lights.
Lamp replacement instructions
An operation such as replacing a fog lamp should be carried out in an inspection pit or rack. Replacing the lamp in the left and right PTF is carried out identically:
- The first step is to remove the front wheel.
- After this, remove the front fender liner element by removing the plastic latch.
- After this, you need to unscrew the front mounting piston holder using a Phillips screwdriver and remove the piston.
- The same manipulations must be carried out with all the fender liner pistons holders.
- After this, you need to bend the fender liner towards you to get to the lamp.
- The lamp must be turned counterclockwise 180 degrees and removed from the headlight itself.
- Now you need to firmly squeeze the block latches and disconnect the lighting element from the block.
- This is followed by replacing the lamp and reassembling all the elements in the reverse order.
Replacing the lamp in the PTF ends with checking the functionality of the installed device. The service life of a high-quality lamp is limited to one year, which means that you will need to replace it periodically.
Replacing DRL lamps in Hyundai Solaris 2021
In the 2021 model, instead of H27 lamps, conventional 1-pin P21W 12v lamps are installed in the fog lights and serve as daytime running lights. Replacement is done in exactly the same way, only the socket with the lamp is removed from the PTF.
Which lamps to choose for DRLs
- PHILIPS 12V P21 W P-12498 price from 40 RUR
- PHILIPS 12V P21 W LONGLIFE ECO VISION with extended service life P-12498LLECOCP price from 60 RUR
- BOSCH 12V P21 W Pure Light 1987302201 price from 40 rub.
- KOITO 12V P21 W 4514 price from 60 rub.
- OSRAM 12V P21 W 7506 from 45 RUR
Instead of conventional lamps, you can install brighter LED analogues
- MTF 12V P21 W lens 360 P21W360W from 800 RUR piece
- Beacon 12V/24V 12-30T15/B-31 360* white 6000K price from 400 RUR bright
- Beacon 12V/24V 12-30T25/5/B-44 360* white 6000K price from 450 RUR very bright
There are many other analogues, philips or made in China.
What kind of low beam lamps will we install?
The service life of the factory lamps on the Hyundai Solaris is also not outstanding, so after 20–30 thousand kilometers many people have to think about how to change the low and high beam bulbs.
Not so much “how”, but “what”, because the prices for H4 lamps are very different. First, let’s dot the i’s and figure out which lamps can be installed in the Hyundai Solaris optics in principle.
Types of lamps
Lamp H4 low and high beam.
24-volt lamps with the same base can be more powerful - 75/70 W. The socket for this lamp is designated P43t. The complexity of the base and socket is due to the fact that each of the threads must be at a certain angle in relation to the diffuser and reflector. Only then will the light flux be directed and effective. In order not to confuse the position of the lamp during installation, there are tongues on the lamp base, and on the body of the headlamp there are recesses that need to be aligned and snapped into place.
Light from diode and regular halogen low beam lamps. Halogen on the left, diode on the right.
Leaders of sells
For some of the popular lamps suitable for Hyundai Solaris, we have found current prices and brief descriptions for 2021:
- The Osram H4 Night Breaker Unlimited lamp remains the best seller. Shines brightly and for a long time. Standard power, 60/55W, price around 1100 rubles per pair.
- Philips “Vision”, catalog number 12342PRC1, standard power, price about 600 rubles per pair. The flask is made using Philips Quartz Glass technology, which in theory should minimize the evaporation of tungsten from the filament in an environment of halogen gases.
- Philips "LongLife EcoVision", catalog number 12342LLECOC1. Inexpensive, average quality German lamp. The company guarantees operation for 100 thousand mileage. The price is about 500 rubles per pair.
- Koito H4 12V Whitebeam. Japanese expensive lamp. The reviews are very positive, but the price is quite high. For a pair they ask from 2100 to 2500 rubles, depending on the series.
Video instructions for replacing DRL lamps
Fog lights, otherwise called fog lights or simply PTF, are found in every Hyundai car. The main element in them is light bulbs. It is the lamp that can burn out and leave the driver without this function, which is indispensable during fog. Sometimes it is used instead of front running lights or low beam lights.
The PTF in such a car, the Hyundai Solaris, is not complicated; even a beginner can cope with replacing the fog light. A similar replacement at a car service can exceed three times the cost of the light bulb alone. Moreover, the headlights are not so complicated.
Every car enthusiast should understand his car and understand it, at least in its simplest details, which include PTFs. Replacing a lamp takes 5 minutes and does not require special skills, but you need to know how to do it correctly. It is also best to find a hole in the garage, as it is almost impossible to reach these bulbs from above. But it is worth noting that some people cope with this task simply by lifting the car on a jack.
LED lamps for Hyundai Solaris (10-14) sedan
- Luminous flux: 4000 lm
- Power: 50W
- Warranty period: 1 year
- Luminous flux: 1000 lm
- Power: 10W
- Warranty period: 2 years
- Luminous flux: 2200 lm
- Power: 22 W
- Warranty period: 1 year
- Luminous flux: 200 lm
- Power: 1.5W
- Warranty period: 3 years
- Luminous flux: 800 lm
- Power: 21 W
- Warranty period: 1 year
- Luminous flux: 800 lm
- Power: 5W
- Warranty period: 2 years
- Luminous flux: 330-990 lm
- Power: 2.5-11.8W
- Warranty period: Lifetime
- Luminous flux: 400 lm
- Power: 3.2W
- Warranty period: 3 years
- Luminous flux: 160 lm
- Power: 2W
- Warranty period: Lifetime
- Luminous flux: 200 lm
- Power: 1.5W
- Warranty period: 3 years
- Luminous flux: 120 lm
- Power: 0.85W
- Warranty period: 1 year
- Luminous flux: 500 lm
- Power: 5W
- Warranty period: 1 year
- Luminous flux: 800 lm
- Power: 21 W
- Warranty period: 1 year
- Luminous flux: 800 lm
- Power: 5W
- Warranty period: 2 years
- Luminous flux: 400 lm
- Power: 3.3W
- Warranty period: 1 year
- Luminous flux: 80 / 460 lm
- Power: 0.8 / 3.6 W
- Warranty period: 2 years
- Luminous flux: 80 / 260 lm
- Power: 1.5 / 4.3 W
- Warranty period: 1 year
- Luminous flux: 1000 lm
- Power: 7 W
- Warranty period: 2 years
- Luminous flux: 200 lm
- Power: 1.5W
- Warranty period: 3 years
Correctly selected lighting devices for a car are the key to comfort and safe driving in any weather. Relatively recently, energy-efficient LED lamps have appeared on the markets, successfully replacing xenon or halogen devices. If you are thinking about purchasing them, we recommend choosing high-quality products from a trusted manufacturer. It is precisely these lamps - high-quality, branded and with a guarantee - that are presented in the catalog of the Netuning website.
Replacement instructions
Replacement of fog lamp lamps is carried out in the inspection pit.
We unscrew the lower part of the front wheel arch liner, bend it back and see the lamp. Turn it counterclockwise and remove the fog lamp. Press the latches on the sides and remove the connector.
We take a new lamp, without touching the glass bulb, connect the plug.
It is advisable to check the serviceability of the lamp before installing it in the fog lamp, as there are cases of defects.
We insert it into place and turn it clockwise. Screw the fender liner into place.
We make identical replacements on the opposite side.
As you can see from the instructions, replacing the light bulb in the PTF is quite simple and the most important thing is that it doesn’t matter whether the headlight is right or left, the whole algorithm is absolutely the same. With the help of these instructions, you can easily overcome possible troubles associated with fog lights or help a friend with this in a Hyundai Solaris. It is worth noting that once you try to make a replacement yourself, no one will want to do it in a salon.
PTFs on the Hyundai Solaris are located in a rather inconvenient place, but this can probably be said about every car that has fog lights. However, not everywhere you can simply change them for new ones. Some owners even engage in tuning of such elements. Light bulbs can shine in a variety of colors, but not everything is permitted by the legislation of the Russian Federation. But for the sake of beauty, the owners of Hyundai Solaris also go to break the law.
Connection of PTF in the "Active"/"Optima" configuration
If you have the Hyundai Solaris “Active” or “Optima” equipment, then you need to do the following:
- Remove the bumper, plastic elements near the steering wheel, the control itself and the upper part of the dashboard.
- Installing PTF begins with removing the plastic plugs on the bumper. Be careful, they are very fragile. Then all you have to do is install the headlight in place and stretch the wires - one to ground, and the second to the interior. Pull the wires in a braid, securely fixing them with plastic ties to avoid rubbing them against the elements of the body parts. We do not recommend drilling the ground point into the body with a self-tapping screw, since after a while a corrosion center will form there and the contact will be lost.
- Put the bumper in place, remove only the minus (-) terminal from the battery.
- Inside, disconnect the steering column switch connectors. Remove the right and left switches one by one. Instead of the last one, install a new one with PTF support.
- Find the relay in the lower part of the cabin and perform the manipulations with it that are indicated in the instructions attached to each PTF.
- Check the optics and return parts of the interior decor to their place.
There is nothing difficult in installing fog lights on Solaris in these trim levels, since the ability to supplement the optical part of the car with them is provided in advance by the manufacturer.
LED low beam lamps Solaris 2nd generation
Inexpensive Chinese LED lamps with an HB3 base with a power of 25W and a declared luminous flux of 3800 lumens were installed.
The photo shows that the LED lamp in the lens produces a clear light boundary
And this is how the lamps shine in the evening on dry asphalt
It is worth noting that these are far from the highest quality and brightest LED lamps for low beam on Solaris 2. For example, you can install brighter and higher quality lamps that will give a completely different light.
What lamps and light bulbs need to be purchased?
Any repair work must begin with the preparation of equipment and parts. Optics and lighting must be purchased only in the original, since any problem with the lighting devices increases the risk of danger for the driver and passengers.
The Korean manufacturer installs the following lighting fixtures in its cars:
- in block headlights only halogen lamps for high and low beam, article number H4, with a power of 60/55 W are used;
- for turn signals you will have to purchase lighting fixtures with article number PY21W and a power of 21 W;
- The side lights are equipped with bulbs with article number W5W and a power of 5 W.
Who the manufacturer of the lamp is in this case is not important, the main thing is the coincidence of powers and names. The headlight bulbs are halogen, so work on replacing light fixtures should only be done with clean gloves.
If you touch the glass with your fingers, traces of sebum will remain on it, which will subsequently cause darkening. The lamps quickly become cloudy, regardless of the care taken when installing them, and the luminous flux power decreases sharply. This needs to be monitored and troubleshooted in a timely manner.
Bright lamps for Solaris with lensed optics
If your car has lensed optics, the lamps listed above will not suit you. The lens contains HB3 lamps, which simultaneously perform the function of low and high beam due to the curtain inside the lens.
Therefore, you should select xenon, LEDs or bright halogen lamps with an HB3 base.
- HB3 Osram Nightbreaker Unlimited 110% 12V 60W from 1750 RUR
- HB3 Koito Whitebeam 12V 65W from 1400 RUR
- General Electric HB3 Megalight Ultra 120% from 1300 RUR
The above lamps differ from conventional ones in brightness, while the power of the lamps remains the same.
It's up to you to decide what exactly to choose to make your car's light brighter - xenon, LEDs or halogen.
Daytime running lights in Hyundai Solaris
Hyundai Solaris usually uses daytime running lights using LED bulbs. The beam of light in them is directed directly onto the road in front of the vehicle. Therefore, they are even more convenient and efficient than conventional headlights. A car with such lights is more visible on the road, which significantly reduces the risk of a collision.
LED elements are more economical compared to halogen ones - less fuel is required to create energy for their operation. This is a very fundamental advantage in modern economic conditions.
Application of LED lamps
Replacing PTF lamps Solaris
Replacing PTF Solaris
.
Replacing the running lights bulb Hyundai Salaris updated
replacing a fog lamp on a Hyundai Solaris
xenon lamps - cheap, free delivery.
Someone previously wrote about MTF. Lamps, complete G... I installed them twice already, no light, every month they burned out.
Narva article 48054. Yellow, really high power 37W. You don’t have to worry about the reflector; the temperature is no different from 27W. Price
250 rubles per item.
Let's take a look at them...) thank you!
Solaris has PTF only for beauty, I recommend doing it like I did, putting diodes there, they will be like DRL, and there will be no load on the battery
Fascinating thought...) thank you!
Solaris has PTF only for beauty, I recommend doing it like I did, putting diodes there, they will be like DRL, and there will be no load on the battery
What to choose
When replacing optics on Solaris, you cannot use kits with higher power ratings than recommended by the manufacturer. The brightness of the road lighting will not increase, but the car's electrical wiring will be constantly under overload. It is recommended to purchase lamps of the established parameter, which are on the list of recommended ones for a particular car.
Factory analogues used for Hyundai Solaris have the following characteristics:
- 55/60 – power indicator for high and low beam;
- H4 class (type) of the base;
- L/L (long-life) resource.
It is possible to install LED elements that can replace standard halogen optics.
If the choice remains with halogen lamps for near and far optics, the following models can be installed in conventional headlights:
- Bosch Plus 90. Features an increased resource with standard performance.
- Philips Long Life EcoVision. Has a low cost.
- Narva RangePower +110. Brightness increased by 10%.
- Philips VisionPlus, X-treme Vision. Maximum illumination area, provide white light.
Philips Longlife EcoVision
Low beam bulbs for Hyundai Solaris manufactured by Philips, especially the Longlife EcoVision variety, are in great demand when replacing standard lights. The halogen flask is made of quartz glass, resistant to ultraviolet radiation. Standard parameters of the EcoVision line:
- minimum service life – 100 thousand km;
- heat resistance (for filament 2650 ºC, glass 800 ºC);
- vibration resistance;
- waterproof 100%.