Welcome to the website kuzov.info!
In this article we will look at how automotive plastic repairs are carried out. Let's figure out what types of plastics are used in the manufacture of a car and what repair methods can be used to restore them.
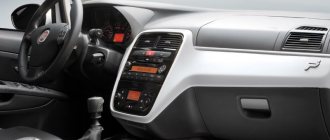
In modern cars, plastic is used quite widely. Most often these are bumpers, tuning body kits, false radiator grilles. Also, plastic on some cars is used in the manufacture of some body panels, and sometimes the entire outer part of the body. And, of course, plastic is used in the manufacture of vehicle interior elements.
There are more than 50 types of plastic that are used in the automotive industry. Each type has its own characteristics and features in repair. You can read more about the types of automotive plastics in the article “Types of automotive plastics.”
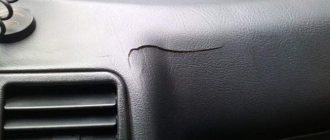
Bumpers are more likely to be damaged than other body panels. Initially, their function is reduced to the perception and damping of shock. Now the plastic bumper itself plays more of a decorative role.
Plastic parts, in particular bumpers, can be restored from almost any damaged condition. You just have to consider the cost-effectiveness of the repair. Bumpers receive damage such as deformation, cracks, tears, or complete separation of a segment. Let's look at the methods that are used for recovery.
Heating, welding, gluing, mesh reinforcement, and the use of special staples are used to ensure joint strength.
Heating is used to restore the shape of the deformed part of the bumper and straighten dents. When heated, the plastic becomes more pliable and, with light pressure, returns to its original shape.
Pasting with vinyl film
Pasting plastic parts with film is a labor-intensive task that requires a certain skill. A wide variety of colors of vinyl films makes it possible to create a unique interior in the salon.
To paste, you will need to disassemble the interior, thoroughly wash each part to remove stubborn dirt, degrease and dry.
Next, the film is cut using a sharp knife. For each part, be sure to leave a couple of centimeters of margin around the edges. The backing is removed from the film, the material is applied to the plastic element, carefully heated with a hair dryer and smoothed with a rubber roller or special spatulas. In order for the film to adhere perfectly to the plastic, you need to remove all air bubbles using constant smoothing. You should wait a certain period of time specified in the instructions on the sticker, and only then install the plastic parts back into the interior.
Incorrectly applied vinyl film may swell when exposed to sunlight, and in winter, due to low temperatures, it may lag behind the plastic. It is better to entrust the choice of film and work with it to professionals.
Plastic restoration methods
There are several methods for restoring plastic car parts. One of the simplest methods of restoration is gluing. Repairing plastic parts of a car with your own hands in this way will require a minimum amount of material and a little free time from the master. Also, many car enthusiasts resort to soldering plastic to the affected area. However, this method is much more complicated and requires special equipment (a soldering iron for melting plastic). A beginner will hardly be able to carefully solder the damaged area together.
There are also other quite popular methods for repairing plastic car parts (door handles, bumpers, parts in the vehicle interior):
- Covering the damaged area of plastic with leather (natural or artificial).
- Primer and subsequent painting.
- Grinding with a special tool after heating the plastic part.
- Covering the defect with masking film. It is important to choose the appropriate color of the repair material.
2. Padding
Reupholstering plastic elements with leather or its substitute is the most expensive method. The interior is prepared in the same way as when working with film: the parts are dismantled and cleaned of contaminants. A cut is made along their contour with an allowance of a couple of centimeters.
To glue the skin you will need special glue. Using a rubber roller, the material is carefully smoothed, its edges are wrapped and glued to the back of the part. After complete drying, the pasted elements are mounted in the interior.
Repair of plastic car parts using gluing method
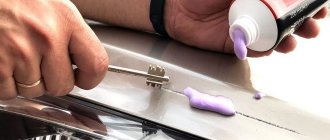
1. In order to seal a crack, for example on a bumper or spoiler, we need fiberglass, plastic putty, sandpaper and epoxy glue with a hardener. You can purchase fiberglass with epoxy in one set at any auto market where special sets are sold for these purposes.
When everything you need to carry out the repair is at hand, you can begin removing the damaged part from the car.
2. After dismantling work, cut a piece of fiberglass fabric of the required size and impregnate it with epoxy resin, which must first be mixed with a hardener. Then stick the fabric onto the surface of the part to be repaired - it is advisable to do this from the inside out, which must first be cleaned with fine sandpaper.
There is a small peculiarity here. Do not try to cover the entire area with fiberglass at once; this will not give you the required strength of the part. It is necessary to glue several pieces of fiberglass so that the edges of the fiberglass overlap each other by a couple of centimeters.
3. Painting
Painting plastic, unlike the two previous options, is much more economical and easier to do. The parts are removed, washed and dried. Using fine-grained sandpaper, sanding is performed, which effectively removes scratches and other damage. If there are very deep cracks in the plastic, then they need to be puttied and also sanded. It happens that the plastic has a complex and deep pattern, then grinding is not used.
The prepared parts are coated in two layers with a special primer, matted again with sandpaper, then painted, and in some cases varnished. After complete drying, the parts are installed in the interior and polished.
Restoration of car interior plastic. DIY + video
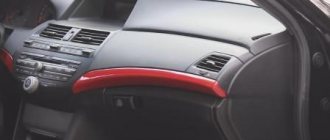
It's no secret that after a certain mileage, the plastic of the car interior (and the engine compartment) fades, becomes dull, faded, and in general, loses its original charm. Is it possible to somehow restore it, and do it all with your own hands? Or is this not real at all? It turns out you can do it in budget ways, which I’ll tell you about today. As usual there will be a text version + video at the end...
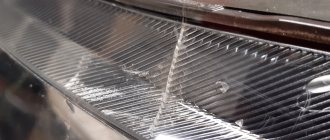
To be honest, modern plastic does not fade so quickly (the chemical industry works well). It simply gets clogged with dirt and loses its original blackness.
If the interior of your car is light or gray, then you notice black stains (or stains) that just... don’t want to go away! What to do? Clean, and on a budget. I have only three points that really work and have helped me more than once.
Heated grinding
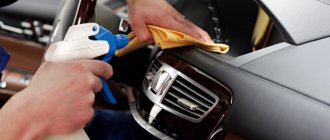
Heated grinding is one of the most commonly used methods, as it requires minimal material, time and physical costs. For restoration work, you will need products for cleaning and degreasing plastic, a terry towel, fine-grain sandpaper and a hair dryer. All the work can be done with your own hands.
Plastic parts cannot be disassembled; all work can be carried out in the salon. First of all, surfaces to be restored are treated with special compounds that remove all kinds of contaminants. After drying, the plastic is sanded with sandpaper.
MORE Auto articles,
Maintenance and repair
How to choose a battery for a car
For deep scratches, use coarse abrasive paper. After all damage has disappeared from the plastic surface, a hair dryer comes into play to heat the treated surfaces. It must be used with extreme caution, since even slight overheating can melt the plastic and generally ruin the part.
Beginners are recommended to work with a household hair dryer, which produces significantly less heat, but is quite enough to carry out all the necessary manipulations.
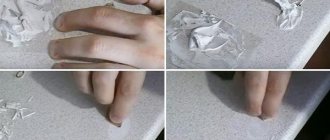
So, we heat the plastic surface and at the same time begin to polish it with a terry towel. We make circular movements. Rubbing with a towel is done until the surface takes on a renewed look.
This method of plastic recovery is very effective and accessible to everyone. It literally makes plastic parts look new.
Step-by-step instructions for repairing plastic
Let's look at plastic repair step by step so that even an inexperienced repairman can understand it:
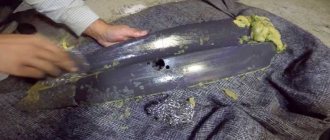
- Initially, you should find out the composition of the material from which the damaged part is made. Pay special attention to the fact that the plastic of the solder must be identical to the plastic of the part being repaired. Taking this factor into account, the craftsmen set the required temperature for heating the air - if the solder does not match the part itself, one of the materials will not warm up well and will simply fall off. Or the part will overheat and the solder will “float”, which will lead to a disastrous result. The material index (marking of the plastic part) can be found by looking behind the back of the component being repaired. In most cases, there are three main types of plastic: PP (polypropylene parts), ABS (products made of acrylonitrile, butadiene and styrene), and finally, PA (polyamide parts);
- Cleaning the part before repair work. Before starting restoration work, the crack edges of the damaged part must be carefully cleaned to get rid of protruding plastic teeth and chips. These manipulations can be easily carried out using a file or sandpaper - experts recommend cleaning 5-10 mm from the edge of the fracture on each side;
- Assembly of the part. If the part crumbles into several separate pieces, the craftsman will have to work hard and assemble the part like a puzzle. Each individual element will have to be cleaned around the edges and installed in its rightful place. To prevent the “assembly” from falling apart, we secure the entire mosaic with clamps (similar to small clothespins). Their cost is low and they can be easily obtained at any hardware store (the price does not exceed 70 rubles per 1 piece);
- Welding work. We take one rod (solder), sharpen its tip and gently press it to the edge of the cleaned fracture. As it heats up, we begin to heat the solder and plastic. With the temperature and air supply level correctly set, we begin welding work by heating the rod and placing it against the heated part. The stream of air will itself press the heated plastic, so you don’t need to do anything with your hands.
That's it, we have completed the repair work.
Brief summary
Now you know how to restore a plastic part yourself, without turning to specialists. After welding, all that remains is to align the protruding weld to the level of the part and that’s it. All that remains is to paint the part and install it on a motorcycle or car.
Silicone
To restore the plastic of the car interior from scratches, we will use a special product from the store. Let's read its composition. It turns out that it uses regular silicone. So why overpay?
We take regular silicone grease for car door seals and apply it to the scratch. We fill it with silicone, partially masking it. Its cost is lower than purchased car interior plastic polishes - around 35 rubles. In this way, you can “disguise” small scuffs from shoes on door panels or thresholds.
Important! It is worth understanding that silicone grease will not completely remove deep scratches, but it will partially eliminate them.
Then we apply tire ink and give the parts a radical black color - cheap and looks cool.
Tire ink
Sometimes, summer or winter, I blacken the tires of my car, they look better this way (personally, I like the option with glitter). Moreover, the composition often does not contain any ingredients that could somehow negatively affect the rubber.
Often the “ink” consists of: Glycerin, alcohols, distilled water, liquefied gas and various surfactants
BUT wait! Can it be used on plastic? YES OF COURSE YOU CAN! After all, car plastic polish (both with and without a restoration effect) often contains almost identical components.
So you can safely process it. The black velvet color is restored - “WELL”! Moreover, there are inks that have an antistatic effect (it will be written so on the bottle), which means that dust will not settle much.
After processing, the engine compartment simply sparkled black, just like on a new car. YES, the plastic door trim has also been noticeably updated.
This way you can process everything in the car, both the front panel and the central one. First we clean and wash, then silicone, then black.
Now we are watching the video version of the article.
As you can see, very useful tips, especially now in the spring, when many people are selling cars and want them to look 100%.
Moreover, the price if you break down the costs: 2 rubles foam (taking into account that you pour it yourself at a self-service car wash) + silicone 35 rubles + ink (the cheapest can be found for 60 rubles) = 97 rubles. As you can see, it's very affordable.
I’ll end here, there will be a lot more useful materials. Sincerely yours, AUTOBLOGGER
(
3 votes, average: 5.00 out of 5)