Ceiling lamp
All illumination of the room is carried out by the lampshade into which the lamp is directly installed. It is the lampshade that scatters the light and fully illuminates the license plate of the car. It happens that when dismantling or in the process of replacing lamps, the lampshade may break. If this happens to you, then do not panic, lampshades are sold at any auto parts store.
Catalog number of the Priora lamp: 2170-03717010-00;
Its price is: from 100 to 200 rubles;
You should also not forget about the lampshade gasket; it is necessary to protect against moisture getting into the interior.
Gasket catalog number: 2170-03717012-00;
Cost of laying: from 20 rubles;
The lampshade is the same for all Lada Priora models.
As easy as pie
The traffic police may have questions if the license plate illumination does not work. A fine may not be issued for this, but an unpleasant aftertaste will remain, and time will be wasted. And since replacing the license plate lamp is as easy as shelling pears, it’s worth doing it yourself.
It will be faster and more reliable, and, of course, cheaper than carrying out such work in a car service center. Here you can slowly do everything right, and not somehow. Unfortunately, many service stations treat cars and minor repairs this way. Since anyone can change a license plate light bulb, this does not require special skills or knowledge. A minimal set of tools and a little free time are enough, and then you can safely start doing the work.
Lamps
Lamps installed from the manufacturer's factory have a filament. After the first replacement, many install brighter LED lamps in place of the standard ones, which can illuminate the number much more efficiently and prettierly, giving the car a more beautiful look.
Standard lamps have the number W5W. The incandescent lamp has a power of 5W, which is quite enough to illuminate the room.
Cost of W5W lamp: from 20 rubles;
You can also install LED analogues instead of the standard lamp. LEDs consume less electricity and have a higher luminous flux.
It should be noted that according to the law on the safe operation of cars, the consecration of the license plate must allow one to see letters and numbers from a distance of at least 20 meters.
Legal aspects
In accordance with the regulations of the Road Traffic Rules (SDR), each car must have a rear license plate light, activated when the side lights are turned on. This external light device must be turned on while the vehicle is moving at night. In this case, the brightness of the lamps must be sufficient for the inspector to be able to identify the state. car number from a distance of 20 meters. The absence of illumination or an unreadable car number for any reason is regarded as a violation and, in accordance with Article 12.2 Part 1 of the Code of Administrative Offenses of the Russian Federation, entails a warning or a fine of 500 rubles.
The situation can be corrected and thereby improve the illumination of the registration plate by upgrading the standard lights. The most common way is to install LED light sources: modules, rulers, strips. However, this innovation can be regarded as a change in the design of the car with all the ensuing consequences.
The Appendix to the Traffic Regulations of the Russian Federation states that it is prohibited to make changes to the design of a vehicle without permission from the State Traffic Safety Inspectorate of the Russian Federation (clause 7.18 - Other design elements). This point can be interpreted as follows. Firstly, if the car is not involved in road traffic (not in use), then the violation cannot be detected. Secondly, if the changes made have been certified by the traffic police and have documentary evidence, then the modernization was carried out according to the law.
GOST 8769-75 (updated on August 1, 2013) in paragraph 2.8.2 states that the rear registration plate of a car must be illuminated by a stream of white light. According to this clause, a ban is automatically established on illuminating the license plate with any other light, with the exception of shades of white. It turns out that the bright and rich colors of LEDs (blue, red, green) according to the law cannot be used in organizing rear license plate illumination. They can add ambiguity and confuse drivers of vehicles following behind.
Replacement
It is easy to replace the lamps by following the instructions described below.
In hatchback and station wagon bodies, before starting work, it is necessary to remove the plastic trim on the trunk door; it is attached to plastic clips. To dismantle, carefully snap off the clips at the edges and the upholstery will come off.
Work process
- We find the lamp plug in the area of the number, turn it clockwise and pull it towards ourselves. The cartridge will be removed from the lampshade.
- We take out the old lamp by pulling it towards ourselves and install the new one.
- We assemble in reverse order.
- As you can see, there is nothing complicated in the process of replacing license plate lamps.
The license plate light does not light up - reasons
Statistics indicate that the light bulb burns out in the first year or two after replacing it in 45% of cases. However, for the most part, this is not where the problem lies, we advise you to start with the simplest and move on to the more complex:
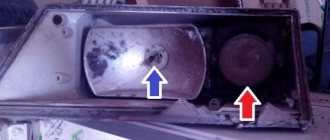
- Dampen a cotton cloth with an alcohol solution and remove all dirt and dust from the surface of the lighting panel. It is necessary to carry out a visual inspection to find out whether the lamp has darkened, condensation may have accumulated inside, and the lampshade could also be damaged, for example, due to high temperature.
- According to the standard, two lamps are mounted on the sides of the number. If one of the bulbs is on and the other is not, then you can be sure that the problem is not a blown fuse or wiring. You can knock on the lampshade a little if you notice blinking, perhaps the socket has become deformed and the contact has become worse.
- If all the available backlight lamps do not light, then you first need to check the fuses. Only after you have verified their integrity can you begin to test the power wiring.
Why does the rear license plate lamp often burn out?
Perhaps due to the increased humidity, the cartridge or antennae have rusted inside. It is necessary to install a new one or clean and replace the conventional incandescent lamp with an LED lamp that is insensitive to moisture.
Long-term shaking, off-road driving, and bumpy roads shorten the service life of standard lamps.
The lighting suffers due to a blown fuse or voltage drops in the car's electrical circuit. The chain may break due to natural wear and tear. These damages can be determined using an ohmometer.
The fuse responsible for the license plate light is called “Tail” 10A. If it burns out, the dimensions will stop lighting.
If, after lightly tapping the rear license plate light, the light comes on, it means there was a bad contact or it was dirty, you need to clean it.
There is also a nuance with the number plate illumination. Normally, during the day it lights up if the trunk is open. When opening the car using the key fob, make sure that you do not open it along with the interior doors. Many car enthusiasts complain about the ever-burning license plate light, which does not go out after 5 or 30 minutes until you turn off the car and remove the key from the ignition. It's all about the trunk lock: either the limit switch is stuck, or the car was opened twice with the key fob, or the chip contains a program for opening all the doors and trunk with one click. A constantly glowing lamp often burns out, and the battery also runs out at the most opportune moment.
Today, any car must be equipped with special lighting that illuminates the rear license plates. When a car just comes off the assembly line, it has 2 lamps installed; they are usually located in the lower trunk saber. The lamps work fine at first, but over time they burn out. Some car owners do not even think about replacing burnt out lamps, which is wrong and entails quite serious consequences.
You may also be interested in our specialist's article on how to install.
Traffic police officers have the right to fine negligent car owners who drive cars without license plate lights.
It is important to take into account that the basis for collecting a fine is not only the lack of room lighting, but also the incorrect installation of lights.
Therefore, such situations should be avoided in order to save nerves, time, and money that will have to be spent on paying the fine. Moreover, any driver can replace the backlight on a car on their own with minimal knowledge in this area.
Selecting lamps and backlight emitters to replace burned out ones
As already mentioned, you should not replace an LED emitter with an incandescent lamp and vice versa. It's easier if there is an incandescent lamp. Usually a standard light bulb with a power of no more than 5 watts is used. Such lamps can be purchased at any normal gas station.
The situation is more complicated for LED designs. If it is not so difficult to purchase emitters for common designs, then for unique car models it is more difficult to do, except perhaps during disassembly.
In this case, you can find ordinary radio amateurs who will change the LEDs element by element, that is, they will perform ordinary radio repairs. LEDs should be replaced as a set. Typically there are three diodes in series on the board. Therefore, even if one of the three is faulty, all three must be replaced.
If you live in a small town where there is no radio parts store, you can buy an LED in online stores that sell radio parts.
It is better to choose a powerful LED (about 1 Watt), white, so that there are no complaints from inspectors and during technical inspection. Installation difficulties may arise. LEDs are often connected using spot welding instead of soldering. This will not cause any difficulties for an experienced radio amateur. Active acid fluxes can be used to facilitate soldering. In everyday life, flux is an excellent substitute for an aspirin tablet. Just don't inhale fumes when soldering. They are not dangerous, but extremely unpleasant.
If problems with the license plate illumination cause great difficulty when replacing lamps and emitters, as a last resort, you can purchase a license plate frame with built-in illumination. Difficulties may arise during the technical inspection, but they can be solved.
Tips for purchasing automotive diodes
W5W bulbs are used to illuminate license plates on most car models. But there are manufacturers who equip their brands of cars with C5W lamps, which differ in the type of base. Therefore, when purchasing, you need to know what type of spotlights are installed on a particular car.
There are LED analogues, the installation of which is permitted by law, but within certain limits. It is important that the lamp light is white and the license plate is clearly visible and readable from a distance of 20 meters. In this case, the lighting should illuminate only the sign, and not the entire road behind the vehicle.
When installing a new light bulb, you should pay attention to the power declared by the manufacturer and compatibility with the lampshade. Brighter diodes can cause contact melting, overloading the car's electrical network and darkening the lampshade.
This is interesting: What kind of oil and how to fill it in the power steering: useful tips and recommendations
We recommend products from the company specified in the instructions for the vehicle from the car dealer. There are many fakes on the market that are almost impossible to distinguish from a high-quality original. When choosing a product, you should pay attention to the packaging itself, the inscriptions on it, markings and the quality of the soldering of the light bulb.
The process does not require trips to a car service and can be completed in 10–15 minutes in the garage. Tools needed to replace the license plate lamp:
- damp cloth;
- flat and Phillips screwdrivers;
- liquid key or WD-40;
- LEDs.
Before starting dismantling, you must remove the negative terminal of the battery, first turning off the ignition.
Each car model has its own nuances of the location of light sockets and fastening methods. The standard method is to clamp and install the lampshade onto bolts.
Caution doesn't hurt
Often the condition of the ceiling leaves much to be desired. Sometimes they burst due to exposure to high temperatures or mechanical stress, but their destruction also happens simply due to time. It is strongly recommended that you carefully dismantle the lampshade if necessary. There is a high chance that it will crack in your hands.
If your car has a regular incandescent lamp, then you can replace it with an LED lamp of similar power. This is due to the fact that the latter last an order of magnitude longer and provide better lighting. They are also inexpensive and are installed similarly to conventional ones. Now you know how to change the license plate light bulb. As you can see, there is absolutely nothing complicated here. Often you don’t even need a special tool. In the worst case, replacement takes no more than half an hour. Usually you can handle it in 10-15 minutes. The main thing is to maintain consistency and not install too powerful lamps that melt the contacts and wiring.
Good day to all guests and subscribers!
Even at the beginning of the life history of my car, there were the following topics on replacing light bulbs (if anyone is interested, you can read it): - DRLs and headlights - in the headlight turn signals - in the cabin
Well, there was also the installation of PTF, the light in the trunk with a diode strip, also with the replacement of the bulb with a similar one in the cabin.
Today, the traffic lights/brake lights have received this attention! I still don’t change the tradition, I use lensed diodes from MTF P21/5W.
PS Let me remind you about money - MTFs are quite expensive, 500 rubles each, depending on the type of lamp.
PPS Night photos! In principle, the light itself is clear that it is a little more red, because lamps with incandescent filaments are transparent and the color is given to them by the body of the flashlight... According to stopari, the focusing in the photo turned out to be disgusting... But MTF is just a little brighter.
Issue price: 1,200 ₽
Troubleshooting algorithm
At the first sign of a malfunction in the license plate illumination, you should immediately begin to determine the cause and eliminate it. A non-functioning license plate lighting system is one of the significant reasons for stopping a vehicle at night.
For traffic police officers, the absence of license plate illumination can be regarded as an attempt to hide the ownership of the car and information about its registration. In most cases, this will result in a fine.
Trying to make an excuse like “I don’t know, it just happened” leads nowhere. The driver is obliged to check the car before leaving, especially when driving in the dark. Moreover, usually two backup light sources are usually used for illumination. As soon as one emitter fails, the car owner is obliged to immediately fix the problem.
Video - replacing the license plate lamp on a Mitsubishi Outlander 3:
At the first stage, it is advisable to perform a complete computer diagnostic of the car, including monitoring the multifunctional unit (body control unit). In most cases, it will indicate the cause of the problem. But it can also provide a more concise explanation of an error such as “faulty license plate illumination.” This is understandable even without diagnostics.
Typically, a reverse fault finding algorithm is used, that is, from the final control element, that is, from the emitter (lamp or LED system). To do this, you need to have the simplest measuring instrument - a multimeter.
In many cases, it is quite difficult to reach and dismantle the emitter light, especially if the license plate itself is installed in the bumper: access from below the car is required. To be on the safe side, it's best to first check the fuse that supplies the license plate lamps.
The specific location of its installation can be found in the operating manual of your car or you can find this information using Internet search engines or special resources.
Further actions:
1. Remove the license plate light.
It is necessary to find detailed information on this issue, since intuitive actions can lead to damage to the latches or connector.
2. Disconnect the connector.
3. Check for voltage at the connector when the side lights are turned on. To do this, turn on the ignition and dimensions. Next, using a multimeter in the position of measuring direct voltage at the limit of 20 Volts, connect the multimeter probes to the connector contacts. If there is no voltage, then most likely the problem is not in the flashlight emitter, but in the wiring, control unit or fuse.
4. If voltage is supplied, proceed to disassemble the flashlight in order to remove the emitter.
First of all, the diffuser mounted on the clamps is usually removed.
5. Next, remove the emitter. It can be of two types:
- incandescent lamp;
- LED.
The incandescent lamp is easily removed from the socket.
Usually it has two thin leads that are bent on the sides. The cause of its malfunction may be broken leads or burnt-out filament. For greater confidence, you can ring it using a multimeter in resistance measurement mode at a limit of 200 Ohms.
LED design is usually more complex.
It is better to call it from the connector.
To do this, switch the multimeter to the “diode” control mode. The LED emitter should ring in one direction and show “1”, that is, infinity, when the probes are connected back. If the design does not ring, you often have to “unplug” the lantern, as in the Lifan X60.
6. If it is determined that the light emitter (lamp or LED structure) is faulty, it must be replaced. You cannot replace a lamp with an LED or vice versa. They have different current consumption. The body control module may detect an error. You can install an emulator, but this is an additional unnecessary hassle.
7. If the emitters are working properly, no voltage is supplied to them, you should follow the wiring to the fuse. It is necessary to check whether there is voltage at the fuse contacts when the dimensions are turned on. If not, then the problem is in the control unit. If so, then the problem is in the wiring. The weakest point of the wiring is under the threshold in the driver's seat area. It is necessary to dismantle the threshold and inspect the wiring harness. It will be good if you know the color of the wire that serves the backlight. Another weak point is under the corrugation of the tailgate (if the license plate is installed on it).
This is interesting: Broken timing belt and possible consequences - causes, symptoms, repair
8. Finally, the most unpleasant case is when the backlight is controlled directly from the multifunctional unit without a fuse in the circuit. If there is a short circuit or a non-original emitter is connected, the control circuits in the electronic unit may fail. In this case, expensive repairs to the unit may be required. It is cheaper to turn to Kulibins, who will install a bypass circuit or connect the lights directly to the side lights.
Video - replacing license plate lamps on a Skoda Octavia A7: