The device of the VAZ 2170 Priora car
- Repair manuals
- Repair manual for VAZ 2170 (Priora) 2004+.
- Car device
1.0 Car structure General information about the car Passport data Car keys Controls Instrument panel Instrument cluster Trip computer Heating and interior ventilation Device features Interior ventilation Cleaning windows from snow and ice Quick step...
1.1 General information about the car Small class car VAZ-2170 Lada Priora with a four-door sedan-type body (class C according to the international classification) is designed for operation at ambient temperatures from –40 to +50 °C on public roads with hard surfaces. The Lada Priora car is equipped with…
1.2 Passport data In the engine compartment, vehicle numbers are located in the following places: 1 – body identification number; 2 – identification plate; 3 – engine model and number. Vehicle identification number (VIN), engine model, manufacturer name, year of manufacture and information...
1.3 Car keys The car comes with two sets of keys, each of which contains two keys: one for the ignition switch (lock), the second for the door locks and trunk lid. This is what a set of car keys looks like: 1 – key for door locks and trunk lid; 2 – ignition key (learning key);…
1.4. Controls (Category). See the list of materials inside...
1.5. Interior heating and ventilation (Category). See the list of materials inside...
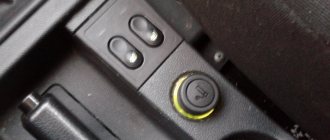
1.6 Ensuring a comfortable air temperature in the cabin If the windows in the cabin are cleaned, but the temperature in the cabin has not reached the desired temperature, do the following. 1. Set the desired temperature using knob 2. 2. Set knob 1 to the vertical position. 3. Select the required intensity of warm air supply into the cabin using a...
1.7. Doors (Category). See the list of materials inside...
1.8. Passive safety equipment on a car (Category). See the list of materials inside...
1.9. Seats (Category). See the list of materials inside...
↓ Comments ↓
1. Car structure
1.0 Car structure 1.1 General information about the car 1.2 Passport data 1.3 Car keys 1.4. Controls 1.5. Heating and ventilation of the cabin 1.6 Ensuring a comfortable air temperature in the cabin 1.7. Doors 1.8. Passive safety equipment on the car 1.9. Seats
2. Recommendations for use
2.0 Recommendations for use 2.1. Safety rules and recommendations 2.2 Running in the car 2.3 Operating the car during the warranty period 2.4. Preparing the car for departure
3. Problems along the way
3.0 Malfunctions along the way 3.1. The engine does not start 3.2 Malfunctions of the fuel injection system 3.3 Idle speed has disappeared 3.4. Interruptions in the operation of the 3.5 engine. The car moves jerkily 3.6 The car accelerates poorly 3.7 The engine stalled while driving 3.8. Oil pressure dropped to 3.9. Engine overheating 3.10. The battery does not recharge 3.13. Knocks in the engine 3.16. Wheel puncture
4. Maintenance
4.0 Maintenance 4.1. General provisions 4.2. Inspection work 4.3. Lubrication and filling works 4.4. Diagnostic work 4.5. Repair and adjustment work
5. Engine
5.0 Engine 5.1 Design features 5.2 Possible engine malfunctions, their causes and solutions 5.3 Useful tips 5.4 Checking compression in the cylinders 5.5 Removing and installing the decorative engine casing 5.6 Removing and installing the engine splash guard 5.7 Installing the piston of the first cylinder to the TDC position of the compression stroke 5.8 Replacing the drive belt gas distribution mechanism and tension roller 5.9 Replacing the power unit supports 5.11. Replacing engine seals 5.13. Engine cylinder head 5.15. Engine repair 5.16. Lubrication system 5.17. Cooling system 5.18. Power supply system 5.19. Design Features
6. Transmission
6.0 Transmission 6.1. Clutch 6.2. Gearbox 6.3. Front wheel drives
7. Chassis
7.0 Chassis 7.1. Front suspension 7.2. Rear suspension
8. Steering
8.0 Steering 8.1 Design features 8.2 Possible steering malfunctions, their causes and solutions 8.3. Steering column 8.4. Steering linkage 8.5. Steering gear
9. Brake system
9.0 Brake system 9.1 Design features 9.2 Possible malfunctions of the brake system, their causes and solutions 9.3 Bleeding the brake system hydraulic drive 9.4 Removing and installing the vacuum brake booster 9.5 Replacing the brake pedal axle bushings 9.6. Main brake cylinder 9.7. Front wheel brakes 9.8. Braking mechanisms of the rear wheels 9.9. Pressure regulator 9.10. Brake hoses and tubes 9.11. Parking brake
10. Electrical equipment
10.0 Electrical equipment 10.1 Design features 10.2. Battery 10.3. Mounting block (relays and fuses) 10.4. Generator 10.5. Starter 10.6. Ignition switch (lock) 10.7. Electronic engine control system (ECM) 10.8. Ignition system 10.9. Lighting, light and sound signaling 10.10. Windshield cleaner 10.11. Washer reservoir 10.12. Electric fan of the engine cooling system 10.13. Electric motor of the heating and ventilation system fan 10.15. Cigarette lighter 10.16. Instrument cluster 10.18. Electronic anti-theft remote control system 10.19. Immobilizer 10.21. Replacing sensors and switches
11. Body
11.0 Body 11.1 Design features 11.2 Possible body malfunctions, their causes and solutions 11.3 Removing and installing windshield frame lining 11.4 Removing and installing soundproofing upholstery in the engine compartment 11.5. Removing and installing bumpers 11.6 Removing and installing the fender liner and protective wing cover 11.7 Removing and installing the front fender 11.8 Removing and installing decorative sill trims 11.9. Hood 11.10. Trunk lid 11.11. Doors 11.12. Seats 11.13. Seat belts 11.14. Rear view mirrors 11.15. Interior fittings 11.16. Instrument panel 11.17. Heater 11.20. Body care
12. Applications
12.0 Appendix 12.1 Appendix 1. Tightening torques of threaded connections, Nm 12.2 Appendix 2. Fuels, lubricants and operating fluids 12.3 Appendix 3. Nominal filling volumes 12.4 Appendix 4. Basic data for adjustments and monitoring 12.5 Appendix 5. Spark plugs used on vehicles 12.6 Appendix 6. Lamps used on a car 12.7 Appendix 7. What you need to have in a car 12.8 Appendix 8. Tools used when repairing a car
13. Electrical diagrams
13.0 Electrical Diagrams 13.1 Diagram 1. Instrument Panel Harness Connections 13.2 Diagram 2. Vehicle Front Wire Harness Connections 13.3 Diagram 3. Engine Electronic Control System (ECM) Harness Connections 13.4 Diagram 4. Vehicle Rear Wire Harness Connections 13.5 Diagram 5. Light Harness Connections license plate light 13.6 Diagram 6. Left front door wiring harness connections 13.7 Diagram 7. Right front door wiring harness connections 13.8 Diagram 8. Rear door wiring harness connections
Towbar for VAZ 2110, 2111,2112, 2170, 2171,2172 (with removable ball) (without electrics)
As an additional equipment, LADA vehicles can be equipped with a towing device (trailer hitch or towbar). The towing device is designed for articulated coupling of a vehicle with a towed trailer. The design of LADA vehicles provides for the possibility of installing a trailer hitch without additional mechanical influences (drilling holes, welding) on the vehicle body. The following are instructions for installing and connecting a standard towbar on cars of the Lada Priora family.
For each LADA car model, several trailer hitch options are offered for installation, differing in design, but identical in the method of attachment to the car body.
The trailer hitch, regardless of the model and design of the device itself, is attached to the rear power elements (side members) of the car body.
Tightening torques for threaded connections
Vehicle check
To ensure traffic safety and increase the service life of the vehicle, it is necessary to periodically carry out external and internal inspections of the vehicle. The length of the inspection depends on how well you know your car and how often you use it. While operating your car, you will learn about the rate of oil consumption in the engine and gearbox, brake and coolant, and the reliability of various systems and devices. This will allow you to plan your actions and time to inspect the car in the future. For example, if it turns out that the engine consumes oil quite intensively (albeit within normal limits), then the oil level in the engine sump should be monitored more often. If the oil consumption of your car’s engine is low and there is no visible change in the oil level over a month, you can limit yourself to a monthly check. The more familiar the car inspection activities become for you, the less time you will spend on them. However, if you encounter difficulties in servicing the car yourself or suspect that it is faulty, you must contact one of the service centers for servicing this car model. Source
Location of components and assemblies (bottom view) : 1 - mudguard of the power unit; 2 — gearbox; 3 — front suspension stretch; 4 — left wheel drive; 5 — front suspension arm; 6 — anti-roll bar; 7 — transmission control rod; 8 — jet thrust of the gearbox control mechanism; 9 — tubes of the power supply and brake systems; 10 — additional muffler for the exhaust gas system; 11 — pressure regulator in the hydraulic drive of the brake mechanisms of the rear wheels; 12 — fuel tank; 13 — rear suspension beam; 14 — main muffler of the exhaust gas system; 15 - niche in the bottom of the trunk for a spare wheel
Bottom view of the front part of the car (the power unit mudguard has been removed for clarity) : 1 - front wheel brake mechanism; 2 — engine sump; 3 - generator; 4 — cross member of the front suspension; 5 - starter; 6 — gearbox; 7 — left wheel drive; 8 — anti-roll bar; 9 — transmission control rod; 10 — jet thrust of the gearbox control mechanism; 11 — additional muffler pipe; 12 — right wheel drive; 13 — front suspension stretch; 14 — front suspension arm
From the outside of the car we check : – air pressure in the tires: inspect them for damage; – tightening the wheel bolts; – serviceability of lighting and alarm devices. You can check the operation of the brake signals without an assistant by pressing the brake pedal and watching in the rearview mirror for the reflection of the signal light from a wall, such as a garage; – no traces of leakage of oil, coolant, fuel and brake fluid.
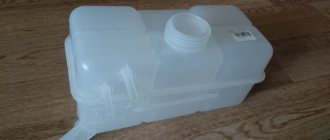
In the engine compartment we check : – engine oil level; – oil level in the gearbox; – coolant level in the expansion tank of the cooling system; – brake fluid level in the brake hydraulic reservoir; – presence of liquid in the windshield washer reservoir; – generator drive belt tension; – condition and fastening of battery cable terminals.
Inside the car we check : – serviceability of the vacuum brake booster; – operation of the clutch and gearbox drives; – the amount of travel of the parking brake lever; – serviceability of the sound signal; – serviceability of the windshield cleaner and washer; – serviceability of instrumentation; – fuel level in the tank; – adjustment of rear view mirrors; – serviceability of door lock mechanisms.