How to remove the center console (panel trim) of Lada Priora
The interior of Priora 2 (after the latest restyling) is significantly different from the previous version of the car.
The interior now has a more stylish dashboard (dashboard) with the ability to install a modern multimedia system. If you are engaged in independent modifications or repairs of your car, then you will need instructions for removing the central lining (together with the tunnel, it is also called the “beard”). The plastic center console is attached to the panel (dashboard) with 6 screws. To gain access to the lower two mounting screws, you will have to remove the tunnel cover:
- Remove 2 screws under the heater and air conditioning control unit;
- Remove the gearshift knob cover by prying it off with a flat screwdriver and remove the 3 screws under the cover;
- Unscrew the 2 lower screws securing the center console.
screws for fastening the tunnel cover of the Lada Priora; screws for fastening the tunnel cover of the Lada Priora; lower screws for fastening the center console of the Lada Priora
To remove the remaining four screws securing the center console:
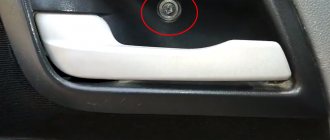
- Remove the upper block of buttons and the plug by prying them off with a flat screwdriver or a plastic spatula;
- Remove the 2 upper console mounting screws;
- Remove the 2 middle console mounting screws.
plugs for the center console of the Lada Priora, upper mounting screws for the center console of the Lada Priora, middle mounting screws for the center console of the Lada Priora
All that remains is to pull the center console towards you and disconnect the connectors with wires at the back. Installing the plastic cover is done in the reverse order. The process is also shown in the video:
How to remove a beard on Prior 2?
We suggest you familiarize yourself with the topic: “how to remove a beard on a Prior 2?”, including the latest trends.
| If you need to install sound insulation on the floor, or paint, or reupholster the interior plastic of the Lada Priora, then you first need to remove the central tunnel (beard). The procedure is not complicated and you can easily do it without an assistant in 30 minutes. |
Tools required: 10mm socket, Phillips screwdriver, tall 10mm socket, flathead screwdriver.
Disconnect the negative terminal from the battery, and for ease of work you can remove the front seats. Then:
- Unscrew the nut securing the air duct to the feet of passengers in the rear seat using a 10mm socket.
- Remove the air duct. Remove the second air duct on the right side in the same way.
- Raise the armrest and pry off the armrest hinge pad.
- Remove the armrest of the Lada Priora.
- Unclip the latches to pry open the container for storing small items. Get him out of the tunnel.
- Unscrew the 2 bolts securing the armrest hinge using a 10mm socket and remove it.
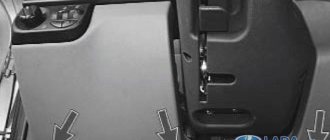
- Unscrew the 4 screws securing the floor tunnel using a Phillips screwdriver.
- Through the opening, press the latch and remove the block with wires from the trunk lock control button.
- Unscrew the 2 tunnel fastening nuts using a high 10mm socket.
- Place the front seats in place and move them forward as far as possible. Unscrew the self-tapping screw securing the tunnel to the base on the left and similarly on the right, using a Phillips screwdriver.
- Remove the plastic plug at the bottom of the cup holder using a flathead screwdriver.
- Unscrew the tunnel fastening screw using a Phillips screwdriver.
- Unscrew the 2 screws securing the floor tunnel on the left and similarly on the right, using a Phillips screwdriver.
- Remove the plug in the handbrake housing using a slotted screwdriver.
- Unscrew the screw securing the side panel of the tunnel using a Phillips screwdriver.
- Remove the left tunnel shield, and similarly the right shield.
- Unscrew the screw securing the front part of the tunnel using a Phillips screwdriver. Unscrew the screw on the right side in the same way.
- Unclip the latches and remove the Priora gearbox cover. Leave the frame with the cover on the gearshift lever.
- Remove the 2 screws securing the tunnel to the instrument panel console using a Phillips screwdriver.
- Lift up the tunnel.
- Press the latch and disconnect the block with wires from the cigarette lighter. Remove the central tunnel of the Priora.
Installation of the tunnel lining is carried out in the reverse order.
The question of removing the center console on a Priora worries quite a few car owners, since this has to be done quite often and here’s why. The fact is that some control elements, such as a clock, a heater control unit, or the central heater deflector, cannot be replaced without removing the console.
To remove it, you will need a minimum of tools and the main one, which you simply cannot do without - a Phillips screwdriver.
Removing and installing the center console of the instrument panel on a Priora
The center console trim on cars with “standard” and “luxury” configurations may differ in the size of the cutout for the radio. Otherwise, there will be no difference in fastenings. Moreover, many owners cut a hole out of a regular one for installing a 2-din radio and everything works out quite successfully. So, let’s get closer to the point - if you have a radio installed, you must first remove it, using special removable keys that usually come with it.
After the niche is free, pressing on the button connectors from the inside, we take them out, approximately as can be seen in the photo below.
Then we disconnect the block with wires from the buttons that go to the console.
HOW TO REMOVAL A TORPEDO/TUNNEL ON PRIOR
Next, you need to remove the ashtray by pulling it with a certain force from each edge in the open state, since it is attached along guides in the grooves:
After this, two fastening screws are clearly visible in the recess, which, of course, will need to be unscrewed.
In this case, we are dealing with a 2-din console that has already been cut out, so the two remaining screws are not visible, and only a little lower are the attachment points that were once there visible. In the photo above they are visible - slightly in the recess. If you have everything in factory form, then everything will look like this - a couple of screws are under the cover:
Connecting a voltmeter to the on-board network
How to remove the center console on a Prior
A digital voltmeter in a car must meet two main requirements:
- show the voltage on the battery as accurately as possible;
- turn off when the engine is not running so as not to discharge the battery while parked.
Accurate data on the voltage on the battery can be taken directly from its terminals. To do this, you need to connect the wire from the positive terminal to the installation location of the voltmeter. To prevent conductor resistance from causing a voltage drop across the device, the wire cross-section must be at least 0.5 mm.
The wire must have strong, good insulation so that a short circuit does not occur over time.
It is important that this way of connecting the wire bypasses the standard fuse box, so care should be taken to protect the circuit from overload. For safety, install a fuse between the battery and the wire going to the voltmeter
Otherwise, the wiring may even catch fire in the event of a short circuit.
It is best to lay the wire into the cabin to the place where the voltmeter is installed in the general wiring harness of the Priora. To do this, you will have to bring it into the cabin and stretch it under the dashboard.
It is ideal to dismantle the entire torpedo for this, but this is a complex and time-consuming job. The problem is solved by partial disassembly: removing the dashboard or center console. To do this, there is no need to disconnect the wiring harnesses; you just need to move the “tidy” a little to be able to pull the wire to the right place.
It is enough to connect the second wire of the voltmeter to ground where it is convenient. When connecting a voltmeter to the wires of the ignition switch, tape recorder or other wires located in the dashboard area, its readings will be lower due to the voltage drop across the contacts and connections.
In order for the voltmeter to turn off when the ignition is turned off, an electromagnetic relay must be inserted into the gap in the wire between it and the battery terminal. The relay winding should be powered from any wire on the ignition switch, on which voltage appears after turning the key.
If you have no experience or desire to tinker with laying the wire from the positive terminal of the battery to the car voltmeter
The first step, of course, is to dismantle them. This is quite easy to do on a VAZ classic, but not so much on a Priora. In order to remove the watch, you need to remove the plastic decorative panel. Then remove two screws, and we will find a couple more under the ashtray.
But it doesn’t end there, there are still screws waiting for us, we will find them after we remove the radio. And only then can you remove the panel by gently pulling it towards you. Take a knife or flat screwdriver and press on a fairly tight latch.
Now we need to disassemble the watch, and this is easier than removing it. We see four latches on the sides; we snap them off. Now carefully remove the arrows. If desired, the arrows can be replaced, if, of course, there are other more elegant ones at hand. But you don’t have to do this, since we are annoyed by the shade of the arrows, and not by the elements themselves. Therefore, they can simply be repainted, but this must be done carefully and efficiently. To do this, we degrease the hands, and at the same time remove the annoying orange color with a solvent. Then everything is simple: as paint, you can use ordinary office putty, or, as it is also called, a touch, because buying a can of white enamel for two arrows is not constructive. In addition, moisture will not get inside the watch anyway, so the touch will fit perfectly - it gives an even white color and dries instantly.
Lada Priora Hatchback “Bobosyan” › Logbook › Armrest reupholstery
Yo, joke people, it's me again.
I decided to overcome laziness and post something in the BZ
So I reupholstered the armrest.
I myself am surprised that I traveled with him for two years. Now I'm even a little ashamed.
We have a local group that sells car stuff. Among other things, they also have door card inserts. Leatherette, stitching, different patterns, everything. If there are inserts, then there are those who sew them. Since there are those who sew them, it means they can sew something besides inserts, I reasoned. A short dialogue on VKontakte confirmed my thoughts.
Guys from Pyatigorsk. The cost of the armrest upholstery is 400 rubles (the same simple material). Production took four days. I went to Pyatigorsk and picked it up. Oh, this Pyatigorsk, especially when you don’t know it at all
So, I have the upholstery. I removed the armrest (two bolts) and brought it home.
To take it apart, I warmed it over the stove. Warmed it up carefully. For a long time. But I figured it out anyway. The old upholstery itself was not even glued, but simply inserted into the cracks of the glove compartment. I took it apart to fit the new one properly.
I glued the new upholstery. If you are also a scourge and stick in a moment, then let the armrest air out. I'm a simple guy - I did it and installed it right away. The next morning I had some kind of gas chamber in my car. Glory to the Germans from Henkel, their moment has been non-toxic for 15 years now. Yes, it evaporated quickly and the smell went away
My armrest was the source of incredible rattling noises, so I made some noise along the way
The spring really did my mind; I didn’t immediately understand why it was and where it was placed. I tried to remove the backlash and gaps of the studs by putting heat shrink on them, but it didn’t work. And to hell with him.
Well, already installed on the car
It didn't turn out perfect, unfortunately, but it suits me. I have gained experience working with similar materials, next time it will be better. In my defense, I can say that it was a little oversized, which was reflected in the front part (a crease is visible in the photo). Yes, and this was the first time in my life that I did something like this, and I couldn’t eliminate the jambs by properly gluing it. It's okay, now I'm a scientist
Removal and installation of the instrument panel Lada Priora, VAZ 2170, VAZ 2171, VAZ 2172
How to improve the dashboard and console of the VAZ-2107
Useful tips When installing the instrument panel, you may need clamps to secure the wiring harnesses, since in some cases it is easier to cut them when dismantling the panel. Depending on the vehicle configuration, a different number of pads with wires may be used. Therefore, when separating the pads, mark them relative to each other. This will make the job easier when installing the instrument panel. Mark the free pads separately.
You will need: 8" and 10" socket wrenches, flat and Phillips blade screwdrivers.
1. Disconnect the wire from the negative terminal of the battery. 2. Remove the steering wheel (see “Removing and installing the steering wheel”). 3. Remove the steering column trim (see “Removing and installing steering column trim covers”). 4. Remove the VAZ 2172 steering column switches (see “Checking and replacing steering column switches”). 5. Remove the floor tunnel linings (see “Removing and installing the floor tunnel linings”). 6. Remove the lada priora instrument cluster (see “Removing and installing the instrument cluster”).
7. Remove the right and left screws securing the center console of the Lada Priora instrument panel.
8. Using a screwdriver...
9. ...remove the side window heating nozzles on the right and left.
10. Using a 10mm socket wrench, unscrew the two nuts of the upper fastening of the Lada Priora instrument panel on the left and right.
11. Turn the three latches and remove the fuse and relay box cover.
12. Remove the four screws securing the instrument panel amplifier of the Lada Priora...
13. ...and remove the amplifier.
14. Turn inside out from the bottom left...
15. ...and on the bottom right there are two screws securing the Lada Priora instrument panel.
16. Remove the screw securing the instrument panel to the left of the steering column...
17. ...and the fastening screw located on the right under the instrument panel.
18. Using a size 8 wrench, remove the bolt securing the ground wires of the instrument panel to the body bracket.
19. Move the clamps of the VAZ 2171 instrument panel wiring harness blocks to the right...
20. ...and disconnect the three harness pads from the pads installed on the bracket.
21. Disconnect the wiring harness block of the Lada Priora ignition switch (lock).
22. Disconnect the wiring harness connectors from the electric power steering.
23. Using a 10mm wrench, unscrew the nut securing the ground wire of the instrument panel harness from the bracket for the electronic units.
24. Slide the pad lock...
25. ...and disconnect the instrument panel harness from the ignition system harness.
26. Disconnect the instrument panel harness connector from the electrical accessories control unit.
27. Slide the lock...
28. ...and disconnect the instrument panel harness connector from the airbag control unit.
29. Remove the instrument panel and remove it from the interior of the Lada Priora.
Note Since the instrument panel is quite bulky and heavy, this operation should be performed with an assistant.
30. Install the VAZ 2170 instrument panel in the reverse order of removal.
How to replace the cooling radiator on a VAZ 2170-VAZ 2172?
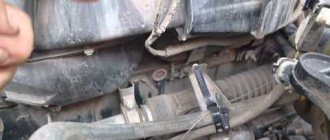
1) Before you start work, drain all the coolant from the radiator (read “here” for how to drain the liquid) and proceed to removing the electric fan (If you don’t remove it, you simply won’t remove the radiator), to do this, first reset the negative terminal with the battery by loosening the bolt that secures it, then remove the air filter housing since it will get in the way very much (Read “here” how to do this), and you can start removing the electric fan, first disconnect the wiring from each other, wiring the electric fan has a connector and block on the side (see photo 1), then unscrew (it’s most convenient to use a wrench) two bolts that secure the electric fan to the casing on the left and four nuts, two of which are located on the top and two bottom (see photos 2 and 3 below) and later remove the electric fan by pulling it to the top and putting it aside.
Read:
2) Next, remove the sound signal, since it will not allow you to remove the radiator (For information on how to do this, read the article: “Replacing the signal on the Lada Priora”) and then loosen all the clamps that secure all the supply pipes to the radiator (see
photos 1 and 2, pay your attention to photo 1, there is another pipe indicated by an arrow, so don’t miss it) and disconnect them, immediately after that unscrew the two nuts that secure the radiator to the body (see photo 3) and then pull out the holder , which holds the hose so that it does not dangle from the hole in the cross member of the engine compartment (see
photo 4), and that’s it, you can safely then tilt the radiator towards the car engine and then pull it out of the engine compartment.
How to remove a VAZ 2110 torpedo
Mirrors from Priora on VAZ 2112 installation
In the interior of the VAZ 2110, the dashboard is the most noticeable part. Every driver wants to sit in a stylish and well-maintained interior. But the standard panel looks angular and gray. This is especially noticeable after long-term use, when abrasions, scratches and cracks appear on the panel.
Motorists solve this problem in different ways - some install another standard dashboard from a VAZ 2110, other drivers prefer to install a Europanel - this is the name of the trim from a third-party manufacturer. The trim allows you to transform the interior and turn the “ten” into a foreign car, at least on the inside. Whatever you choose, removing the panel is a must.
In this material we will tell you how to properly dismantle the standard panel and install the Euro version.
This is what a standard VAZ 2110 torpedo looks like
Alternative torpedo
The alternative dashboard is softer than the standard “tens” dashboard, but the main advantage is the absence of unpleasant grinding and squeaking. Motorists decide to get rid of the standard one precisely because of the squeaking. For the VAZ 2110 car there are several types of panels that differ in design.
Voltmeter instead of a Priora watch
The current time is displayed on the Priora dashboard, so there is no particular need for a separate clock.
To install a voltmeter instead of a clock you will need:
- digital voltmeter with LED scale of suitable size;
- hot glue;
- file;
- knife or jigsaw;
- a piece of plexiglass or CD case;
- a piece of tint film.
To install a voltmeter in the body of a standard clock, you need to dismantle it and remove the mechanism. After this, you need to install the voltmeter panel into the case, slightly filing its corners. It is better to secure the panel to the housing with hot glue.
There is a hole in the middle of the glass for the time adjustment knob, so you need to find a replacement for it. You can cut new glass from a CD case or from a piece of plexiglass. To hide the “filling” of the voltmeter, the glass should be tinted before installation, for example, with a piece of tinting film. In this case, only the luminous LED display of the voltmeter will be visible from the outside.
Next, all that remains is to solder the wires to the voltmeter terminals and insert the voltmeter instead of the Priora clock. Connecting the wires will be discussed below.
Types of tuning of the Priora central console
Below are some of the most popular examples of console modifications by Prior owners.
Painting
Painting is carried out in several stages. To begin work on modifications, it is necessary to dismantle the console and remove all attached electrical equipment from it, such as a clock, climate control unit and media system.
Then the factory paintwork on the plastic is sanded, primed and painted.
Pros and cons of this method:
Pros:
- Durability;
- Reliability;
Minuses:
- The impossibility of returning everything to its original appearance;
- Long and expensive work process;
Pasting with film
This type of modification is the most popular and widespread due to its speed and low cost. With such modification, as well as with painting, it is necessary to dismantle the center console and all attachments. After removal, the console is treated with a degreaser and a film is glued to the degreased surface and, using a hairdryer, stretched over all convex areas.
Pros and cons of this method:
Pros:
- Cheapness;
- Rapidity;
- The ability to return to its original appearance;
Minuses:
Not durable, the film quickly begins to sand and crack;
This modification involves sawing off excess parts of the console, which may interfere with the installation of a large two-din radio. Practically no modifications will be required if you install such a radio in the center console of a luxury Priora, since a larger multimedia system is installed there from the factory.
Why do you need a voltmeter in the Priora cabin?
Most modern car models do not have a voltmeter on the instrument panel. Manufacturers decided that information about the on-board network voltage is not needed by the driver. This indicator is monitored by the on-board computer, which signals problems in the event of an obvious malfunction of the charging system or the vehicle’s on-board network. At the same time, a voltmeter is one of the most popular additional devices installed by car owners. This is caused by the following circumstances:
- the device allows, if necessary, continuous voltage monitoring;
- analysis of voltmeter data allows you to determine the load on the generator and its operating efficiency.
Network voltmeter - instead of a clock
You can actually put a voltmeter in the Priora instead of a clock! This device helps monitor the mains voltage and generator operation.
It doesn't end with the voltmeter! You can add a voltmeter and a thermometer to the electronic clock discussed above, which will show the temperature inside the cabin. You can choose the display color of these models - fortunately there is a choice. The backlit device also looks great in the evening when dusk sets in, adding coziness to the Priora’s interior.
Time in any car is part of a comfortable trip. They, like any other element, should become part of the interior. There is no limit to perfection - you shouldn’t be content with factory solutions.
CHOOSE SECURE PAYMENTS After payment you will receive an electronic cash receipt
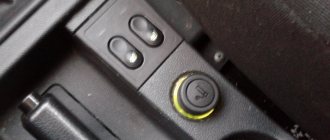
Hazard warning button Lada Priora
with 19% discount
Acoustic shelf with sidewalls for VAZ 2108, 2109, 2113, 2114
How to remove the instrument panel, tuning, modifications
Removing the instrument panel on VAZ 2110, 2111 and 2112 cars is not an easy task. But at the same time, it is possible to carry out this repair yourself, if you have the necessary tools at hand, as well as clear instructions.
Regarding the action plan, there are not many detailed guides on the Internet for removing and installing the instrument panel, and all this is due to the fact that the procedure has a number of difficulties and subtleties that not everyone can remember when writing such an article.
However, I will try to make material that will at least 90% help give the overall picture and the main points that should be taken into account when removing the panel on a VAZ 2110-2112. To perform the repair you will need the following tool:
- Phillips screwdriver, both short and long
- 10 mm head, preferably deep
- Ratchet handle or crank
- Wire cutters or sharp knife
- Flashlight if necessary
Removing and installing the instrument panel on VAZ 2110, 2111 and 2112
Before you begin this repair, you must do the following:
After this, you can proceed to further actions. We immediately remove and remove all the elements of the panel, such as: the standard clock, the heater control unit, the display unit, as well as the central deflector, and do not forget about the buttons with the radio. As a result, we get approximately the following picture:
Next, using a screwdriver, pry up and remove the plugs at the upper corners of the instrument panel mounting. In reality it looks like this.
On the other side, we do the same, after which, using a socket and an extension, we unscrew the nuts securing the instrument panel in the upper part.
Now let's move on to the remaining attachment points. At the bottom, in the left and right parts of the panel - in the corners, there is also one screw that needs to be unscrewed. The first one is shown below.
The second one is located on the right side of the panel in the same place - at the bottom in the corner. Also, immediately unscrew the self-tapping screw that secures the diagnostic block:
Now we move on to the side fastening points of the frame, which are located in the center on each side - the photo below shows the left side:
On the right everything will be the same. Next we move on to the internal frame fastenings, which are located in the following places. The first one is under the fuse mounting block, to get there we open the cover and look inside the panel:
The second one on the right is visible when the glove compartment lid is open:
Of course, the mounting block will also have to be removed so that it remains intact with the sub-panel wiring.
- We thread it inside with the instrument panel pulled back; you will also have to cut off some of the wiring fastening clamps, for example, in this place, which is shown in the photo:
- Now we are trying to remove the VAZ 2110 panel, moving it to the side on both sides, evenly, without much effort or sudden movements.
In the photo above you can see that the headlight hydraulic corrector tubes were cut off, since in my case they were simply not needed. If you need to save them, do everything carefully and remove them by pulling the control unit out of the instrument panel. Next, we finally remove the panel, of course, after first disconnecting all the wires that will interfere with this.
Installation occurs in the reverse order, connecting all wires and connectors to their places, blocks and switches, as well as other elements that were removed as a result of this procedure.
Installation of Europanel instead of the usual one on VAZ 2110, 2111 and 2112
Many owners who have owned a VAZ 2110 for a long time would like to change the boring panel to a more modern one. In this case, you can install a new type of panel from cars manufactured after 2006, or from the “Bogdan” versions, which are analogues of the tenth family, except that they were assembled in Ukraine.
With such alterations, basically you won’t have to change anything, but it’s worth considering that in this case you need to buy a complete Europanel:
- instrument panel frame assembly with trim
- instrument panel (combination)
- buttons and switches
- heater deflectors
- New heater control unit
- sub-panel wiring
- steering wheel, cover and switches
Only in this case everything becomes without any problems with minimal labor costs.
How to disassemble the instrument panel?
It often becomes necessary to dismantle the car interior in order to replace a part, for example, backlight bulbs.
To do this, first of all, you need to understand how to disassemble the instrument panel. Removing the panel is quite simple. Select the required screwdriver and carefully unscrew the attached hardware. Disassembling the panel begins with removing the hands on the dial, which can be disconnected with a knife. The main thing is to be careful and not damage the speedometer parts. It is advisable to use cardboard as a holder for glass elements. Replacing the backlight is done by scraping out the cover of the gasket in the speedometer. If you do not need to change the backlight of the sensors, you can simply clean them and leave them brighter.
But in most cases, the driver wants to change the color of some elements in the speedometer and make it much more useful. For example, the backlight of the instrument panel will be able to display the maximum permissible speed or extremely high engine overheating with indicators of a different color. To do this you will need a thin multi-colored cellophane bag.
You need to use a small piece of brightly colored cellophane to cover the indicator you are interested in on the inside of the dial. Dashboard lighting is limited to more than just highlighting indicators. Many motorists try to ensure that the lighting of their devices is uniform.
To achieve brighter and more even illumination, it is necessary to cover the panel with a special LED strip, which must be connected to the stock backlight wires in accordance with all the rules of current resistance. The set of instruments on the Priora can be easily supplemented with the latest method of illuminating the needles.
You can use CMD diodes, which can be easily fused into the glass panel using a soldering iron. To do this, we disassemble the dial and begin soldering directly under the base of the hands. The contact wires must be connected from the reverse side. If the instrument panel in Priora is broken, qualified assistance may be needed to repair it.
But you can easily do it yourself. To do this, you will need a panel pinout, that is, a diagram indicating the correspondence of the contacts with certain car devices. It looks like this:
- 1 — power steering;
- 4 - hand brake;
- 7 — external lighting regulator;
- 8 — right turn signal;
- 9 — left turn signal;
- 12,13 — immobilizer antenna sockets (A and B);
- 14 — mileage reset regulator;
- 15 — brake fluid regulator;
- 18 — instrument panel backlight control;
- 20 — battery terminal 30;
- 21 — battery terminal 15;
- 23,24 — forward and backward buttons on the steering column;
- 25,26 — outside temperature regulators (- / +);
- 27 — fuel tank regulator;
- 31 - panel diagnostic service.
Pinout numbers that were not specified are backup pins.
Main process
Using a screwdriver, remove the windshield blower nozzles. Then the upper fastener, consisting of three clamps and bolts holding the instrument panel, is removed. The next step will be dismantling the amplifier. After a visual inspection of the bottom of the console, remove the corresponding screws that are located at the bottom of the panel. Next, the wiring of the instrument assembly is dismantled by unscrewing the pads and clamps.
The wiring system associated with the ignition switch is also inspected and removed. Together with it, the ground fastening, the power supply structure of airbags and other components with an electrical connection are disassembled. The final step is to dismantle the Priora dashboard itself with the center console. The part in question is a rather weighty part; it is advisable to have an assistant to remove it from the cabin. At this stage, the operation to remove the center console can be considered completed and further planned work can begin.
Voltmeter selection
Of the domestic automobile voltmeters on the market, you can only find devices from UAZ and VAZ 2107. Both of them are poorly suited for installation in a Priora. The first one has a rough appearance and is more suitable for installation on a tank than in the interior of a modern car. The second does not have an external housing, and its dimensions do not allow the device to be neatly placed on the Priora panel. Therefore, it is better to find special tuned devices or use a digital car voltmeter made in China, inserting it into a button or instead of the dial of a Priora watch. Such devices are distinguished by good accuracy, low price and attractive appearance of the digital panel.
What does the dashboard consist of?
The Priora instrument panel contains all the necessary parts that no modern car can do without:
- regulator of external lighting and internal panel lighting;
- switch for turning, side and headlights;
- signal regulator;
- car instrument cluster;
- windshield wiper and washer regulator.
This is how the dashboard works
In addition, the panel contains an ignition switch connected to the anti-theft system. It contains 3 positions. Among the secondary mechanisms, we can note the presence of regulators for the rear window heating system, alarm and interior cooling. It is also worth mentioning the glove compartment, built-in clock and radio input jack.
Lada Priora Sedan › Logbook › Removing the center console of the Priora
I’ll just tell you this for those who don’t know.
To remove the center console you need a Phillips screwdriver.
1. Remove the cover "*** Open ***" and the ashtray below. 2. Take out the buttons (they come out from the front, just pry them off with a flat-head screwdriver)
3. Take out the “emergency lights” button (the same as those buttons)
4. We take out the radio along with its box.
5. 2 bolts in place of the radio (they will be at an angle towards you)
6. 2 bolts in the pocket where the cover was *** Open *** 7. 2 bolts in the ashtray 8. Now pull the console towards you, smoothly without jerking (resistance is possible)
9. The console will not come out completely, because... the clock and control unit for the stove are connected there. The clock connector is located between the air ducts
Now turn off the control unit of the stove.
Well, that's all, we have the console in our hands, congratulations!
By the way, I want to “hoard up” a little. To remove the watch, unfasten the latches on the console
, and to remove the used stove, unscrew 4 screws from the console.
Do-it-yourself tuning and dismantling of the center console
Dismantling the center console on the Lada Priora is quite simple, but has a number of secrets. First, you need to remove the “Open” cover and unscrew the two screws underneath it. Then remove the ashtray and also unscrew a couple of screws under it. Next, remove the tape recorder and take out the frame, under which again there will be two screws that must be unscrewed. The cover needs to be pulled towards you in order to remove the central nozzles from the stove at the top (overcoming some resistance). After the top disconnection, you need to stick your hand in and remove the connectors from the heating, clock, emergency lights, control system. The center console can now be completely removed.
Car interior tuning
The Lada Priora, which came off the assembly line, has fairly light colors in the interior, which can be made darker by painting the center console, door handles, and replacing the upholstery. For painting we will need white spirit, varnish, acetone, primer for metal and plastic, and spray paint. The center console is degreased, primed in a couple of layers with drying between them, painted in 2-3 layers (also with intermediate drying), and varnished.
The situation is much worse if the instrument panel in the Priora is faulty and requires repair. In this case, pinout is needed, i.e., matching the contacts and wires to a particular device. The description of the combinations for the shield states that contacts 2,3,5,6,8,9,16, 17,22, 28-30 are reserve,
Contact
Device
Step-by-step instructions for dismantling the standard radio:
- Before removing the Priora's standard radio, it is recommended to disconnect the negative terminal of the battery from the body.
- Carefully insert a thin steel plate into the slots located under the Scan and TA buttons. The tools must be placed at a slight angle to the side, being careful not to damage the plastic of the radio panel.
- The plates must be inserted until a click appears, indicating that the latches are actuated.
- Then you need to pull the head unit out of the cavity in the Priora instrument panel. To do this, turn the plates slightly to the sides and use them as levers for dismantling. If the tool comes off, it should be reinserted into the groove until it makes contact with the latch.
- Pull the equipment out of the shaft, carefully disconnect the power plugs, antennas and connections to the speakers.
Many owners cannot remove the head unit from a Lada Priora car using the given method, since the tool bends, but the latches do not come off. Instead of plates, it is allowed to use nail files or special keys used to remove Pioneer or Sony radios.
Alternative dismantling method:
- Before removing the radio from the Priora using nail files, you need to completely open the glove box lid.
- Insert the file into the cavity of the right latch until it makes contact with the latch. Then turn the instrument slightly to the right, disengaging the tongue from the audio device body.
- Gently push the rear of the radio through the glove box. Since it is necessary to simultaneously hold the clamps and push the equipment out of the installation shaft, it is recommended to hire an assistant.
- After the body of the audio device extends 2-3 mm, you should move the latch on the left side.
- Continue pushing the radio until it comes out 30-40 mm from the mounting socket. Further movement is limited by the antenna coaxial cable, which is secured with plastic clamps along the lower edge of the instrument panel near the glove box. It is necessary to cut off the clamp and disconnect the connector located in this place.
- After the audio device is completely removed from the mounting socket, you should carefully disconnect the existing plugs.
How to easily and quickly remove the dashboard on a VAZ 2110 with your own hands?
Without a doubt, the dashboard is the most noticeable interior detail in a car, because it is located right in front of the eyes of passengers and drivers. The need to remove the dashboard on a VAZ 2110 may arise for car owners for a variety of reasons.
So, by removing this part, you can get full access to all the electrical components of your vehicle, replace the burnt-out wiring with a new one, connect additional devices or lighting, install a Euro trim or sound insulation.
Options for replacing the standard VAZ 2110 panel:
Old-style panel trim for VAZ 2110 Panel trim for VAZ 2110 Euro-2 Panel trim for VAZ 2110 Euro-1 Panel trim for VAZ 2110 Euro-3 Panel chestnut trim for VAZ 2110 (instrument panel in the center) Panel chestnut trim for VAZ 2110 (instrument panel in the center) Trim panels VAZ 2110 Kashtan Panel trim VAZ 2110 Kashtan Panel trim VAZ 2110 Kashtan
If desired, you can cover the dashboard with various materials of your choice, thereby making the desired changes to the interior of the cabin.
Subtleties
I would like to say right away that removing and replacing a torpedo on a VAZ 2110 will require a lot of time and patience from you
In addition, all repair work must be carried out extremely carefully and carefully so as not to accidentally break the fastening, since the dashboard will not fit back as it should and will creak when driving
To work you will need the following tools:
- marker;
- self-adhesive labels;
- set of screwdrivers and wrenches.
Removal instructions
It is recommended to remove the VAZ 2110 torpedo in the following sequence:
- Interior details. Before starting work directly, it is necessary to prepare the interior, since disassembling the front panel of the VAZ 2110 is best done with room for maneuvers. Therefore, the first thing we do is remove the front seats and steering wheel of the car. It is advisable to carry out dismantling in exactly the same sequence as indicated above, since otherwise it will be extremely difficult to remove the driver’s seat. In order not to break anything, consider your strength when pulling the wheel out of the column splines; to do this, loosen the steering wheel nut a little, and then pull it towards you while loosening it from side to side;
- Transmission tunnel. After the salon is prepared and there is a place to work, we are faced with the next task - dismantling the floor tunnel in the salon. Simply unscrew the screws and push the top of the part being disassembled back. Then do the same with the bottom of the tunnel;
- Steering wheel and steering column. Unscrew the screws on the steering column casing of the VAZ 2110, and then remove the steering column switches. Mark all the wires and connectors released during disassembly with a marker or labels; this will later work to your advantage when, when assembling the torpedo, you end up with a large number of wires of different colors. It is recommended to use the marking especially for owners of cars that are already equipped with an audio system and alarm system;
- Glovebox. The next stage of work will be to dismantle the glove compartment, after which it is necessary to remove the relay and mounting block. Don’t forget to mark the wires as you work and take special care with the fragile speedometer and other dashboard elements that also require special treatment;
- Torpedo. And now we can move on to the immediate purpose of the repair - we have to remove the dashboard. To do this, it is necessary to unscrew the screws in the resulting void behind the glove compartment and unscrew the fastenings. After that, use a screwdriver to hook the air duct on the left side and remove it. Then all that remains is to unscrew the nut, holding the torpedo with your hand, the torpedo and pull it out from the studs, at the same time do not forget to mark the wires with a marker so as not to get confused.
How to remove the radio on the Lada Kalina 2
To remove the MMC of the new Kalina, first remove the plastic panel trim (see above), and then remove the fastening screws.
Now you can familiarize yourself with the sticker on which the radio model is indicated, and based on this, select the appropriate firmware. You can also disassemble the MMC to replace the standard amplifier chip with a more powerful analogue. Don't forget that you can connect a rear view camera or amplifier to the standard radio.
Keywords: cassette player Lada Kalina | Lada Kalina torpedo
Removing and installing the panel (dashboard) Priora
If you decide to install sound insulation for the engine shield, or paint or reupholster the panel, then carefully study the instructions on how to remove and install the Lada Priora dashboard yourself.
A necessary tool. Phillips and flathead screwdrivers, 10mm head, pliers with narrow jaws.
Before starting work, you should disconnect the negative terminal from the battery. Then remove the steering column switches.
Remove the fuse box cover:
- Turn the three locks of the mounting block cover 90°.
- Unclip the fuse box cover.
Disconnect the wires from the ignition switch. Then remove the instrument cluster. and remove the central floor tunnel. Disconnect the wires from the electric power steering:
Then in order:
- Unclip the plastic clips and remove the left A-pillar trim. Remove the right A-pillar trim in the same way.
- Pry off the left door glass blower nozzle using a flat-head screwdriver with soft material underneath to avoid scratching. Similarly, remove the blower nozzle on the right side.
- Unscrew the nut of the upper fastening of the Priora panel, it is located in the cavity under the door glass blower nozzle, using a “10” socket. Unscrew the nut on the right side in the same way.
- Unscrew the bolt securing the ends of the ground wires of the dashboard using the same key.
Console equipment and instrument purpose
The instrument panel on the center console is the place where the interconnection of all devices occurs, correcting and reading the performance of most components of the car. As a rule, the top of the panel is covered with a protective layer. Main instruments located on the console:
- Tachometer;
- Fuel level indicator;
- Turn signal;
- Motor temperature mode sensor;
- Other indicators of vehicle systems being turned on;
- On-board computer display;
- Additional sensors.
The tachometer indicates the number of revolutions of the engine shaft. The scale is graduated in 0.5 increments from 0 to 7. The frequency of readings is calculated by multiplying the data per minute by 1,000. The divisions marked with a red line indicate excessive load above 6,000, which negatively affects the condition of the machine and the power unit.
The left turn sensor signals its operation by flashing the indicator green. Also, the indicators are duplicated with an audio message. The speedometer shows the speed of the vehicle. The coolant heating indicator indicates its temperature. Exceeding 115°C indicates a dangerous level of overheating, which is accompanied by an audible signal and the arrow moving into the red zone.
The instrument panel is removed along with the unit in question. After carefully studying the operating instructions, you can find out how to remove the center console on a Priora correctly. To avoid the possibility of a short circuit, the battery must be disconnected before starting work.
Features of dismantling
The process will not take much time, it is quite simple, no special tools are needed, only a cross-shaped twist. But before you find out how to remove the console on a Priora, learn about some of the features of the procedure.
Disassembly always begins with removing the radio and disconnecting the wires. To remove it, press the special buttons on the sides of the device; you should hear a characteristic click. Pull the radio towards you, disconnect the wires.
Now you need to remove the compartment in which the radio is located, after which the car owner will see two self-tapping screws, they must be unscrewed during the process of dismantling the console.
Peculiarities
Despite the fact that removing the element in question is a fairly simple process, you should remember some nuances. Disassembly must begin by dismantling the radio. For this procedure, special pullers are used, which are inserted into the sides of the tape recorder until it clicks. Then you just need to pull the element towards you, and then disconnect all the connectors that appear. The metal niche where the radio was located is removed. Then the two console trim fasteners are unscrewed.
In order not to miss all the fastening elements, it should be taken into account that the console is fixed with two hidden screws under the Open cover and four similar screws under the ashtray and radio. In the upper part, the cladding is secured with additional metal brackets. To remove it you will need to apply some force.
If the center console is dismantled to eliminate an unpleasant squeak, after dismantling the cladding, you need to paste over the edges of the panel with a special insulator, which acts as protection against extraneous noise. In addition, you should treat in a similar way all areas with which the console interacts and make sure that the element is securely fixed and will not rattle after assembly.