Hot press bearing technology
Pressing bearings in a hot or cold state is, as it turns out, a whole science.
In preparing this material, a lot of existing technological processes and research documents were studied. The data reviewed includes materials from the SKF Group, which specializes in solutions for bearings and bearing units, seals, services and lubrication systems. It should be noted that an entire doctoral dissertation could be written based on the materials of this company. For those interested, a link to their website will be after the article. Why is hot pressing of bearings necessary at all?
Sometimes this requirement is specified in the design documentation for the assembly of the unit. There are also a number of cases when the dimensions and weight of the bearing do not allow it to be installed on the mounting diameter using only pressure alone. In these cases, heating units are used.
The technology for hot installation of bearings is quite simple: the inner diameter is heated to a certain temperature and the bearing is installed on the shaft. Often this operation is carried out using a small press force.
Equipment for heating bearings can be divided into several types:
- Oil baths are rarely used, because... there is a risk of bearing contamination and rapid failure (14% of all bearing failures occur due to contamination)
- Heating plates with electric heating - also not used often, due to one-sided heating
- Induction heating machines are the most commonly used type of equipment for hot mounting of bearings. We will talk about them further.
Here, probably many may think about using gas burners. This heating process is practically uncontrollable. During the heating process, you can get undesirable metal structures, warping and cracking.
Induction installations or installations for heating with high-frequency currents are divided into the following types according to their design:
- Stationary induction heating installations
- Mobile induction heating systems
- Portable equipment as shown in the diagram
It is important to note that using the above links you can only view the basic design of the equipment. Induction hardening installations and induction installations for heating bearings will differ greatly in their characteristics: output frequency and electromagnetic field power
In terms of design, the bearing is an assembly unit with geometric tolerances of hundredths of a micron. Therefore, before planting, it is heated only to a temperature of 90-120⁰C on induction units with a low output heating power. This temperature completely allows for trouble-free installation of the bearing and without compromising its integrity. At this temperature, there are no quantitative or qualitative changes in the structure of the metal, and no distortion of geometric dimensions occurs. In principle, when heating bearings, the same laws of the electromagnetic field operate as during hardening with high-frequency frequencies.
These are perhaps the most important aspects of hot pressing bearings using induction heating. Hot installation of bearings is not a very complicated technology, but on the other hand it is a very responsible process, because 14% of all bearing failures occur due to improper installation.
As promised, the Russian-language website of the SKF Group
Combined design lugs
If your equipment is homemade, and the ground for work is not too difficult, the wheels should match. You can make lugs for a walk-behind tractor with your own hands using a tread from a tractor.
To make it you will need halves of Zhiguli wheel rims. We select tires with a developed tread from the tractor. We cut off the sidewalls and get a closed rubber ring with good tread. We open the halves of the wheel rims and twist them firmly after laying the tire.
The resulting lugs allow you to move along a compacted dirt road without fear of loosening it. On the soft soil of a plowed field, the wheels will also not let you down, although the traction force will be less than when using the metal version.
If, in addition to the tenacity of the wheels, the task is to necessarily loosen the soil in the rut, knife-type lugs are made. You can create a homemade rim for attaching hooks, or you can weld them onto wheel rims.
The only drawback of this design is that the knife-type lugs are not suitable for normal movement of the walk-behind tractor. In any case, the land in the rut will be plowed. When loosening the soil in spring in combination with traditional attachments, the width of the soil processed in one pass doubles, saving your time.
Conclusion: It doesn't matter how you make the lugs. The main thing is that it is not at all difficult, and the cost savings are huge.
If you have any questions, see homemade lugs for a walk-behind tractor from what you found in the barn.
Press-fitting - bearing - rolling
Encyclopedia of Mechanical Engineering XXL Sulphation of battery plates SEARCH
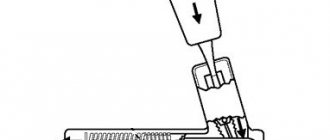
The design of stands and pressings for pressing rolling bearings should, if possible, exclude the transmission of force through the rollers or bearing balls, as this leads to their collapse and damage to the treadmills. In these cases, the pressing force must be transmitted directly to the bearing ring that is being pressed. In order for the pressed parts to easily fit into the guide parts of the stands and press fittings, they must have chamfers at an angle of 30 or roundings made strictly concentric with the main diameter.
| Keys for removing studs.| Presses for assembling parts. |
If there are no special devices for pressing rolling bearings, use drifts made of copper or other soft metal. The blows transmitted through the drift are applied alternately along the entire end of the ring.
The greatest difficulty in assembling the unit is the unpressing and pressing of the rolling bearing onto the cylindrical part of the pin of the lower head of the connecting rod. If there is an oil bath for heating the bearing, the operation of seating the bearing on the pin is greatly simplified.
One of these devices with a double swinging pneumatic cylinder and a lever amplifier for pressing rolling bearings into housings and shafts is shown in pos.
One of these devices with a double swinging cylinder and a lever amplifier for pressing rolling bearings into housings and shafts is shown in pos.
The pressing of rolling and sliding bearings into the holes of parts or their installation on shafts is carried out using presses of various designs.
Installation of bearings in the housing, if the outer ring is pressed into the housing hole, is done in the same way, only the housing is heated or the bearing is cooled. Pressing a rolling bearing into the housing usually requires relatively little force.
| The simplest methods for pressing rolling bearings. |
In some cases, when parts need to be pressed into large and heavy housings, for example, into a lower frame or turntable, and presses cannot be used, special devices are used. If there are no special devices for pressing rolling bearings, then you can use drifts (Fig. 232, a) made of copper or other soft metal. The bearing is seated on the shaft by uniformly hitting a hammer pressed against the inner ring with a hammer. The blows transmitted through the drift are applied alternately along the entire end of the ring.
In some cases, when parts need to be pressed into large and heavy housings, for example, into a lower frame or into a turntable, and it is impossible to use presses, and also when excavators operate at a great distance from repair bases, special devices are used for pressing parts. In Fig. 264 shows devices for pressing bushings, and in Fig. 265 - for pressing in rolling bearings. Such devices can be made at any Khoi repair shop.
Simplifying assembly operations and assigning them to specific workstations allows for maximum mechanization of assembly. Line assembly areas are equipped with conveyors for moving engines, electric and pneumatic tools for tightening bolts, presses for pressing rolling bearings onto the shaft, rotary tables and other special mechanisms and devices.
When assembling rolling bearings, the following defects are possible. Ovality of the inner ring of a radial bearing occurs due to improper pressing onto the shaft. Misalignment of the rings during assembly leads to chipping of their edges. Rotating the rings on the shaft or in the housing leads to heating of the bearing and vibration. During assembly, care must be taken to ensure that the fixed ring is able to self-align to compensate for thermal expansion. When pressing rolling bearings, it is often necessary to heat them in an oil bath to 80 - 100 C.
How to make lugs with existing factory wheels
The easiest way is to put the structure on the tire, like snow chains.
It is enough to take sheet iron 2-3 mm thick and cut a strip that will be slightly wider than the tire profile. The tension is ensured by a simple tie rod made of bolts. The edges of the strip should be folded to prevent slipping under lateral loads.
The lugs themselves are cut from thicker sheet steel (4-5 mm). They must be bent in the middle at an angle of 120°. The blanks are then welded to the strips at regular intervals.
Therefore, before starting work, you should use ready-made drawings, or develop a layout yourself.
You can make such lugs with your own hands in a couple of evenings. If you use a regular smooth tread on a homemade walk-behind tractor, the device will turn the equipment into a real SUV.
We will introduce small mechanization lovers to various types of structures and varying degrees of complexity.
How to press a bearing onto a pipe
Encyclopedia of Mechanical Engineering XXL SEARCH
Before you begin to repair the pipe and press the bearing onto the pipe, you need to prepare the installation site and check the inscription on the bearing packaging and its markings.
Re-preservation of the bearing is carried out in accordance with the in-plant instructions, which specify the permissible heating of the part, usually up to +80 ... +90 ° C. Correct pressing of the original bearing onto the pipe involves heating the enclosing ring and cooling the seating shaft. If freezing is not possible, then you can limit yourself to heating only.
Installation algorithm
Thermal operations in service centers are performed in muffle or induction furnaces, and for small parts in mineral oil baths. In the absence of the necessary equipment, the parts are heated in an oven or with a hairdryer, taking into account the specifics of the connection. If the element is installed on a pipe, then the bearing heats up, if inside, then the seat. After heating, the elements are washed in special solutions, usually gasoline, a 6-8% oil solution or an aqueous anti-corrosion preparation consisting of the following components:
- Water.
- Sodium nitrate.
- Triethalonamine.
- Wetting agent OP.
The shelf life of treated parts without additional anti-corrosion treatment is limited to 2 hours.
Mounting accessories
The following are used as additional devices to facilitate and speed up the pressing process:
- a guide tool in the form of fingers or a female ring that protects the connection from distortion. The choice of the type of auxiliary element that ensures uniform distribution of forces over the supporting surface depends on the diameter of the bearing;
- puller,
- standard keys.
Basic Rules
To minimize the risk of damage to elements and ensure reliability of the connection, it is recommended to take a number of precautions, which include:
Pressing in the bushings is carried out only using a mandrel or special cups made from a pipe with holes for bleeding air and a hammer. In this case, the size of the glass should slightly exceed the mounting diameter. You can make the mandrel yourself from old parts by turning them in the right places, but it is preferable to buy a ready-made set. Attempts to install the bushing manually using a hammer often end in jamming of the working rings. The best tool for doing the job is an industrial press, which creates a uniform linear load
When pressing a bearing, the main attention should be paid to the alignment of the parts. Deviation is fraught with distortion of the bushing shape, scuffing and destruction of the inner rings
How to control the quality of work?
- An external inspection of the parts should not reveal chips, cracks, nicks, traces of corrosion, risks from processing and contamination;
- When turned by hand, the bearing rotates quietly and without jumps. The most competent way to determine performance is to analyze vibration indicators.
- An objective indicator of the proper functioning of a bearing is the temperature, which should not exceed the ambient temperature by 30°C. Its growth is provoked by excessive tension, lack of lubrication, small gaps, too much surface wear, and misalignment of the rings.
- The tightness of the fit of the end part of the bushing to the supporting area is determined by a 0.03 mm feeler gauge. It must be uniform and comply with regulatory and technical requirements.
If the conditions are met, a reliable fit and minimal deformation of the elements are achieved. The work of installing a bearing on a pipe takes a few hours and is no more difficult than installing a wheel.
How to press Alisa-motors bearings correctly
Encyclopedia of Mechanical Engineering XXL Dry cylinder liner SEARCH
The realities of a complete lack of technical literacy are not an idle question. In this difficult field, a lot of things were ruined: bearings, sockets in which they are placed, sledgehammers were broken off, but how many nerves were spent? It's scary to imagine...
To install a bearing and forget about it forever, you need to meet several conditions:
- Sobriety
- Good theoretical preparation
- Availability of mandrel
- Desire to learn and constantly develop in your craft
Most people ignore the mandrel: they take a sledgehammer, place the bearing on the socket and hammer it like a crutch into a sleeper... With this approach to repair, it is difficult to predict the result:
- The clip may burst
- Will flatten out
- Will stand up lopsided
- The socket may become jammed
- The sledgehammer breaks
- Your wallet will be empty
- The weekend will be wasted
Theory
In order to make your work as easy as possible and reduce the risk of damage to parts to a minimum, and at the same time ensure high quality repairs, you need to follow several important rules:
- The bearing must be pressed in using a mandrel only. It is strictly not recommended to apply force to the bearing through its working elements! If you need to press a bearing into a seat, then the pressing force must be applied strictly to the race with which you are pressing or pressing it. And in no case should you do the opposite: drive the bearing onto the shaft by hitting the outer race or hammer it into the socket by hitting the inner race, that is, apply force through the working elements
- In order to facilitate work and minimize damage to sometimes very expensive parts, the mounting sockets must be heated to a temperature of 100-110 degrees. It is best to heat it with a hairdryer or in the oven according to the principle: if we press the bearing into the socket, then we heat the socket, if we seat the bearing on the shaft, we warm the bearing
- For greater effect, heating can be supplemented with freezing in the following combination: if you need to press a bearing into a seat, we heat the seat and freeze the bearing. If the bearing needs to be mounted on a shaft, we heat the bearing and freeze the shaft. Unfortunately, freezing for various reasons is not always possible and you have to limit yourself to heating only. If possible, the bearing should be pressed in using an industrial press. This method provides a lot of advantages: only a linear load will be applied to the bearing, and not an impulse load if hammered in
Mandrel
It is not at all necessary to buy a mandrel; you can make it yourself in a few minutes from a scarce material: from the same bearing that needs to be pressed into place. If you are too lazy to bother, you can buy a mandrel or even buy a whole set and use it for your health. Whatever is more acceptable to you, then choose.
We take an old unnecessary bearing that is still capable of rotating. We bring the bearing to the wheel of the sharpening machine and grind the cage a little: if the bearing is turned across the stone, the work will go much faster
There is no need to sharpen the clip, literally a tenth of a millimeter is enough
We cut out the inner ring by welding
For ease of operation, we weld a washer onto the holder
Press-fitting
We heat the seat, position the bearing, place a mandrel on the bearing and use a hammer to drive it to the required depth. You need to hammer in several gentle blows, constantly monitoring so that the bearing does not become distorted.
It is even easier to install a bearing on the shaft: we cut off a piece of a suitable size pipe, heat the bearing, put it on the shaft, place the pipe on the inner race and hammer it in
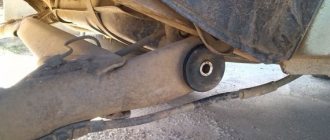
All about wheel bearing repair
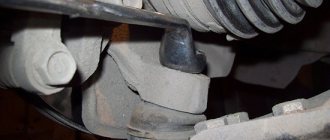
Actually, the procedure itself (we will support it with photographs) for replacing the bearing: — we install the car on a flat surface; — be sure to place shoes under the wheels that we will not repair; — with the keys we tear off the nuts on the wheel and after jacking up, finally unscrew it, the wheel with the disk of God is in a secluded place until better times; — dismantle the fixing pin and unscrew the axle nut; — using wrenches, disconnect the tie rod ends (if we are talking about the front suspension), the lower arm and the stabilizer link — look at the photo: — clasping the hub with both hands and rotating it left and right with careful movements, dismantle the hub.
- remove the sealing ring and retaining rings, in accordance with your car model, and using a puller, easily and simply press out the faulty bearing.
Press-fitting - bearing
The holes in the mounting cups (Fig. 7.11, a, c) are intended for the outlet of the housing from the internal cavity of the cup when pressing the bearing onto the shaft.
The holes in the mounting cups (Fig. 7.11, o, c) are intended for the free release of air from the internal cavity of the cup when the bearing is pressed onto the shaft.
Fitting the bearings onto the shackle axis is carried out similarly to fitting the bearing onto the crank pin, using for this purpose an oil bath for heating or a special mandrel for pressing the bearing.
| Electric motor type EPT-2. |
The cast aluminum disk 18 (see Fig. 81) of the movable brush is placed on the axis of the polisher body, secured with a screw and closed with a threaded cap (plug). After pressing the bearings, the disk is statically balanced, the end runout is allowed no more than 0 3 mm. When the cone roller is pressed onto the friction clutch, the roller carries with it the disk holder of the movable brush.
When installing bearings with twisted rollers and split outer rings, use the device shown in Fig. 17; it compresses the outer ring of the bearing, making it easier to fit into the housing. After pressing the bearings, it is necessary to check the fit of the bearing to the shaft shoulder or to the side of the bearing housing; a feeler gauge 0 05 mm thick should not pass through.
The steering gear screw needle bearing must be pressed into the upper cover of the steering gear housing so that the marked end of the bearing faces inside the cover. After pressing the bearing, the needles should move freely in the bearing race.
| Method of mounting ball bearings. |
To make it easier to press the bearing onto the shaft, it is advisable to heat the bearing for 10 - 15 minutes in machine oil at a temperature of 80 - 100 C. When pressing the bearing into the housing, the latter is preheated with a stream of hot air or immersed (a small-sized housing) in hot oil. It is also possible to cool the bearing to a temperature of -75 C in a thermostat with dry ice.
The basic rules for installing bearings are as follows. When pressing the bearing, the force must be transmitted directly to the ring that is installed with interference. If both rings are installed with interference, then the force must be transmitted directly and simultaneously to both rings. It is unacceptable for force to be transmitted from one ring to another or from the cage to the ring through the rolling elements.
| A device for pressing out the needle bearing housing of the cardan shaft of the Moskvich-2140 car.| Cardan joint assembly. / - cardan fork, 2 - retaining ring, 3 - bearing cup, 4 - seal, 5 - spider spike, 6 - bearing needle, 7 - dipstick. A, B, C, D - dipstick blades. |
When pressing bearings, when the cross rests against the bearing housing (in this case there are no gaps), use a measuring probe, which has four petals 1 53 thick; 1 56; 1 59; 1 62 mm, determine the distance between the bearing housing and the end of the annular groove.
When pressing the bearing onto the shaft, the force from the mandrel must be transmitted to the end of the inner ring, and when pressed into the housing, to the torus of the outer ring. When simultaneously pressing the bearing onto the shaft and into the housing, a mandrel with concentric flanges abutting the ends of both rings is used.
In the crankcase and its covers, the press-fit areas of bearings, mainly rolling bearings, wear out. If the size of the hole for press-fitting the bearing is outside the tolerance established by the repair technology (which is determined during a defect with a non-passing plug or by eye), the crankcase or crankcase cover is rejected or bored out for press-fitting of an adapter steel sleeve. After boring the crankcase, use a special device to check the alignment of the bored hole with the hole in the front cover using an indicator. The misalignment should not exceed 0 02 mm.
In the crankcase and its covers, the press-fit areas of bearings, mainly rolling bearings, wear out. If the size of the hole for press-fitting the bearing is outside the tolerance established by the repair technology (which is determined during a defect with a non-passing plug or by eye), the crankcase or crankcase cover is rejected or bored out for press-fitting of an adapter steel sleeve. After boring the crankcase, use a special tool to check the alignment of the bored hole with the hole in the front cover using an indicator. The misalignment should not exceed 0 02 mm.
Trailer options for walk-behind tractor
Depending on the planned volume of transportation, the method of using the trailer and the capabilities of the walk-behind tractor, several different options can be made:
- The lightest single-axle trailer weighs 50-70 kg. load without taking into account the weight of the driver, the easiest way to make this option is from a heavy single-axle garden cart with rubber wheels. All that needs to be done is to weld to the handle a towbar for a walk-behind tractor, made from a hitch from a plow, and a small stand for sitting;
- Universal small-sized trailer for small loads. Unlike the previous option, such a trailer can lift up to 120 kg, is safe and stable even on uneven ground. The U-shaped frame structure is welded from an I-beam, a towbar is installed on the drawbar to the walk-behind tractor from the plow, which can be used as a stand;
- A heavy rubber trailer will allow you to use the most productive capabilities of the walk-behind tractor. By spending money on metal profiles and cheap spare parts from the running vehicle, you will get a convenient trailer design for walk-behind tractors, costing several hundred dollars.
The heavy version will allow you to transfer the attachments, the plow, and the entire stock of potatoes to planting at one time. The service life of such a machine is tens of years.
READ How to make a walk-behind tractor with a gearbox
Trailer frame: 1 — brace (angle 21x21x3), 2 — seat frame (angle 21x21x3), 3 — riser (pipe 50x25x4), 4 — seat posts (angle 40x40x4), 5,14 — front struts (pipe 50x25), 6, 15 — longitudinal spars (angle 40x40x4), 7.8 — right wheel axle supports (angle 32x32x4), 9.16 — rear struts (pipe 50x25), 10 — reinforcing cross member (angle 40x40x4), 11 — longitudinal hinge housing (pipe 58x4 ), 12 — wheel axle (rod with a diameter of 30), 13.17 — transverse spars (angle 40x40x4), 18 — gussets (s4)
Do-it-yourself wheel bearing replacement
Replacing a wheel bearing is a routine job that all car enthusiasts can do.
The essence of the work is to transmit rotation through rolling bodies.
In this case, the outer and inner cages are not connected to each other.
In our case, the inner race is articulated with the hub, and the outer race with the steering knuckle. Inside the hub there are teeth that serve to engage the hub with the drive shaft. It is these splines that allow torque to be transmitted from the gearbox to the wheels of the car.
It’s worth noting right away that replacing the wheel bearing is possible in two ways:
- canonical, which is the only option if you want the part to go happily ever after;
- artisanal. In this case, the service life of the new spare part depends entirely on your skill.
Another type of design involves using the threaded joint between the bolt and nut as a force to push out the bearing.
The principle of selecting attachments is the same as for the previous puller. The second replacement method involves using various attachments and a hammer. They knock out and then drive the wheel hub and bearing back in.
Using the Daewoo LANOS as an example, let's look at how to replace the front wheel bearing. When you feel that the bearing has stopped, you can stop.
Install the second retaining ring. Press the hub into the steering knuckle.
Folk craftsmen recognize two ways out of this situation:
- file the remains with a grinder and then cut them with a chisel;
- knock off the clip using a chisel.
Both of these methods are dangerous because there is a risk of damaging the front bearing seat on the hub.
Recommendations
Replacing wheel bearings may vary from vehicle to vehicle. Modern cars may be equipped with various easily damaged electronic devices that must be removed when replacing a bearing. Therefore, if you are not a highly qualified car mechanic, it is better to entrust this work to car service specialists.
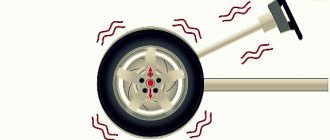
It is also worth doing a wheel alignment after replacing the wheel bearing. An adjusted wheel alignment will improve the car's road holding on turns and straights, eliminate vibration, and also reduce tire wear and fuel consumption. Vibration may also occur due to a crookedly inserted bearing. To eliminate it, you need to knock out the bearing again and check the tightness of the wheel nuts.
Pressing out - bearing
| Crankshaft pulley puller for Moskvich car. |
Pressing out the bearing when replacement is necessary is very difficult. The split collet of this device with external shoulders has an internal conical surface. The collet is inserted into the hole under the bearing, then the collet's petals are pushed apart with the body until they touch the inner ring. Thanks to the shoulders on the collet petals, the bearing is captured by the end surface of the inner ring. By screwing the nut onto the collet screw, the bearing is pressed out.
| Diagram of pressing the shaft out of the rotor core. |
Sliding bearings are pressed out of the housing using a vertical press in case of replacement, and most often when it is necessary to refill the bearings. Bearings of low-power electrical machines are pressed out by hitting a wooden extension with a hammer, taking care not to damage the bearing housing.
Hydraulic pullers have recently begun to be used to press out bearings, as well as coupling halves, pulleys and other parts. They are very convenient to use and facilitate the disassembly of machine components for repair.
To press out rolling bearings from the housing, if the latter does not have special grooves for inserting the puller legs into them, use bolts screwed into through threaded holes (Fig.
| Dismantling the bearing. |
When pressing bearings out of the housing seats, cavities or grooves are provided into which the paws of the puller are inserted.
When pressing a bearing out of the housing, force is applied to the outer ring, and when pressing from the shaft, force is applied to the inner ring. Do not press out bearings with impact tools.
When pressing bearings out of the caps, use special pullers.
When pressing the bearing out of the housing, force is applied to the outer ring, and from the shaft - to the inner ring. Do not use a percussion instrument.
When pressing a rolling bearing from the shaft, its inner race is poured with hot oil.
A device for pressing out spindle bearings of screw-cutting lathes.
There is a known method for pressing out bearings by applying axial forces to a ring pressed onto a shaft or in a sleeve. However, with this method it is impossible to dismantle bearings in cases where there is no free access to the pressed ring.
| Allowable and correctable defects on rolling bearings during repairs. |
General information and characteristics
For a cart, walk-behind tractor, or cultivator, the hub is an indispensable component. With the help of this part, and also thanks to the installation of a special attachment, you can, for example, hill up and plow the land, harvest crops, and plant potatoes much more efficiently and with better quality.
The hub for a walk-behind tractor comes in two main types. In particular, these are:
- hub with differential for walk-behind tractor with unlocking (differential);
- ordinary detail.
It is believed that the hub is differential - it is universal for all types of walk-behind tractors. Hubs for a walk-behind tractor with a differential are needed if the walk-behind tractor is not equipped with a wheel unlocking function, and turning or turning the agricultural machinery causes great difficulties at the end of the beds. A differential hub with bearings for a cart or walk-behind tractor will improve the maneuverability of the device. This is why the differential hub is universal for all types of walk-behind tractors: it allows you to make only one additional revolution all the way and makes maneuvering the device easier.
Differential options (or axle shafts with differential) consist of:
- from the retainer;
- their one or two bearings.
The hub on the walk-behind tractor can also be of different diameters. The following parts are distinguished by shape:
- round;
- hexagonal (24 and 32 millimeters);
- sliding
How to press in a wheel bearing with your own hands
And only in case of “dead” sticking of the clip should resort to emergency measures. The principle of pressing out and pressing in the rear wheel bearing is no different from the work done on the front axle.
If you are changing the front wheel ball bearing using a makeshift method, pay attention to the following tips:
- The old bearing can be used as a press-fit race.
- a socket head of a suitable diameter can be used as a clip for pressing out;
The clip should be struck with even force. You need to hit on opposite sides or evenly moving in one direction. The main thing is that there are no distortions.
Since the hole has widened, there should be no problems performing this task. When all the parts have cooled down, you can try to pull out the bearing - it is unlikely that you will succeed. Naturally, the second option will cost more.
Determining the condition of parts
To determine the condition of the hub parts, it is necessary to lift the car wheel so that one or more wheels are above the ground. And shake them simulating vertical and horizontal load. Before checking the wheel, it is necessary to check the stability of the body; to do this, push the body from the side; the body must stand securely; if there are vibrations, it is better to shift the safety pad. If the wheel play is no more than 2 mm, then you can try to adjust the gap in the rolling elements of the product.