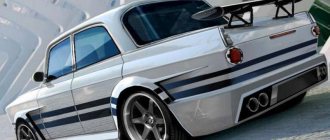
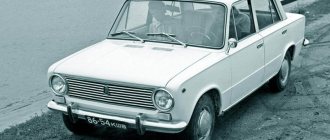
Moskvich tuning appeared quite a long time ago, back in the times of prosperity of the Moscow Automobile Plant and widespread demand for the products of this enterprise. Even then, the owners of “Muscovites” were thinking about how to change the appearance and internal structure of their “iron horse”. The results of these attempts to stand out from the crowd often seem pathetic to a modern person - they are so insignificant. However, car enthusiasts often reached heights unprecedented in their technical sophistication for the Soviet Union. Today, the work of the Kulibins is continued by their Russian descendants, who want to give the “Muscovites” a second life.
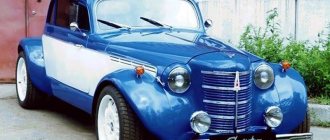
In this material we will talk about models 408, 412 and 2140, since they are based on the same platform and are similar in structure. Modern Moskvich car tuning can develop in three directions: classic, ratluk and sport. Sometimes they are mixed, and then, for example, under the hood of a car with a classic body there is an improved engine with excellent technical characteristics.
External tuning
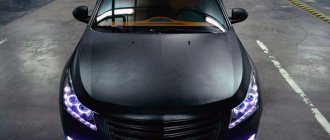
Do-it-yourself tuning of the Moskvich 2140 begins with improving the body characteristics. The car body undergoes a major overhaul and only after that it will be improved. An air intake scoop is installed on the hood, which will further cool the engine.
External body kit and plastic thresholds can be purchased at the store or made yourself from fiberglass. Installation of the front and rear bumpers is carried out on the standard mounts of the Moskvich 2140 car. Tuning (photos presented in the article) made of fiberglass is considered optimal, since the cost of the material is low, and it is easy to work with it, even if the parts are made by hand.
Plastic thresholds are glued with double-sided tape. To install the wing, you will need to drill holes in the trunk lid. Next, you need to secure the spoiler with bolts, but before that, treat the holes from corrosion.
The tuning of the Moskvich 2140 does not end there. Then you need to select and mount rear view mirrors on standard seats. You will also have to replace the mirror in the cabin, which over the years has become covered with black spots along the edges.
Before starting airbrush tuning, Moskvich 2140 (the surface where the pattern is applied) is coated with a matte layer. After which, if necessary, it is cleaned and paint is applied.
The technology for upgrading the Moskvich 2140 Lux is similar. The cars are only slightly different on the outside, although each radiator grille is individual, so it is selected separately. You can also make the radiator frame yourself.
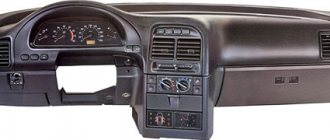
What can be changed in the cabin: installing a heated seat system and a new dashboard
When considering what can be changed when tuning a car, we will pay attention to upgrading the interior. Interior tuning involves a relatively small investment. Very often, heated seats are installed, as well as the dashboard is replaced.
Heated seats can be organized using several methods:
- In the store you can find various pads that are placed on seats. Devices of this type can be powered from the on-board network or cigarette lighter. It is worth considering that a device powered by a cigarette lighter is less popular today, as it creates a significant load. As a rule, preference is given to systems that operate from the on-board network.
- Most often, the heating system is connected through an additional fuse to the ignition switch drive. An additional button is installed to control this function.
The dashboard can also be upgraded if necessary. The features of such work include the following points:
- The standard backlight is relatively low in efficiency. It is gloomy, poor quality, and in the dark it is impossible to read all the information.
- To change the design, you need a set of LEDs, which are the light source, double-sided tape for attaching it, glue and a set of screwdrivers for mounting the dashboard.
Salon
If you decide to change the interior, then tuning the Moskvich 2140 begins with the car’s interior being completely disassembled. The instrument panel can be covered with a special colored film or replaced with an alternative one from Oper Vectra B.
When tuning 2140, the seats are covered with Alcantara fabric. The color range of this material allows you to choose the desired color to match the interior and exterior. Next comes the reupholstery of the ceiling and side pillars. The rear shelf where the speakers are mounted is being redone. The seats can be replaced with the same ones, but from another car.
The latest modification is the installation of a multimedia center and subwoofer in the luggage compartment.
Exterior modernization: features of the work being carried out
In order to make a car truly unique, its body must be modified. There is simply a huge amount of work that can be done to make the body more attractive. Most often, ready-made kits are purchased, which are produced by tuning companies. These kits include:
- Body kit.
- Front or rear bumper. In many ways, the style of the car depends on the design features of the installed bumpers. In this case, the front one may have built-in fog lights, which increase the degree of illumination of the road when driving at night.
- The skirt is installed in order to make the car appear to have a lowered suspension. At the same time, it is made from a more plastic material than a bumper.
- Various types of overlays. In order to make the body more complex in appearance, various types of linings are installed, which can also be painted in the color of the car.
- Head optics and rear lights.
The advantages of a ready-made set include the following points:
- Real designers are involved in the production of the set, who make the car more attractive.
- The finished sets are of high quality, as they are manufactured using modern technologies.
- Making a body kit yourself is quite difficult. We are talking about both the development of a unique design and the actual execution of the work.
- Elements from a ready-made kit are easier to install.
Changing the body of the Moskvich involves more serious intervention, for example, welding on the wings or lengthening the rear to increase the luggage compartment. In addition, do not forget that the car has not been produced for quite a long period, the body is often in poor technical condition. Therefore, it is necessary to clean and repair corrosion. It’s possible to receive bonuses without investment, and if there is one in a casino, it’s a profitable, customer-oriented company. Thus, the Super Slots no deposit bonus for registration provides maximum benefit, and the result of its use is real money. You just need to familiarize yourself with the wagering conditions, this is the only way to achieve good profits.
Engine
On a Moskvich 2140 car, engine tuning should be done completely, since the car is devoid of electronics, there are two modification options: the first is tuning the mechanical part, the second is a complete replacement of the power unit along with the gearbox.
In the first option, lightweight pistons, a camshaft, repair liners, valves with a thin chamfer, and enlarged seats are installed. All these modifications can be done with your own hands, with the exception of boring and honing the block. By installing a turbocharger, you can increase power by 10%, and if you add a water injection system through the carburetor, you can achieve 25% with fuel savings of 15%.
In the second option, an Opel 2-liter engine is installed in place of the old engine. This modification requires some modifications to the power, cooling and exhaust systems.
"Moskvich-2140 Lux" has the same technological procedure for tuning the engine, except that valves and seats cannot be replaced, since they are not commercially available. A way out of the situation may be to independently manufacture these parts on a lathe.
Suspension
To improve the suspension, longitudinal thrust stabilizers are installed, which are made with your own hands on the Moskvich 2140. Tuning (photos of converted cars are presented below) is that it is necessary to replace all the shock absorbers with Zhiguli ones, and also install forged low springs to reduce the ground clearance.
In this case, wheels and tires are selected according to the bolt pattern. They can either increase or decrease ground clearance. The tuning version of the tires has a size of 185/60R15. Also, by replacing the hubs and installing a 5x100 bolt pattern, you can install chrome wheels, which will allow the car to always be stylish and recognizable.
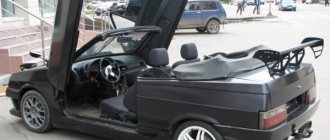
Tuning Moskvich 2140 - how to turn a Soviet rarity into an exclusive car?
105), in the middle part of which the main gear reducer and semi-balanced flange axle shafts 7 are mounted, supported by closed-type ball radial bearings 4 with disposable lubrication.
Rice. 105. Rear axle assembly:
1 — housing of the outer seal of the bearing; 2 — bearing mounting plate; 3 — thrust bushing; 4 — axle bearing; 5 — axle shaft seal; 6 — locking bushing of the bearing; 7 — axle shaft; 8 — rear axle housing; 9 — spring washer; 10 — gearbox mounting bolt; 11 — gear housing; 12 — driven gear of the main gear; 13 — drive gear of the main gear; 14 — rear drive gear bearing; 15 — adjusting shims; 16 — spacer sleeve; 17 — adjusting gaskets; 18 — front drive gear bearing; 19 — oil deflector washer; 20 — drive gear oil seal; 21 — flange for fastening the propeller shaft with the mud deflector assembly; 22 — washer; 23 — drive gear nut; 24 — satellite finger pin; 25 — differential box; 26 — differential box bearing; 27 — adjusting nut of differential bearings; 28 — stopper; 29 — spring washer; 30 — stopper mounting bolt; 31 — axle gears; 32 — satellite; 33 — satellite finger; 34 — oil filler plug; 35 — plug gasket; 36 — spring washer; 37 — driven gear fastening bolt; 38 — differential bearing cover; C - installation size
The free splined ends of the axle shafts are located in the holes of the side gears installed in the final drive differential.
Gears 12 and 13 of the main gear with hypoid gearing are installed in a cast ductile iron crankcase 11.
The drive gear 13 is supported by two tapered roller bearings. The differential box, in which the driven gear 12 is installed, rests on two tapered roller bearings 26.
The movement of the differential box with the driven gear when adjusting the side clearance is carried out using adjusting nuts 27.
The brake drums and wheels are directly attached to the axle flanges.
Main gear ratio = 3.9 (35 and 9 teeth).
During the operation of the car, the moving parts and components of the rear axle are subject to wear, which over time begins to affect not only the operation of the rear axle, but also the entire transmission.
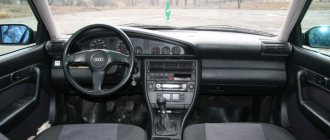
To say that the Moskvich dashboard has lighting problems at night is an understatement. Having time, great desire, experience in an advertising agency and, as a consequence, knowledge of technologies and materials, I decided to completely change the panel. I will briefly describe in words what it was decided to do. Bring all devices to one plane, illuminate the arrows, as well as completely over-illuminate the panel with an LED strip using a voltage stabilizer and adjusting the brightness of the backlight. Below I will describe step by step how the process proceeded, accompanied by photographs.
The idea was in my head, then I scanned the stock overlay with sensors, transferred my thoughts into electronic format and the following came out:
To begin with, having a layout, it was necessary to make sure that all calculations and measurements were correct. To do this, I printed out the drawing on thick A3 paper and cut it out, then inserted it into the panel and - hooray - everything fit as it should. After this, you can send the prototype to production. The next day I went to pick up the finished platform, the tachometer and speedometer rings, as well as the edges of all the instruments. They were cut out on a laser machine from organic material, 2mm thick transparent parts, 3mm white.
In another organization I took color inserts cut using a plotter into a future panel. Color scheme - black background, dark gray scales with white numbers, color division in additional devices. Arriving home, I started selecting cuttings, and also glued a white film onto a transparent base (due to the lack of dairy organics of the required thickness)
The next day, I was woken up by an SMS from tj-DimON-02rus saying that it was time to get up to pick up the volgostrelki, for which I thank him very much. I began to slowly assemble the cuttings into a single whole, gluing the cut out parts under the bottom of the main sticker. We apply the mounting film to the top layer, then peel off this sandwich, turn it over with the adhesive side up, wet the surface with wet fingers (as when tinting), and glue the colored pieces, thereby simulating a color filter. Thus, we collect all the parts and set them aside to dry so that the water dries up and we can continue working.
In the meantime, switch to the remaining plastic. I took the idea from the dashboard of the Audi A1. We have rings for the tachometer and speedometer, which will be notched; the inner cavity of the gray scales has a digital designation. And this whole composition is decorated with a silver rim. A white film of the main plane remains under the ring with notches, which provides a glow, and given that the plastic of the ring itself is transparent, there will be an additional pleasant light from the ring towards the numbers. In order for the rim of the tachometer and speedometer to stand out from the rings, I made it from two rims 2mm thick; as a result, the rim became 4mm high - this is more than enough. Then we paint them with paint from a can in several layers. The best thing to do was to go over it with putty and wipe off all the joints after gluing them; they weren’t visible on white, but after painting they came out, but not having putty, I left them like that.
While the headbands are drying, we return to our film and begin to assemble the sandwich. On the white film glued to the base, we apply the main layer of black matte film, on which the signal light icons have already been applied on the inside (the only weak point in all technologies is fine cutting - it is impossible to cut accurately and finely).
Then gradually, slowly, with great endurance and straight hands, we apply the remaining elements in turn. It is at this stage that the panel begins to be drawn, much better readability is already visible, relative to the standard, of which nothing remains here.
Next, we glue a white film onto the rings, scales on it, and then glue it all onto the tidy, then glue the rim.
We do the same with the speedometer and glue the rims onto the additional devices. And we get this wonderful panel:
Before starting to work on lighting devices, it was decided to assemble the accompanying circuits - a backlight brightness regulator and a voltage stabilizer. Why reinvent the wheel if everything was already invented a long time ago. A friend suggested the stabilizer diagram, I’ll just give the diagram here:
Being carried away by assembly and soldering, I missed the moment of photographing the assembled circuit, I came to my senses when I had already sealed it into a box with a glue gun:
Next according to plan was the assembly of the backlight brightness adjustment.
I found a ready-made circuit on the drive; my only change was to use a 1K Ohm variable resistor for smoother brightness control. The result is this:
The last goal before overexposure was to remove, if possible, all the jumpers for a more even distribution of light across the panel, leaving only the posts in the center on which the panel itself rests:
That's it, preparation for overexposure has been completed, let's proceed to the process itself. For overexposure I used an Arlight LED strip, model LUX RT-5000 12V 2x 3528 (120 LEDs per meter). We mark the locations of the LED strip and slowly begin to glue, solder, fasten, and fix with a hot glue gun:
Since I probably had a soldering iron before in the 9th grade, at first everything went for a long time and not on the first try, the next evening I called a friend for help and the two of them mastered the remains and checked the glow with the devices already thrown on:
The uniformity completely satisfied me, now I could move on to illuminating the hands. The illumination scheme is as follows: for additional instruments there is one 3mm transparent 12v red LED, with the head cut off as I don’t want, and three of the same LEDs for the tachometer and speedometer. It sounds easy, but in reality I had a lot of trouble with paralleling three LEDs. For convenience, I took a piece of plastic, drilled three holes with a diameter of 3mm with a similar arrangement in the instrument panel and soldered it there, it looked like this:
Next, we illuminate the tachometer using this method, and power the remaining single LEDs in parallel:
Now let's move on to the arrows themselves. The whole problem was that the original additional instruments are located in a “recessed” plane relative to the tachometer and speedometer, but my task was to raise them to one level, it is clear that the axes of the instruments need to be lengthened, the solution to this problem was given to me along with the volgo shooters by the respected tj- DimON-02rus. The solution - using needles from a syringe as the axis of the device - is simply ingenious. It was experimentally found that syringes with a diameter of 0.8 mm are ideal. Using a Dremel, we grind the needle and put it on the axis of the device (the exception is the economizer - there the axis is wider):
Next, we drill out the holes in the arrows to 0.8 mm (oh, I’m tired of running around looking for this drill) and put the arrows aside until the panel is assembled.
Next, we close the panel and, swearing very hard, begin to place the arrows on the axles; I used Cosmofen CA12 glue, which glues everything that is needed and not needed. I’ll find out how accurately I hit the arrow orientation only tomorrow, when I install the panel, but for now the panel glows like this during the day
All that remains is to write a report on the installation, I will do it when the weather outside permits) Please, comrades, use and comment
Author: k1taez
Related articles:
Brake system
Tuning "Moskvich" 2140 in the brake system is more than justified. As you know, all cars of this brand had a bad braking system. Replacing brake discs and pads will improve the quality of the brakes. Along the way, you will also have to replace the cylinders to make sure the brake part is perfect.
The parking brake is suitable from the manufacturer ATI, which has proven itself well in the domestic spare parts market. When installing the handbrake and cables, you won’t have to redo anything; you just need to install them instead of the standard parts.
Improved steering mechanism
The Moskvich 2140 was supplied from the factory with an insufficiently reliable steering mechanism. So, after driving 5-7 thousand km, the driver noticed that play appeared on the steering wheel, which was associated with the poor quality of the tips. Tuning masters usually installed a Zhiguli steering mechanism from a VAZ 2107 instead of a standard steering mechanism. This required making some design changes.
At the beginning of the 21st century, with the entry into the domestic market of a large number of parts from different countries, motorists began to install a steering mechanism from Chery Amulet on the Moskvich 2140 as an upgrade. This made it possible to improve control stability and purchase power steering for the old car.