Lada Priora (VAZ 2170) is one of the few domestically produced cars equipped with such a multifunctional device as an electrical package control controller. However, what is it and what controller is on the Priora?
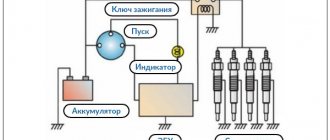
The power package controller is a device that controls all of the vehicle's electrical functionality. Thus, this regulator is responsible for the operation of the turn signals, power windows, instrument panel lighting, side lights, fog lights, interior lighting, heated rear window, and reversing lights. Equipping a car with such a control unit makes it more practical in terms of using electronics.
The electrical package control controller on the Priora is mounted using brackets in the central, lower part of the dashboard above the engine control unit (ECU). On the Lada Priora, the controller is connected via two connectors: the power connector is responsible for supplying energy to the control unit, and the information connector is responsible for its direct functions. Also, the unit is equipped with protection from moisture and dust.
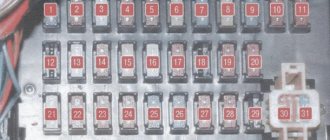
Essentially, the Priora electrical package controller is a circuit in a plastic case. The board itself (circuit) consists of 15 chips, each of which has its own purpose.
Purpose of parts on the board of the Priora electrical package control unit 2170-3763040.
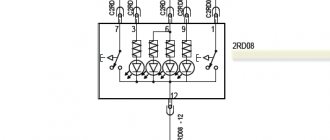
Diagram of the Priora electrical package control unit 2170-3763040.
POS - interior lamp; ZPTO - rear fog lights; BS - low beam; PTF - fog lights; MDV - driver's door module; PUP - direction indicator switch; PAS - hazard warning switch; FPD - front right door; FLD - front left door; ZPD - rear right door; ZLD - rear left door; PS - passenger door power window switch; FOB - trunk light; ZP - right mirror; ZL - left mirror; GO - side lights; UP - direction indicators.
The pinout of the electrical package controller on a Priora car is an electrical process, the complexity of which is explained by the versatility of the unit. In this regard, many wires of different functionality are connected to the controller - the unit is connected by more than 25 wires.
The machine electronics control unit has several operating conditions:
- air temperature from -45°C to +40°C;
- atmospheric pressure up to 800 mm Hg. or 105 kPa;
- air humidity up to 90%;
- operating voltage range from 9 to 15 V.
Failure of the electrical package controller may be caused by overheating of the system or disconnection of wires. In this case, it is necessary to inspect the control unit itself. On a Lada Priora car, the controller is located above the engine, and in case of malfunction or interference, it will be necessary to remove the dashboard.
The electrical package controller in Priora is a device used to control the functionality of the vehicle. This unit is responsible for the operation of turn signals, power windows, control panel lighting, dimensions, fog lights, interior lighting, and rear window heating system. This device also ensures the normal operation of the reversing lights. The fact that the car is equipped with this device makes it even more practical.
Priorovsky electrical package control controller
Location
The control device on the Priora is located above the electronic engine control unit, at the bottom of the center console, in the middle. In this case, the device is connected using two connectors - power and information. The power output is used to supply voltage to the control unit, and the information output is used to perform the functions of the device. It should also be noted that the control unit is protected from external influences of dirt and moisture.
In general, this device is a circuit installed in a plastic case. The board itself includes 15 chips, each of them performing certain functions. This is the entire electrical part of the car, including power windows, door open sensors and a control system for external electric mirrors (the author of the video is the CompsMaster channel).
terms of Use
In order for the node to operate normally, certain conditions must be met:
- the air temperature level in the car interior should be from -45 to +40 degrees;
- the air humidity level in the cabin should be no more than 90%;
- The voltage parameter for normal operation should vary around 9-15 volts;
- The atmospheric pressure level should be up to 800 mm Hg.
As practice shows, malfunctions in the operation of this device often appear as a result of its overheating or disconnection of wires or contacts inside the structure. If you are faced with the problem of a device failure, first of all you need to visually diagnose it. It is quite possible that the reason can be discovered only by looking at the device.
Photo gallery “Connection diagram and designation of controller board elements”
1. Designation of elements on the controller board 2. General control circuit
Possible malfunctions and ways to eliminate them
What malfunctions may occur in the operation of the electrical package controller:
- Turn signal failure. First of all, you need to diagnose the serviceability of the fuse, light bulbs, and the steering column switch. It is quite possible that the contact in the switch itself is broken; the problem can be solved by resoldering the contacts or replacing it. If this does not help and the problem really lies in the board, then there are two options - either resoldering it in accordance with the diagram, or replacing it. Usually, soldering is done first, and if it does not help, then the controller itself is changed.
- The power windows don't work. Before getting into the circuit, you need to make sure that the problem does not lie in other elements. As in the previous case, first check the fuse, and then diagnose the power window control unit, it is built into the driver's door trim. If only one window regulator does not work, then most likely the contact on the unit has simply come loose and needs to be reconnected. Sometimes the problem lies in a broken or broken wire, in which case the circuit needs to be restored. If this does not help, then the DA7VN5016A or DA6VN5016A controller is resoldered. The first is responsible for the operation of the power windows and central locking on the right doors, and the second is responsible for the same elements, only on the left door. Both elements are marked in the diagram for clarity. The problem with the central locking is solved in a similar way if it does not work. Also pay attention to the DA11L9848 controller - it is responsible for the operation of the lift control relay. So if the relay does not work, but the contacts of its seat are intact, then perhaps the problem lies with this controller.
- At the same time, the side lights, front and rear fog lights, interior lights, reversing lights, and the rear window heating system stopped working. If these components stop working at the same time, then there is no doubt that the problem lies in the electrical package control unit. In this case, the DA1 MC33972EW controller is resoldered, since it is he who is responsible for the operation of these components. If resoldering does not help, then the entire circuit changes.
- If the rear fog lights and the dashboard lights do not work, then most likely the culprit is the DA9 VND5025AK controller. You can also try to re-solder this component, but if re-soldering does not produce results, then it will need to be completely changed.
LADA 2170
Instrument panel diagram
Communities Lada Priora Lada Priora Club Blog what affects the clutch release limit switch
1, 2, 3, – instrument panel harness connectors to the front harness 4 – instrument panel harness connector to the rear harness 5 – contacts of the mounting block connector 6 – brake light switch 7 – instrument cluster 8 – lighting control module 9 – driver airbag module 10 – sound signal switch 11 – diagnostic block 12 – on-board computer mode switch 13 – ignition switch 14, 15 – blocks to the electric amplifier control unit 16 – electrical package controller 17 – light alarm switch 18 – windshield wiper switch 19 – air flow distribution gearmotor 20 – block heater control 21 – heater electric motor switch 22 – rear window heating switch 23 – clock 24, 25 – instrument panel harness connectors to the radio 26 – hazard warning switch 27 – glove compartment lighting switch 28 – glove compartment lighting switch 29 – instrument panel harness connector to ignition system harness 30 – airbag system control unit
Front Wire Harness Connection Diagram
1 – starter 2 – battery 3 – generator 4 – battery harness and starter and front harness connectors 5 – 7 – front instrument panel harness connector 8 – engine compartment lamp switch 9 – left headlight 10 – right headlight 11 – brake fluid level sensor 12 – sensor air temperature 13 – washer motor 14 – reverse light switch 15 – engine electric fan 16 – heater damper gear motor 17 – additional resistor 18 – windshield wiper motor 19 – main fuse block 20 – heater motor 21, 22 – sound signal
Ignition system diagram
1 – controller 2 – ignition system harness connector to the instrument panel harness 3 – main fuse box 4 – speed sensor 5 – rough road sensor 6 – oil pressure warning lamp sensor 7 – throttle position sensor 8 – coolant temperature sensor 9 – pointer sensor coolant temperature 10 – mass air flow sensor 11 – idle speed control 12 – fuel pump relay 13 – fuel pump power supply circuit fuse (15 A) 14 – ignition relay 15 – ignition relay fuse (15 A) 16 – controller power circuit fuse (7, 5 A) 17 – crankshaft position sensor 18 – oxygen sensor 19 – phase sensor 20 – knock sensor 21 – canister purge solenoid valve 22 – diagnostic oxygen sensor 23 – ignition coil 24 – spark plugs 25 – injectors 26 – ignition coil wiring harness block to the ignition system harness 27 – ignition system harness block to the ignition coil wiring harness 28 – ignition system harness block to the injector harness 29 – injector harness block to the ignition system harness
And here are the electrical diagrams of the Lada Priora Lux.
CAR ELECTRONICS REPAIR BATTERY CHARGERS
Video “Diagnostics of the electrical package control controller”
How to diagnose the functionality of the electrical package controller in a garage environment - see the video below (the author of the video is Vyacheslav Kravchenko).
The electrical package control unit, or the so-called Priora comfort unit, is a complex electrical device. Its basis is a printed circuit board with numerous microcircuits, relays, control drivers and other elements soldered to it.
The control unit (hereinafter referred to as the product) is installed directly in the car, so its components (microelectronics) are exposed to negative influences. For example: cold, active shaking, temperature changes. As a result, certain elements burn out on the board, the integrity of the contact group is disrupted, which leads to the failure of many vehicle functions important for the daily operation. Unfortunately, in many Lada Priora cars, failure of the electrical package control system has become a fairly common occurrence.
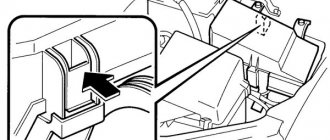
Where is the Priora comfort block located?
To gain access to the product, you will need to unscrew the protective plastic walls of the car's center console. They are located on the left side of the front passenger seat and on the right of the gas pedal, on the driver's side. The device itself is located above the control unit. In order to remove the device you will need a 10 mm wrench and a Phillips screwdriver.
Pinout of the Priora comfort block
The main, important elements of the device are:
- The so-called control drivers. Each driver is responsible for a set of specific functions.
- Transponder receiver.
- Relay control.
- Transceiver. Communicates with the module installed in the door.
- 2 connectors. The first is responsible for supplying power, the second for transmitting the necessary technical information.
Click to enlarge
To ensure proper operation of all elements connected to the comfort unit connectors, it is necessary to study the correct pinout (numbered diagram for connecting wires to contacts). The design of the comfort block for the Priora, when studied in detail, is not particularly difficult.
Location of the comfort controller in the cabin
You need to know that there are two options for the location of this device:
- On the first Priora models it is under the beard.
- On subsequent ones, to the left of the mounting block.
When these cars appeared, the comfort unit was installed in the area of the electronic control unit. That is, under the “beard”. If you open the decorative plastic cover located at the passenger’s left foot, you will see the Priora control unit with attached relays. Directly above them is a comfort unit (electrical package).
Self-repair of the Priora comfort unit, is this possible?
If you have never encountered soldering, diagnostics of printed circuit boards of varying complexity and configurations, or do not have the necessary diagnostic or soldering equipment, then it is better to address the repair question to qualified specialists. If you have the above skills and understand the causes of malfunctions, independent repairs are carried out quite often. This is due to the fact that various microcircuits or chips constantly fail. For example, having established that the reason for the turn signal failure is a failed control driver, it is always possible to purchase a new part and simply re-solder it to replace the faulty one.
Malfunctions and their possible causes
The cost of a new, original unit is quite high, so do not rush to buy a new product, figure out the causes of the malfunctions. Of course, there are always cases when the board cannot be repaired and it is more advisable to simply install a new product to replace the faulty one. Do not forget that the causes of malfunctions can be frayed or broken wires that are connected to energy consumers.
According to statistical data collected on technical support forums, car owners quite often complain about malfunctions in the operation of power windows, turn signals, and parking lights.
If we talk about the components of the printed circuit board itself, the most common breakdowns are associated with: - a break in the W-Line communication line; — burnout of control drivers; — burnout of controllers responsible for correct operation; - the output of their transponder; — significant oxidation of contacts.
"Important! Before carrying out any electrical work, disconnect the power supply by disconnecting the negative terminal of the battery."
Replacing the Priora comfort unit
Before purchasing a new product, you must be sure that the cause of the malfunction lies precisely in it. To do this, you can install a known-good unit in your car and test the operation of problematic units. If, with a new, serviceable device, electrical consumers operate normally, the old comfort unit is faulty. Otherwise, use an integrated approach, check fuses, relays, wiring, and all kinds of drives. In other words, the entire technical chain with which the faulty unit usually comes into contact during operation.
Replacement of the device is carried out in 7 simple steps:
- We put the car on the parking brake.
- Open the hood, loosen the negative terminal and remove it from the battery.
- We move into the car interior. For ease of operation, we roll the front seats back into the cabin as far as possible.
- We prepare the tool. Using a screwdriver, unscrew the mounting bolts and remove the 2 side walls.
- Using a 10mm wrench, unscrew the two fastening nuts.
- Carefully remove the block itself. When removing, rotate the product so that it does not hit other elements. Disconnect two contact connectors, the first is power, the second is information.
- Remove the faulty product and install a new one.
Characteristics of the comfort unit on Priora: what does ride comfort depend on?
Almost all modern cars today are equipped with electric windows, which allow you to control the opening of the windows at the touch of a button. And the Russian Priors in this case are no exception. The control device, with the help of which the windows are raised and lowered, as well as many other functions, is called the Priora comfort unit. You can learn more about its structure, as well as repair, from this article.
Lada Priora Sedan Knight Rider › Logbook › Repair of comfort unit 2170 Itelma
Somehow I don’t keep track of Priorka, although a lot has been done. And so, closer to the topic. There has been a glitch with the left window lifter since the moment I bought the car. Gluck expressed himself as follows. When you pressed the button on the left ESP, the glass lowered a couple of centimeters and stopped. I had to press it 5-6 times to lower or raise the window. But in the lowered state, when arming, the window was raised normally by the interface. The problem is in the ESP button, I thought and rode like that until November. At the same time, there was an interesting moment with the opening of the trunk. From the first press of the button it did not open. There were only clicking sounds from the accuator. It opened the third time. And the most stupid thing is the spontaneous opening of the trunk when you engage reverse gear in wet weather or after a car wash. It was a circus. I have already checked the wiring and connectors for shorts. Nothing helped. Well, the last straw was the left door. When arming/disarming, the left door did not close/open. I had to work with a key. Again I dismantled the entire door and floor wiring. Everything is whole. But I didn’t know that the comfort unit was responsible for all these functions. I reasoned on the principle of wiring classics, dozens. In general, there are a lot of letters and background. But maybe it will be useful for someone. I took it off, disassembled the comfort unit and saw a burnt part.
Well, I’m like a normal guy on Google, looking at the new block. And then the price is $100. Oops... According to the showdown - no. One place has it for $80. Well, nah, it’s better to buy a new one. I went to smoke D2. I immediately came across articles by Vanchello003 www.drive2.ru/b/2901599/ I found this part in a radio store. The VN5016A costs as much as $2.
I bought a pair just in case
In the morning I bought it and went to a service center for repairing PCs, phones, etc. The boys kindly agreed to re-solder the part. Work and checking the parts around each leg took 20 minutes and cost $1. (30 UAH)
New part in place
At the exit I received a refurbished unit for $3. Now everything works great. In addition, I bought a new block of buttons and repaired the button housing.
Glued it with epoxy. Now it doesn't bother me. This is the recording that came out.
Central unit of body electronics VAZ 2172 Priora (electrical package controller)
Dear customers, in order to avoid errors when sending the electrical accessories control unit, in the “Comment” line indicate your car model, year of manufacture and vehicle equipment (standard, standard or luxury).
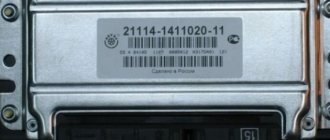
The central body electronics unit (CBEC) -21900-3840080-11/21 is responsible for all the electronics on the car - except for the operation of the engine, its sensors and everything related to the fuel mixture and automatic transmission.
TsBKE there are two types of blocks 21900-3840080-11 / 21 designed to perform the following functions:
— control of the windshield wiper in the “manual control” mode;
— control of the windshield wiper in the “automatic control” mode (for TsBKE 21900-3840080-21);
— control of the windshield heater;
— control of the rear window heater and electric side mirror heaters;
— control of low beam headlights, side lights and daytime running lights in the “manual control” mode, provided for by UNECE Regulation No. 48-04;
— control of low beam headlights, side lights, daytime running lights in the “automatic control” mode (for TsBKE 21900-3840080-21);
— control of daytime running lights in accordance with UNECE Regulation No. 48-04;
— high beam headlight control;
— control of direction indicator and hazard warning lamps;
— control of the interior lamp;
— energy saving management of vehicle interior lighting devices;
— central locking: locking/unlocking the side door locks from the key, from the driver’s door lock button from the passenger compartment, from the button in the driver’s door module;
— opening the trunk lid (tailgate) from a button in the cabin;
— control of electric window lifters;
— control of electric drives of side mirrors (for TsBKE 21900-3840080-21);
— control of heated front seats;
— trunk lighting control (for TsBKE 21900-3840080-21).
Applicability: 21900-3840080-21 only on Priora NORM and LUX.
TsBKE 21900-3840080-11 (standard) this is for all other Priora modifications - without electric mirrors, rain sensor and auto lights, rear windows and trunk lighting controls.
Ambient temperature from minus 40 to plus 45 °C;
Relative humidity of ambient air at a temperature of 27 °C 90%;
Atmospheric pressure from 84 to 106.7 kPa (from 630 to 800 mmHg);
The operating supply voltage range is from 9 to 15 V.
Other article numbers of the product and its analogues in the catalogues: 21900384008011, 21900384008021.
VAZ 2170, VAZ 2171, VAZ 2172.
Any breakdown is not the end of the world, but a completely solvable problem!
How to independently replace the electrical package controller on a Lada Priora?
With the online store DiscounterAvtoAzbuka, repair costs will be minimal.
Replacement and repair of the electrical package control unit 2170-3763040 Lada Priora
Priora electrical package control unit 2170-3763040 (Comfort unit) The vehicle equipment, as is sometimes written, does not matter when a unit with this number is installed.
The electrical package controller is a device designed for installation on VAZ 2170 Priora cars. It controls many car functions, for example, turn signals, power windows, instrument panel lights, side lights, low beam, fog lights, reverse lamp, interior lighting, heated rear window.
This controller is installed in the central, lower part of the dashboard above the ECU unit. To remove it, you need to remove the lower sides of the torpedo. Using a socket wrench 10, unscrew the two nuts.
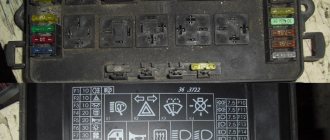
Priora electrical package control unit housing 2170-3763040
Priora electrical package control unit board 2170-3763040
Location of terminals of the Priora electrical package control unit 2170-3763040
Diagram of the Priora electrical package control unit 2170-3763040
Purpose of parts on the board of the Priora electrical package control unit 2170-3763040
POS - interior lighting lamp ZPTO - rear fog lights BS - low beam PTF - fog lights MDV - driver's door module PUP - turn signal switch PAS - hazard warning switch PPD - front right door PLD - front left door ZPD - rear right door ZLD - rear left door PS - passenger door power window switch FOB - trunk light ZP - right mirror ZL - left mirror GO - side lights UP - direction indicators
At this link you can see additional information on the above unit and others: www.chiptuner.ru/content/usp_norma Problem with the electrical package control unit 2170-3763040 Priora:
Advantages of cars with a comfort unit
The standard list of comfort systems on new versions of cars includes:
- interior lighting;
- remote opening and closing of locks;
- window regulators;
- signaling;
- anti-theft systems;
- mirror adjustment;
- heating of the rear machine.
Premium class cars are also equipped with other latest electronics developments that make it possible to create comfort in the cabin.
The driver can recode the settings to suit his own menu.
The main functions performed by the electrical package control unit (comfort unit)
In fact, this device is a multifunctional control computer. His responsibilities include ensuring the functionality of many Priora functions:
- Electric windows.
- Adjusting the side mirrors.
- Turn and hazard warning lights.
- Anti-theft system.
- Door locking from the driver's door remote control.
- Lighting module.
So many options require precise operation of the Priora comfort controller.
Conversion of the comfort block
To recode the comfort unit, you need to connect the VAG-COM diagnostic adapter to the car and computer. To connect it to the vehicle's comfort unit, you need to turn the key, check the coding code for the comfort unit used on your vehicle and write it down, as it may still be required.
Go to the official Vag-Com website, enter the code of your comfort unit in the “Encoding” field and click the “Decrypt” option. A complete breakdown of the unit’s functions will appear on the monitor. Active functions are marked with a green light and a check mark. If you don’t need some functions, make them inactive, and enable the inactive ones that you need.
Check if everything is connected and activate. To activate the selected options, enter the new code in VAG-COM. If you mess up, you'll have to reset the new settings, enter the old code and start all over again.
Comfort block problems and their elimination
The most common cause of malfunctioning lighting, opening and closing windows and doors, locks and other elements are rusted or burnt (sticking) contacts of the comfort unit relay. They usually deteriorate due to moisture getting on the wires and the comfort unit.
If a faulty device is left in place or removed, the comfort functions will no longer function. Many car owners, due to the high price and complexity of connecting new blocks, tend to buy a used block or try to repair an old one.
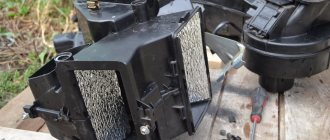
The repair involves re-soldering, since the comfort block is a circuit, and if it doesn’t work, it means something has fallen off, burned or become corroded. Before starting repairs, you need to find out which relay is broken. In most cars, the comfort unit is located under the driver's seat.
To get a block, you need to:
- disconnect the battery;
- Unscrew the screws from the rear seat, usually they are hidden under a plug;
- from the driver's seat, unscrew the nuts using a ratchet wrench;
- squeeze out the plastic plug with pliers;
- pull out the seat;
- unscrew the terminals from the seat and remove it;
- unscrew the nuts and plugs and remove the cover plate;
- bend the carpet on the floor;
- if there is dampness, dry the floor and wires using a heat gun.
In some car models, the seat does not need to be removed. You can simply move the driver's seat all the way, remove the cover at the hood release handle and the plastic platform under the feet (by unscrewing the nut). Then remove the plastic sill from the driver's door opening and fold the mat toward the passenger side.
Underneath there is a thick wiring harness that goes to the comfort unit (black box). The wires are wrapped with rag tape. In the place where the adhesion is broken, the electrical tape will turn green due to oxidation.
To identify all damage, you need to go through the wiring going to the comfort unit. To do this, you can resort to the help of an electrician. He will test the wiring with a multimeter to determine which pin is faulty. Next, touching the contact with one probe and the block connector with the other, you need to set the tester for continuity.
This way you can determine which relay it will fit. This is an economical and lightweight option. You can use a labor-intensive but more reliable method. To do this, you need to remove the unit from the car, disassemble it and unsolder the relay one by one, checking where the bad contact is. Then check the resistance at the relay contacts in the on and off states.
If even a very small resistance is detected, the contacts are burnt, and therefore the voltage drops across them. Once the faulty relay is identified, all that remains is to replace it and solder it. If you do not know how to use a soldering iron or are unfamiliar with basic concepts in electronics, it is better to contact a workshop.
Sometimes it is enough to clean the relay contacts with fine sandpaper and wd-40.
Location of the comfort controller in the cabin
You need to know that there are two options for the location of this device:
- On the first Priora models it is under the beard.
- On subsequent ones, to the left of the mounting block.
When these cars appeared, the comfort unit was installed in the area of the electronic control unit. That is, under the “beard”. If you open the decorative plastic cover located at the passenger’s left foot, you will see the Priora control unit with attached relays. Directly above them is a comfort unit (electrical package).
On subsequent cars this unit was positioned slightly differently. At the driver's left foot, with the instrument panel cover removed under the steering wheel, there is a fuse and relay assembly. Or - a mounting block. And behind it, at the wall of the body, the electrical package is mounted. Access to it is quite difficult.
Removing the comfort block on new models
If you follow the manufacturer's technological instructions, this is a very complex and time-consuming process. Suffice it to say that according to this scheme it is necessary to partially dismantle the entire dashboard of the Priora. Of course, experienced locksmiths do not do this. The process goes as follows. The negative terminal of the battery is removed.
After this, remove the decorative panel under the steering wheel. It is secured at the bottom with 3 plastic swivel fasteners. The mounting block will become available. Now comes the most difficult part. You will need a 10mm bell key. This is the most convenient option for this job.
You'll have to climb and grope with your hand. As already mentioned, the electrical package controller is screwed behind the mounting one. It is perpendicular to it. It is secured with two bolts
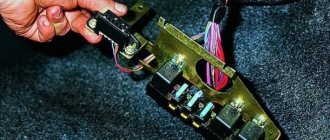
Replacing the relay on the comfort unit
The sequence for replacing the relay on the comfort unit:
- Open the back cover of the unit; to do this, press the connector contacts to pull out the board.
- Call the contact and after detecting a breakdown, proceed to replacing the relay.
- Using a utility knife, remove the anti-corrosion varnish from the contacts of the relay that is to be replaced.
- Lubricate the contacts with flux and solder them with a soldering iron.
- Remove all tin using a special tin sucker to free the burnt relay from the board.
- Remove the faulty relay, insert a new one and solder it carefully.
- Remove any remaining flux with a cloth soaked in alcohol.
- Reassemble the comfort block in reverse order.
- Install it in your car.
If the comfort unit has been replaced, the keys need to be “trained” so that they recognize the car. This procedure is usually performed using VCDS.