Checking and replacing the timing belt
The timing belt has a toothed profile.
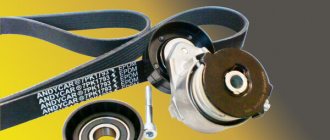
This prevents it from slipping on the pulleys, which also have teeth. The belt is needed to ensure communication between the crankshaft and the camshaft (camshaft). The belt also drives the water pump. The belt tension is provided by a tension roller. The roller should have a clean and smooth surface, without any burrs. It should rotate smoothly, without jamming. Note: Keep in mind that depending on the engine type and vehicle version, timing belts vary. When purchasing, check the modification of your car and the engine option. Use the VIN number to clarify.
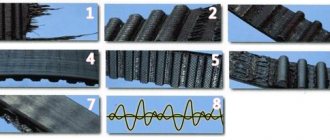
This is what subtle tears in the timing belt look like next to the teeth when checking for bending. Its mileage is only 5 thousand km. It is clear that such a belt cannot be used.
A new timing belt with the same bend looks like this:
1st example of a gas distribution mechanism
1 — mark on the rear timing drive cover; 2 — mark on the crankshaft toothed pulley; 3 - crankshaft toothed pulley; 4 - tension roller; 5 - pump toothed pulley; 6 — timing belt; 7 — rear drive cover; 8 — mark on the rear cover of the timing drive; 9 — mark on the camshaft timing pulley; 10 - camshaft toothed pulley
2nd example of a gas distribution mechanism
Engine 1.4 i. 1 - crankshaft pulley, 2 - timing belt, 3 - coolant pump, 4 - camshaft pulley, 5 - tension roller. This engine uses a belt marked 245. 100 60 40 (94 teeth with a pitch of 9.25 mm)
The schedule for replacing the timing belt (sens, lanos, chance) is 60-80 thousand km, but auto mechanics recommend changing it after 60 thousand km, regardless of how good the belt looks. The belt is also replaced after 6 years of operation, regardless of mileage. When replacing a belt, its tension roller is also replaced. In addition, after 50 thousand km. mileage you need to check the condition of the belt. If there is any type of damage, wear exposing the thread or oiling, the belt is replaced. If there are traces of oil, it is necessary to find the cause of their appearance.
Checking the timing belt (without removal)
The check is carried out only on a cold engine!
We unscrew the top cover of the timing mechanism (4 bolts “by 10”)
Move the cover to the side and inspect the belt for damage.
To check the belt tension , you will need to remove the air filter and completely unscrew the timing cover (you may also need to remove the upper decorative engine cover). The tension is checked by twisting the belt around the axis with two fingers, in the place shown in the figure. Although the exact tension is checked using instruments, with the help of hands its correctness can be determined as follows: the belt should twist around its axis by 90 o.
An overtightened belt leads to accelerated wear, as well as wear on the tension roller and water pump. An under-tightened belt can cause the belt to slip several notches along the teeth, and this will lead to a violation of the valve timing. How to tighten or loosen the timing belt is described below, after replacement operations.
Replacing the timing belt
To replace the timing belt, remove the air filter housing and the right wheel.
Remove the air conditioning compressor belt and the alternator belt. Completely remove the front timing cover.
Use the pulley bolt to turn the crankshaft clockwise using the 17mm head.
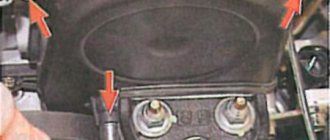
until the mark on the camshaft pulley matches the mark installed on the rear cover of the timing mechanism:
The mark on the auxiliary pulley should be opposite the mark on the lower front timing drive cover:
Remove the power steering pump. Using a 17mm socket, unscrew the bolt securing the auxiliary units pulley. To keep the crankshaft from turning, an assistant must engage fifth gear and press the brake pedal. We take out the bolt and washer and remove the auxiliary drive pulley.
Check again that the mark on the camshaft timing gear matches the mark (slot) on the rear cover of the gas distribution mechanism (see photo above).
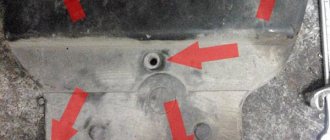
When the timing of the gas distribution mechanism is correctly set, the mark on the crankshaft toothed pulley should be opposite the mark (slot) on the rear cover of the gas distribution mechanism:
Using a 10mm socket, unscrew the three bolts securing the lower front timing cover and remove it:
We loosen the tension of the timing belt by turning the movable tension roller bar with a screwdriver clockwise (overcoming the resistance of the spring) until the hole in it coincides with the hole in the roller bracket and insert a pin with a suitable diameter of 4.0–4.5 into both holes mm (for example the back of a drill or a simple screw).
We remove the timing belt from the gear pulley mechanism of the camshaft, crankshaft and pump.
Using the “12” head, unscrew the tension roller from the cylinder block and remove it:
Note: if you disassembled the mechanism only to replace the tension pulley, then it is not necessary to remove the timing belt.
Install the new tension roller in the reverse order. Before installing the accessory belt, make sure that the marks on the crankshaft and camshaft timing pulleys match their corresponding marks (slots) on the rear timing cover.
In this position, we put the belt on the crankshaft toothed pulley. We place the rear branch of the belt behind the tension roller and put the belt on the pulleys of the water pump and camshaft, while making sure that the front branch of the belt does not sag. We remove the pin from the holes of the movable bar and the tension roller bracket. We install the auxiliary units pulley and tighten the bolt securing it. Turn the crankshaft (by the bolt) two turns clockwise.
If at the same time the pointer 1 of the movable bar of the tension roller coincides with notch 2 on the bracket, then the timing belt tension is in order. If not, adjust the belt tension by turning the water pump.
Adjusting the timing belt tension
To do this, use a 5-point hex key to loosen the three screws securing the water pump.
The timing belt tension changes when the pump housing is rotated in its seat. You can turn the pump using the 41 hexagon on its body.
To rotate the pump, you can make the following device yourself from a sheet of metal:
We install the device in such a way that its “legs” tightly cover the hexagon of the pump, after which we use the device as a lever.
The hexagon pump can also be turned using large sliding pliers.
Turn the pump counterclockwise until the pointer of the movable tension roller bar aligns with the notch on the roller bracket.
In this position, tighten the coolant pump mounting screws. Turn the crankshaft clockwise two turns and check that the alignment marks of the shafts match. If necessary, repeat the operation. We make sure that there is no leakage from under the coolant pump. If necessary, replace the pump housing O-ring.
We carry out further assembly in reverse order.
We fill the power steering hydraulic drive with working fluid and remove air from it. Bring the coolant level to normal.
How to tighten the Lanos timing belt
Checking and replacing the timing belt
Timing belt. has a gear profile. This prevents slipping on the pulleys, which also have teeth. The belt is necessary to ensure the connection between the crankshaft and the camshaft (camshaft). The belt also drives the water pump (pump). The belt tension is provided by a tension roller . The roller should have a clean and smooth surface, without any breaks. It should rotate smoothly without interference.
The note. Keep in mind that depending on the engine type and version of the car, timing belts vary. When purchasing, please indicate your vehicle modification and engine option. Use the VIN number to confirm.
This is what the invisible belt tears look like next to the teeth when checking for kinks.
The mileage is only 5 thousand km. It is clear that such a belt cannot be controlled.
A new timing belt with the same bend looks something like this:
This engine uses a belt marked 245. 100 60 40 (94 teeth with a pitch of 9.25 mm)
The timing belt replacement time (meaning, Lanos, chance) is 60-80 thousand km, but mechanics recommend changing it after 60 thousand km, regardless of how good the belt looks. Also, the belt is replaced after 6 years of operation, regardless of mileage. When replacing a belt, its tension roller is also replaced. In addition, after 50 thousand km. mileage should check the condition of the belt. If any type of damage occurs, the bare thread becomes worn or smudged. the belt has been replaced. If there are traces of oil, it is necessary to find the cause of their appearance.
Checking the timing belt (without removal)
Inspection is carried out only on a cold engine!
Unscrew the top cover of the synchronization mechanism (4 bolts “in 10”)
Leaving the cover aside, inspect the belt for damage.
To check the belt tension , you will need to remove the air filter and completely unscrew the timing cover (you may also need to remove the engine top cover).
The tension is checked by turning the belt around its axis with two fingers at the indicated location. Although the exact tension is checked with tools, with the help of hands its correctness can be determined as follows: the belt should rotate around its axis through approximately 90°.
A too-tight belt causes rapid wear and tear on the tensioner pulley and water pump. Incompleteness causes the belt to slide along the teeth in several sections, which disrupts the valve timing. as raise or loosen the timing belt described below after replacement.
To replace the timing belt, remove the air filter housing and the right wheel.
GT (Garage Themes) Replacing the timing belt (tensioner pulley) Pump) with Lanos 1.5 SE
Timing belt Lanos
belt
Contitech slides.
Remove the air conditioning compressor belt and alternator belt.
Remove the front transmission cover completely.
Above the pulley bolt, head “at 17”, turn the crankshaft clockwise.
until the mark on the camshaft pulley matches the mark on the rear cover of the gear mechanism:
The mark on the pulley should be opposite the mark on the lower front timing belt cover:
Remove the power steering pump. We unscrew the “17” head using the auxiliary units . To prevent the crankshaft from rotating, an assistant must engage fifth gear and press the brake pedal. Remove the washer bolt and pulley assembly.
Check the alignment of the mark on the camshaft pulley with the mark on the (notch) rear cover of the timing mechanism (see photo above).
Head “in 10” Unscrew the three screws that secure the lower front cover of the timing mechanism and remove it:
We loosen the tension of the timing belt by turning the screwdriver clockwise (overcoming the resistance of the spring), the tension roller of the tension roller until the hole in it coincides with the hole in the roller bracket, and insert a pin of the corresponding diameter of 4. 4. 5 mm. (such as the back of a drill bit or a simple screw).
Remove the timing belt from the camshaft, crankshaft and pump gears.
Head “at 12”, disconnect the tension roller from the cylinder block and remove it:
Note: If you are disassembling the mechanism only to replace the tension pulley, the timing belt does not need to be removed.
Reinstall the new idle speed control. Before installing the accessory belt, ensure that the marks on the crankshaft and camshaft pulleys line up with the corresponding marks (grooves) on the rear cover. gas distribution mechanism .
Adjusting the timing belt
To do this, hex key “5” Loosen the three screws that secure the water pump.
The timing belt tension changes as the pump housing rotates in place. You can flip the pump over the “aged 41” hex on his body.
To rotate a metal pump, you can make the following device yourself:
We are positioning the device. so that its “legs” are tightly covered with the hexagon of the pump, after which we use the device as a lever.
The hex pump can also be rotated using large pliers.
We rotate the pump counterclockwise until the tension bar roller pointer aligns with the notch on the pulley bracket.
In this position, tighten the screws that secure the coolant pump. Turn the crankshaft clockwise two turns and check the alignment of the shaft alignment marks. Repeat the operation if necessary. Make sure coolant is not leaking under the pump. If necessary, replace the pump housing O-ring.
Further assembly is carried out in reverse order.
Fill and bleed the power steering hydraulic drive. Bring the coolant level to normal.
Source
Chevrolet Lanos timing belt
The timing belt is essentially recognized as a necessary part of any car. This element plays an important role as a link that connects the camshaft and crankshaft.
The presence of this part contributes to the creation of synchronized actions in any modern vehicle. The Chevrolet Lanos car has spare parts that are manufactured by General Motors.
This also applies to the timing belt, which can be found in the official catalog under the article number - 96352407. The average price of such a belt in the automotive market is at least 4,000 rubles.
Experts recommend purchasing a timing belt along with tension rollers. If you buy these parts in one set, it will cost much less than purchasing each part separately.
When purchasing each necessary element of the gas distribution mechanism (GRM), the cost will be formed from the following parts:
- A timing belt tensioner roller costs approximately 8,000 rubles.
- Timing belt guide roller at a price of 2000 rubles.
- The belt itself costs 4,000 rubles.
Thus, the cost of original spare parts is 14,000 rubles.
However, you can also select analogues that are in no way inferior to the original parts. The table shows analogues of timing belts for Chevrolet Lanos and their cost.
Which timing belt to install on Lanos and Chance
As for manufacturers, belt drives are produced by various companies Dayco, KAP, Flennor, Dongil, AE, Dongshin and others. Naturally, preference should be given to the original
GM, which has serial number 96352407, as well as the Gates analogue with number 5310 XS.
It is important to note that the timing belt size for a Lanos 1.5 8 valve car is 17 mm wide and consists of 117 teeth.
Lanos with a volume of 1.6 have two camshafts, so the timing belt for them is correspondingly longer in length. The original belt for Lanos 1.6 from GM has code 96814098. Its width is 25 mm and the number of teeth is 127. The recommended analogue of the timing belt for Lanos 1.6 from Gates is number 5419XS.
It is not recommended to choose Contitech brand products, since, according to car owners, the quality of this brand’s products has significantly decreased. Preference should be given to Bosch brand products. The company values its reputation and produces high-quality products, albeit at high prices.
This is interesting! When choosing a timing belt, consider not only the brand name, but also the cost. High-quality products will not be cheap, and even if you come across devices priced below 800-1000 rubles, then avoid them. A high-quality belt for Lanos costs at least 1000 rubles or more than 400 hryvnia.
Replacing the timing belt on a Chevrolet Lanos
There are several reasons for replacing a worn belt with a new one. Most often, the “User Instructions” supplied with the car especially emphasizes and discusses in detail when it is necessary to replace a worn-out timing belt with a newly purchased one.
However, some car owners are completely unclear what the timing belt is for and where it is located. To find the location of the named part called the timing belt in a Chevrolet Lanos, just lift the hood of the car. The belt is located to the left of the engine.
A newly purchased timing belt in a Chevrolet Lanos car should be installed instead of a worn-out one, according to the attached operating instructions for the car, after each mileage of 75 thousand kilometers. However, car service centers recommend carrying out such a replacement after traveling 60 thousand kilometers.
In order to independently come to a decision whether it is worth replacing a worn-out belt with a newly acquired one, or whether it is not time yet, you must first of all carefully examine it.
The following belt deficiencies require immediate replacement. If replacement is not made, the belt may break while driving.
- The belt bend is covered across with many cracks, especially between the teeth;
- There are small cracks near the beginning of the teeth;
- The thickness of the belt does not look the same, there are traces of delamination, and you can also find noticeable oil stains and ingrained dirt.
About timing belt life
The manufacturer says that consumables must be replaced after 75,000 km. Most likely, this is actually the case, but here it is necessary to take into account some factors, which include the driver's driving style and local road conditions. Experts advise replacing the timing drive on this car after 60,000 km. This is a guarantee that it will not break and thereby cause a lot of problems for the car owner. It is necessary to diagnose the condition of the consumable. It will have to be changed if the following defects are detected:
All these defects are the reason that it is time to replace the belt. If this is not done, it may tear. By the way, this happens not so rarely. If you decide to make the repairs yourself, then read these instructions. First, about what we need to carry out this, I must say, difficult procedure:
Replacing the belt yourself
To replace an old timing belt with a new one with your own hands, you need to prepare:
- timing belt, designed to replace the old one;
- open-end wrenches of various sizes;
- set of socket heads;
- a small flat blade screwdriver;
- When carrying out replacement in your own garage, you can use an inspection hole. If it is not available, a jack is required;
- impact wrench
After the hood is opened, it is necessary to remove the air filter and pipe using open-end wrenches.
To remove the pipe, use a prepared flat screwdriver. To relieve the belt tension, you need to unscrew one of the three bolts on the generator. This bolt is located at the top, there is only one there. As a result of this action, we achieve loosening of the power steering pulley bolts.
The power steering mechanism can then be easily removed.
Next, remove the timing belt cover using 10 mm wrenches. There are four such bolts. After the bolts are unscrewed, the cover is removed without much effort. After removing it, the crankshaft is rotated so that the mark on the pulley coincides with the mark on the top cover. This alignment indicates that the first piston is located at top dead center.
Further procedures depend on the presence or absence of a pit intended for inspecting the car. If it is missing, you need to use a special device - a jack - to lift the right wheel and remove it. Then you should remove the right fender liner, behind which the air resonator is located.
Removing it will allow you to gain access to the protective panel made of plastic or metal that hides the belt. You can remove the protection using a 10 mm open-end wrench by unscrewing two bolts and two nuts.
After removing the protection, you can see the bolt securing the crankshaft pulleys. Using a wrench and a 17 mm socket, this bolt is unscrewed.
After all this, the crankshaft and timing belt will be accessible. The crankshaft is characterized by the presence of two marks (on the key and on the tooth). Before starting the next manipulations, you should remember how these marks are located.
Next, using a socket head, unscrew the 3 bolts that secure the lower protective plate.
Now the timing belt is removed and inserted into the slot, which is located next to the power steering housing.
To install a new timing belt, you must perform each of the above steps, but in reverse order. When installing a new belt, be sure to ensure that the mark on the tension roller bar and the slot on the bracket coincide.
Thus, the timing belt plays an important role in ensuring road safety. If you replace the timing belt in a timely manner, after a maximum of 75 thousand km, you can avoid many troubles that are often life-threatening for motorists and their passengers.
Failure to promptly replace the timing belt on a Chevrolet Lanos can lead to engine problems. Therefore, it is cheaper to replace a worn belt than to fix costly breakdowns.
Replacement process
Open the hood and remove the air filter along with the air pipe. To remove the pipe, you need to loosen the clamps securing it using a screwdriver.
Now the timing case is dismantled, for which you will have to unscrew 4 bolts. Then we begin to rotate the crankshaft. We do this until the mark on the pulley aligns with the mark on the casing. When alignment occurs, this will mean that the piston of the 1st cylinder is at dead center.
Loosen the power steering pulley bolts. Unscrew the bolt on the generator. The alternator belt will now slack and can be removed. The pulley is also removed.
Now let's use the overpass, if there is one, and if not, then we lift the front part of the car with a jack. We remove the right fender liner and air resonator, after which we gain access to the plastic belt protection. We remove the protection. It is not always plastic; sometimes metal is used.
Take a wrench and unscrew the crankshaft pulley mounting bolt. Choose a wrench with a long wrench. The tension roller will be released and the air conditioning belt can be easily removed.
Now we have a view of the timing drive. There are 2 marks on one of the teeth and the crankshaft key. We remember their location.
Now you can remove the timing belt and insert it into the slot located near the power steering housing.
When you install the purchased consumable, make sure that the mark on the tension roller aligns with the cutout on the bracket.
Replacing the timing belt on a Chevrolet Lanos with your own hands
Replacing the timing belt on a Chevrolet Lanos takes approximately 2-3 hours of work. The article contains complete instructions, as well as little things that you should pay attention to when replacing the timing belt on a Chevrolet Lanos.
The Chevrolet model range is ideally suited for use in all regions of our country. True, the uninterrupted and trouble-free operation of all vehicle components depends on timely and competent maintenance. As part of the publication, it is necessary to raise an issue that interests the majority of Chevrolet Lanos car owners, which concerns the independent replacement of the timing belt. Since performing this procedure does not require special filigree, a motorist of any level can master it, saving a significant amount. The only thing you need to know is the correct sequence of actions.
What is a timing belt and its purpose?
A timing belt is an elastic toothed ring, which has a certain diameter (depending on the car brand and engine type), and serves to connect the crankshaft to the camshaft (or shafts, as in the case of Lanos 1.6). This element is made of rubber and fiberglass threads (cords), the quality of which affects the strength and duration of the service life. The rubber coating has a thickness of 5 mm. Nylon teeth play an important role in the design of the timing belt, due to which it not only drives the camshaft gear, but also ensures synchronization between the crankshaft and the camshaft. This allows us to guarantee a high service life of the product.
An alternative to a belt is a chain drive, which has gained less popularity due to its inherent disadvantages. The belt design is used on most vehicles, including Lanos, Chance and Sens cars. It is important to note that this type of transmission device is used not only on Lanos with a 1.5 engine, but also with 1.6-liter engines.
Over time, the belt drive wears out and can break, which can have serious consequences for the engine. The resource depends on many factors, but it is important to know that for each make and model of car the corresponding service life of the product is indicated. If on Lanos cars this resource is up to 60 thousand kilometers (although the original devices last much longer), then on models of other cars this value can reach 90 thousand or more. This information is indicated in the technical documentation for the vehicle.
Purpose of the belt in the timing belt design
In the design of the gas distribution mechanism, the belt provides interconnection between the two shafts of its power unit. It is performed in two versions:
- metal chain
- rubber belt
In the timing system, it automatically supplies the fuel mixture to the engine cylinders, while simultaneously freeing the unit from exhaust gases. Simply put, the timing belt controls the operation of the intake and exhaust systems. Since the belt is aggregated not only with both engine shafts, but also with its other elements located in the engine compartment, it therefore quickly wears out and fails.
When to change the timing belt on a Chevrolet Lanos
The manufacturer's regulations for the 16-valve engine of the Chevrolet Lanos car set a four-year service life for the timing belt, or its replacement after 60 thousand kilometers. Since our operating conditions for vehicles have never been considered ideal, we should not rely on this interval, but replace the belt earlier, for example, after 40-50 thousand kilometers. Note that in the gas distribution system of the power unit, the belt performs an important function, so its unintentional breakage will lead to tragic consequences for the engine. In this case, the cost and complexity of the repair process will be incommensurate with the procedure for replacing it.
The prerequisites for this event are the following:
- Manufacturer's schedule;
- Deterioration of the working surface of the belt (cracks, damage, etc.);
- Wear of the components of the metal chain.
Note that the condition of the belt depends on the intensity of use of the vehicle. But there are known cases when this element of the gas distribution system failed several hours after installation. Therefore, it is very important to pay attention to its condition and purchase only an original product.
How to replace the timing belt on a Chevrolet Lanos yourself
On a sixteen-valve Lanos engine, the procedure for replacing the timing belt yourself should not cause any particular difficulties. To carry it out, you do not need special, expensive equipment or a thorough knowledge of the structure of the power unit. Any more or less advanced car owner always has the necessary tools, namely:
- jack;
- socket heads;
- several screwdrivers of various configurations;
- open-end wrenches and spanners.
In addition to preparing the described tool, you must take care in advance of purchasing a new timing belt. The replacement sequence is as follows:
- Before carrying out work, it is worth removing the interfering air pipe;
- We dismantle the air intake housing;
- There are bolts on the power steering pump pulley. They need to be loosened;
- We unscrew the generator mounting bolt located in its upper part;
- We loosen the generator belt, and then remove it;
- It is necessary to remove the power steering pump pulley.
- Having approached the timing cover, we tighten the bolts securing it;
- Now you need to jack up the front part of the car, and then remove the front right wheel, having previously placed a strong support under the bottom of the car;
- If motor protection is provided, it must be removed;
- We remove the air resonator, which does not allow full access to the timing system;
- It is also worth removing the climate control drive;
- Loosen the crankshaft pulley by unscrewing the bolt securing it;
- After setting the piston of the first cylinder to the TDC position, it is necessary to check that the marks on the casing match the mark on the crankshaft pulley;
- The lower half of the cover that covers the timing drive must be removed by first unscrewing the fastening bolts from it.
- There are marks on the camshafts that must be parallel to each other;
- The power steering pump mount must be removed by unscrewing the bolts;
- Before removing a worn timing belt, it is necessary to remove the tension roller;
- Installing a new timing belt is done in reverse order. Before installing it, you need to check the alignment of the marks on the crankshaft and camshaft;
- If necessary, you can tighten the belt by turning the pump.
It would not be superfluous to assess the condition of the pump, in which it will be clear whether it is worth changing this element or not. As you can see, the procedure for independently replacing the timing belt in a Chevrolet Lanos is not particularly difficult. However, the first time you carry it out on your own, it is better to enlist the help of a more experienced friend, or to familiarize yourself in detail with the information that is available in abundance on the Internet.
Video: replacing the timing belt on a Chevrolet Lanos with your own hands
How to set timing marks when the belt breaks on a Lanos
For cases where the timing belt breaks while the engine is running, it will be necessary to correctly set the timing marks separately for the camshaft sprocket and the crankshaft. How to do this, detailed instructions are described below.
- Initially, it is necessary to align the mark on the camshaft gear by turning it clockwise using a ratchet wrench.
- The photo shows the marks for aligning the camshaft gear.
- By the way, if you are wondering whether the valves on Lanos 1.5 and Chance 1.5 bend, then the answer is yes.
When the timing belt breaks on a Lanos, the valves bend, but it all depends on when the break occurred. If at idle or during startup, then the probability is extremely low. The greatest danger is when the belt breaks at high speed and under load. In this case, before replacing the belt, you should check the serviceability of the valves. So that you understand what bending the valves on Lanos means, below is a photo. - To check the serviceability of the valves on a Lanos, you should rotate the camshaft sprocket 360 degrees, and at the same time listen for characteristic knocking sounds. Their absence does not at all guarantee that the valves are not damaged, and their malfunction can be more accurately identified in two ways: by installing the timing belt and starting the engine, and also visually, but for this you will need to remove the valve cover.
- After setting the marks on the camshaft gear, we move on to the crankshaft. To do this, you need to unscrew the spark plugs (it is not necessary to unscrew all of them, but only the one that is located in the well of the first cylinder).
- Remove the left wheel, and using a wrench with an extension, unscrew the crankshaft pulley mounting bolt. To do this, engage fifth gear, depress the brake pedal, and the bolt breaks off.
- Remove the crankshaft pulley and screw the bolt back into place, through which the marks will be aligned. We turn the crankshaft and make sure that the marks on the gear and the lower part of the timing case match. The mark is also duplicated on the engine block.
- An assistant should place the tip of a screwdriver into the spark plug hole, and at the same time report when the piston in the first cylinder moves to the top position (TDC).
- The mark on the pulley must coincide with the mark on the timing case housing.
- Actually, this means that the phases of the gas distribution mechanism are installed correctly. You can begin installing the timing belt.
To summarize, the timing belt is the most important structural element of the engine. Its malfunction is fraught with serious and expensive breakdowns, and a possible replacement of the valves is not the worst thing. After all, if they break, the pistons can be damaged, which will lead to the need to replace them, and this is a more expensive engine repair.
To eliminate the possibility of such situations, it is recommended to regularly replace the timing belt every 60 thousand kilometers or every 4-5 years, and for replacement use only original and high-quality products with a minimum service life of at least 100 thousand kilometers.
Changing the timing belt on a Chevrolet Lanos
Today a representative of the Zaporozhye Automobile Plant with the big name Chevrolet Lanos came to us, replacing the timing belt at 120,000 kilometers and doing a little maintenance before a long journey. We definitely need to change the pump.
To replace the timing belt, in addition to the standard tool, sockets, spanners and hexagons, we also need a special wrench for the pump, since on this engine the timing belt is tensioned by it. You can either order it in advance on the Internet, or make it yourself from one and a half millimeter metal, it will not be very convenient, but it will be enough for once.
So, for replacement, we purchased a timing belt and a tension roller, a pump, two shawarmas and coffee.
Actually, the patient himself looked like this before the replacement.
Drain the antifreeze. Remove the air filter along with the housing and all pipes. To do this, unscrew three 10 bolts securing the body and loosen several clamps.
While the attachment belts have not been removed, we loosen, but do not unscrew, the three bolts securing the power steering pump pulley.
We loosen the tension of the generator belt by unscrewing the nut to thirteen, after which we move the generator closer to the engine.
At the bottom, loosen the locking nut of the tension roller and turn the tension bolt to loosen the air conditioner belt. Remove both belts.
With the help of an assistant, unscrew the crankshaft pulley bolt. The sequence of actions is as follows: the assistant in the car turns on the fifth speed and presses the brakes; with a slight movement of your hand, you unscrew the bolt from the outside through the pipe.
Unscrew the four bolts of the timing belt protective cover. You will not remove the cover until you unscrew the power steering pump.
We unscrew the two bolts securing the power steering pump, having first removed the pulley.
Unscrew the three bolts of the lower timing belt protective cover.
Set the top dead center. Turn the crankshaft clockwise until the marks on the camshaft match.
And also the crankshaft.
Next, unscrew the timing belt tension pulley bolt and remove the belt along with it. Having locked the camshaft sprocket, unscrew the bolt and dismantle it. There are two small ten-point bolts hidden under it; we turn them out.
Having removed the protective cover, we see a miracle: it turns out that the thermostat housing is leaking.
Once you open it, we'll replace the thermostat itself. Unscrew the two bolts and remove the thermostat housing.
We unscrew the three bolts with a five-point hexagon and remove the pump, remembering how it stood.
We install a new pump and thermostat, lightly lubricating them with sealants.
And here is the new pump itself, along with a special key for 41.
We screw the thermostat housing tightly, but we just tighten the pump so that we can turn it. We put the protective plastic, the camshaft sprocket, and the tension roller in place.
We check all the marks. We install a new timing belt. First we put it on the crankshaft sprocket, then on the camshaft sprocket, with tension, then the pump and tension roller. If the timing belt does not tension on the tension roller, turn the pump counterclockwise. Pay attention to the direction of rotation of the belt.
Then we start stretching.
The photo is from another car, so don't pay attention to the color of the tension pulley.
Rotate the pump until the marks on the roller match. Shown in the filmed video.
We tighten the pump. We turn the crankshaft two turns and check the marks and tension again. If everything is normal, install all the removed parts in the reverse order of removal. Fill with antifreeze. Well, if something goes wrong, you will have to repeat the stretching procedure again.
Well, that's it, the whole procedure with a snack took two hours.
Sequence of actions (also for cars with air conditioning)
- The hood of the car is opened, using a set of open-end wrenches, the air filter and the air supply pipe that is attached to it are removed (to remove the pipe, the fastening clamps are loosened with a flat screwdriver).
Removing the air filter and pipe by loosening the clamps
- There are 3 bolts on the power steering pulley. They are weakened. After this, the top bolt on the generator is unscrewed (there it is 1). As a result, the tension of the alternator belt weakens and it can be easily removed. Next, the power steering pulley is removed.
Power steering pulley bolts are loosening
- The timing belt cover is secured with four 10mm bolts. These bolts are unscrewed, after which the cover is removed.
- After opening the belt cover, the crankshaft rotates until the mark on the pulley matches the mark on the top cover (the coincidence of these marks means that the piston of cylinder 1 has reached top dead center).
The piston is at top dead center, the marks coincide
- If there is no inspection hole, the right wheel of the car is jacked up and removed. Then the right fender liner is unscrewed. Behind it there is an air resonator, which is also removable. This gives access to the plastic protective panel, behind which the belt is located.
- The protection is removed using a 10-mm open-end wrench (it is held in place by 2 bolts and 2 nuts). In some Chevrolet Lanos models, this panel may be made not of plastic, but of steel.
Bolts on steel under-fender protection panel
- The bolt on which the crankshaft pulleys are attached is now visible. It is unscrewed with a wrench (and its wrench should be very long, and the socket head should be 17). All this is done in order to loosen the tension roller from the air conditioner drive (provided that the car has this device). Through the above procedure, the tension roller is released so that the air conditioner belt can be removed freely.
The crankshaft pulley mounting bolt is unscrewed with a wrench
- Access to the crankshaft and timing belt is provided. There are 2 marks on the crankshaft (one on the key and one on the tooth). Before further actions, you need to remember their position.
Position of marks on crankshaft and tooth
- On the lower protective plate covering the belt, use a 10mm socket to unscrew 3 bolts.
The crankshaft protection plate is secured with 3 bolts
- The tension roller is fixed in the retracted position using a screwdriver. There are holes on the bar of this roller that must be aligned.
The tension roller is fixed
- Now the timing belt is removed and inserted into the slot, which is located next to the power steering housing.
The belt is removed and pushed under the power steering housing
- When installing a new belt, be sure to ensure that the mark on the tension roller bar exactly matches the slot on the bracket.
The mark on the bar and the slot must match
Video on the work + information about tags
Replacing the timing belt on a Daewoo Lanos step by step
The Lanos car is the brainchild of the Korean company Daewoo, assembled at an automobile plant in Zaporozhye for the market in Russia and the CIS countries. More than 170 thousand cars of this brand were delivered to the regions of the Russian Federation. The appearance of the car is pleasing to the eye, comfort is at the proper level.
Unfortunately, there is no choice of engines for this model. The car is equipped with only one modification of the power unit, the displacement of which is 1500 cm3. It is capable of developing a power equal to 86 horsepower, and is equipped with a manual transmission, which has 5 stages for selecting gears. The timing mechanism is driven by a toothed belt, so it will be useful for the owners of this car to learn how to replace the Lanos timing belt.
Important points
- To successfully replace the belt, it is important to carefully monitor the position of all marks on the tension rollers and pulleys. If this is not done, the belt tension may be too strong and it will simply break. The location of important marks is shown below.
Location diagram of timing marks on Chevrolet Lanos 1.5
As can be seen from this article, when replacing the timing belt on a Chevrolet Lanos 1.5, there are a lot of nuances that the car owner will have to take into account. First of all, this is the position of the tension rollers and marks, of course. However, if you act consistently and use the above diagram, even a novice driver will be able to replace the timing belt.
About the car
The car does not spoil the owner with an abundance of cool bells and whistles; a standard set of instruments, levers, and switches is installed. The interior has rounded shapes that follow the contour of the body. The upholstery inside the cabin is made of both fabric and plastic, in approximately equal proportions. This ratio does not allow for good insulation from noise, so the operation of the engine at high speeds can be clearly heard in the cabin. The car belongs to the budget class, so the factory did not pay much attention to this.
The Lanos engine runs on AI-95 gasoline; the power system uses an injector. The cylinder head is cast from an aluminum alloy and contains 8 valves driven by a single camshaft. The valve mechanism is driven by a timing belt.
If you carry out scheduled maintenance work on this car in a timely manner and with high quality, it will please its owner for a long time.
Replacement procedure
Many drivers, especially those who have not previously had to deal with a timing belt drive, pay little attention to the technical condition of the parts of this unit. This is completely wrong, since the toothed belt experiences significant loads. It transmits rotation from the crankshaft to the coolant pump, the camshaft. A broken belt or cut teeth will not allow the engine to start, so special attention should be paid to the condition of the drive parts.
You can replace worn parts of the timing mechanism yourself. No special tools or equipment are required. The work can be done in a garage over an inspection hole, overpass, or lift. If your hands confidently hold a mechanic's tool, the car owner is familiar with the structure of the power unit, you can get to work.
Which belt to buy and what you need
Today, managers of retail chains offer a large assortment of timing belts for driving the timing mechanism. If you ask repairmen for advice, they will advise using the original GM belt 96183353, but its cost corresponds to the reputation of the product and its quality. You can successfully use spare parts from Gates, Contitech. When choosing, you should carefully check the part you are purchasing, as you can buy a fake. In addition, experts recommend changing the tensioner roller and coolant pump at the same time as the belt.
From the tool you will need:
- Wrenches (open-end, box-end).
- Set of sockets with a knob.
- Hexagons.
- Screwdrivers with a flat, cross-shaped blade.
- Hammer, pliers, spatula.
- Car jack.
- Stand under the car body.
- Anti-recoil shoes.
- Rags.
If you plan to replace the pump, then you will have to stock up on antifreeze for topping up and a container for draining the coolant.
Step by step description
When the car is placed at the work site, the handbrake cable is tightened and wheel chocks are installed under the rear wheels. Work begins in the engine compartment. First of all, disconnect the battery terminals to prevent a short circuit in the electrical circuits. Next, the procedure will be as follows:
- Unscrew the fasteners of the air filter housing and remove it along with the supply pipes.
- The next step is to remove the protection of the timing drive mechanism; to do this, you need to unscrew 4 screws, after which the casing is removed from the engine compartment.
- Next, you should remove the wheel bolts of the right front wheel.
- After this, the front part of the body is lifted with a car jack, lowered onto a stand, and the wheel is removed.
- Remove the plastic protection of the front wheel arch, gain access to the lower timing belt protection, and remove it.
- Rotate the crankshaft until the installation marks coincide. It is convenient to work with a head with a long knob.
- The work will be hampered by the power steering and generator belt, which should be removed. To do this, loosen the tension of the generator, unscrew the fastening of the power steering pulley, remove the belt, then the pulley.
- Using an accessible method, secure the crankshaft from turning and remove the pulley from it.
- Release the fastening of the tensioner roller and remove the toothed belt.
Installation of new parts is carried out in the reverse order of their removal. Before installation, you should check the alignment of the alignment marks; if they have not moved, you can install a new timing belt.
It is necessary to ensure correct belt tension in the drive. For this purpose, there are marks on the body of the tension mechanism. The roller should be turned until they are aligned. When the belt is tensioned, turn the crankshaft two turns and check that the alignment marks match. If they have not moved, you can complete the installation of the previously removed parts.
Alignment marks
To obtain maximum operating efficiency of the power unit, you should correctly configure the operation of the mechanism for distributing the intake of the combustible mixture and exhaust gases. For this purpose, there are installation marks on the engine, the coincidence of which guarantees that the piston of the first cylinder is at the dead center. Marks are placed on the crankshaft and camshaft pulleys, as well as on the rear cover of the timing mechanism and cylinder block. The shafts are turned until the mark on the camshaft pulley is strictly opposite the recess of the timing belt protective casing. The crankshaft pulley also has a mark, which is combined with the ebb on the cylinder block. With this arrangement, you can obtain the expected performance of the motor.
Do I need to change the roller and pump?
The “useability” of these consumables depends on many factors. These include the quality of the spare parts used, the operating conditions of the vehicle, and the region in which the vehicle is used. It is almost impossible to check their technical condition without removing the belt. A pump malfunction can be detected by the presence of traces of antifreeze, or by loud noise after the destruction of the bearing assembly. The tension roller is usually replaced the second time the belt is replaced.
Experts recommend changing the timing belt after a mileage of 60 thousand km. There are known cases when the pump and tension roller work when the total mileage of the car is more than 120 thousand km.
0 0 vote
Article rating