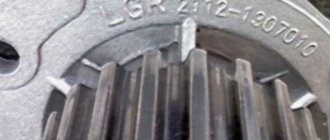
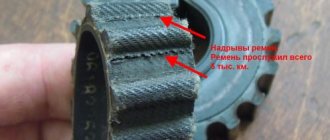
Belt faults
Malfunctions of the timing belt can arise as a result of its long-term operation, and can also be the result of incorrect adjustment or malfunctions of the pump or tension roller. These include:
- violation of the integrity of the belt (cracks, delamination);
- deformation;
- belt break.
If any of the specified malfunctions are detected, the belt must be replaced.
Belt tension on 8-valve VAZ engines
Before tensioning the timing belt on the VAZ, the following preparatory work should be performed:
After this, the drive marks should be checked. One of them, located on the crankshaft pulley, must coincide with the installation tab of the rear cover. At the same time, check the mark on the flywheel. It should be flush with the alignment mark on the block boss.
IMPORTANT! In reality, it is not always possible to achieve an exact match of marks. Therefore, the mechanism is adjusted with an error of +/- 1-2 mm. This does not have a noticeable effect on the driving performance of the car.
If the marks match, the question of how to tighten the timing belt can be considered resolved. Without removing the belt, it is necessary to move the weakened tension roller to the right so that the necessary tension occurs. After this, the roller is tightened tightly. To adjust the roller, a special “horned” key is used. If it is not available, you can use two Phillips screwdrivers, which are inserted into special holes on the roller.
If the marks do not match, the timing belt on the VAZ-2109 must be removed from the pulleys. After this, the pulleys themselves are individually set according to the marks. It is better to start reinstalling the belt from the rear branch. After installing it, the roller is tightened.
IMPORTANT! When installing the timing belt on a VAZ-2114 and other front-wheel drive models, the pulleys located according to the marks can shift by 1-2 teeth. If this happens, the marks should be set with an error to the left, which allows you to compensate for the offset. After installing the belt, the pulleys themselves will move into the required position.
It is necessary to finish tensioning and fixing the belt, and then manually turn the engine 2-3 turns by the crankshaft pulley. To do this, it is convenient to use a “19” head with an extension. The gearbox must be in neutral. If after turning the marks have not moved relative to each other, the procedure can be considered completed. Assembly is carried out in reverse order. » alt=»»> The question of how to check the consistency of the tension should be answered. To do this, hold the strap between your thumb and index finger and turn it 90°. The technician must be able to do this, otherwise the belt is considered over-tensioned.
Why change the belt?
In accordance with the list of routine maintenance for the VAZ 2110, the timing belt must be changed after every 60-75 thousand kilometers, however, here you also need to take into account the conditions of its operation, and this is:
- temperature changes;
- oil getting on the belt;
- problems with the tension roller;
- faulty pump.
All this will inevitably lead to damage.
It is necessary to inspect at least once a month:
- belt (determining its integrity);
- tension roller ;
- water pump gear.
And although on 8-valve VAZ engines, the valve does not bend when the belt breaks, this breakdown can damage the pump or generator.
How to install and correctly tension the timing belt on a VAZ-2114: video
The timing belt must have a strictly defined tension.
If the tension is insufficient, it can hit the casing or jump over the teeth, which can lead to a violation of the valve timing.
What are the consequences of incorrect timing belt tension for the VAZ-2114 engine?
The timing belt has almost slipped. Pay attention to the gap from the belt to the engine, it is uneven
If the belt is significantly displaced, a picture similar to its complete break may be observed. Therefore, it is necessary to pay serious attention to the correct tension of the timing belt, both when replacing it and during operation of the vehicle. You can do this yourself, but be careful and be sure to follow the instructions below.
Proper tension (order and process)
Before you begin tensioning the timing belt, you must turn off the engine after idling in neutral gear. In this case, the engine crankshaft will stop in a position where all the forces acting on it will be balanced. Now let's start tensioning.
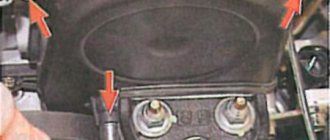
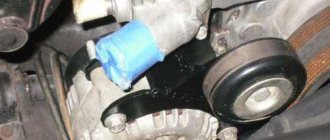
- Remove the belt protective cover.
The casing has been removed. We inspect the belt - Rotate the crankshaft clockwise. The notch on the flywheel is opposite the intermediate value on the scale. The camshaft pulley mark matches the markings on the flywheel.
- By rotating the crankshaft in the opposite direction from the clock hand, we move the mark on the camshaft pulley lower than the flywheel mark by two teeth.
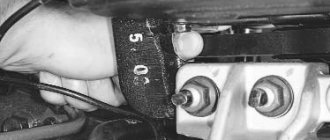
Here we also combine - The belt is tensioned correctly when, by applying a force of 1.5 to 2.0 kgf in the middle between the camshaft and crankshaft pulleys, the belt can be rotated 90˚.
- When the degree of tension is less than required, it is necessary to rotate the crankshaft in the direction of the clock hand until the camshaft and flywheel marks coincide. Now you need to loosen the nut securing the tension roller, tighten the crankshaft 10 - 15˚ and tighten the nut securing the axle.
- We make two turns of the crankshaft in the direction of movement of the clock hand until the marks on the camshaft and the flywheel coincide, after which it is necessary to turn in the opposite direction until the mark on the camshaft pulley moves below the flywheel mark by two teeth. We re-determine the degree of tension of the timing belt. For more information about setting marks, see “We set timing marks on the 8-valve VAZ-2114.”
- In the event that the tension is not normal, all tension steps must be performed again.
- With a normal degree of belt tension, it is necessary to tighten the tension roller nut with a force of 4 kgf*m. Then install the belt guard. Excessive tension is undesirable because may lead to increased load on the bearings of the pump and tension roller and their premature failure.
Video of replacing and tensioning the timing belt on a VAZ-2114
conclusions
Incorrect timing belt tension will lead to accelerated wear.
Accelerated wear of the timing belt due to incorrect tightening.
The engine on a VAZ-2114 does not bend the valve when the timing belt breaks, but still, there is a risk of getting up at night in a dark field in our big country. You will be lucky if the belt breaks at home or at work, and not on a long trip. To prevent this from happening, you need to set the timing belt correctly, as we wrote above!
Timing belt price
The price of a VAZ 2110 timing belt, depending on the manufacturer, can vary from 400 to 1000 rubles. The tension roller costs about the same, which is recommended to be changed along with the belt. The cost of replacing these timing drive elements is 600-1000 rubles.
To save money, you can replace the belt and roller yourself. There is nothing complicated in this procedure, and no special tools are required. You just need to purchase spare parts.
The table below shows timing belt models for the 8-valve VAZ 2110 from different manufacturers, indicating their catalog numbers.
| TIMING BELT VAZ 2110 (8 VALVES) | |
| AVTOVAZ | 2112-1006040 |
| BOSCH | 1987949559 |
| CONTI | CT996 |
| CONTITECH | CT 996 |
| GOODYEAR | G1535 |
| GATES | 5539 |
| FLENNOR | 4428 |
| LUZAR | LTB0112 |
| LYNX | 136CL254 |
| PILENGA | CTP0996 |
| OPTIBELT | ZRK1538 |
| TENSION ROLLER | |
| AVTOVAZ | 21120-100612000 |
Timing belt tensioning VAZ-2112 16 valves: photo and video
The VAZ-2112 engine was installed on LADA cars of the “tenth” family: 2110, 2111 and 2112. Two timing shafts in this engine are driven by a belt. When replacing a belt, you need to be able to control the tension, and it seems that special equipment is produced for this. We believe that tensioning the timing belt on a VAZ-2112 can be done using a dynamometer. In this case, the tension force can be set without errors. You just need to make a technological plate used instead of a tension wrench. The drawing will be given below.
The following video shows how exactly the tension is checked, without even using a dynamometer.
The process of tensioning the timing belt “from start to finish”
We perform all operations on a cold engine. Let's say the belt is now being replaced and the nut on the roller is not tightened. Then just skip "step 1":
- We take a crocodile clip for the battery and fix the belt on the pulley.
Then use a 17mm wrench to loosen the nut (see photo). First step before adjustment - We screw an M8 pin into the threaded hole next to the roller.
We screw two nuts onto it. We put a plate on the roller and set the force with a dynamometer - exactly 4 kgf. How to set tension - The inner nut on the stud should touch the plate. Screw another nut on top, securing the plate in place.
- Taking the key “17”, tighten the nut on the roller.
Recommended force – 33.2-41.1 N*m. Fixing the video - All that remains is to remove everything unnecessary - the plate and the pin.
On a VAZ-2112 engine, the timing belt tension depends on the force applied to the adjusting key. The force should be 2.0 N*m. And our distance from the axis to the “ear” is 51 mm (see below). Multiply 0.051 by 39.2266 (4 kgf in Newtons) and you will get what you need.
Plate drawing
The plate shown in the drawing is made from steel 2 mm thick. The pattern must be made based on the characteristics of the bending equipment. When bending, the length decreases, which means that the dimensions of the pattern will be larger than 94x75 mm.
Technological plate
Threads for M4 screws are cut in the standard way. Each screw should protrude 7 mm beyond the plane.
If the plate is not made
Everyone knows that on a VAZ-2112 engine, tensioning and replacing the timing belt is done using a key. Its appearance is shown in the photo.
Tension adjustment key
You can make a slot on the handle, and then, installing a dynamometer, adjust the force as shown above.
If the force is 4 kgf, then the distance from the slot to the midpoint between the pins should be 49.5 mm.
The difference between methods “1” and “2” is very simple: in the second case, the plate (key) is not fixed. This means that the key will have to be held at the same level while tightening the nut. Make a choice.
Another method for checking belt tension
It is convenient to check the tension when the timing cover is installed:
- On a cold engine, a feeler gauge d=16 mm should be inserted between the edge of the cover and the belt;
- For a warm engine, a correction is made: d=12 mm.
The role of the probe can be performed by a tube, steel rod, etc.
Error warning
If we talk about the VAZ-2112 engine, the timing belt tension can be increased or decreased. In this case, you must adhere to the recommendations:
- Let the holes for the pins first be in the lower left quarter;
- Taking the tuning key, the tension is increased by rotating the roller counterclockwise.
The result of correct and incorrect settings is shown below.
Left - which is correct
Turning to the right should correspond to a loosening of tension. And the one who did the opposite, then let him take offense at himself: the belt will wear out very quickly!
If all recommendations are followed, the holes cannot be at the top (as in photo 2).
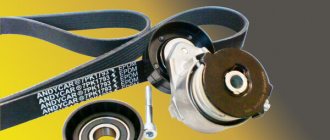
Replacement with a self-tensioning roller (automatic tensioner)
On engines 11194 and 21126, rollers with an “automatic tensioner” are installed. It would seem that the automatic roller is suitable for any VAZ engine. But don't rush.
Two different tension rollers
The roller from the VAZ-2112 engine is equipped with protrusions on the sides. There are no protrusions on part 21126-1006238. This is the problem.
Don’t take unnecessary risks - you only need the original roller 2112-1006120 or its equivalent.
What did we try for?
If the timing belt malfunctions, the VAZ-2112 engine successfully bends its valves, requiring their replacement. Violations include belt breakage, as well as jumping over several teeth. The second malfunction occurs when the tension force is too low, and the first is the result of wear on the belt as a whole. Draw conclusions.
Regulations and articles
Check the timing belt tension every 15 thousand km - this is the regulation. We will not give the belt part number - we were not talking about replacement. And if you decide to change the tension roller, find part 2112-1006120-XX. Instead of XX there may be numbers from 00 to 10, and all of these are products of domestic factories (00 is VAZ).
Components produced in Russia
All analogues
Let's jump straight to the list:
Camshaft design VAZ 2114, VAZ 2115, VAZ 2113
Engine camshaft VAZ 2114, VAZ 2115, VAZ 2113
When to tension the timing belt
The timing belt of the VAZ-2112 and other VAZ models is tensioned in the following cases:
- Installing a new belt;
- Loose belt;
- “Slipping” of the belt with a violation of the timing adjustment;
- Replacement of the tension roller and other timing drive mechanisms.
If the cause of the intervention is a broken or “slipping” belt, you must first ensure the integrity of the valves. A broken gas distribution mechanism (drive) leads to engine damage on 16-valve 1.5-liter power units. However, in cases of drive failure at high speeds, valves and CPGs are also destroyed on other engines.
They check the operation of the timing belt on the VAZ-2114 and other models equipped with 8-valve units by turning the camshaft manually. A working mechanism should turn with some effort. A faulty one, as a rule, cannot be affected.
During the procedure, it is necessary to check the compression in each of the cylinders. The easiest way to do this is to tightly cover the spark plug hole with paper. If there is pressure in the cylinder, the plug is knocked out of its seat at a certain stage of camshaft rotation. ” alt=””> A similar check on 16-valve engines is not recommended. The risk of damage to an initially good valve mechanism is too great. There are no grooves in the pistons of one and a half liter engines of this type. Therefore, valves that move down bend when they contact the piston surface.
Timing belt tension VAZ 2110, 2111 (8 cl.)
To adjust the belt tension, turn the crankshaft counterclockwise so that the mark on the camshaft pulley moves down from the rear cover antenna by two teeth.
| The timing belt is a rubber belt, with notches on the inside, designed to synchronize the crankshaft and camshaft of the engine. It is important that it is not only installed correctly, but also tensioned. Do you know how to properly tension the timing belt with your own hands? |
Checking the timing belt tension means that the front branch of the belt is twisted 90° with the thumb and forefinger of the hand with a slight force of 15–20 N (1.5–2.0 kgf). Here questions arise: how to calculate the force? Everyone’s finger strength is different, how do you determine the required strength? You need to tension the timing belt so that in the longest section you try to turn it 90 degrees with 2 fingers, and if this is almost possible, then the belt is tensioned normally.
Try tightening the timing belt and keep in mind that
16 valve engine
On sixteen valve engines, in contrast to eight valve engines, when the timing belt breaks, serious consequences occur:
- Since a break or a belt slipping through a tooth (or several teeth) is almost one hundred percent likely to occur in pistons with valves
- This definitely leads to bending of the latter, and therefore major repairs are not very cheap
- That is why the instructions require checking the condition of the timing belt drive and replacing it in a timely manner.
- You should not forget about the quality of domestic spare parts, so you should take this issue seriously
- It is prescribed to check the condition of the belt every 15 thousand kilometers and replace it after 50 thousand or earlier, follow these rules
Diagram of the gas distribution of a 16-valve engine
- To visually assess the condition of the belt, pry off the plug with a screwdriver, it is located on the front drive cover
Removal
Replacing the VAZ 21154 timing belt begins with removing it, for this:
- Stop the car and put chocks under the rear wheels
- Using the “10” head, unscrew the six bolts that secure the front cover and remove it
Removing the timing mechanism casing
- Then remove the right wheel and behind it the plastic shield covering the engine compartment
- Using the “17” head, turn the crankshaft in a clockwise direction using the bolt that secures the generator drive pulley
- In the flesh until the marks on the camshaft pulleys coincide with the marks on the rear timing case cover
- On the engine flywheel, the mark should be opposite the mark on the slot in the clutch cover cover
- Insert a screwdriver through the hole located on the clutch housing between the flywheel teeth to fix it, unscrew the generator drive pulley bolt
- Remove the pulley
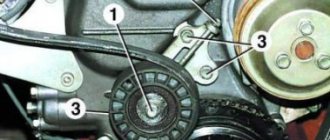
- Then use a 17" wrench to loosen the tensioner pulley nut.
Use a wrench to loosen the drive tension by loosening the tensioner roller nut
- Turn the roller and loosen the belt tension, remove its rear branch, starting with the toothed pulley on the exhaust camshaft, then with the tension roller, then with the pump pulley
- After this, the belt is removed from the crankshaft and exhaust camshaft pulleys and from the support roller
- The drive belt is installed in the same way, the sequence of putting it on is the reverse of taking it off.
- We make sure that the alignment marks of the shafts match
- By turning the tensioner roller, tighten the drive belt and fix the roller
- After this, rotate the crankshaft two revolutions and check again that the alignment marks match
- Replacement of VAZ 21154 timing belt drive is completed
- The tension is checked by pressing your fingers in the middle part between the camshaft pulleys
That's all, no matter what type of engine you have, our article is useful in both cases, take care of the car, in addition to these procedures, follow the others prescribed in the manual, and additionally watch our video.