A generator is an important part of any car, which is responsible for its power supply. With the help of this unit, it is possible to provide a continuous supply of electricity to all components, various systems and sensors, making its operation possible.
On the car, a unit with article number 9412.3701 is used as a standard generator. Such a generator can also be found on the injector of the VAZ-21214, VAZ-2131, VAZ-2123.
If the generator on a Chevrolet Niva fails, you can replace it with analogues, the most popular of which are presented in the table.
| Generator | vendor code | Cost, in rubles |
| VAZ-2123 (produced after 2003) | 5112.3771-30 T | 5370 |
| VAZ-2123 (produced after 2003) injector 14V 80A PRAMO | 5112.3771 | 4460 |
| VAZ-2123 (produced after 2003) | 9402.3701-04 | 4380 |
A generator for a Chevrolet Niva costs between 5,000 and 7,000 rubles. The price of the original unit depends on the region of purchase. Many owners prefer to use Start Volt at 120 amperes when the factory generator fails.
Replacing the Chevrolet Niva generator
The generator is responsible for powering the vehicle while the engine is running. When diagnosing some malfunctions, it is necessary to replace the Chevrolet Niva generator, but you must first make sure that this procedure is appropriate.
Signs of a generator malfunction
As a consequence of the fact that the purpose of the generator is well defined, its failure is easy to diagnose. Whether the Chevrolet Niva generator can be repaired or not, it will definitely have to be removed from the car. There are several basic diagnostic procedures to make sure that repairs are necessary.
- The battery charge indicator light is on on the instrument panel.
- Excessively rapid battery discharge when the engine is running.
- Changes in light brightness as engine speed increases.
- All these signs indicate either a complete lack of charging or insufficient charging current, which leads to replacement of the unit.
- You can watch a video that describes the procedure for removing the generator.
- In order to carry out repair work with your own hands, you need to have a suitable tool, as well as know the algorithm for performing all the actions.
Tool for the job
To carry out work on replacing the device on a Niva Chevrolet car you will need:
- 8-open-end wrench;
- 10 open-end wrench;
- head for 10, knob
- 13 open-end wrench
- 17 open-end wrench
- poly V-belt (it is recommended to install a new one after removing the drive belt).
Generator replacement algorithm
The first thing you need to worry about is your own safety by removing the terminals from the battery. Depending on the type of terminals, you will need a 10 or 8 key.
Then, on the rear panel of the generator, the wire is unscrewed from the contact bolt and the block is removed from the brush assembly.
The generator belt is tensioned using a special plate - tensioner. It can be adjusted by first loosening the mounting bolts. You can find the tensioner plate in the area of the tension roller. This plate is secured with three bolts. It is more convenient to unscrew them with a 10 mm open-end wrench. However, only two bolts can be easily unscrewed with an open-end wrench.
For the third, a ratchet or crank is provided. The bolts are not completely unscrewed, but only slightly loosened. Right there, next to the plate, you can see the adjusting bolt. Using a 10mm wrench, it must be completely unscrewed, and the tensioner plate together with the current source will move to the side, loosening the belt.
You can read more about how to remove the belt here.
- Why does the battery light on the instrument panel light up?
Replacing a Chevrolet Niva pump
Incredible! Replacing the tablet without removing the generator! Chevrolet Niva!
All that remains is to dismantle the belt and unscrew the generator, which is attached by two bots, top and bottom. This procedure will require a 13 mm wrench, but if the bolts turn, you will have to hold them at the back with a 17 mm wrench.
Generator installation
Replacing a Chevrolet Niva generator comes down to the subsequent installation of the device. You must follow the same algorithm. Naturally, in this algorithm it is necessary to reverse the order of actions. First, the assembly is screwed to the engine using two bolts.
It is not recommended to tighten them completely, as the belt will still need to be tightened later. The new V-ribbed belt should fit onto the pulleys with little effort.
It is necessary to bypass the pulleys in the following sequence: hydraulic pump pulley, pulley (tensioner), crankshaft pulley, power steering pulley, roller (bypass), pulley of the device itself.
Using the adjustment bolt, we ensure that the belt in the upper free part, when applied with force, has a deflection of 15-16 mm. Only after this, tighten the three bolts of the tension plate, after which you should check the tightness of the bolts securing the power source.
Generator connection
In order to connect the source to the circuit, you must first complete the work on its rear panel, and then only connect the terminals to the battery. All contacts must be clean, so the wires should be cleaned of oxidized deposits and dirt.
The terminals on the battery must be tightened, otherwise they will quickly oxidize. When starting the engine with a working generator, the warning lamp should go out immediately after starting.
- Repair and replacement of the VAZ 2107 generator: how to remove and check the device yourself
However, experts prefer to evaluate the operation of the generator by measuring the voltage at the terminals.
The process of replacing the fuel filter on Lada Kalina
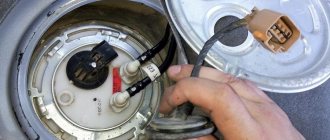
There is nothing complicated about replacing the fuel filter on the Lada Kalina. You can change it at home with your own hands. Its location is behind the right rear wheel. So, let's take a closer look at how to replace it yourself:
- To make it more convenient to change the filter, you need a pit or a lift. If they are not there, then you will have to secure the car from accidentally rolling and remove the rear right wheel. For safety, it is best to lift the rear right side of the car and place a stump.
- We clean the workspace from dirt, dust and other debris, spray with WD-40.
- Using a 10mm wrench, loosen the clamps of the fuel mixture inlet and outlet pipes. You should be careful, since there is pressure in the system, and protect your face from accidental contact with the fuel mixture.
- Unscrew the clamp securing the Lada Kalina fuel filter.
- Remove the filter element.
- Installation is carried out in reverse order.
When starting for the first time after replacing the Lada Kalina fuel filter, you should turn the ignition key for 3-5 seconds so that the fuel pump can restore pressure in the system and charge fuel. Turn off the ignition, wait 5-7 seconds and start the car without any problems.
Refinement of the fuel filtration system
Some car enthusiasts modify the fuel filtration system. This is quite easy to do, since anyone who has owned a Zhiguli Classic is familiar with this. For modification you will need: a Zhigul class fuel filter with a removable mesh, wire cutters and 2 clamps marked “10-12”.
The modernization process itself:
- We find the fuel line under the hood of the car.
- Carefully cut it in half.
- We install the filter and tighten it with clamps.
Everything is like the good old “Classic”. Thus, the car receives additional fuel filtration, which increases engine protection.
Generator operation
The Niva Chevrolet generator is responsible for the reliable and high-quality operation of the electronics system. The owner should identify possible malfunctions in a timely manner and carry out high-quality repairs, since the functioning of all lighting devices depends on its good condition. This also affects the battery charge. A continuous supply of current is provided by a generator.
Although it has small dimensions, the generator is very durable. To prevent damage and failure of the car regulator, the owner must follow the rules for operating the car.
Particular attention should be paid to how the Chevrolet Niva generator works. Malfunctions that led to a malfunction in its operation can be determined using automotive diagnostics
And the repair depends entirely on the degree of complexity of the breakdown.
Troubleshooting
Repair of the Niva Chevrolet generator may be necessary only in some cases when replacing parts does not solve the problem. There are several signs after which it is worth checking the serviceability of the generator assembly. They are as follows:
- After starting the engine, the indicator light indicating the battery should go out. If after the engine starts running the signal still works, then the battery is not being charged, the generator voltage is not enough to charge.
- When the engine was turned on, the headlights became dim. Although there is a charge from the battery, it is too small to support the normal operation of electronic devices in the car; measuring instruments show low voltage characteristics - 12 V.
- There is noise from the motor side, in addition, points 1 and 2 are observed. The sounds may resemble metallic surfaces colliding or whistling. Most likely, the bearing has broken and needs to be replaced.
And also interesting: Non-adjustable wheel bearings in the field
These 3 signs will help to identify, but not recognize the problem. Without special devices, it is very difficult to guess which part is damaged. Only service diagnostics can give a clear idea of the breakdown.
The diagram and design of the generator, of course, will help in finding a breakdown, but if a person has not previously made such repairs on his own, it is better to take the car to a service center.
Nuances of moving a generator
The disadvantage of domestic Niva SUVs is the location of the generator unit - at the bottom of the engine compartment. It constantly gets contaminated when driving off-road, and coolant constantly drips. The problem is solved by moving the generator upstairs (the author of the video is SARTANETS).
To transfer, you will need a set of keys, a bracket, mounting bolts, and a V-belt. You can make a generator transfer bracket with your own hands according to the drawing below.
Drawing of a homemade bracket
Sequence of actions during transfer:
Replacing the VAZ 2110 alternator belt
- We dismantle the propeller, pump and remove the belt.
- By unscrewing the standard bracket, you can remove the generator.
- We cut off the bead around the side of the cylinder head and on the cylinder block.
- Then you should unscrew the two bolts and two studs.
- Next, the assembly is installed on a new bracket and final assembly is performed.
Thus, moving the generator unit upstairs is not difficult.
A simple way to diagnose an engine using the oil filler neck
Auto mechanics rightfully consider the oil filler neck to be the “mirror” of the entire engine. This part of the engine is as accessible as possible for a quick inspection and allows you to identify a number of faults without opening it. Fixing problems early allows you to save a lot on repairs later. That is why I decided to talk about how to diagnose an engine using the oil filler neck without using specialized equipment.
Many car owners use the oil filler neck exclusively to add engine oil. At the same time, auto mechanics recommend inspecting this area at least occasionally even if there are no noticeable problems with the engine
.
Early diagnosis of a malfunction will make it possible to get rid of it with a quick and inexpensive repair
, rather than having to overhaul the entire engine later.
First, you should inspect the oil filler cap. Many car enthusiasts notice a white emulsion
and they start sounding the alarm.
A similar liquid in color and consistency is formed inside the engine when antifreeze mixes with engine oil through a broken cylinder head gasket. However, a white coating on the oil filler cap does not indicate such a problem
.
As a rule, an emulsion is formed as a result of condensation. The oil filler cap is usually located at the top of the engine, so this is where the maximum amount of condensate accumulates
.
Now we look into the oil filler neck itself and evaluate the surfaces for the presence of deposits
.
Car owners often encounter the formation of dark, thick contaminants that look like fuel oil. A similar phenomenon is associated with the use of low-quality oil or its untimely replacement
. In such a situation, it is advisable to flush the engine with a good flushing oil the next time you change the engine oil.
Next, you need to tighten the oil filler cap and start the engine. With the engine warm, unscrew the cap again and observe unnatural phenomena. Worn out engines can usually be identified by smoke coming out of the oil filler neck.
.
This phenomenon is associated with incorrect operation of the crankcase gas exhaust system. The situation can be corrected by cleaning the valve or replacing structural components, but in practice, car owners forget about the problem and drive like this for a very long time. It is advisable to still think about troubleshooting, otherwise the engine life will gradually decrease
.
Smell of unburned gasoline from the oil filler neck
may indicate that the air-fuel mixture is too rich or the fuel pump is faulty.
In this case, it is advisable to carry out a full diagnosis of the car, since it is impossible to determine the exact cause of the phenomenon by smell
.
Source
Removing the generator
For this process you need to take a Phillips screwdriver. In addition, you need to use a car tester or ohmmeter, a 10mm wrench and a test lamp.
To change the generator, it must be removed from the engine compartment. First, disconnect the wire and terminal of the battery with a negative charge. Next, disconnect the block with wires and the generator output, and take out the protective cover from there. Then, unscrewing the nut, disconnect the wires on the generator contact bolt. Then unscrew the bolt that secures the generator to the tension bar and pull it out. It is also necessary to unscrew the bolt-shaped fastening at the bottom of the generator.
Then you should remove the belt. After removing all the bolts, the generator must be removed from the bracket using a mounting spudger. To install a new one, you need to go through the entire process in reverse order.
After replacing the described electromechanical device, you need to inspect its drive belt and adjust its tension. But before you replace the old Niva Chevrolet generator with a new one, you need to make sure that the replacement is really necessary. There are times when you can do repairs yourself, without the help of specialists.
In order to avoid confusion, you need to note how the generator covers are correctly positioned. Next, you need to remove the plastic protective casing by unfastening the three latches on it. The voltage regulator and brush holder are removed together. In order to release the rectifier unit and capacitor, it is necessary to disconnect the wires from the regulator terminal. The stator winding has three terminals. And in order to carry out the operation to remove the rectifier unit and capacitor, you need to bend these leads a little. Use a flat-head screwdriver to pry off the side where the slip rings are located and remove the cover from the generator.
Holding the generator rotor in a vice, unscrew the fastening from the pulley. Then remove the spring washer, pulley and thrust washer. Then the rotor and spacer ring are carefully pulled out and their condition is checked. If the ring shows signs of damage, scratches and is noticeably worn out, it needs to be sanded with regular sandpaper. If the result is poor, the ring is ground on a lathe to remove a small layer of metal.
Having connected the rotor to the slip rings, check the resistance of its winding with a tester. If the wiring is broken, the meter will show an infinite reading. For this reason, the rotor must be replaced.
To check whether the rotor winding closes or not, you need to connect the test lamp to a network carrying 220 V alternating current. One wire of the lamp is connected to the rotor, and each ring is connected to the second in turn. If the lamp lights up, the rotor needs to be replaced.
Do-it-yourself device repair
Now let's talk about how a generator is repaired. The repair procedure can be performed at a service station or in a garage, of course, if you have an idea of what needs to be done.
Replacing the alternator belt
- First of all, the connector with the DPKV is dismantled, after which the screw that secures this regulator is unscrewed and removed.
- The nut that secures the device should be loosened slightly, but not completely unscrewed. The generator assembly can be moved towards the block, after which the strap on the displaced device can be removed without problems, since it will be loosened.
- Using a jack, which must be installed in advance on the side where the unit is located, you need to slightly raise the car by turning on first gear.
- Next, pull the strap itself so that it can move away from the pump shaft. Then spin the wheel until the tension point reaches the pulley.
- The next step in replacing the alternator belt will be to remove the belt from the other shafts.
- As for installing a new one, it should first be put on the shaft of the unit and the crankshaft, only after these steps can it be installed on the pump shaft.
- The wheel turns until the strap hits the pulley. Then the device is put in place, the strap is tightened, after which the assembly is fixed to the bracket using a nut. The final stage will be the installation of the DPKV in place (author - Ig K channel).
Replacing the tension roller
Repair of the Niva Chevrolet generator may involve replacing the tension roller. The main part of this element is the bearing, so if the strap is loose, then first of all it is necessary to check it. If the roller is in good condition, then the bearing will rotate quietly and there should be no jerking.
To replace an element, follow these steps:
- First, install a crowbar or other tool so that the clutch shaft is blocked. This will prevent the crankshaft from moving.
- Then the screw that secures the roller itself is loosened, and the tension on the strap is relieved.
- The axial screw is unscrewed, after which the roller can be removed.
- A working roller is installed and the strap tension is adjusted. After replacement, make sure the device is working properly.
Replacing the brush
Worn and new voltage regulators
- To replace these components, the regulator must be completely removed. Also, the “-” terminal is disconnected from the battery and the wiring coming from the generator unit is disconnected.
- Next, the block of wires is dismantled, from the tips of which the rubberized cap is removed - this component is intended for protection. After this, you need to unscrew the nut from the wires that secured them to the mechanism block.
- Then you need to disconnect the spring fasteners and remove the plastic casing, using a Phillips-head screwdriver to unscrew the regulator clamps.
- The regulator is dismantled along with the brushes, after which the wires need to be disconnected from this element.
- The brushes are changed, and further assembly of the structure is carried out in the reverse order. Brushes should be replaced if their length is less than 0.5 cm. If the length of the brushes is normal, and the generator device is not working correctly, it is necessary to diagnose the regulatory element, as well as the electrical circuit in the area from it to the brushes.
Dismantling the generator
- Replacing the generator begins with removing the device from the engine compartment. All wiring going to it is disconnected, and we must also not forget about disconnecting the battery. The protective plastic casing is removed.
- The nut securing the wires and the screw securing the assembly are unscrewed. The fastening in the form of a bolt is detached; it is located at the bottom of the structure, after which the strap is removed.
- When all the bolts are unscrewed, the mechanism can be removed from the bracket; a mounting spade may be needed for this.
- To install a new unit, all steps should be repeated in the reverse order. After the new generator is installed, it is necessary to diagnose the condition of the drive belt and also adjust the tension.
Sorry, there are no surveys available at this time.
Generator
The Chevrolet Niva generator unit allows you to provide the entire vehicle with energy for the operation of all electronic devices of the vehicle. This node consists of 3 main elements:
- generator set - creates alternating current;
- rectifier - converts alternating current into direct current;
- voltage regulator - stabilizes the output voltage.
The total power of the installation of 5000 rpm allows you to maintain a constant voltage of 13-14 V, while the current is 55-60 A. These characteristics are optimal for the normal operating condition of the car. The electricity generated by the generator is distributed to all consumers of the system, and the rest is used to recharge the battery while the engine is running. The generator itself is located near the engine and connected to its crankshaft via a belt drive. Its lower part is attached with 2 special claws to the engine bracket with 1 bolt fastener. The device is secured to a bar at the top via a pin. Since the unit in the VAZ 2123 is located very close to the car engine, it has a reliable design that can withstand loads from vibration, temperature, as well as a humid environment and dirt. A generator rarely breaks down, but some of its parts become unusable after a certain period of use, for example, brushes.
Checking the condition of the engine using the oil filler cap
Agree that when you come to inspect the car you like, you are unlikely to measure compression, oil pressure and timing chain tension on the spot. But checking in the service is not free, it takes time, and the owners (for obvious reasons) do not particularly like this procedure. However, you can roughly understand the condition of the piston without service, literally in the yard.
Verification procedure
Everything is elementary. Start the engine and unscrew the oil filler cap. And then there are possible options.
Option number one: nothing special happens.
And by placing a piece of paper on the oil filling hole, you can watch how it slightly sticks to it. This is a good sign. You can inspect the car further (you should prepare a list of items to check in advance). However, the probability of encountering such an idyllic picture on a middle-aged engine is approximately equal to the probability of encountering the crew of a flying saucer. But anything can happen, what if you are lucky?
Option number two: nothing special happens, but the leaf blows away.
It's already worse, but in general, it's expected.
Now we place the lid itself on the neck. Just put it on the hole as tightly as possible. The lid twitches, but does not fly off
. And this is the most likely outcome of events. In the absence of other negative factors (smoke or oil splashes), you can already put on a sad face and tell the seller that “the ventilation is all over, and maybe there’s no compression at all. "Remember this phrase - it will come in handy. Well, then - the classic auction and further inspection of the car with passion.
Option number three: something incomprehensible is happening.
Namely: smoke comes from the engine neck, or worse, oil splashes.
The attached cover comes off even at idle. And here there is nothing more to talk about. You screw it back in, shake the seller’s hand and leave. No options.
And what is the result?
Those who carefully read my blog can already guess. For those who don’t read carefully, I recommend reading this article
, where I described in detail the essence of the VKG system. Therefore, I’ll simply state: firstly, a strong “blowing” from the neck indicates a clogged crankcase ventilation. This may be bad, but it can be solved independently (see below). But what’s worse is that this is a symptom of an active breakthrough of gases into the crankcase itself. From there they are already rushing out with all their might through any hole, which you can observe with the oil filler cap removed. Needless to say, in this case, replacing the piston rings and disassembling the engine is the best option for further developments. And the worst is banal capital. Moreover, you will only find out the price during the process. And you shouldn’t be surprised that it can easily amount to up to a third of the price of a car purchased “without looking”.
Below is a personal example of how to clean the ventilation system built into the valve cover.
Source
Common reasons why the battery light is constantly on
These include the following cases:
- The alternator drive belt is loose, worn or torn;
- the fuse has blown in the section of the circuit from the ignition switch to the control light (in this case there is charging);
- contact is broken in the connector blocks of the mounting block;
- malfunction of the relay regulator;
- diode bridge malfunction;
- malfunction in the circuit of additional diodes;
- break in the current supply circuit to the rotor electromagnets;
- poor contact at the battery terminals;
- lack of supply current at the output of the generator;
- the generator brushes are worn out;
- there is no ground on the negative wire.
The source of many faults in the battery charging system is the generator voltage regulator relay
The light may sometimes come on when the turn signal is turned on.
The most common reason is a malfunction of the diode bridge, poor contact in the rotation fuses, or poor contact in the ground wire of the instrument panel. It is necessary to check the contacts of all terminals on the wires coming from the generator. The problem must be fixed. Indeed, if the generator malfunctions (a break in one of the three diodes), the battery will no longer receive a full charge and after some time will be completely discharged every time the turn signals are turned on and/or off.
The light bulb goes out and burns at full intensity
A battery light that barely burns at half intensity while the engine is running indicates a generator malfunction: the diode bridge or insulation in one of the stator windings is broken. Less commonly, there is a problem with the ignition switch. The key cannot turn all the way due to accumulated dirt. A few drops of WD-40 “liquid key” into the ignition key hole will alleviate the situation. Sometimes it may be necessary to repair the car's electrical wiring and timely diagnose a decrease in the signal to the indicators.
The light comes on when the speed increases
This is a signal that charging has stopped when you press the gas pedal. The most common cause of this malfunction is wear of the slip rings on the generator shaft. There are problems with the belt, brushes or bearings of the generator. The malfunction must be found and eliminated. Otherwise, due to loss of charging, the battery may fail at the most inopportune moment.
The light comes on at idle
The light comes on as soon as the car starts. Sometimes the reason is simple. When the engine is idling, powerful current consumers are turned on: air conditioning, headlights, windshield wipers. The load on the generator increases sharply and the battery simply does not have enough charge. The light starts flashing periodically. If the alternator belt is loosely tensioned, then when you turn on the headlights or air conditioning, you can hear the squeal of a slipping belt. But a battery light burning at low speeds can also indicate a malfunction of the relay regulator or rectifier bridge. In any case, the fault must be found and eliminated.
The light flashes periodically when the engine is cold
A flashing battery light requires you to pay special attention to the generator. Perhaps the brushes or copper slip rings on the armature shaft are worn out
Perhaps there is a bad contact in one of the phases of the diode bridge. Often the cause of this malfunction is loosening of the nuts securing the diode bridge contacts or oxidation of the closing surfaces of the contacts.
The battery charge control lamp lights up when the headlights are turned on.
The light comes on when the headlights are turned on
This is the reason why the generator cannot produce rated voltage when the load increases. It is necessary to check the AC source for a break in one of the phases of the diode bridge, wear of the commutator rings or brushes.
The light remains on when the ignition is off
In this case, the current to the light bulb can only come from the ignition system. It is most likely that there is a problem with the ignition switch, the switched on contact of the ignition unloading relay or the car alarm.
Article on the topic: Center differential lock: what is it?
And the light is on and charging is in progress
In this case, it can be assumed that there is a loss of current in the battery lamp circuit or at the contact from the generator, or at the contact from the ignition switch. The reasons may be different: the wire is broken or has fallen off the connector, the contacts in the connecting blocks have oxidized or rusted. Very rarely, the cause may be a relay regulator.
Let's take a closer look at electrical repairs:
First, the generator must be removed. Before disconnecting the wiring, carefully sketch or photograph the connection diagram. Place the unit on a clean surface so that no debris can get inside. How to connect a generator in the field:
Disconnect the voltage regulator and diode bridge board. Test the diodes and connecting buses with a tester. Faulty radio components are usually visible without measurement. Their repair is impossible, only replacement.
Inspect the rotor current collector tracks. The copper surface must be free of oxide deposits, cracks and other damage. If necessary, you can clean it with fine sandpaper. Connect the tester to the stator and rotor windings, and check them for open circuit or short circuit. There is no need to replace the generator; the windings are easily restored. After troubleshooting, reassemble the case without damaging the internal parts. Reinstall the assembly, tighten the drive belt, and crank the crankshaft without starting the engine. This will check that the installation is correct. Then start the engine and check the charge voltage. If it exceeds 13.8 volts, the repair has been completed successfully.
Circuit breakers:
F1 (5 A) - license plate lamps, instrument panel lamps, indicator light on the dashboard, engine compartment lamp, additional brake light lamp, left side marker lamps.
If any of the listed lamps do not work, check this fuse and the lamps themselves, their connectors and wiring.
F2 (7.5 A) - low beam in the left headlight. Similar to relay K4.
F3 (10 A) - high beam in the left headlight, indicator lamp for turning on the high beam headlights on the dashboard. Similar to relay K5.
F4 (10 A) - backup fuse.
F5 (30 A) - front door electric windows and their relays. If, when operating the power window, the window goes down but not up (or vice versa), check the button on the door. When lowering and raising, the polarity and direction of rotation of the motor are different. It could also be a problem with the window lift mechanism.
To get to it, you need to remove the door trim. Check that the mechanism does not bite anywhere and that the gears are intact, without broken teeth. If there are problems, you can replace the entire power window drive with a new one.
F6 (15 A) - door lock control unit. If one or more doors stop opening, check this fuse. The issue may be in the central locking, control unit, as well as the mechanisms themselves, rods and door locks. If you have no experience, it is better to contact a car service.
F7 (20 A) - sound signal and its relay, cigarette lighter. If the horn does not work, check this fuse, the steering column contacts and the wiring; the contacts may have oxidized and the wiring may have become frayed. Also check the horn itself, you can replace it with another one, for example, a two-tone one from Volga.
If the cigarette lighter does not work, check the wiring and its contacts. The white wire is responsible for the backlight, the red and black wires go to the cigarette lighter contacts.
Do not insert non-standard connectors into the cigarette lighter, they may cause a short circuit. If the connector in the cigarette lighter moves to the sides, it is better to use a splitter and insert this connector there.
F8 (20 A) - rear window heating element and relay (contacts).
Similar to relay K7.
F9 (20 A) - rear window heating relay winding, additional relay, rear window wiper motor, windshield wiper and washer switch.
F10 (20 A) - backup fuse.
F11 (5 A) - right side lamps.
F12 (7.5 A) - low beam in the right headlight, gear motors for headlight range control. Similar to relay K4.
F13 (10 A) - high beam in the right headlight. Similar to relay K5.
F14 (10 A) - backup fuse. F15 (20 A) - backup fuse.
F16 (10 A) - turn signal and hazard warning light switch (in emergency mode). Similar to relay K3.
F17 (7.5 A) - interior lighting, individual backlight lamp, brake lamps, check lamp for malfunction of the engine management system. If the brake lights do not work, check this fuse, the lamps themselves, their connectors, usually the problem is bad or oxidized contacts. Also check the operation of the brake light switch located near the brake pedal.
F18 (25 A) - heater electric motor and its switch. If the stove blows cold air, the problem may be in the hot air damper, the cable to which comes from the regulator under the casing not far from the gas pedal. The coolant level must be within acceptable limits.
If the heater doesn't work or blow at all, it could be the heater motor. Also check the heater switch and its contacts.
F19 (10 A) - turn signal and hazard warning light switch (in turning mode), indicator light in the light switch, turn signal lamps, turn signal indicator lamps on the dashboard, differential indicator lamp. If the turn signals or hazard lights do not work, read the information about relay K3.
F20 (7.5 A) - reserve.
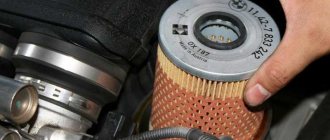
Stop over-tightening the oil filter.
Every time I buy another used car, I, like many of you, naturally immediately change all the fluids in the car, as well as all the filters. Including oil. In general, this is unnecessary maintenance, a guarantee that the car will last as long as possible. After all, you must agree that an honest car seller is a rarity these days. I have been convinced more than once that all owners need only one thing - to sell their car as quickly as possible. For this they are ready to do anything. So, “a big lie” about the last recent maintenance, in which all the fluids were allegedly changed, is a normal occurrence when communicating with a car owner.
You know, I bought a lot of cars on the secondary market. There were both good and bad. I admit, I have made the wrong choice more than once, buying outright rubbish. True, I was always lucky, I quickly got rid of unwanted cars. Moreover, I often gave away a car I didn’t need, even more expensive than I bought it for.
And you know what irritates me most about used cars during the first maintenance after purchase? Oil filters. You won't believe it, but every car I've ever purchased on the aftermarket had terribly tight oil filters, which caused me a lot of inconvenience. Yes, I understand that a loose filter can also turn into a whole problem. But this does not mean that when replacing it, the filter needs to be tightened as if it will remain in the engine forever.
Did you know that every part in a car must be tightened with a certain force? For this purpose, the automotive industry even has entire specifications that indicate the torque (force) required for reliable and correct fixation of parts, components and attachments of the car.
Of course, it is worth mentioning that it is not convenient to screw in oil filters on all cars. After all, it all depends on where its landing nest is located.
For example, on my 1992 Jeep Cherokee (photo above), the oil filter is in a very convenient location, allowing it to be easily accessed from above. It only takes a few minutes to unscrew the old filter and install the new one. The filter on this SUV screws in very easily.
But, for example, another one of my cars (Jeep Grand Wagoneer - pictured above) has a slightly different location of the oil filter. Therefore, if you screw the filter very tightly later, when replacing it with a new one, unscrewing the oil filter will not be so easy. Most likely, in this case, you will have to use a special tool for unscrewing oil filters to unscrew the filter, or adapt your home tool to a special filter puller. Agree, it is very inconvenient. This is what constantly irritates me when, after buying a used car, I change the engine oil along with the oil filter.
But that's only half the problem. In many cars, removing the oil filter can be a real hassle. Especially in those cars where the design of the engine compartment and engine does not provide easy access to the filter.
For example, the photo above is of the engine compartment of a 1995 Jeep Cherokee, which has an oil filter located very close to the engine.
Removing this filter from the engine is very difficult even with the help of tools, since the space between the filter is very small. The thing is that when you use a tool to unscrew the filter, you have virtually no room left to rotate the filter. In this case, many auto repairmen and car owners, when dismantling the old filter, get rid of it as best they can, using the dirty method that is so popular in our country: a flat screwdriver + a hammer.
For example, here's how to unscrew an old oil filter from a Nissan:
Why did I decide to raise this topic? As you can see, there are many cars in the automotive world that, due to their complex engine compartment design and engine features, have oil filters located in places that are inconvenient for replacement. That's why I urge anyone who changes their own oils and oil filters not to tighten them too tightly. Can you imagine what it will be like to unscrew a tightly screwed filter, if it is still located in a very inconvenient place. Then you yourself will suffer.
The battery charge indicator light is constantly on.
The phenomenon indicates that the generator has stopped its normal operation; at this moment, the BS is powered by the battery. With a normally charged battery, you have 30-40 km of mileage left to get to the repair site. Disconnect consumers as much as possible, arm yourself with a multimeter and a set of keys.
A) Belt break.
Pay attention to the presence of a belt on the pulleys of the water pump and generator. To return it to its place, you will need 17 or 13 socket wrenches, depending on the year of manufacture of the car, as well as a strong flat-head screwdriver
Disconnect the HF position sensor (for example, on 21213,21214).
Loosen the nuts securing the tension bar and slide it to the side towards the cylinder block.
Place the belt on your seat.
Upon completion of installation, adjust the tension, controlling the deflection when pressing with your thumb on the belt gap between the generator and pump pulleys - 10-15 mm, pump and crankshaft - 12-17 mm. Failure to comply with this requirement may result in the belt slipping with further damage and rupture.
B) Burnout of wires, poor contact in the circuit.
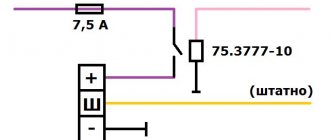
If the circuit opens at terminals B, V and Ш, tighten the nuts or replace the terminals with new ones.
C) The charging relay-voltage regulator has failed.
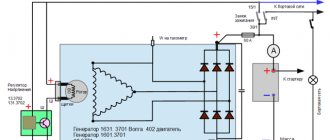
To initially check the performance of the LV, use a multimeter (voltmeter), which allows you to record the voltage directly at the battery terminals. Normal voltage is considered to be in the range of 13.85±0.35V. If it is different from this, we diagnose the element. The location where the charging relay is located near the Niva is determined by the age of the car. Thus, a remote relay can be found on the right fender liner of a car with a classic engine compartment layout; more modern modifications of generators are equipped with a LV combined with a brush assembly.
The element is not repaired, but replaced completely. To assess the condition, you will need power supplies of 12-14 V, followed by replacement with 16-22 V, and also an incandescent lamp of 1-3 W. According to the diagram drawing, apply current to the voltage regulator in series. If the first test is characterized by the operation of the lamp, and the second - by the absence of glow, then the LV is working.
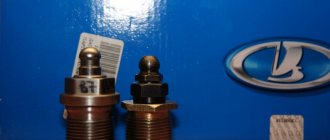
If there is a break, the lamp will not light up at all, and if there is a breakdown inside the regulator, it will light up even when the voltage increases above 14 V. In addition, weak charging, as well as its absolute absence, is often explained by abrasion of the brushes (residual height less than 5 mm) and slip rings of the generator . If the first part is changed along with the brush holder, then the second is restored by grinding, grooving or removing the remains of the old rings and pressing in new ones. It is recommended to supplement the disassembly of the unit with a total cleaning.
D) Diodes or rectifier unit are faulty
To assess the condition of the mentioned components (negative, positive and additional diodes), arm yourself with a low-power lamp and battery. Diodes are indicated by numbers in the diagram: 1. Positive
2. Negative
3. Additional.
Performance is determined by connecting “+” to terminal 30 of the generator (for positive), bolts of the rectifier block (for negative) or to 61 (for additional), and “-” to its body (for negative) or to any of the bolts of the rectifier block ( for positive and additional). The glow of the lamp indicates that the diodes have been shorted, which leads to the conclusion that the diode bridge will have to be replaced. Be attentive to the indications on the instrument panel. Often the icon lights up half-heartedly and is not noticeable in bright light.
Do-it-yourself device repair
Now let's talk about how a generator is repaired. The repair procedure can be performed at a service station or in a garage, of course, if you have an idea of what needs to be done.
Replacing the alternator belt
- First of all, the connector with the DPKV is dismantled, after which the screw that secures this regulator is unscrewed and removed.
- The nut that secures the device should be loosened slightly, but not completely unscrewed. The generator assembly can be moved towards the block, after which the strap on the displaced device can be removed without problems, since it will be loosened.
- Using a jack, which must be installed in advance on the side where the unit is located, you need to slightly raise the car by turning on first gear.
- Next, pull the strap itself so that it can move away from the pump shaft. Then spin the wheel until the tension point reaches the pulley.
- The next step in replacing the alternator belt will be to remove the belt from the other shafts.
- As for installing a new one, it should first be put on the shaft of the unit and the crankshaft, only after these steps can it be installed on the pump shaft.
- The wheel turns until the strap hits the pulley. Then the device is put in place, the strap is tightened, after which the assembly is fixed to the bracket using a nut. The final stage will be the installation of the DPKV in place (author - Ig K channel).
Replacing the tension roller
Repair of the Niva Chevrolet generator may involve replacing the tension roller. The main part of this element is the bearing, so if the strap is loose, then first of all it is necessary to check it. If the roller is in good condition, then the bearing will rotate quietly and there should be no jerking.
To replace an element, follow these steps:
- First, install a crowbar or other tool so that the clutch shaft is blocked. This will prevent the crankshaft from moving.
- Then the screw that secures the roller itself is loosened, and the tension on the strap is relieved.
- The axial screw is unscrewed, after which the roller can be removed.
- A working roller is installed and the strap tension is adjusted. After replacement, make sure the device is working properly.
Replacing the brush
Worn and new voltage regulators
- To replace these components, the regulator must be completely removed. Also, the “-” terminal is disconnected from the battery and the wiring coming from the generator unit is disconnected.
- Next, the block of wires is dismantled, from the tips of which the rubberized cap is removed - this component is intended for protection. After this, you need to unscrew the nut from the wires that secured them to the mechanism block.
- Then you need to disconnect the spring fasteners and remove the plastic casing, using a Phillips-head screwdriver to unscrew the regulator clamps.
- The regulator is dismantled along with the brushes, after which the wires need to be disconnected from this element.
- The brushes are changed, and further assembly of the structure is carried out in the reverse order. Brushes should be replaced if their length is less than 0.5 cm. If the length of the brushes is normal, and the generator device is not working correctly, it is necessary to diagnose the regulatory element, as well as the electrical circuit in the area from it to the brushes.
Dismantling the generator
- Replacing the generator begins with removing the device from the engine compartment. All wiring going to it is disconnected, and we must also not forget about disconnecting the battery. The protective plastic casing is removed.
- The nut securing the wires and the screw securing the assembly are unscrewed. The fastening in the form of a bolt is detached; it is located at the bottom of the structure, after which the strap is removed.
- When all the bolts are unscrewed, the mechanism can be removed from the bracket; a mounting spade may be needed for this.
- To install a new unit, all steps should be repeated in the reverse order. After the new generator is installed, it is necessary to diagnose the condition of the drive belt and also adjust the tension.
Sorry, there are no surveys available at this time.
Mounting block diagram:
When troubleshooting electrical problems, you may also find the wiring block diagram useful, using which you can easily find the desired contact or determine how to wire a particular fuse.
It is better to check the fuses with a tester, because on the outside they may look intact, but in fact there may be a break inside. To avoid unnecessary problems, you should always have known working fuses of different ratings on hand.
Do you often encounter electrical problems in a Chevrolet Niva? What do you usually do when troubleshooting? What solutions have you had to use to restore the functionality of devices?
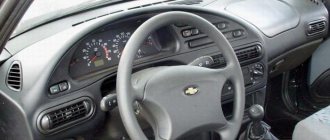
Rice. 1. Instrument cluster There are two power sources in the car - the battery and the generator.
The battery is used to start the engine and to supply 12 V electric current to the starter and other consumers when the engine is not running.
When the engine is running, the main source of current - the generator - provides electric current to all consumers, including the ignition system, and charges the battery.
If the red battery discharge lamp is lit in the instrument cluster (pos. 16 in Fig. 1.12), it means that current is not supplied from the generator to the on-board network and the battery’s energy reserve is consumed.
This supply is limited and depends on capacity.
If the battery is fully charged, you can drive to the garage without a generator, but it is better to try to fix the problem on the spot.
Check if the alternator drive belt is broken. If the belt is intact, check its tension.
Press the top of the belt with your thumb and see how much it bends.
If the deflection is not within the norm, adjust its tension (see “Adjusting the tension and replacing the water pump and generator drive belt”).
To get to the garage or the nearest spare parts store if you don’t have a spare belt, you can replace the broken one with a ring cut from an old car inner tube.
If it was not possible to find a temporary replacement for the belt, you will have to move further in tow, since the same belt drives the water pump and in its absence the engine will “boil” almost immediately.
2. If the belt is tensioned normally, check whether the corresponding fuse has blown.
The location of the fuses and their ratings are indicated in the article (see “Electrical equipment”), a separate electrical diagram, on the housing of the mounting block and on the fuses themselves.
If the fuse is blown, replace it, start the engine and check to see if the low battery light goes out.
If the light goes out, you can continue driving.
Do not install fuses designed for a higher rated current: this can lead to damage to electrical equipment and even a fire.
3. If the battery discharge lamp does not go out, check the wire going from the generator to the “positive” terminal of the battery.
Three wires are connected to it: the thicker one connects the battery to the starter, the thinner ones connect the generator and the engine control system.
The wire may be broken, broken inside the insulation, or have oxidized or unreliable contacts.
Correct the problem and start the engine.
If charging current appears, you can continue driving.
If, after taking measures, the discharge lamp continues to light while the engine is running, then the possible cause of the malfunction lies in the generator itself.
There may be several reasons and it is better to eliminate them in a car service center or garage, and you just have to hope that the energy reserve in the battery is enough to get to them.
To reduce current consumption when driving a car with a faulty generator, if possible, turn off the radio, unnecessary lights, heater fan, etc.
Experienced car enthusiasts can be recommended to check the generator voltage regulator.
The operation of the voltage regulator is to continuously automatically change the generator excitation current so that the generator voltage is maintained within specified limits when the generator speed and load changes.
Precautionary measures
The operation of a generator set requires compliance with certain rules, mainly related to the presence of electronic elements in them.
- The generator set must not be operated with the battery disconnected. Even a short-term disconnection of the battery while the generator is running can lead to failure of the voltage regulator elements.
If the battery is completely discharged, it is impossible to start the car, even if you tow it: the battery does not provide excitation current, and the voltage in the on-board network remains close to zero. It helps to install a properly charged battery, which is then replaced with the old, discharged one while the engine is running. To avoid failure of the voltage regulator elements (and connected consumers) due to increased voltage, it is necessary to turn on powerful electrical consumers, such as heated rear windows or headlights, while the batteries are being replaced. In the future, after half an hour or an hour of engine operation at 1500-2000 rpm, the discharged battery (if it is in good condition) will be charged enough to start the engine.
- It is not allowed to connect electrical sources of reverse polarity (plus to ground) to the on-board network, which can happen, for example, when starting the engine from an external battery.
- Any checks in the generator set circuit with the connection of high voltage sources (above 14 V) are not allowed.
- When carrying out electric welding work on a car, the ground terminal of the welding machine must be connected to the part being welded. The wires going to the generator and voltage regulator should be disconnected.
Installing a new generator
The algorithm for installing a new generator is practically no different from dismantling the old one, only all steps are performed in reverse order. So, the car owner will need:
Screw the assembly to the engine by turning and fixing two bolts - upper and lower. At the same time, there is no need to tighten them too much, since then the belt still needs to be tensioned.
Install a new V-ribbed repair on the pulleys. You need to put it on with a little effort and go around the pulleys in the following sequence: hydraulic pump pulley, roller, crankshaft pulley, power steering pulley, roller, generator pulley. Tension the belt by tightening the adjustment bolt and the special plate
It is important that the belt deflection in the upper free part does not exceed or be less than 15-16 mm.
Then all that remains is to tighten the three bolts of the bottom plate and check that the power source is secure.
Little tricks for operating and repairing VAZ-2109, VAZ-2108:
| How to fix flying caps on a VAZ-2109 and VAZ-2108? Tips from craftsmen. When refueling, where should you put the cap from the fuel tank of a VAZ-2109, VAZ-2108? Why don’t the LEDs light up or blink in the daytime running lights? Where is it best to install a fragrance in the cabin of a VAZ-2109? VAZ-2109 and VAZ-2108, what to do if Is water dripping from the muffler? |
Car polishing. How to do it correctly? How to soundproof a VAZ-2109 with your own hands? We learn to drive a domestic “eight” or “nine”. Features of driving VAZ-2109Care and repair of seat covers for VAZ-2109Auto loan. Why take it? We save on gasoline Anti-corrosion treatment of the underbody of a VAZ-2109, VAZ-2108 car yourself. Repair. The rear wheel of the VAZ is stuck and does not spin. What to do and what is the reason? How and with what to remove rust from a car. Repair of VAZ-2109, VAZ-2108Replacing the hood cable of a VAZ 2109Opening the hood of a VAZ 2107Opening and closing the hood of a VAZ-2109How to open the hood of a VAZ 2105 and close it?
Generator
The Chevrolet Niva generator unit allows you to provide the entire vehicle with energy for the operation of all electronic devices of the vehicle. This node consists of 3 main elements:
- generator set - creates alternating current;
- rectifier - converts alternating current into direct current;
- voltage regulator - stabilizes the output voltage.
The total power of the installation of 5000 rpm allows you to maintain a constant voltage of 13-14 V, while the current is 55-60 A. These characteristics are optimal for the normal operating condition of the car. The electricity generated by the generator is distributed to all consumers of the system, and the rest is used to recharge the battery while the engine is running. The generator itself is located near the engine and connected to its crankshaft via a belt drive. Its lower part is attached with 2 special claws to the engine bracket with 1 bolt fastener. The device is secured to a bar at the top via a pin. Since the unit in the VAZ 2123 is located very close to the car engine, it has a reliable design that can withstand loads from vibration, temperature, as well as a humid environment and dirt. A generator rarely breaks down, but some of its parts become unusable after a certain period of use, for example, brushes.
Removing the voltage regulator
The voltage regulator can be removed from the Niva Chevrolet for replacement using a flat-head screwdriver and a size 8 wrench. The procedure is as follows:
- This is worth doing if the voltage in the system does not correspond to the norm - less than 13.5 V.
- Disconnect the wire from the negative battery.
- Disconnect the generator block with terminal D. Turn the rubber boot to the side and unscrew the nut.
- Disconnect the wires from the stud.
- Unscrew the nut securing the generator excitation circuit terminal, and then remove the terminal itself.
- Loosen the 3 screw fastenings of the plastic casing of the generator set and remove the casing.
- Next are 2 more fastening nuts that secure the voltage regulator.
- We disconnect the screw securing the terminal to the D bus from the rectifier, after which you can finally remove the voltage regulator itself.
Also interesting: Installing a towbar on a Chevrolet Niva
The generator on Niva works for a very long time and will remain in operation for several years without any problems. Over time, its power drops noticeably, then it is worth replacing several of its parts or the entire assembly. If after replacement the problem with a drop in power cannot be eliminated, you should go to a service center for diagnostics.
How to replace the tension roller
The design of the generator roller is quite simple. The bearing is its main part. If the belt loosens or slows down, you need to check the bearing itself by turning it by hand. A serviceable roller rotates quietly, without jerking or biting. If the roller is faulty, it is necessary to replace it, which is possible even in the garage, with a minimum set of tools.
Install a pry bar or other tool that can prevent the crankshaft from moving so that the clutch disc is blocked. By loosening the bolt that secures the roller, relieve the tension on the belt. Having completely unscrewed the axial bolt, the tension roller is removed. Then a new roller is installed and the belt tension is adjusted.
After replacing the roller, you need to re-inspect and check its operation. The instruction manual contains detailed instructions regarding the problem described.
How and where to store a car. VAZ-2109, VAZ-2108.:
| Preparatory work for car storage. VAZ-2109, VAZ-2108. Vehicle storage and maintenance. VAZ-2109, VAZ-2108VAZ-2108, VAZ-2109. How to remove a car from storage? |
Cleaning the drainage holes in the body of VAZ-2109, VAZ-2108 cars. Where and how to store the car. VAZ-2108, VAZ-2109 How to properly wash a car. VAZ-2109, VAZ-2108. Operating a VAZ-2109 and VAZ-2108 in severe frosts. What you must always have with you when operating a VAZ-2109 and VAZ-2108 in winter. How best to drive a VAZ-2109 and VAZ-2108 in winter? Care and restoration of body coating. VAZ-2109, VAZ-2108