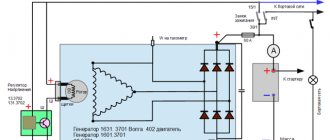
Connection diagram for regulator relay gazelle 402
Hello everyone again, and today we’ll talk about charging, fortunately it’s winter, and the problem is relevant.
The standard design of the ZMZ-402, in comparison with other engines, has a number of features. The main one is the inclusion of the relay-regulator “by minus”. A solution common in the late 80s in the automotive industry, and supplanted by self-excited generator sets that appeared later. Nevertheless, it successfully existed under the hood of carburetor Volgas until their production ceased.
I will not consider options for “reversing the polarity” of the excitation winding, since the real return from such an operation is low. The reliability of the excitation circuit does not increase: the relay-regulator is still critical to a good “ground”. Even the number of wires cannot be reduced. In general, in our case the type of arousal pattern is rather a matter of religion.
Any voltage regulator has two systems: measuring and actuating. This is enough theory (those who wish can study the issue deeper, I will provide links at the end of the post), but the practice is as follows: the Volgovsky RR measuring body measures the voltage in the on-board network strictly after the ignition switch (at terminal 15/1), and the fact that turns on regardless of the lock, it doesn’t care. On the one hand, this is good: it seems that the voltage drop across the lock is taken into account, and this voltage is supplied to all consumers at a value not lower than the permissible value. On the other hand: I have repeatedly noticed, especially when starting is difficult, on a connected battery the voltage after start is about 15.1 V, which is clearly more than normal.
At the same time, trying to deal with the lack of voltage in the generator at idle speed (cured by pulling and cleaning all the power wiring, ground, as well as replacing the power fuse block, the diode bridge and RR were not to blame), I dug up an elegant and outrageously simple solution on the Internet. It is necessary to connect the PP measuring element to the “+” terminal of the battery! Thus, obtaining a stable voltage on it in all engine operating modes. Which, if the wiring is in good condition, does not threaten to deteriorate the power parameters of devices turned on after the ignition switch.
So, ordinary power relays come to our aid. The diagram will be a little lower, but everything is implemented in an incredibly banal way: carefully remove the “+” wire from the standard PP connector (directly with the terminal, for subsequent insertion into the relay block) and make it a signal for our additional relay. The second contact of the additional winding. relay - naturally, to ground. We connect the power contacts of the relay as follows: one (mine is “30”) - to the “+” of the battery (I connected it to the input of the power fuse block, but I have a 3110, on older models it is more correct to connect it to the B+ terminal of the generator, or remake wiring according to scheme 3110, moreover, make the generator-battery wire with a cross-section of at least 10 sq. mm). The second (“87”, respectively) - to the “+” contact of the relay regulator (instead of the removed standard wire).
This ensures that the PP measuring circuit is connected to the “plus” of the battery only when the ignition is turned on.
Now about what it gave. Started the engine. Idling speed is 600. The voltage on the battery is clearly maintained at 14.3 V plus or minus 30 mV (when measured by a tester, you can clearly see how the RR switches within the limits of the stabilization voltage). But there were some bugs. I give the load: long range, heater, heated glass, I also turned on the emergency lights. Drawdown to 12.1. But it holds stable. I left one stove - 14.3 again. With increasing speed (up to approximately 800-900), the voltage increases to 14.3 V and stabilizes at this value, regardless of the load.
The conclusion from here is this: the standard 65-amp ZMZ-402 generator [almost] does not work at speeds below 900. Which, by the way, is indicated by its factory characteristics. The disadvantage is that the voltage on the generator in this mode is about 16 V, which is quite high. But at rpms of 900 and above everything is fine! Full charging of the battery begins. That is, the battery begins to charge (with the load on) at lower speeds than in the standard version. Moreover, the charging voltage is stable! Perhaps for this purpose (as well as to maintain oil pressure at an acceptable level), it is better to raise the idle when frequently stuck in traffic jams. I haven’t picked it up yet because I rarely get stuck in traffic jams. However, the difference, compared to the standard circuit, is noticeable even without devices - simply by the way consumers work.
Now a few words about the voltage drop after the lock and compensation for the consequences of “reconnecting” the RR. In general, my lock drops about 0.5 V, which in principle does not suit me very much, but I don’t want to change the contact group of the lock. More precisely, this will not solve the problem at the root. What I did: I installed another unloading relay along the 15/2 circuit, now powerful consumers (stove, wipers, heating) receive voltage directly from the battery. I repeat, on older models it is more correct to connect powerful loads directly to the generator.
——- In the next series, we unload the ignition switch from the excitation current (or another relay in the charging circuit). It should give that very coveted charge from the very idle speed of the engine, and the lock will apply for eternal life (it has had enough of the ignition system currents). I’ll also tell you how you can use an unconnected charge control lamp in the instrument cluster. All that remains is to translate it into metal. Well, and the photo, of course, where would we be without them.
Source
Gazelle generator circuit
The generator on Gazelle cars is a synchronous three-phase electric machine, in the excitation windings of which electric current is generated. The rotor (armature) rotates in the housing and is located inside a constant magnetic field, which is created by the stator (winding). Electricity is generated here as follows:
- when the engine starts, the movement is transmitted from the crankshaft through the drive belt to the generator set pulley;
- the rotor begins to rotate together with the pulley, a magnetic field arises between the stator and armature windings;
- due to electromagnetic induction, EMF is generated, alternating current appears;
- a diode bridge, consisting of diodes of different polarities, rectifies the electric current, making it constant;
- then the current from the rotor commutator is transferred to the brushes and supplied to the relay regulator;
- The regulator limits the voltage, ensuring safe operation of consumers.
The Gazelle generator circuit is very simple; the assembly consists of the following parts:
- case, it is made of two halves - aluminum front and back covers;
- fixed winding - stator;
- rotating shaft - rotor (armature);
- pulley and impeller;
- diode (rectifier) bridge;
- two bearings on which the armature rotates;
- brush assembly;
- relay regulator (voltage regulator).
It should be noted that the voltage regulator is not located directly on the generator on all Gazelle models; on cars with a ZMZ-402 engine, the relay regulator can be mounted on the side member.
Checking and repairing the generator on GAZ 3110 vehicles with 402 and 406 engines
Every modern car is equipped with a generator device, which is used to power electrical equipment connected to the on-board network. And Gazelle cars are no exception. What is a GAZ 3110 402 engine generator, what elements does it consist of and what do you need to know about malfunctions? Read about it below.
What elements does the engine generator unit 406 consist of, what is its connection diagram and what is the principle of operation? First, let's look at the description of the mechanism.
Design and principle of operation
The generator unit in Gazelle is a three-phase synchronous electric motor with electromagnetic excitation, as well as a built-in diode rectifier.
The rotor mechanism is driven into rotation from the crankshaft pulley of the power unit via a V-belt. The stator device, as well as the mechanism cover, are tightened with four bolts.
The shaft of the rotor mechanism rotates in bearings, which are located in the covers. By the way, bearing devices are lubricated for their entire service life.
The rear bearing is installed in the shaft of the rotor mechanism; it is pressed using the rear cover through a plastic sleeve. The front bearing element is located on the inside of the front cover. It is secured with a washer and four bolts.
The stator mechanism contains two three-phase windings that are connected to each other in parallel. A diode bridge or rectifier includes six diode elements that are mounted in two steel or aluminum plates. The plates themselves are combined into a rectifier unit, which is fixed inside the rear cover of the unit.
The mechanism is equipped with excitation windings, which are installed on the rotor mechanism. Their leads are soldered to two copper slip rings, which, by the way, are located on the mechanism shaft.
Power to the windings is provided by two carbon brushes connected to them and located in the brush holder.
Under the expansion tank, on the mudguard in the area of the right side member, there is a voltage regulator for the ZMZ Chrysler engine.
Why Chrysler? Because the first gazelle engines were equipped with these motors. The regulator operates in conjunction with the generator set and if this element fails, it must be replaced.
Also, the connection circuit involves the use of a capacitor device. This element is designed to protect the Gazelle's electrical equipment from possible impulses in the ignition system.
The capacitor also serves the function of reducing radio interference.
Cooling of the rectifier unit, as well as the windings of the mechanism, is carried out through the air flow entering through the holes in the centrifugal fan covers.
Device components
The node consists of the following elements:
- the housing in which the entire structure is enclosed;
- stator mechanism;
- rotary device or anchor;
- pulley and impeller;
- rectifier block or diode bridge;
- two bearing devices on which the rotor rotates;
- brush mechanism;
- voltage regulator.
How to check the generator?
The procedure for diagnosing a unit without dismantling is as follows:
- First you need to start the engine and let it warm up. Increase engine speed to 3 thousand per minute.
- Activate the optics - high beams, rear window heating system, stove, radio, light alarm and turn on the wipers. This is done in order to ensure operating conditions as close as possible to real ones.
- Next, using a voltmeter or multimeter, measure the voltage value at the battery terminals; this parameter should be at least 12 volts. If the obtained value is not the same, then this indicates that a problem has occurred in the operation of the windings - a short circuit or break. Or the fault lies in the voltage regulator or brushes. The problem may also lie in the oxidation of the winding rings.
Types of Gazelle generators
The type of generator installed on Gazelle commercial vehicles depends on the engine model - the first GAZ-3302 vehicles had two types of engines:
- ZMZ-402;
- ZMZ-4063.
The second generation of Gazelles began to be equipped with ZMZ-405 and Chrysler 2.4 engines; Gazelle Business cars, produced since 2010, are equipped with UMZ-4216 and Cummins engines, respectively, and other types of generator devices are installed on them.
Generators come in different capacities and are capable of producing currents of different magnitudes. The standard current source is calculated with a small power reserve, but additional electricity consumption is not taken into account here. Additional energy consumers can be:
- electric windows;
- electrical antenna:
- audio system;
- air conditioner;
- additional cooling fan in the cabin;
- additional heater motor.
If the generator turns out to be weak, it will not be charged enough, which may result in the battery being discharged. Therefore, in many cases, Gazelle owners try to install a more powerful current source - the car will not suffer in any way from the power reserve. For gazelles, there are generators that produce current 65/75/90/100/115/120/135 Amperes. There is a misconception that if the power of the generator device is high, the electrolyte in the battery may boil. But this is incorrect - the generator produces current depending on the load, and the excess voltage is limited by the relay regulator. A powerful generator has only two drawbacks:
- such an electric machine has a higher price;
- a dimensional unit may not always fit in size.
How to set the ignition on a ZMZ 402 carburetor
The ZMZ0-402 type engine is equipped with an ignition distributor sensor (1908.3706) - non-contact, with a control pulse sensor (generator) and built-in vacuum and centrifugal ignition timing regulators.
The distribution sensor performs two functions: it sets the moment of sparking and distributes high voltage pulses among the cylinders in accordance with the order of their operation. For this purpose, a slider mounted on the shaft of the sensor-distributor is used.
A noise suppression resistor is installed in the slider.
The switch (1313734) opens the power supply circuit of the primary winding of the ignition coil, converting the sensor control pulses into current pulses in the ignition coil.
Malfunctions of Gazelle generators
The generator, like any other part in the car, tends to break down; there are several types of malfunctions:
- charging disappears completely;
- there is an “undercharge”;
- high voltage appears in the network (more than 14.7 Volts);
- the generator starts to make noise.
There can be several reasons for the noise:
- bearings are worn out or defective;
- the drive belt has defects;
- The belt tension is weak, and therefore a whistle occurs;
- the impeller touches the belt or generator housing;
- pulley damaged;
- The generator fastener came loose.
If the voltage in the vehicle's on-board network is higher than the permissible norm, there is only one cause of the malfunction - the relay regulator has failed. For the same reason, there may be an undercharge - the voltage regulator does not cope with its functions.
If there is not enough charging, or it is completely absent, there may be several reasons for such problems:
- the brushes in the brush assembly are worn out;
- there are breaks or short circuits in the armature winding;
- these same defects are present in the stator winding;
- The diode bridge is faulty.
On a Gazelle car, the generator can be repaired quite easily, but if there are too many defects in it (for example, the rotor and stator are faulty at the same time), it is easier to buy a new unit and replace it.
Possible malfunctions and ways to eliminate them
What are the signs that indicate that the generator set is not working properly?
- charging on the device disappears;
- lack of charge, equipment cannot be supplied with normal current;
- the on-board network generates too high a voltage of more than 14.7 volts;
- the unit itself began to work too noisily.
Brush replacement procedure
In accordance with the connection diagram, the procedure for replacing brushes is as follows:
- First, the battery terminals are disconnected.
- Next, you need to disconnect the connector from the brush holder.
- Using a flat-head screwdriver, you need to unscrew the two bolts securing the holder mount.
- Then the holder itself can be dismantled and the protrusion of the brushes from it can be checked. If the protrusion is less than 8 mm, then the holder itself or the brushes must be replaced. The installation procedure is carried out in reverse order. You also need to make sure that the brushes move smoothly around the holder.
Photo gallery “Changing brushes”
The nuances of replacing the belt
As for replacing the belt, this procedure is also not particularly complicated; it is performed as follows:
- First you will need a 12mm wrench to loosen the screw that secures the tension roller. Difficulties may arise due to the radiator located nearby. If the radiator bothers you, you can remove it.
- Next, you need to loosen the tension of the strap; to do this, using a 10mm wrench, you need to turn the tension roller screw counterclockwise.
- After completing these steps, the belt itself can be removed from the pulley.
- Then a new strap is installed. Using a wrench, you need to rotate the roller screw until the deflection of the strap is 15 mm under a load of 8 kgf. In this case, the load itself must be applied to the center of the drive branch, that is, between the pulleys of the generator device and the pump. If the tension suits you, then you need to tighten the screw that secures the roller.
How to change bearings yourself?
To change bearing elements, you need to perform the following steps:
- First, the generator set itself is removed from the vehicle.
- Next, you need to remove the plastic cover from the unit body.
- After this, the brush holder from the regulator relay is unscrewed; before this, you need to disconnect the connector with wires from it.
- Then you will need to remove the four tie rods of the unit housing, as well as the cover along with the stator mechanism.
- Next, the winding terminals from the diode bridge are disconnected, the stator is dismantled, and, if necessary, the bridge itself.
- Now you can remove the drive pulley from the shaft, as well as the cover with the bearing device. The bearing itself is pressed in, so it can be removed using a special puller. The bearing is installed by pressing it in; assembly is carried out in the reverse order.
Troubleshooting and repair of car generators
Any worn or faulty parts found are replaced with new ones. The previously practiced rewinding of rotor or stator windings is now unprofitable. More often, brushes, bearings, and belts require replacement. You can easily do small jobs yourself. For example, solder wires torn off from the output terminals. Wash the slip rings with gasoline and dry.
You can handle simple repairs that do not require professional skills and highly qualified auto mechanics yourself. We must remember that repairs should be approached wisely, and do not repair the part that is easier to buy and replace with a new one. After all, the old one will fail faster, and repairs will turn into an endless process.
Obviously, you can diagnose the operation of the generator components yourself. This requires desire, very few tools and time. If you don’t have the desire or time, you can always turn to an experienced master. The main thing is not to ignore such an important component, so that traveling by car brings pleasure, and does not force you to solve new problems.
Knowing the main signs of a generator malfunction can help you make timely repairs, preventing the battery light from suddenly lighting up while on the road. Let's consider all the breakdowns that can occur with a car generator set.
Before reading the material, we recommend that you familiarize yourself with the principle of operation of the generator. Knowledge will help you better understand the cause of the breakdown and timely track the nature of its manifestation.
Possible faults
If the Gazelle generator malfunctions, the operation of all electronic devices is disrupted, and the battery is not recharged. A special indicator on the dashboard informs the driver about the breakdown of this part. With such a malfunction, starting the engine and driving the car is still possible, but until the battery is completely discharged. It is impossible to travel normally in such a car.
The main malfunctions of the generator include the following: violation of the integrity of the charging circuit wires, failure of bearings, damage to the diode bridge, short circuit of the stator winding, breakdown of the voltage regulator, wear of slip rings, excessive wear of brushes.
The Gazelle generator, like any car mechanism, can have both mechanical and electrical damage. Therefore, both the method of repairing the breakdown and the types of operations are different.
Mechanical damage includes wear and damage to rolling bearings, springs, damage to the integrity of the housing, pulley and drive belt.
Faults that are called electrical include breakage of the stator winding, cracks and wear of brushes, breakdown of the relay regulator, melting of the insulating coating of the turns, and interturn short circuits.
In case of any of these types of breakdowns, the car's generator does not fully perform its functions or completely fails, which affects the operation of all electronic devices and the engine as a whole.
Alternator belt Gazelle
On Gazelle cars, the alternator belt drives the generator, thereby ensuring rotation of the rotor, thereby generating the electrical current necessary for the on-board network. Different engine models are equipped with different types and sizes of belts:
- ZMZ-402 – toothed or smooth poly-V belt, size – 10x1030 mm;
- UMZ-4216 - the same type as on the ZMZ-402 motor, size - 13x1040;
- ZMZ-406 (405) with power steering - multi-ribbed type, length - 1420 mm;
- ZMZ-406 (405) without power steering - multi-stream type, 1220 mm;
- Chrysler – poly-V-type, 1750 mm;
- Cummins 2.8 – multi-stream type, 1226 mm.
Depending on the engine model and manufacturer, alternator belts can vary in price; over time, they wear out and must be replaced. Since the belt drive also ensures the rotation of the water pump, when the generator belt is too tight, noise appears from the bearings of the pump and the generator itself. You can’t do a very weak stretch either:
- charging disappears;
- the water pump pumps weakly, and accordingly, the engine begins to overheat;
- A very unpleasant belt whistle appears.
Prices for Gazelle generators
For Gazelle and Sobol cars, generators are produced by different manufacturers, the most well-known companies are:
- ELDIX (Bulgaria);
- PRAMO-ISKRA (city of Rzhev);
- KZATE (old name KATEK, Samara);
- BATE (Belarus).
In 2021, generators for GAZ commercial vehicles cost on average from 4,000 to 9,000 rubles; the cost of the unit largely depends on the manufacturer, engine model and the power of the generator itself. The most expensive parts are for the Cummins turbodiesel, prices for spare parts range from 8 to 15 thousand rubles, the most expensive are original production parts. The ZMZ-402 generator produced by KZATE for 65 Amperes is relatively inexpensive - on average 4.5-5 thousand rubles.
Generator replacement
The entire generator unit on a car is changed in the following cases:
- if many parts in the device require replacement, and repairing the unit is not economically profitable, it is easier and cheaper to buy a new generator;
- you need to go on a flight urgently, and there is no time to do repairs;
- a new generator is installed, and the old one is repaired and put away as a reserve - it is a backup.
The difficulty of replacing the generator unit also depends on the engine model, but on any engine the work is done quite quickly, since it is still simple on all brands of Gazelle cars. The easiest way is to replace the generator on a car with a 402 engine; we carry out the work as follows;
- we place the car on a flat surface; in this case, you can easily do without a pit or a car lift;
- de-energize the electrical circuit - remove the terminal from the battery (preferably the mass one);
- unscrew the nut securing the power wire from the back of the generator (10 mm wrench);
- pull out the generator brush connector;
- unscrew the bolt of the tension bar of the alternator belt (12 mm wrench);
- first move the generator towards the engine with your hands, remove the generator belt;
- then we pull it away from the engine, unscrew the bolts and nuts (2 pcs.) – securing the generator unit to the brackets;
- dismantle the unit, install a new generator, attaching it to bolts and nuts;
- Do not tighten the fasteners all the way, press the generator housing against the engine, and put on the belt;
- Using a wrench or pry bar, we tension the belt and tighten the tension bolt;
- After tensioning the belt, we secure the bolts and nuts to the end - they are now located under the generator, and getting to them is somewhat more difficult.
To fasten the generator securely, you need to install two nuts on the bolts, and be sure to lay it between the bolt and the nut along the engraver - on ZMZ-402 motors (as well as on UMZ-4216), vibration-proof fasteners tend to unscrew.
Troubleshooting
Let's look at the most common reasons why the battery of GAZ cars with ZMZ 402, 405 and 406 engines cannot be charged, and we will also tell you what can be done in each specific case.
Checking belt tension
Over time, the drive belt can stretch and begin to slip. To check its tension, you need to apply a force equal to 40 N (4 kgf) to the middle of its upper section. In this case, the belt should bend by 8-10 mm.
To adjust the belt tension on a GAZ car with a 402 engine, you need to:
using a wrench, loosen the two bolts that secure the generator to the bracket;
loosen the bolt securing the adjusting bar;
Using a wrench, loosen the adjusting bolt;
- increase the belt tension by turning the generator in the direction opposite to where the engine cylinder block is located;
- tighten the adjusting bolt and check the tension; if it is within the normal range, tighten all the other bolts.
On machines with a ZMZ-406 engine under a load of 80 N (8 kgf), the deflection should be 15 mm. To achieve this you need:
using a wrench, loosen the tension roller bolt;
tension the belt by turning the adjusting bolt clockwise.
Wiring problems
Sometimes the reason why charging fails can be a bad contact. The most common cause of contact failure is oxidation of the battery terminals. To clean them you need:
disconnect the wires from the battery;
wipe the battery;
- prepare a cleaning liquid (dilute 30 g of soda in 0.5 liters of water);
- soak a toothbrush in the prepared liquid and clean the terminals;
clean the contacts from the cleaning liquid and wipe them with a dry cloth;
connect the wires to the battery.
How to check the generator
Without removing the generator, you can check the rotor winding for an open circuit. To do this, remove the brush assembly, set the ohmmeter measurement limit to 10 Ohms and measure the electrical resistance of the rotor. It should be between 2.5 and 3 ohms.
To check the generator after removal, perform the following steps:
- connect the battery negative to the generator housing;
- we connect the positive terminal to the rotor brushes;
- We connect one output of the control light to the negative terminal of the battery, and the second to the power output of the generator.
Now when the generator pulley rotates, the light should light up.
Video of a quick check of the generator:
Diagnostics of the relay regulator
To check the relay regulator, you need to start the car engine and turn on the headlights. After 25 minutes, you need to measure the voltage between terminal “B+” (for motors ZMZ 405 and 406) or 30 (for ZMZ 402) of the generator and ground. The voltage should be in the range from 13.6 to 14.6 V. If it goes beyond these limits, then the regulator does not perform its functions.
You can see another way to check a relay regulator removed from a car in the video:
Currently reading:
Charging lost on Niva: main reasons and repair instructions for all models
Why the charger on the VAZ 2107 disappeared - we look for and fix problems
There is no charging on the VAZ 2114 - the main reasons and ways to eliminate them
How to repair a computer power supply with your own hands
Why won't my laptop turn on without a battery?
How to Tension the Alternator Belt on a Gazelle
We are replacing the alternator belt on a Gazelle
A broken alternator belt is a common problem on the Gazelle. If this happens on your Gazelle with enviable regularity, you should pay attention to this problem and, before replacing the belt, try to find out what is actually the cause of frequent breaks.
Except for those cases when the belt has to be changed after 150 - 200 thousand mileage or during scheduled maintenance, the very situation when it breaks is abnormal. If this happens on your Gazelle with enviable regularity (at least more than once every 50,000 km), you should pay attention to this problem and, before replacing, try to find out what is actually the cause of frequent breaks. The pulleys may be installed out of alignment, or the belt may not be tensioned enough after installation.
Well, in the meantime, the belt of our Gazelle still broke. You definitely need to start by buying a new one. Some car enthusiasts prefer to buy packs of cheap, non-original spare parts, declaring that “they break all the time anyway, let me always have some in my car.” Usually, belts break very quickly, always for two reasons. Only one of them is structural (such as pulley misalignment or oiling), the second is simply their poor quality. The greedy, as you know, pays twice. Moreover, in the case of belts, the concept of “stingy” is not very applicable, because the difference in cost between a factory and a non-original belt is not at all that great, since the spare part itself is cheap. Therefore, we recommend obtaining belts, for example, from the GAZ online spare parts store or from an official spare parts supplier. A belt purchased in this way will definitely be suitable specifically for your modification and specifically for your pulleys and center distance.
Drive belt Gazelle
There are still plenty of masters who come up with riddles or non-standard solutions.
Replacing the belt tensioner gazelle ZMZ 405
In fact, it is preferable to use high-temperature lubricant for the roller bearing, lithol sklo.
So, the belt has been purchased, let's move on to its installation. Let us note that it is better to work with gloves, because in the area of interest to us there are a huge number of sharp corners, and if we make the replacement right on the highway, then some units under the hood may not have time to cool down.
First, it is better to immediately dismantle the front panel and radiator trim. There is little space under the hood and it is better to make working conditions very easy for yourself. Using a 12mm wrench, unscrew a pair of bolts on both sides of the panel, and using a 10mm wrench, unscrew one bolt directly under the hood lock. The decorative grille is secured with 2 more bolts from below. We place the removed grille and the panel side by side (as far away as the lock cable allows).
Now, using a 12mm wrench, loosen the belt tensioner screw on the generator, armed with a suitable wrench, move the generator
to the engine. In this way we loosened the belt (if, of course, it did not break earlier). Now you need to loosen the tensioner pulley nut and the tensioner nut itself and move the roller towards the engine and remove the belt.
If we change others along with the generator belt, then we remove the fan belt from the pulley on the crankshaft and carefully thread it between the fan blades. Later we will also remove the water pump belt. Next, we simply install new ones and tighten them. Finally, we put the front panel and radiator grill back in place - the replacement is done, you can hit the road.
How to set the ignition on a gazelle
Articles Loading...
The ZMZ0-402 type engine is equipped with an ignition distributor sensor (1908.3706) - non-contact, with a control pulse sensor (generator) and built-in vacuum and centrifugal ignition timing regulators.
The distribution sensor performs two functions: it sets the moment of sparking and distributes high voltage pulses among the cylinders in accordance with the order of their operation.
For this purpose, a slider mounted on the shaft of the sensor-distributor is used.
An interference suppression resistor* is installed in the slider.
The switch (1313734) opens the power supply circuit of the primary winding of the ignition coil, converting the sensor control pulses into current pulses in the ignition coil.
how to set the ignition on a gazelle
How to set the ignition correctly on a 402 engine
Gas club community
It’s almost worth using a strobe light on the VOLGA. The MH is installed at the middle mark (for the 92nd, or in the center between 3 and 2 for the 80th). If there is a BSZ, you need to combine the mark on the magnet with the arrow on the sensor coil body (at the same time, turn the magnet to the right until it stops).
Before installing the MZ, set the middle mark of the octane corrector opposite the arrow of the washer under the fastening bolt, make the adjustment itself by releasing the bolt from the BOTTOM REAR of the pump body (if there is not enough adjustment space with the bottom bolt, use the octane corrector bolt). The final adjustment of the OZ is carried out on the road (from a speed of 40 km/h, sharply press the gas to the floor.
A brief DETONATION should appear. It can knock up to 65-70 km/h). Fortunes.
Dude who helps from time to time Messages: 532 Registered: 05 Sep 2013, 16:54 From: Ryazan
There is a factory annotation that is unclear.
This is a table for the 402nd motor.
1. Turn off the vacuum pump using a straw.
2. Specifically check -
600 rpm - 5 g advance, this is the middle or second mark on the crankshaft pulley. We look with a strobe light. 1st mark - TDC, 3rd - 12 deg.
Then we put the assistant in the cab, he uses the gas pedal to increase the speed to approximately 850. Looking at the table, it should be 10 g. Using a stroboscope, look at the marks somewhere between the 2nd and third marks of the crankshaft pulley.
Then the assistant increases the engine speed to approximately 1250. The stroboscope should show 12-14 degrees, i.e. 3rd mark on the c/v pulley.
Further 1750 rpm = 15-18 degrees, from the third mark you need to add a distance with a marker equal to the length between the first and 2nd marks, i.e. 125=17 g advance.
In fact, there is another method, I'll look for it at the moment.
Last edited by Dude on Sep 14, 2013, 01:26 pm, edited 1 time in total.
Dude who helps from time to time Messages: 532 Registered: 05 Sep 2013, 16:54 From: Ryazan
It was like this: it jerks at 1500 rpm. on any transmission. And what’s most interesting is that it’s on gas. that on gasoline. What I did in the fight for stability: I replaced the spark plugs. I changed the wires, the trampler, the crosspieces, the rims and the wheels, but the problem was as it was
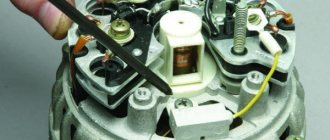
Replacing bearings
If the bearings in the generator wear out, noise (hum) appears in the generator unit. It is possible to drive with such noise for a while, but it is not advisable, and you cannot delay repairs for a long time - the bearings can jam and burn out. Bearings are always replaced on a removed generator, and in order to replace it, the generator assembly must be disassembled. You can do this kind of work yourself, but keep in mind that the bearings are pressed in and will require a special puller to dismantle them. The rear bearing is rigidly pressed onto the rotor shaft, and it is practically impossible to do without a puller.
In some cases, the bearing in the front housing cover boils tightly, and in this case it is easier to replace it together with the cover.
Source
Repair GAZ 3110 (Volga): Checking and replacing generator brushes
You can check and replace the brushes without removing the generator from the car.
| EXECUTION ORDER | |
| 1. Disconnect the wire from the negative terminal of the battery. | |
| 2. Disconnect block 1 with wire from the brush holder terminal. Unscrew two screws 2 and remove brush holder 3 from the generator. | |
| 3. Check the ease of movement of the brushes in the brush holder. If the brushes are jammed, you need to remove the two mounting screws and remove the brush holder cover. Clean the brushes and clean the holes in the brush holder. If it is impossible to achieve the required result, replace the brush holder assembly or brushes. Brushes with chips, cracks or other defects must also be replaced. | |
| 4. Check the amount of protrusion of the brushes from the brush holder. If the value “a” of the protrusion of the brushes in a free state is less than 8 mm, replace the brush holder assembly or brushes. |
Connection diagram for regulator relay gazelle 402
The Volga and Gazelle were equipped with the ZMZ 402 engine.
For this version of the car, a generator of type 16 KZATE or 19 ATE1 (Eltra) was used
These generators were completely interchangeable. They were identical in design and allowed the mutual use of parts for repairs.
For Volga engines, generators were equipped with a double-row pulley, for Gazelles - with a single-row pulley. For cars produced in the first half of the 90s, an alternating voltage output from the generator phase was used to operate the tachometer. In subsequent models, the tachometer received a signal from the ignition system, and the generator phase output was no longer needed; if the generator has one, it is simply not connected.
The generator has a traditional circuit. Winding, rotor, diode bridge, brush assembly. The voltage regulator type 13.3702 (131.3702) is separate and connected to the generator by wires.
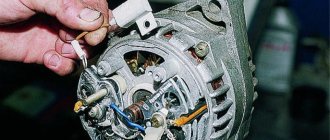
How to check the generator Gazelle 402 engine
An initial express check of the generator can be performed directly on the car
Checking the generator on cars with a ZMZ-402 engine
On cars with engines ZMZ-4025 and ZMZ-4026, generators 16.3701 or 191.3701 are installed, which are not equipped with a built-in voltage regulator.
These generators operate in conjunction with an external transistor voltage regulator type 13.3702-01 or 50.3702, which has electronic protection against short circuits in the generator excitation winding circuit.
It is more convenient to do the work together.
We start the engine, let it run for a few minutes, then, pressing the gas pedal, bring the crankshaft speed to 3000 rpm.
We turn on the consumers: high beam headlights; heater fan; wiper; emergency alarm.
In this mode, we measure the voltage at the terminals of the battery, which should be above 12 V.
If this is not the case, the generator windings are faulty (open or shorted), the voltage regulator with the brush assembly is faulty, the contact rings are oxidized or oiled, the brushes are worn out or stuck.
In order to verify that the voltage regulator is faulty, turn off all consumers except the side lights and measure the voltage at speeds of 1000...1200 rpm, which should be within 13.8...14.5 V.
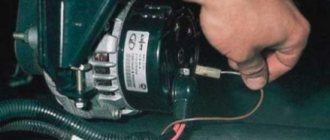
To check the generator excitation circuit, disconnect the connecting block from the regulator.
We connect a voltmeter or test lamp to terminal “W” of the block and to the body of the voltage regulator.
If there is no voltage (the lamp does not light), one of the following malfunctions is possible: failure of contact of the excitation winding with the slip rings; break of the excitation winding; “hanging” of brushes in the channels of the brush holder; burning, oxidation and severe wear of the rotor contact rings.