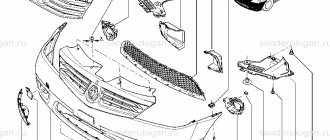
A car body kit is one of the body parts that is most susceptible to mechanical damage. They occur due to careless driving and minor accidents. A damaged body kit spoils the appearance of the car, so the part requires restoration. To eliminate the damage, you will need to remove the front and rear bumpers on the Opel Astra h.
Replacing the front body element
To dismantle the front bumper on an Opel astra you will need:
- Remove the engine crankcase protection. To do this, you need to unscrew one screw each near the right and left wheels of the car.
- Open the hood and unscrew the 6 screws securing the body element to the vehicle radiator.
- 100 sides of the front wheel arch, you also need to unscrew 3 screws on each side.
- Under the bottom of the car, remove the 4 pistons securing the front buffer.
- Loosen the mounting fasteners.
- Unclip the buffer at the junction of the body kit and the wing. In order to unlock the clips, use a flat-head screwdriver.
- Disconnect the control unit for fog lights and side lights. Before this action, it is important to de-energize the vehicle.
Fundamentally! Installation of the front bumper is carried out in reverse order.
How to remove the front bumper of an opel astra h (replacing xenon lamps) - analysis - kasko-lux.ru
how to remove the front bumper on astra j. Not for the faint of heart
Due to these factors, bolts and screws are difficult to unscrew.
used in stock with delivery throughout Russia and the CIS.
The plastic latches and clips must be carefully removed. Front bumper beam mounting bolts:
That's it, the bumper is removed, there is a plastic protection holding it from below, but this does not bother me, I put an oil can under it. In more complex cases, the Germans suggest using a repair kit cat.
Under the bottom of the car, remove the 4 pistons securing the front buffer.
Unclip the buffer at the junction of the body kit and the wing. To unlock the clips, use a flat-head screwdriver.
Disconnect the control unit for fog lights and side lights. Before this action, it is important to turn off the power to the vehicle.
Installing the front bumper is done in reverse order. Removing and installing the rear buffer Replacing the rear buffer of the Opel Astra h is carried out as follows: Before removing the rear bumper, you need to remove the taillights.
After removing the lights, you need to remove the license plate.
Required Tool
In order to remove the bumper from the car, you will need to stock up on the following set of tools:
- Key TOPX T20
- Flat head screwdriver.
- WD 40 solution.
- Jack.
- Rags.
Once the necessary equipment has been prepared, it is necessary to perform a number of actions before dismantling:
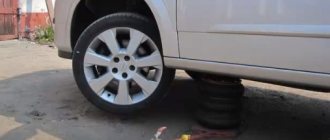
- Drive the vehicle onto an overpass, inspection hole, or use a jack. Otherwise, dismantling the body kit will be inconvenient.
- Carefully clean the working surfaces (bumper and underbody of the car) from dirt and traces of corrosion. If this is not done, then dirt and rust will fall on the motorist during work. This will significantly interfere with the dismantling or installation of the body element.
- Treat fasteners with WD 40 and wait 15-20 minutes. Over time, traces of corrosion and dirt appear on the fasteners. Because of these reasons, bolts and screws are difficult to unscrew. In some cases, they have to be cut off completely. The head is removed from the bolt using a grinder. The cutting process requires special vigilance and additional time costs.
After completing the preliminary work, dismantling begins.
Removing and installing the rear buffer
Replacing the rear buffer of the Opel Astra h is carried out as follows:
- Before the rear bumper is removed, the taillights must be removed.
- After removing the lights, you need to remove the license plate.
- Provided that the car is equipped with parking sensors, before dismantling the electronics are turned off and the car is de-energized.
- Disconnect the wheel arch protection; this is done by unscrewing the fastening parts.
- By pressing on the side parts of the body element, remove the trim from the rear bumper bracket holders.
- Remove the cover from the central guide.
- Remove the polystyrene foam insert and remove the expansion rivets.
- Carefully open the clips and latches and remove the body kit. It is recommended to use this function together with an assistant.
The process of installing the rear buffer is carried out in the reverse order of removal. In this case, it is recommended to secure parts of the body kit using new bolts and nuts. This will ensure reliable fixation of the body element, and will greatly facilitate the subsequent removal and installation of the part on the vehicle.
Fundamentally! On the Hatchback and the Opel Astra h, the process of removing and installing the buffers is similar.
Using a TOPX T20 wrench and a flat-head screwdriver, you can easily remove the body element. Doing the work yourself allows you to save time and money. It is important to do the work carefully and carefully: you need to make sure that the headlights and electronics are turned off and the car is de-energized. You need to carefully remove the plastic latches and clips.
How to remove the rear bumper of an Opel Astra H
Opel Astra H cars were produced from 2005 to 2015 (in Russia 2009–2014), and they were replaced by a new generation of Opel Astra J. In the line of models with the letter “H”, not only cars, but also hatchbacks and cars were produced with station wagon body. Naturally, the procedure for dismantling all the parts at the rear of the car will have its own certain aspects.
The procedure for removing the rear bumper on a 5-door and 3-door hatchback is as follows:
- Open the trunk lid, and only then turn off the power to the car by disconnecting the battery terminal.
- Remove the lights by unscrewing the fastening of the trunk trim and the plastic covers on the rear light blocks.
- Disconnect the license plate light and remove the license plate itself together with the number frame.
- Remove the mounting screws on the wheel arches on both sides.
- Remove the luggage compartment lock cover.
- Unscrew the central bolts (there are two of them) located in the place where the license plate is attached.
- If your car has parking sensors, you must disconnect the wiring leading to the sensors.
- Carefully remove the car trim from the guides on both sides.
- Release the central part of the cover and remove it.
- Unscrew the bolts securing the bumper to the body frame (4 on each side and two in the center) and remove it.
When dismantling the same part from the Opel Astra N station wagon, you will need:
- Dismantle the rear block lights.
- Unscrew the fastening of the upper edge of the trim on both sides of the car. Having freed the upper edge, remove 2 more bolts and disconnect the trim from the protective structure of the wheel arches.
- Pull out the clips holding the polystyrene foam insert and remove it.
- The upcoming removal of the bumper from the body frame is done in the same way as for a hatchback.
To replace the xenon lamp on a GTC you need to remove the bumper
Removing the Bumper Opel Astra J
Removing bumpers from the Opel Astra brand may be required not only for its repair or replacement, but also for other, more familiar ones. For example, when replacing a light bulb in a headlight, one of the bolts securing its cover is located just below this protective element of the body. When installing a towbar, it is necessary to remove the same rear part, which is dictated by the need to connect the socket to the trailer. The process of removing housing buffers is simple, but requires force and care to avoid damaging the fasteners.
How to remove the rear bumper of an Opel Astra N
Opel Astra H cars were produced from 2005 to 2015 (2009–2014) and were replaced by the new generation Opel Astra J. The model range produced not only sedans, but also hatchbacks, as well as touring cars. with the letter “N” is a carriage. Naturally, the procedure for dismantling any element at the rear of the car will have its own specific nuances.
The body of the Opel Astra, like any other car that first encounters obstacles and barriers and is designed to soften the impact while protecting the rest of the body, the interior and the people in it, is a bumper.
The procedure for removing the rear bumper on a five-door and three-door hatchback is as follows:
- Open the trunk lid, and then turn off the car by disconnecting the battery terminal.
- Remove the lights by unscrewing the luggage compartment mount and the plastic trim on the rear lights.
- Turn off the license plate light and remove the license plate and subframe.
- Remove the wheel mounting screws on both sides.
- Remove the luggage compartment lid.
- Unscrew the central bolts (two of them) located behind the license plate.
- If your vehicle has parking sensors, you will need to disconnect the wiring leading to the sensors.
- Carefully remove the guide trims from both sides of the vehicle.
- Release the center of the cover and remove.
- Unscrew the bolts securing the bumper to the body frame (4 on each side and two in the center) and remove.
When removing the same Opel Astra N station wagon you will need:
- Remove the rear lights.
- Unscrew the top edge of the trim on both sides of the car. Having lost the top edge, unscrew 2 more bolts and remove the cover from the wheel arch protective structure.
- Remove the holding clips from the Styrofoam and remove it.
- Further disassembly of the bumper from the body frame is carried out in the same way as for a hatchback.
To replace the xenon lamp on the GTC, remove the bumper
Removing the front bumper from the Opel Astra N
The Opel Astra N model is no longer available in Europe, nor is it the same one that once replaced the Opel Astra G, replacing the new generation Opel Astra J. But cars with the letter “N” continue to work, and their owners often have to resort to disassembling the front bumper. After all, this part of the body is more at risk of contact with the barrier, and therefore its repair or replacement always remains relevant.
How to remove the bumper on an Opel Astra: H, J and G
Removing bumpers from an Opel Astra car can be useful not only for their repair or replacement, but also for other, more mundane purposes. For example, when replacing a light bulb in a headlight, one of the bolts securing its cover is located specifically under this protective element of the car body. It is necessary to dismantle a similar rear part when installing a towbar, which is dictated by the need to connect an outlet for the trailer. The process of removing the buffer parts of the body itself is easy, but it requires endurance and attention so as not to destroy the snap fasteners.
READ How to Clean the Heater in a Car Without Removing
How to properly remove the bumper on an Opel Astra with your own hands
A car body kit is one of the body parts that is most susceptible to mechanical damage. They occur due to careless driving and minor accidents. A damaged body kit spoils the appearance of the car, so the part requires restoration. To eliminate the damage, you will need to remove the front and rear bumpers on the Opel Astra h.
Removing the front bumper from the Opel Astra H
The Opel Astra H car model is no longer produced either in Europe or in Russia. Just as it once replaced the Opel Astra G, it was replaced by the newest generation Opel Astra J. But cars with the letter “H” continue to be used as before, and their owners often have to resort to dismantling the front bumper. After all, this body part is more susceptible than others to the threat of contact with an obstacle, which means its repair or replacement always remains a pressing issue.
To correctly and without any problems dismantle this body part from the Opel Astra N you need to:
- Open the hood and place it on the stop.
- Loosen the 6 screws securing the front bumper to the radiator frame. Do this from one edge to the other so as not to destroy anything. After this, remove the screws.
This way there are 6 screws securing the front bumper to the radiator frame.
- Next, in both front wheel arches it is necessary to loosen the screws securing the front fender liners to the bumper, then carefully unscrew the screws.
- From the bottom of the car, on both sides, it is necessary to loosen the tightening and carefully unscrew one screw at a time securing the bumper to the body side members.
- The next step is to use a screwdriver to pry off the 4 pins securing the bumper to the front suspension subframe.
This way the 4 pins securing the front bumper to the front suspension subframe are placed.
- Grasping the side of the bumper on the left side of the car, carefully, one at a time, remove the bumper fastening clips on the front fender from the holes in the bumper. After this, disconnect the bumper from the fender. Do the same on the right side of the car.
- From the bottom of the car, on both sides, loosen one pinch bolt securing the bumper to the front suspension subframe brackets.
- After this, remove the bumper mounts from the subframe mounts.
- After this, carefully move the bumper away from the car body.
- You will see the bumper wiring harness connector, press the bumper wiring harness connector lock and disconnect it from the car wiring harness connector, then remove the bumper from the car.
That's the whole procedure for removing the bumper from the Opel Astra.
Attention! On all Opel Astra H cars, regardless of body type, removing the front bumper is done using the same method. When dismantling this body part, you must act carefully, without making unnecessary efforts, in order to maintain the integrity of the structural elements of the latches.
It is striking that a similar procedure is used for similar work with an Opel Astra J model car, with the only difference being that the number of fasteners has been increased, their placement has been slightly changed and it is necessary to additionally disconnect the wiring connector.
Installation of the front and rear bumpers on the Opel Astra H is done in the reverse order. It can be stated that every car enthusiast can carry out this work independently, without resorting to the help of service centers or 100.
How to remove the front bumper of an Opel Astra J with your own hands
Bumpers often take the hit, so it turns out that many drivers are familiar with replacing them firsthand. If you do this operation yourself, it will look like this:
– The crankcase protection is removed first (unscrew four bolts - two on top and two on bottom). The mudguards of the engine compartment are also dismantled - they are held on by three bolts and a clamp, so be careful.
– Then start attaching the bumper to the radiator frame. There should be six screws and they are located immediately behind the top edge of the bumper.
– After this, remove the screws that secure the front fender liners to the bumper. The same needs to be done with the fasteners of the “bumper-spar” link (just one screw on both sides of the car).
– Use a flat-head screwdriver to pry up the fasteners on the piston fastenings to the subframe. There are four pistons installed in a row, so removing them should not be a problem.
– Now carefully remove the clips on the front fender from their connection points with the bumper. Grab the sides of the bumper with your hands to disconnect the bumper from the fender.
“But this is not the end of the work.” You will also need to remove the “bumper” brackets from the brackets on the subframe, having first unscrewed one tightening bolt on each side.
– The last step before final dismantling is to unhook the “trick” of the bumper wiring from the block of the “main” wires of the car.
– Now the front bumper has been completely removed. Installation is done in reverse order.
During work, it is advisable not to tear out small fasteners such as pistons (although this is not always possible, given its location). Bolts may become acidic over time, so treatment with a penetrating liquid may be necessary.
Perhaps the most difficult task is to install a new (or repaired) bumper without distortions and huge gaps between body elements. Here the issue may not even be so much in the bumper itself, but in the condition of the components surrounding it.
Replacing the front body element
Remove the engine crankcase protection. To do this, you need to unscrew one screw each near the right and left wheels of the car. Open the hood and unscrew the 6 screws securing the body element to the vehicle radiator. 100 sides of the front wheel arch, you also need to unscrew 3 screws on each side. Under the bottom of the car, remove the 4 pistons securing the front buffer. Loosen the mounting fasteners. Unclip the buffer at the junction of the body kit and the wing. In order to unlock the clips, use a flat-head screwdriver. Disconnect the control unit for fog lights and side lights
Before this action, it is important to de-energize the vehicle.
The nuances of removing the bumper
Any car brand differs from its competitors in the principle and quality of fixing parts of devices. It often takes quite a long time to remove the front bumper. The process involves the dismantling of all auxiliary structures, which significantly complicates the work.
The rear bumper mounts differ slightly in their complexity. They can be removed more quickly, but additional devices will be useful. The difference lies in the special rivets. They firmly hold the element, preventing it from loosening while moving. There is only one way to remove such fasteners - by destroying them with a drill. A hole is drilled at the location where the rivet is placed. As a result, the result is a perfectly even socket for the new fastener.
Removing and installing the rear buffer
Replacement of the rear buffer of the Opel Astra h is carried out as follows:
- Before the rear bumper , the taillights must be removed.
- After removing the lights, you need to remove the license plate.
- Provided that the car is equipped with parking sensors, before dismantling the electronics are turned off and the car is de-energized.
- Disconnect the wheel arch protection; this is done by unscrewing the fastening parts.
- By pressing on the side parts of the body element, remove the trim from the rear bumper bracket holders.
- Remove the cover from the central guide.
- Remove the polystyrene foam insert and remove the expansion rivets.
- Carefully open the clips and latches and remove the body kit. It is recommended to perform this function together with an assistant.
The process of installing the rear buffer is carried out in the reverse order of removal. In this case, it is recommended to secure parts of the body kit using new bolts and nuts. This will ensure reliable fixation of the body element, and will greatly facilitate the subsequent removal and installation of the part on the vehicle.
Using a TOPX T20 wrench and a flat-head screwdriver, you can easily remove the body element. Doing the work yourself allows you to save time and money
It is important to do the work carefully and carefully: you need to make sure that the headlights and electronics are turned off and the car is de-energized
You need to carefully remove the plastic latches and clips.
Installation of Bumper Opel Astra J
The sequence of operations performed when removing and installing the front bumper on an Opel Astra J.
Remove and adjust front bumper
You will need: TORX T20 wrench, TORX E12 socket, flat blade screwdriver, needle nose pliers.
1. Output and settings the Opel thermostat Open the hood and lock it in place.
3. Opel Astra Removing, installing and adjusting Opel Astra doors Loosen the six screws that secure the front panel. bumpers to radiator frame...
Similar to the screws that secure the front bumper to the radiator frame.
4. ... and unscrew the screws.
5. Set the time of the Opel Astra Station Wagon (solved) - 1 answer In both front wheel arches, remove the screws to attach the front wheel arch to the bumper...
6. ... and unscrew the screws.
7. From the bottom of the machine, remove the fasteners on both sides...
8. ... and remove one screw securing the bumpers to the side members of the body.
9. Where is the engine number for Opel Astra j? Video Special Auto NN Using a screwdriver, remove the clamps of the four mounting bumper covers on the front suspension...
Same as attaching the front bumper to the front suspension.
10. ... remove the clamps from the covers ...
How to remove and install the front bumper on an Opel Astra J.
Details about everything on the cutting edge bumper
and everything connected with it. And I apologize for the turn.
Bumper for Opel Astra J
The video is one of my first, so not everything is clear and beautiful)
11. ... and then the hats themselves.
12. Opel Astra h Removing and installing front doors for Opel Astra N. In the Opel Astra
j 1.4 states that engine oil should be changed at certain intervals. Holding the bumper panel on the left side of the car, carefully remove the bumper mount on the front fender from the holes in the bumper...
13. ... then disconnect the bumper from the fender. Similarly, disconnect the bumper from the fender on the right side of the car.
14. Opel Astra J 1. Removing and installing door handles Opel Astra Opel Astra From the bottom of the car, unscrew one clip on both sides of the car, which secures the bumper to the front suspension brackets...
15. ... and remove the bumper brackets from the subframe brackets.
16. Opel Astra J, where the Autogas car number is located. Remove the bumper from the body...
17. ... put the clamp on the bumper harness trims ...
18. ... disconnect it from the car's seat belt and remove the bumper.
19. If necessary, remove the upper and lower parts of the radiator trim and the energy absorber element from the bumper (see Removing and installing the Opel front door trim). astra h Removing and installing the radiator casing).
20. Replacing the catalytic converter on an Opel Astra jhg Removal. If you removed the replacement bumper and the new bumper does not have an outside air temperature sensor, unscrew the sensor wiring harness clamp with a screwdriver...
21. ... and disconnect the device from the sensor.
22. Using a screwdriver, pry out the outside temperature sensor clamps from the outside of the bottom of the radiator...
23. ... and remove the sensor.
24. Changing engine oil Opel Astra J 1. Opel Astra h Removing and installing the Opel Astra N thermostat Instructions. Tighten the two strap holders with pliers...
25. ... and, having removed the holders from the bumper holes, remove the braid.
26. Removing and installing the front door trim on an Opel Astra H. Install the wiring harness and outside temperature sensor on the new bumper.
27. Replace the front bumper and all removed parts in the reverse order.
How to remove the front bumper?
The front J is quite easy to remove. In order to begin the work, you need to open the hood and unscrew the four bolts in the front part of the engine compartment. Later it will be necessary to remove the screws located in the front arches. It will be enough to turn out only those in front. There are 5 of them in each of the arches. These screws are used to attach the fender liner to the bumper. Having unscrewed them, we move to the four pistons that are located under the bumper.
Disconnect the connectors of this wiring. Now you can easily remove the front bumper. Reinstall it in reverse order.
Features of dismantling on Opel Astra H
In the Opel Astra N, to remove a part, you need to make more effort than for the previous model. Also, withdrawal occurs in the same way for the entire family.
The front dismantled as follows:
- First, unscrew the 3 screws holding the radiator grille and remove it. We tilt the lower part in our direction and pull it up. We take out 2 pistons under the grille.
- We release the fender liners from their fastenings. It is better to turn the steering wheel all the way in the appropriate direction.
- From below, along the entire length, we take out the caps.
- The latches are located at the junction of the bumper and front fenders. We release it from the latches and remove it. Also, do not forget about the communications of parking sensors and PTF.
The rear part is removed using this method:
- There are 2 screws behind the number frame; unscrew them.
- From the wheel arches we unscrew the screws that connect the bumper and the fender liner.
- To remove it, you need to release it from the latches at the junction with the wings and under the rear lights. We disconnect the wires for the license plate light and parking sensors, if available.
READ Timing Belt Replacement Cherie Tigo 2 4
Brackets
This standard fixes the product more firmly on the car body. Each manufacturer makes bumper mounts according to its own unique design. They look like small elongated parts. A distinctive feature of the products is strength and durability. The elements can last for many years without breaking down even on poor road surfaces. But they also suffer in road accidents.
Fasteners have been used by manufacturers of various car brands for a long time. This type of fasteners is most widespread in Europe, Russia and the USA.
Remove the rear bumper of the Opel Astra
The summary will help you remove the rear bumper of the Opel Astra simply and without unnecessary trouble. The website contains step-by-step controls for all generations of the model.
Part of the body of the Opel Astra, like any other car, which first encounters obstacles and obstacles and is designed to soften the blows, protecting the rest of the body, the interior and the people in it, is the bumper. Often, when used carelessly, the bumper itself suffers from collisions with curbs, bumps, impacts on posts and other objects. If a damaged part is replaced or access to parts located behind it is necessary, the element must be removed. It is worth considering that design features also determine aspects of the procedure for removing the front and rear bumpers of the Opel Astra.
Since the launch of the model in 1992, the Opel Astra has already been replaced by four generations, which were significantly different in appearance and design. Therefore, the instructions on how to remove the rear bumper of an Opel Astra will be different for each of them.
We tried to collect all the methods that allow you to easily remove a part from an Opel Astra for owners of any car produced from 1992 to 2015.
How to remove the rear bumper of an Opel Astra J
Opel generation has been produced since 2010. In addition to the usual fastening, it also uses self-latching caps, which can be removed with a certain skill.
- Remove the negative terminal on the car battery to de-energize the car's network to avoid short circuits when turning off/connecting parts.
- Remove the rear wheel fenders.
- Open the luggage compartment.
- Remove the combination lamp sections.
- Use a screwdriver or a metal spatula to pry the caps of the piston clamps from the bottom of the machine.
- Pull the latches down and remove the pistons.
- Gently pulling the bumper trim on the left side of the car with your hand, remove the fastening clamps from the holes one by one.
- Detach the left side of the part from the body.
- Release the upper fastenings of the corner part of the rear bumper to the body.
- Unfasten the cover from the bracket.
- Carry out the same operations with the right side of the rear bumper.
- Lift the upper part from the holders (two eyes) and move it away.
- Remove the rear bumper trim.
- The support is held on by 6 bolts. To remove it you need to tighten three nuts on each side.
As with other generations of Opel Astra, the assembly process is carried out in reverse order.
How is the procedure carried out on an Opel Astra G?
The next generation was produced from 1998 to 2009. On generation G cars, the element was already fixed more thoroughly. To remove it, you need to work hard with the key. In some modifications, to begin the procedure it is necessary to remove the screws located under the rear dimensions. Access to them is revealed through small holes in the trunk, closed by hatches, after removing which you can twist the fasteners securing them.
- Open the luggage compartment.
- Remove the screws on the outside of the opening.
- On both sides of the wheel arches, unscrew the screws securing the fender liners and guides.
- On the bottom side of the spare part, unscrew the fasteners screwed from bottom to top.
- Release the latches securing the rear bumper under the lights and in the fenders.
- Remove the part towards you along the guides.
- If parking sensors are installed, disconnect the connector.
How to remove the front and rear bumper of an Opel Astra H (after 2005)
Dmitry said: For the Opel Astra H station wagon, the step-by-step control is as follows: Remove the rear combination lights. Unscrew the fastening bolts one on each side that secure the auto-fixing upper edge of the trim.
Release the upper edge of the trim, remove two bolts each and move the part away from the wheel arch protection. Remove the expansion rivets and the polystyrene foam insert. Removing the beam is carried out in the same way as removing the Opel Astra bumper for the Opel Astra hatchback. The Opel Astra J generation has been produced since this year. Where is the washer reservoir located on a Nissan Almere? To remove it you need: On each side of the wheel arches, remove the Opel Astra N bumper using the screw that secures the corners of the bumper to the wings.
Unscrew the nuts on the rear panel of the luggage compartment. Remove the spare part by gently pulling it towards you personally.
The next generation was produced over the years. On generation G cars, the element was already fixed more thoroughly. To remove it, you need to work hard with the key. In some modifications, the first step in removing the Opel Astra bumper is to remove the screws located under the rear dimensions. Access there is revealed through small holes in the trunk, closed by hatches, after removing which, of course, twist the fasteners that secure them.
Replacing the front bumper fastenings of the Opel Astra H Open the luggage compartment. Remove the screws on the outside of the opening. On both sides of the wheel arches, unscrew the screws securing the fender liners and guides.
Honda Civic Club. Replacing the Opel Zafira oil filter 1 8 Repairing FIAT cars If you replace a damaged part or need access to parts behind it, the element must be removed. Popular How to remove the front bumper on a rapid car It is worth considering that design features also determine the nuances of the procedure for removing the front and rear bumpers of an Opel. Remove the bumper of an Opel Astra n.
How to remove the bumper on an Opel Astra: H, J and G
Removing bumpers from an Opel Astra car can be useful not only for their repair or replacement, but also for other, more mundane purposes. For example, when replacing a light bulb in a headlight, one of the bolts securing its cover is located specifically under this protective element of the car body. It is necessary to dismantle a similar rear part when installing a towbar, which is dictated by the need to connect an outlet for the trailer. The process of removing the buffer parts of the body itself is easy, but it requires endurance and attention so as not to destroy the snap fasteners.
Replacing low beam lamps Opel Astra H, J and GTC
How to remove the rear bumper of an Opel Astra F
The 1st generation Opel Astra, which replaced the old Kadett in 1992, received the F index. The rear bumper of the car, although different on the outside for modifications with different body types (hatchback, station wagon, car), was attached identically and quite easily.
- On each side of the wheel arches, unscrew the screw that secures the corners of the bumper to the wings.
- Unscrew the nuts on the rear panel of the luggage compartment.
- Remove the spare part by gently pulling it towards you.
Removing the front bumper from the Opel Astra H
The Opel Astra H car model is no longer produced either in Europe or in Russia. Just as it once replaced the Opel Astra G, it was replaced by the newest generation Opel Astra J. But cars with the letter “H” continue to be used as before, and their owners often have to resort to dismantling the front bumper. After all, this body part is more susceptible than others to the threat of contact with an obstacle, which means its repair or replacement always remains a pressing issue.
To correctly and without any problems dismantle this body part from the Opel Astra N you need to:
- Open the hood and place it on the stop.
- Remove the engine crankcase protection.
- Loosen the 6 screws securing the front bumper to the radiator frame. Do this from one edge to the other so as not to destroy anything. After this, remove the screws.
This way there are 6 screws securing the front bumper to the radiator frame.
- Next, in both front wheel arches it is necessary to loosen the screws securing the front fender liners to the bumper, then carefully unscrew the screws.
- From the bottom of the car, on both sides, it is necessary to loosen the tightening and carefully unscrew one screw at a time securing the bumper to the body side members.
- The next step is to use a screwdriver to pry off the 4 pins securing the bumper to the front suspension subframe.
This way the 4 pins securing the front bumper to the front suspension subframe are placed.
- Pull the fasteners out of the pistons.
- Grasping the side of the bumper on the left side of the car, carefully, one at a time, remove the bumper fastening clips on the front fender from the holes in the bumper. After this, disconnect the bumper from the fender. Do the same on the right side of the car.
- From the bottom of the car, on both sides, loosen one pinch bolt securing the bumper to the front suspension subframe brackets.
- After this, remove the bumper mounts from the subframe mounts.
- After this, carefully move the bumper away from the car body.
- You will see the bumper wiring harness connector, press the bumper wiring harness connector lock and disconnect it from the car wiring harness connector, then remove the bumper from the car.
That's the whole procedure for removing the bumper from the Opel Astra.
READ Replacement Glass on Starline A93 Key Fob
Attention! On all Opel Astra H cars, regardless of body type, removing the front bumper is done using the same method. When dismantling this body part, you must act carefully, without making unnecessary efforts, in order to maintain the integrity of the structural elements of the latches.
It is striking that a similar procedure is used for similar work with an Opel Astra J model car, with the only difference being that the number of fasteners has been increased, their placement has been slightly changed and it is necessary to additionally disconnect the wiring connector.
Installation of the front and rear bumpers on the Opel Astra H is done in the reverse order. It can be stated that every car enthusiast can carry out this work independently, without resorting to the help of service centers or 100.
How to remove the rear bumper of an Opel Astra F
The first generation of Opel Astra, which replaced the outdated Kadett in 1992, received the F index. The rear bumper of the car, although it differed in appearance on modifications with different body types (hatchback, station wagon, sedan), was attached identically and quite simply.
Be sure to check out:
To remove it you need to:
- On each side of the wheel arches, unscrew the screw that secures the corners of the bumper to the wings.
- Unscrew the nuts on the rear panel of the luggage compartment.
- Remove the spare part by pulling it smoothly towards you.
Signs of a malfunction of the front hub of the Opel Astra H and diagnosis of failure
The first important signs that the front wheel bearing of the Opel Astra H has begun to malfunction is extraneous noise from the wheel. Additional signs: vibration in the cabin, grinding sound, inconsistent sensor operation, heating, free wheel movement.
To check the wheel bearing on an Opel Astra N, perform the following operations:
- First, the front wheel is hung on the side where the problems (noise) have changed;
- Next, we spin the wheel with our hands to make sure that the noise is coming from it;
- The free movement and smooth rotation are immediately checked;
- If able, determine the axial free play with an indicator; the value should not exceed 0.05 mm;
- The heating of the hub part is checked immediately after stopping the car;
- Watch a selection of diagnostic videos, as well as examples of the operation of a faulty bearing in the hub of an Opel Astra H 1.6-1.8.
Diagnostics of the front wheel hub bearing:
vazoved I drive a LADA VESTA CROSS, Moscow
Then there will simply be no one to pay the fines! This is a Korean 15 in 1 car tablet video recorder for Android.
I forgot about fines and Yandex Navigator. There is Full HD shooting, radar detection and GPS with 32 satellites. I got it at an affordable price for such huge functionality: Here
- Frequent overheating of the part due to insufficient amount of lubricant on the bearing;
- Ingress of dirt or water due to depressurization of oil seals;
- Not careful driving over uneven roads (potholes, potholes, curbs);
- Expiration of the regulated service life declared by the manufacturer;
- Defect or factory defect of the unit.
Replacing the front hub of Opel Astra H - step-by-step instructions
Replacing the Opel Astra H wheel bearing begins with preliminary measures. Place your car on the most level surface with good lighting. Then we put wheel chocks under the rear wheels, release the handbrake and put the gear in neutral. For repairs, you will need a standard set of spanners or sockets with a ratchet, as well as a jack.
Opel Astra remove the front bumper. Opel Astra removing the front bumper
To ensure the safety of the work, you should first loosen the wheel bolts and the drive shaft lock nut, and only later raise the car with a jack.
Removing the wheel bearing Opel Astra H 1.6-1.8
- After removing the wheel and unscrewing the hub lock nut, remove the brake caliper. To begin, use a screwdriver to bend the locking friction lining (spring) to the side. Next, remove the plugs for the rear mounting bolts.
- Unscrew the rear mounting bolts. After that, having removed the caliper, we hang it on the shock absorber spring.
- Now we unscrew the brake disc with a TORX T30 head.
- After removing the brake system disc, take a hammer and carefully knock out the drive shaft.
- Unscrew the bolted connection at the ball joint. Then we insert a screwdriver into the groove and hammer it in to loosen the fastener.
- Gently tap the suspension arm with a hammer to knock the ball joint out of the steering knuckle.
- We turn the fist to gain access to the rear hub flange bolts to unscrew them.
- After which you need to disconnect the ABS sensor wire in order to remove and change the Opel Astra N wheel bearing.
Removing the front bumper of Volkswagen Polo / Caddy
Photo report demonstrating the removal of the front bumper using the example of Volkswagen Polo and Volkswagen Caddy.
There is no point in listing the huge number of circumstances why you need to create a similar function; what is more important is the answer to the question - how to remove the front bumper with your own hands. And there is nothing complicated about this, all that is useful for this is a pair of screwdrivers, a set of Torx keys (usually contains keys from T10 to T 50), and specifically T25 and T27, also a wrench/spanner for 10 and at most 15 -20 minutes of free time.
Removing the rear bumper Opel Astra J video
How to remove the rear bumper, repair of rear bumper mounts Opel Astra j.
How to remove and install the front bumper, Opel Astra J.
Removing (installing) the bumper on an Opel Astra J
Opel Astra H removing the rear bumper/(Removing the rear bumper Opel Astra H)
Replacing the rear fender liner for Opel Astra j.
Opel Astra remove the rear bumper
Repair of front bumper and PTF mounts for Opel Astra j
101.24.9620-Test montaggio Par. post. Opel Astra J
How to remove the front bumper – Opel Astra G
Partial coloring of the OPEL astra j bumper
- Test drive tesla model s p85d
- Review of Kia Rio in winter video review
- Ignition switch Niva Chevrolet repair video
- Ssangyong rexton 2009 test drive video
- Removing the steering wheel Ford Focus 2 video
- Iron cars model accident video
- Great Wall safe crash test video
- Ford Focus 2 injector cleaning video
- Test drive Mercedes ml 350 video 2000
- See the new Kia Rio
- Video review of the new Ford Kuga
- Hyundai Starex off-road video
- Overlock Toyota sl3335 video
- Mercedes Sprinter 216 videos
- Replacing the clutch on a Ford Mondeo 2 with your own hands video
Home » Clips » Removing the rear bumper of the Opel Astra J video
Which front bumper should I install on VW Polo / Caddy I?
Unique number 17180710301C, discontinued.
- Eurobump WOS07GO005 — 3141 rub.
- Polcar 953207-1 — 2162 rub.
Let's start by unscrewing the 3 designated screws using a Phillips screwdriver.
And two more here, also with a Phillips screwdriver.
A little closer to better see where exactly they are. After the screws are unscrewed, pry the grille with a screwdriver from below to release the lower part. At the top of the grille you can find 4 plastic hook-latches, with which it clings to the bumper. We release them with a screwdriver and the grille comes out.
Then, to continue the procedure, a kit like this one will come in handy. If Torx keys are available, you need 2 pieces - T27 and T25.
Using a T27 key, unscrew the 2 bolts on top, located behind the grille.
After this, use a T25 key to unscrew the 3 screws on top of the grille. After that, the turn signals are removed in the following manner: on the turn signal itself there is a plastic latch with which it snaps onto the spring, the spring itself is located on the headlight; This plastic latch on the turn signal needs to be bent towards the wing, after which the turn signal will simply come out.
Using a 10mm wrench, unscrew the plastic nuts on both sides that hold the grille in place.
Using a T27 wrench, unscrew the bolts hidden behind the grille.
Sources:
https://infokuzov.ru/kuzov/zamena-bampera-Opel-astra https://okuzove.ru/remont-kuzova/kak-snyat-bamper-na-Opel-astra-j.html https://asx- club.su/body/kak-snat-bamper-na-Opel-astra-hjig.html https://asgard-motor.ru/kak-snyat-peredniy-bamper-Opel-astra-h/ https://zamena -podshipnikov.ru/zamena-podshipnika-peredney-stupicy-Opel-astra-h.html https://etlib.ru/report/264-snyatie-perednego-bampera-Volkswagen-polocaddy