Which camshaft is better to install?
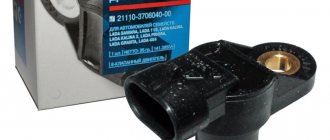
One way to avoid main engine noise is to replace them with adjusting bolts. In this case, it is also necessary to purchase a 213th camshaft, which can improve engine performance.
Problems with the shaft itself include:
- bearing wear;
- bullying in bed;
- cracks, fractures, axial deformation;
- seal damage.
Video 1, the shaft burst 2 times in a row.
Checking the condition before starting work
It is faster and more profitable to check the need to replace the shaft on models 2121, 21214 and any other domestic Niva yourself - as well as the installation and dismantling process itself. Moreover, even if the camshaft does not change, it will still have to be removed and repaired (grinded, straightened, balanced). Parts that are severely worn, cracked, or bent must be replaced with a new one.
Preparing for replacement
Before removing the camshaft to replace it or check its condition prepare a set of tools consisting of:
- wrenches;
- torque wrench;
- chisels;
- socket heads for 10, 13 and 17.
At the first stage of shaft removal work, the following actions are performed:
- 1. Removing the negative terminal from the Niva 21213 car battery (2121 and any other domestic modification of this car);
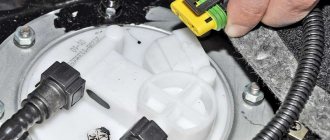
- 2. Removing the cylinder head cover;
- 3. Install the camshaft in a position where the mark on its sprocket coincides with the corresponding protrusion on the bearing housing. And the mark on the pulley is with the protruding part of the shaft drive.
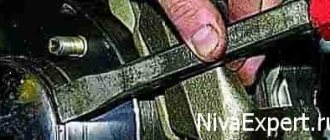
4. Using a chisel, bend the petals at the lock washer of the bolt securing the sprocket.
1. Unscrewing the sprocket bolt of the part being removed (key “17”) and removing it from the hole; 2. Dismantling the timing chain tensioner; 3. Removing the camshaft sprocket (it is recommended to tie a chain to it - this will ensure that there is no jumping; 4. Evenly unscrewing (using a 13mm wrench) all the nuts securing the shaft bearing housing, and removing it from the cylinder head studs along with the camshaft.
5. Unscrewing, using a 10mm socket wrench, the fastenings of the thrust flange to the bearing housing;
6. Removing the flange and then the camshaft.
If it is necessary to replace the valve levers, these parts are also removed immediately after dismantling the shaft . To do this you should:
- Move the presser spring legs to the side;
- Remove the lever;
- Remove the spring.
At the same stage, diagnostics of the condition is performed. If there are noticeable damages (cams are worn by 0.5 mm or more, scratches, grooves and nicks are visible on the surface), indicating the impossibility of repair, proceed to the process of installing a new part. The camshaft, which can be repaired, is brought back into working condition. If the question about the need to replace the camshaft of any Niva model (including 2131 and more modern versions) receives a positive answer, you should purchase a new part. As a rule, they are sold complete with cases. It is worth noting that installing a new shaft requires replacing its rockers and hydraulic compensators, which increases the cost of repairs by approximately one and a half times.
Installation
Before installing the shaft inside the bearing box, lubricate the working surfaces of the journals and cams with engine oil. Now you should install the camshaft so that its pin is located exactly opposite a certain reference point - the upper hole of the thrust flange. The part is fixed and the fasteners are tightened, adhering to certain rules: • the nuts must be tightened, trying to maintain a force of 19 Nm; • twisting is carried out in a certain sequence, which can be seen in the diagram:
Now unfasten the wire that secured the timing chain to the sprocket (leaving marks for ease of installation), and install both of these parts on the shaft. Having unscrewed the fastening bolt, bend the petals of the lock washer. And as a final stage:
Sources:
https://x7.by/remont/145-zamena-raspredvala-niva-shevrole-svoimi-rukami.html https://nivaexpert.ru/dvigatel/remont-i-zamena-raspredvala-vaz-video/ https:/ /nivachevrole.ru/dvigatel/zamena-raspredelitelnogo-vala/ https://autogrm.ru/chevrolet/grm-niva.html https://nivaexpert.ru/dvigatel/remont-i-zamena-raspredvala-vaz-video/
Camshaft replacement process
Don't forget to apply the handbrake and engage fourth or fifth gear. The initial step for removing the target unit is to release the air filter pipe from the 4 bolts and the latch.
To carry out the work successfully, you cannot do without a torque wrench.
Next, the candle tips are removed, after which the elements themselves are removed. The vacuum hose and crankcase exhaust pipe are also dismantled. For convenience, they are retracted to the side.
The valve cover is then cleaned of dirt to prevent particles from accidentally getting inside. The throttle assembly is disconnected (located at the end). Use a wrench to unscrew the 8 studs holding the valve cover.
When disassembling, it is useful to additionally replace old gaskets and treat them with sealant.
The car should be jacked up at the front so that it is convenient to turn the wheel. Then the mark on the back of the gear is aligned with the camshaft mark.
The machine is lowered to the ground, the chain is attached to the gear in a convenient way (using a wire or tie).
A cord is attached to the upper hole of the gear and is connected to the hood lock. Using gentle movements, unscrew the lock washer until it can no longer be turned by hand while holding the washers. Next, the gear is removed from its seat and secured by a cord.
The oil supply ramp is unscrewed.
And it is removed - up and back (to the battery).
Carefully unscrew the remaining camshaft fasteners and dismantle the part.
A new camshaft is installed in place of the old one.
The rockers are removed. They are laid out in the same order as they were.
The hydraulic compensators are unscrewed with a 24 mm wrench.
Oil is removed from wells.
Locking plates with bushings are installed.
The adjusting bolts and nuts are screwed in entirely. Rockers and springs are fixed.
The RV is mounted and tightened. The camshaft tightening torque is 8.33 - 22.6 Nm. In this case, this is done in strict order according to the scheme.
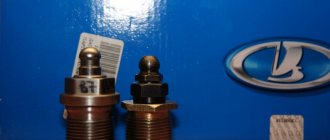
Torsion bolts (plastically deformable)
Part number: 21213-1003271-01-0. Name: Torx cylinder head bolt. This name (torsion bar bolts) is fundamentally incorrect, but what can you do if they are called that on all forums and in all stores. According to science, when they say torsion bar, they mean deformation from twisting. And in this case, tensile deformation. In stores, these bolts are also called cylinder head bolts for Niva Chevrolet or cylinder head bolts of a new type. I also came across the name torx or chamomile. These bolts, unlike hardened ones, provide a constant load. That is, in a very primitive way we can talk about the grommet effect, that is, about the constant force to compress the cylinder head gasket in the axial direction of the bolt. These bolts are widely used on imported engines because they avoid human factor errors. In fact, you don't need to tighten with the precision of a torque wrench. The final values are taken as angular values. I don’t really like this approach, but such things are now commonly called “assembly guarantee”.
Tightening scheme
Using a large screwdriver, the chain tensioner is removed, then the camshaft gear is placed in its original place. The bolt and washer are tightened. The latter is controlled with pliers.
Next, the thermal clearance of the valves is adjusted. Assembly is carried out in reverse order.
Video 2: replacing the timing tensioner.
Niva cylinder head bolts, installation
To work with bolts, a special tool is required. E16 head, which is not always included in universal tool kits, and a torque wrench. To make the process logically complete, the price list includes an E16 head (Sata or Force) and a torque wrench ( JTK) .
I won’t invent anything about the installation technology, just completely follow the factory manual.
- Submerge the bolts in a container of engine oil.
- Let it drain. Exposure for at least 30 minutes.
- Wrap and tighten according to the diagram.
Stage 1 – tightening torque (12…20) N.m [(1.2…2.0) kgf.m];
Stage 2 – tightening with torque (50…70) N.m [(5.0…7.0) kgf.m];
Stage 3 – turning the bolts by 90-110 degrees;
Stage 4 – turning the bolts 90-110 degrees.
Tightening torque of bolt 11 (at the cylinder head tail): preliminary – (14…16) N.m [(1.4…1.6) kgf.m]; final – (32…40) N.m [(3.2…4.0) kgf.m].
This article will describe in detail the most important aspects of installing a camshaft for the famous domestic SUV NIVA.
What is a cylinder head and its functions in a car engine
How to change the cylinder head gasket for a VAZ 2110 8 valve
In order for the connection between the head and the cylinder block itself to be sufficiently tight and airtight, a gasket is used. It performs three functions:
- seals the cooling system channel;
- prevents oil leakage;
- distribution - the cylinder functions normally, as a result of which the mixture of gasoline and air does not leak out.
The seal is used only once and is changed during any engine repair. You can use the following types - asbestos, non-asbestos, steel. Each gasket is good in its own way: metal gaskets distribute mechanical stress well, asbestos gaskets are more elastic and can withstand high temperatures.
You will need the following equipment: a 10 mm wrench, pliers and a flathead screwdriver. Different cars have their own design features, engine models and bolt patterns. It is impossible to create the same algorithm for all machines. Let's look at exactly how to do this with your own hands.
Hydraulic compensators Niva and Niva Chevrolet old and new models
The topic of the article is Niva hydraulic compensators of the old and new type. Since the beginning of production of 21214 engines, the plant has installed old-style hydraulics; from October-November 2008 to the present, new-style hydraulics have been installed. In the case of this engine, it would be more correct to call the spare part a hydraulic mount, but since everyone is accustomed to hydraulic compensators, so be it.
Niva hydraulic compensators, a bit of theory
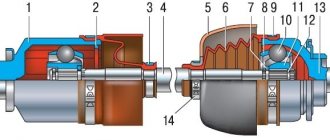
What exactly is a hydraulic compensator and why is it needed in the engine? The valves have a thermal gap. You can “choose” it in two ways. The first way is mechanical adjustment. Either with washers, as on the “eight”, or bolts, as on the “classic”. The second way is to install a hydraulic compensator between the camshaft cam and the valve. Oil is supplied to the hydraulic chamber under pressure, and thereby the valve clearance is selected. But there is one thing, BUT. For high-quality operation of hydraulic compensators, a certain oil pressure is required. According to German documentation, at least 1.5 kg at idle. On our classic engine, normal pressure at idle is 1.2-1.5 kg. But we hung a hydraulic chain tensioner and eight hydraulic compensators on our oil pump. The system is working at its limit. Let me remind you that the design of the pump remains from a penny and has a performance designed for a 1.2 liter engine. Shown in the photo. 1 – old-style hydraulic support, 2 – new-style hydraulic support, 3 – new-style hydraulic support cup.
old and new hydraulic guides
Old-style Niva hydraulic compensators
The first Chevrolet Niva rolled off the assembly line in September 2002. Until 2004-05, General Motors supplied its own hydraulic compensators (I never found the manufacturer). Cars from these years are still driven with only an oil change. But after this time, the “domestic spill” hydraulics began to appear, and problems immediately began. To this day, there are no high-quality replacements, only surgical removal and installation of a “death to old-style hydraulics” kit. Let me remind you that with old-style hydraulics you can only use old-style rockers . Details are described in a separate article.
New sample hydraulics
A separate chapter will be devoted to the new type of hydraulic compensators, as such, now only about the differences and general issues. Apply from October-November 2008. The picture is exactly the same as with the old-style hydraulics. The first couple of years, high-quality wetsuits and good hot cups. Then, hydraulic compensators of unknown origin and disgustingly processed “half-baked” glasses. There is a category of nivovods and shnivovods who firmly believe that under their hood there is not a Fiat engine from the 60s of the last century, but something new and modern. Therefore, it is necessary to put exclusively what the designers intended. For them, in December 2013, I ordered the first trial batch of original hydraulic guides from Germany. Don't be surprised, it's from Germany. Because our designers did not bother themselves with “brain activity”, but simply adapted hydraulics from BMW.
Installation
Several times they sent me links from forums about the fact that they installed German hydraulic compensators, but it became little better than it was. The issue is not with the INA hydraulic compensators, but with the cups. If you look at how the hydraulic compensators are installed in the cylinder head, you will see that the vector of application of force by the camshaft cam goes vertically, and the hydraulic valves and cups are at an angle to the vertical. The cups are traditionally made from shit of poor “half-baked” material, so after a while (50-70 thousand km) an elliptical groove begins to appear, along which the oil pressure required for the hydraulics begins to disappear. Therefore, if you want to update the system and install German hydraulic compensators, install new glasses.
A series of articles devoted to hydraulic compensators and bolts:
Part 1. Hydraulic compensators, review article
Part 2. New type hydraulic compensators
Part 3. Replacing hydraulic compensators with bolts. Set “death to hydrikas”
Part 4. Installing the “death to hydraulics” kit and adjusting the gaps
Did you like the article? Share with your friends!
Front suspension
- Nut of the lower bolts securing the cross member to the body side members M 12×1.25 66.6-82.3 (6.8-8.4)
- Nut of the upper bolts securing the cross member to the body side members M 12×1.25 66.6-82.3 (6.8-8.4)
- Nut of the bolt securing the rebound buffer bracket to the cross member M8 15.1-18.6 (1.53-1.90)
- Nut of the upper arm axle mounting bolt M 12×1.25 66.6-82.3 (6.8-8.4)
- Nut securing the upper end of the shock absorber M10×1.25 27.4-34.0 (2.80-3.46)
- Nut securing the lower end of the shock absorber M10×1.25 50.0-61.7 (5.1-6.3)
- Front wheel hub bearing nut M 18×1.5 cm, “Chassis”, p. 169
- Bolt securing the caliper to the steering knuckle M10×1.25 29.1-36.0 (2.97-3.67)
- Anti-roll bar mounting nut M8 15.0-18.6(1.53-1.90)
- Nut securing ball pins to steering knuckle M 14×1.5 83.3-102.9 (8.5-10.5)
- Nut for fastening the brace to the suspension cross member M 12×1.25 66.6-82.3 (6.8-8.4)
- Nut for fastening the extension to the body M 16×1.5 104.9-169.5 (10.7-17.3)
- Nut connecting the lower arm axis to the cross member M 16×1.5 114.7-185.2(11.7-18.9)
- Nut for fastening ball joints to suspension arms M8 20.60-25.75 (2.10-2.63)
- Wheel bolt nut M 12×1.25 62.4-77.1 (6.37-7.87)
- Upper suspension arm axle nut M 14×1.5 63.7-102.9 (6.5-10.5)
- Nut of bolts securing the swing arm M 12×1.25 66.6-82.3 (6.8-8.4)