How to remove the transfer case on a Chevrolet Niva
All residents of Novosibirsk now have the opportunity to purchase a VAZ gearbox in retail auto stores.
st. Rassvetnaya 17/2
All residents of St. Petersburg have the opportunity to purchase and install a VAZ gearbox from our partners.
Request a call back
Enter your Name and Phone Number and we will definitely call you back!
- Home >
- How to remove and install a gearbox >
- Removal and installation of Transfer Box on NIVA CHEVROLET
Transfer case repair and partial disassembly of the gearbox on a Chevrolet Niva
Greetings, dear friends! In today's article we will talk to you about repairs, transfer case and gearbox on Niva Chevrolet. On a car that we will be repairing, we received complaints from the owner about the presence of extraneous sounds in the car's interior when driving. Increased vibration, hum, noise, and during the inspection it was revealed that the vibrations come from the transfer case of the car, the hum comes from the input shaft bearing in the gearbox. In general, now I will tell you how to fix these problems yourself.
From this article you will learn about transmission repair on a NIVA CHEVROLET, namely: removing driveshafts, removing the transfer case, removing the gearbox, complete disassembly of the transfer case, troubleshooting the transfer case, what the transfer case consists of, assembling the transfer case, partial repair of the gearbox, replacing the input shaft bearing, replacing the input shaft oil seal, installing a gearbox, installing a transfer case.
Step-by-step instructions for removing the manual transmission and gearbox on a Niva Chevrolet
- And so, first of all, we disconnect the negative terminal from the battery.
- Next we will need to disassemble the center console. I will not explain in detail how this is done, if you cannot do this yourself, then it is better for you not to continue working, but to turn to specialized services.
- We remove it and bring it to this form:
- Unscrew the exhaust pipe from the manifold and disconnect the upper oxygen sensor.
- After we have done this, we lift the car on a lift to make it more convenient for us to work. If this is not possible, then you can work from the pit.
- Next, drain the transmission oil from the gearbox and transfer case, as well as from the rear and front gearboxes.
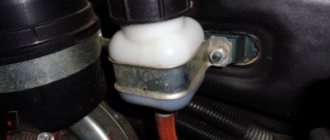
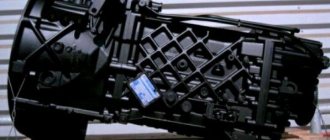
- Here we see our transfer case, it’s all covered in oil.
- Photo of the gearbox, also covered in oil.
- Next comes a very important point: the drain plugs are all magnetized and after we unscrew them, we carefully inspect them for the presence of foreign particles.
- In our case, there are metal particles on the transfer case plug and on the rear gearbox plug. This means that there is something that has fallen apart and we continue to disassemble the car.
- Next, you need to disassemble the following parts: rear cardan, front cardan, unscrew the rubber couplings on the intermediate cardan.
- Now we remove the sensors from the gearbox and transfer case.
- We disconnect the bracket going from the gearbox to the exhaust pipe and the upper front shield going above the exhaust pipe.
- We place the transmission jack under the transfer case and unscrew the supports on one side and the other.
- Unscrew this bolt on the engine mount.
- We lower the transfer case, and now we can easily remove the intermediate cardan.
- We disconnect two terminals from the transfer case. And we let her go calmly.
- Now we can remove the intermediate shaft from the transmission. Remove the sealing ring from it.
- Next, remove the clutch slave cylinder, starter and move it to the side.
- Now unscrew the two bolts from the side of the casing.
- Then there are two bolts on the left side, one is located behind the tab of the second on the right side.
- Next we need to unscrew the rear bracket holding the gearbox.
- Now lower the gearbox and remove it.
- It is recommended to immediately check the clutch disc together with the basket.
Eliminate vibration with additional fasteners
Vibration in the body is the main “disease” of the Niva; it often occurs due to improper alignment of the transfer case. Most often, vibration occurs on VAZ 21213/21214 cars, since the transfer case is mounted only on two supports on the sides of the body; on the Chevrolet Niva, the transfer case is already installed on three supports.
- driveshafts are poorly secured;
- wheels are not balanced;
- there is play in the cardan crosspieces (vibration is especially affected by play in the rear driveshaft crosspieces);
- The vibration comes from the engine itself.
Vibration when starting off on a Niva can also occur for the following reasons:
- the mounting supports of the transfer case have become loose;
- The rubber on the RK supports themselves broke.
Installing the third support of the transfer case on VAZ 21213/21214 vehicles allows you to reduce the level of vibration of the transfer case; with this support it is easier to center the transfer case. The part can be purchased at auto stores or made yourself. The finished product comes with three long studs (for model 2121); to install the third support on this machine, you will need to unscrew the short studs from the transfer case housing and install new studs from the kit. We carry out repairs as follows:
- dismantle the front passenger seat in the cabin;
- remove the floor tunnel lining;
- in the cabin we move aside the carpet covering the body amplifier (in front of the handbrake lever);
- remove the transfer case (alternatively, you can simply hang it up, but removing the third support makes it easier to install);
- We attach the bracket of the new support to the body of the RC;
- we install the transfer case in place, center it in the optimal position, and fasten the side supports;
- we combine the third support with the body, drill two holes in the bottom;
- Using washers, bolts and nuts (from the kit) we attach the support to the bottom of the body.
Vibration is eliminated more effectively by installing a subframe under the transfer case. You can also make such a device yourself or buy a finished product at a car store.
In order to install the subframe, the transfer case must be removed. It is more convenient to carry out such work in a pit; we carry out repairs as follows:
- leave the car in neutral gear;
- disconnect the propeller shaft from the transfer case, it is advisable to mark the driveshaft flange and the drive shaft so that during installation, align the driveshaft according to the marks - this way, the occurrence of unnecessary vibrations is eliminated;
- dismantle the muffler mounting bracket;
- remove the gearbox traverse;
- jack up the transfer case, remove the side fastenings of the transfer case;
- We treat the places where the subframe fits to the body with Movil;
- place the subframe on the gearbox studs;
- we mark the attachment points of the subframe on the side members, drill holes, attach bolts to the body;
- we tighten all fastenings, except for the transfer case supports themselves;
- we perform alignment of the steering wheel;
- Finally tighten the transfer case supports.
It should be noted that installing an additional support or subframe on the steering wheel does not always lead to the desired effect; in some cases, vibration only increases.
Removal and installation of Chevrolet Niva transfer case
Tools:
- Driver for 3/4 socket bit
- Knob attachment 13 mm
- Knob attachment 17 mm
- Knob attachment 13 mm
- Straight box spanner 17 mm
- Medium flat screwdriver
- Medium Phillips screwdriver
Parts and consumables:
Note:
We carry out the work on an inspection ditch or overpass.
1. Disconnect the negative cable terminal from the battery terminal.
2. Remove the floor tunnel lining as described here.
3. Unscrew the control lever handle.
4. We remove it together with the cover.
5. Remove the upper sealing cover of the lever.
6. Using a Phillips screwdriver, unscrew the three screws.
7. Remove the lever hatch cover.
8. Remove the lower sealing cover of the lever.
9. Disconnect the wire block from the speed sensor as described here.
10. Disconnect the front and rear driveshafts from the transfer case as described here.
11. Remove the intermediate shaft as described here.
Removing and installing the Niva Chevrolet transfer case
You will need: keys “13”, “17”.
1.Disconnect all driveshafts from the transfer case
2. Inside the car, disconnect the transfer case lever cover from the tunnel casing
3. Remove the cover along with the lever handle.
4. Remove the rubber cover of the lever.
5. Unscrew the nuts securing the left side cushion of the box suspension to the body and loosen the nuts securing the remaining cushions.
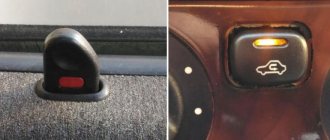
6. Disconnect the wires from the differential lock warning lamp switch
7. Place a support under the transfer case, unscrew the remaining nuts securing the cushions
8. Remove the transfer case.
9. Install the transfer case in the reverse order of removal
To disassemble and reassemble the transfer case, see this article How to repair the transfer case of a VAZ-2123
Removal and installation of Chevrolet Niva transfer case
Tools:
- Driver for 3/4 socket bit
- Knob attachment 13 mm
- Knob attachment 17 mm
- Knob attachment 13 mm
- Straight box spanner 17 mm
- Medium flat screwdriver
- Medium Phillips screwdriver
Parts and consumables:
Note:
We carry out the work on an inspection ditch or overpass.
1. Disconnect the negative cable terminal from the battery terminal.
2. Remove the floor tunnel lining as described here.
3. Unscrew the control lever handle.
4. We remove it together with the cover.
5. Remove the upper sealing cover of the lever.
6. Using a Phillips screwdriver, unscrew the three screws.
7. Remove the lever hatch cover.
8. Remove the lower sealing cover of the lever.
9. Disconnect the wire block from the speed sensor as described here.
10. Disconnect the front and rear driveshafts from the transfer case as described here.
11. Remove the intermediate shaft as described here.
12. We install an adjustable stop under the transfer case. We unscrew the four nuts securing the brackets for the side supports of the box and the two nuts securing the cross member of the rear bracket, as described here.
13. Lowering the box on the stop, disconnect the two wire blocks from the differential lock switch.
14. We remove the transfer case.
15. Using a 17mm spanner, unscrew the nut securing the left suspension bracket of the transfer case.
16. Let's take it off.
17. Similarly, remove the right suspension bracket.
18. Using a 13mm spanner, unscrew the three nuts securing the bracket to the transfer case.
19. Remove it complete with cross member and suspension bracket.
20. Install the transfer case in reverse order.
Note:
Lubricate threaded connections with graphite grease before tightening them to prevent them from rusting in the future.
The article is missing:
- Photo of the instrument
- High-quality photos of repairs
Source: Chevrolet niva device, operation, maintenance and repair. Publishing house "Behind the Wheel".
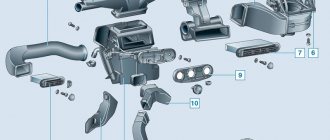
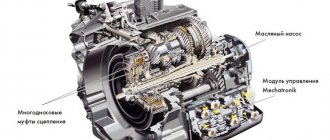
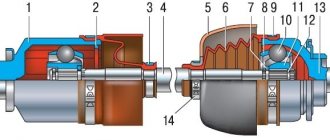
Device
The VAZ 2123 transfer case is installed at the rear of the gearbox and is attached with brackets to the bottom of the car. It is driven by an intermediate shaft. Torque from the drive shaft to the drive axles is transmitted by cardans, which are screwed to the flanges of the transfer case drive shafts.
The transfer case body is made of aluminum alloy. In its upper part there is a hatch with a lid.
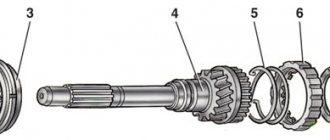
The transfer case consists of the following parts:
- RK Corps.
- Drive shaft.
- Control levers.
- Bearings.
- Gears.
- Drive shafts (front and rear).
- Flanges.
- Differential mechanism housing.
- Axles.
- Satellites.
- Clutches for gear shifts and differential locks.
- Oil seals.
- Retaining and thrust rings.
- Housing covers.
- Breather.
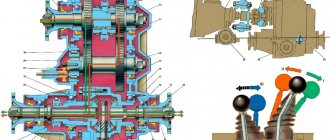
The Chevy Niva transfer case has three speeds:
- The first one, with a gear ratio of 1.2.
- Neutral.
- Low (second), with a gear ratio of 2.135.
Neutral allows you to temporarily disengage the gearbox from the transmission. It is used when connecting a winch and other units to a vehicle.
The first speed is intended for on-road driving, and the second is for off-road use where high torque at low speed is required.
Important: there are no synchronizers in the transfer case. Therefore, it is necessary to switch the locking and speed of the RC only after stopping the machine. If you cannot switch the transfer case, you need to try turning the steering wheel or moving slowly. In this case, the gears will change their relative position, which will make it possible to switch the mode.
How to remove the transfer case on a Chevrolet Niva
All residents of Novosibirsk now have the opportunity to purchase a VAZ gearbox in retail auto stores.
st. Rassvetnaya 17/2
All residents of St. Petersburg have the opportunity to purchase and install a VAZ gearbox from our partners.
Request a call back
Enter your Name and Phone Number and we will definitely call you back!
- Home >
- How to remove and install a gearbox >
- Removal and installation of Transfer Box on NIVA CHEVROLET
Useful video
Look in detail about how the transfer case on a Chevrolet Niva works, how to turn it on and off in the video below:
| You will need: keys “13”, “17”. |
|
How to remove the transfer case Niva Chevrolet
Removal of the transfer case on a Niva Chevrolet car is carried out for its disassembly and repair, as well as when carrying out other work in which the presence of the box will interfere with the progress of their implementation. Drive the car onto a viewing hole, overpass or lifts. Prepare a standard set of tools and perform the following sequence of actions:
- Having driven the car into the inspection hole, drain the oil from the transfer case housing.
- Then we disconnect all the cardan shafts from the box.
- Next, we move into the car interior and disconnect the transfer case switch housing from the floor tunnel.
- Remove the cover along with the handle of the gearbox switching lever.
- Next, remove the rubber cover from the lever. If it is cracked or the rubber has lost its elasticity, replace the cover with a new one.
- We move under the car and unscrew the nuts securing the left side airbag to the body, and simply loosen the nuts securing the remaining airbags.
- Disconnect the power wire from the differential lock lamp switch.
- We install a support under the transfer case and unscrew the remaining nuts securing the supports to the body.
- We remove the box from the car.
At this point, the repair work to remove the transfer case on the Niva Chevrolet car has been completed. Make the necessary repairs, then install in the reverse order.
How to change the oil
If you read the regulations, it is recommended to change the oil in the transfer case every forty-five thousand kilometers. The following tools are required for replacement:
- Key for twelve
- Syringe
- Container where you can drain the waste
Once the tool is ready, we begin replacing:
- We unscrew the oil drain plug and drain the waste
- Screw the drain plug back and unscrew the filler
- Using a syringe, fill in new oil to the required level, and at this point the process can be considered complete.