Content
- Purpose of the DRL unit
- Design
- Modifications of the DRL unit
- Installation
- Luminosity comparison
- Video
- DRL unit passport
- Buy
To control lighting devices, we have developed and produced: Mercury headlight controller , Eclipse DRL controller and Prometheus headlight relay
Eclipse DRL control unit the low or high beam of the vehicle's halogen headlights in accordance with the current traffic regulations of the Russian Federation.
LEDs are very promising, but today's cheap versions do not comply with technical regulations. The design of expensive versions of LED, including car headlights, is quite complicated:
Manufacturing instructions
The daytime running lights control unit can be purchased. Or you can make it yourself. Several schemes of various DRL control units are offered - depending on the availability of the element base and the qualifications of the master, you can choose the best option.
Relay based DRL controller
The simplest DRL controller can be assembled on one relay. True, it will only perform basic functions:
- turning on the DRL when the ignition is turned on;
- turning off the lights when the starter is running;
- turning off DRL when turning on the low/high beam headlights, side lights, fog lights (a slight complication may be required).
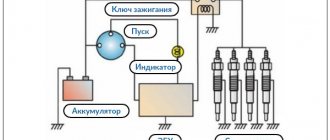
ACC position on the ignition key.
The operation of the controller is tied to the position of the ACC key (accessories) available in the ignition locks of many cars, intended to turn on auxiliary equipment (car audio, cigarette lighter, etc.). The lock has a separate output (a large cross-section wire is connected to it); there is voltage on it when the ignition is turned on, but not when the starter is turned on. This algorithm correlates well with the conditions for turning on the DRL, so it is convenient to use this wire to turn on the DRL.
Relay controller circuit.
When voltage appears on wire A, the relay is activated, the contacts open and the DRLs go out. The connection of this conductor depends on the vehicle's electrical circuit. You can select voltage as a damping signal:
- turning on the fog lights;
- low or high beam;
- dimensions
If the circuit of the car's lighting equipment is constructed in such a way that a separate wire goes to the standard lighting (which then branches), then you can use it. If this is not possible, then there are two options:
- use only one signal to extinguish the DRLs (only high beams, only fog lights, etc.);
- combine all the necessary signals using diodes (using an OR circuit).
In the latter case, the circuit will become a little more complicated - several diodes will be required for the number of signals by which the DRLs should go out.
Connecting a relay to several circuits with diode isolation.
In this scheme, turning on any specified lighting equipment will trigger the relay, open the contacts, and de-energize the DRL.
Important! The use of diodes to decouple circuits is mandatory. In their absence, turning on one equipment will turn on the remaining light sources.
The specific connection points will vary from vehicle to vehicle depending on the network layout and topology. A separate housing is not needed to accommodate this version of the DRL control unit. The relay can be placed in any convenient place. If diodes are needed, they can be soldered directly to the relay coil terminal.
On the comparator
On the Internet you can find a controller circuit on a comparator. Its work is based on monitoring the voltage of the on-board network. When powered by a battery, it is about 12 volts, and when the engine is running and powered by a generator, it is about 13.5 volts. When the voltage crosses the threshold, the comparator will turn the lighting fixtures on or off through a power switch. The switching level is set by a trimming resistor.
Controller circuit on a comparator.
The problem here is that DRL should not turn on when the engine is running, but when the ignition is turned on. But this moment is not monitored in this scheme. But if someone wants to assemble it, they can make it in the form of a module. Electronic components and a connector for connection must be placed on the board and all this must be placed in the case. Preferably metal. Those who have home PCB manufacturing technologies (LUT, photoresist) can design and etch the board. Others can assemble the circuit on a piece of breadboard. The unit is installed in a convenient location and connected according to the diagram.
Performing installation on a piece of breadboard.
Using ATmega8 board
Many motorists themselves develop controller circuits to suit their needs and post materials on the Internet. Here is one of the options on the popular ATmega8 microcontroller. Its use allows you to greatly expand the functionality of the control circuit.
When the ignition is turned on, power is supplied to the board and the controller waits for the engine to start. When a start signal is received, the control circuit checks the operation of one of the turn signals. If at least one turn signal is on, the brightness of the navigation light on the corresponding side is dimmed. The glow level is controlled by pulse width modulation. The inclusion of the low beam is also controlled; the presence of this signal also serves as a reason to turn off the DRL. Turning on the fog lights indicates bad weather conditions, so the DRL brightness, on the contrary, becomes maximum when the low beam is on. If the emergency lights are on, the DRLs flash in antiphase with them. And a very useful function has been implemented - if the ignition is turned off and the low beam remains on, the running lights begin to flash , reminding you that the battery may be discharged.
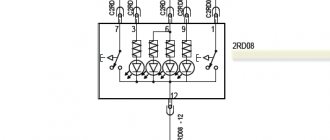
Controller circuit based on ATMega8.
In this case, the controller also does not turn on the lights when the ignition is on, but waits for the engine to start. But this drawback can easily be eliminated programmatically (you can contact the developer with such a request). The connection and assignment of the board contacts to external circuits is shown in the table.
| contact number | designation | Function |
| 1,3 | LED+ | DRL power line (output) |
| 2,4 | VCC | Board power |
| 6 | Lled | Left light |
| 8 | Rled | Right light |
| 5 | lbm | Low beam |
| 7 | fog | Fog lights |
| 9 | Rin | Right turn signal |
| 11 | Run | Signal from generator |
| 13 | Lin | Left turn signal |
| 15 | Ign | Ignition |
| 12,14,16 | GND | Common wire |
You can download the firmware for ATMega here. It is better to assemble the controller on a printed circuit board, and the use of SMD elements will significantly reduce the size of the module. This design is intended for qualified specialists, so it will not be difficult for them to design and manufacture a printed circuit board. Also on the global network you can find many other amateur designs for controlling DRL on other microcontrollers, including the popular “baby” ATTiny13. The functionality of the devices depends on the capabilities of the chip and the imagination of the developer.
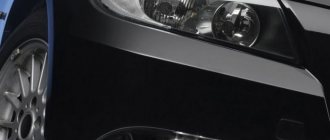
Why do we need DRLs based on standard halogen headlights?
But really, why? There are tons of LED DRLs out there, right?
1. First, let's look at cheap LED DRLs. If we do this carefully, it turns out that they are not suitable for us either in terms of luminosity area or aperture ratio. In addition, most of them have a blue tint, and installing blue light devices on the front of the car entails deprivation of rights for up to 6 months...
2. Let's choose expensive LED-DRLs. The question immediately arises: where to put them to make it beautiful? Of course, they are installed on any car, but there is often no regular place for them. And the front part of any car is a carefully crafted design work; installing additional elements will very likely destroy the image of the car. We ourselves see on the road how ridiculous an oncoming expensive car with a Chinese garland looks...
3. Price. Let us find a worthy place to install expensive LED-DRLs. But the installation itself requires several standard hours in a car service center. Which is also not cheap.
4. Installing a DRL controller based on standard headlights does not change the design of the car and is much easier to implement. In the same car service, this is 0.5 standard hours.
The version of the high beam headlights glowing at a quarter power (mechanical re-switching of the lamps in series) is the most common version of DRLs in the world with wiring installed in this way as standard. But doing this electrical wiring “from scratch” takes several standard hours...
A special feature of Eclipse DRL control unit smooth control of the power of halogen lamps.
The DRL control unit can be installed on any types of Russian and foreign cars.
For this purpose, the DRL unit contains universal inputs and outputs. The headlights in these cars can be permanently connected to both ground and battery power. The DRL unit can be turned off by either low or high voltage levels. Most parameters of the DRL unit can be changed by the user without the use of any additional equipment.
Compared to common car light delay timers, the Eclipse DRL unit has lamp power adjustment and a lot of additional features.
Purpose of the DRL unit
- Ease of use with DRL unit. The car's daylight switches on and off automatically , thereby eliminating the driver's forgetfulness. The Eclipse DRL control unit will pay for itself on the first fine saved for turning off the headlights. When installing the DRL unit on the main beam of the headlights, glare of oncoming traffic is eliminated, and at the rear, the brake lights become much more visible, since there is no illumination from the dimensions.
- The DRL unit saves the life of halogen lamps. Smooth switching on and full-heat operation dramatically increase the service life of halogen lamps. Switching to the standard switching on of low or high beam also occurs on already warmed up lamps and the likelihood of lamp burnout is significantly reduced compared to a “cold” switch on from the standard headlight relay. There is a widespread belief on the Internet that sharp shock heating with halogen is beneficial. This opinion was formed by advertising articles of lamp manufacturers, but if you read these articles carefully, then they talk about turning off lamps and the processes of crystallization-hardening of filaments associated with cooling.
- Fuel economy. Reducing the power consumption of lamps and turning off “extra” side lights leads to a reduction in the load on the generator and a reduction in fuel consumption. The specific value is not so important, at least it is an extra tank of gas for the year. And, by the way, what is important(!), at idle with the DRL unit on, the battery is charging, but with full low beam, the battery is discharged!
Chinese running light controllers
Due to their diversity and low cost, goods from China have flooded the market in Russia and the CIS countries. DRL controllers were no exception. On the popular website AliExpress.com you can find several options for control units for daytime running lights, which have a pleasant price tag and many positive reviews. But let's figure out if everything is really so good.
Compliance with operating mode
On AliExpress you can find about 7 types of car daylight control modules. The first four work automatically.
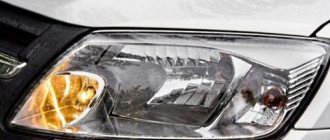
According to the product description, the first option shown in the photo connects directly to the car’s battery and automatically turns on when the engine starts and turns off approximately 15 seconds after it stops.
The next three Chinese control units have the same connection and operating principle, but they turn off the DRLs with a delay of about 30 seconds. There is also an additional control wire that connects to the positive wire of the headlight lamp. When the dimensions are in operation, the running lights are dimmed to approximately half their maximum brightness.
According to the latest edition of UNECE Regulation No. 48, fog lights, low and high beam lamps must only operate with the side lights on.
The most expensive option has a more complex connection - in addition to the power wires from the battery and the plus from the marker lamp, you need to connect an additional wire to the plus of the ignition switch. Additional features include the ability to connect DRL headlights with built-in turn signals and the implementation of strobing by daytime running lights when a sound signal is given.
When the low or high beam is on, the DRLs here also do not turn off, but are dimmed by about half.
The manufacturer claims voltage stabilization built into the control unit at 12 volts, but according to measurements and customer reviews, it is not available.
There is also a version of this DRL controller on sale with a remote control for strobe mode.
Important! According to Part 4 of Article 12.5 of the Code of Administrative Offenses of the Russian Federation, driving a vehicle on which devices for sending special light or sound signals (with the exception of security alarms) are installed without appropriate permission - entails deprivation of the right to drive vehicles for a period of one to one and a half years with confiscation of the specified devices.
What conclusions follow from the above? Firstly, when the low or high beam is working, the DRLs should go out completely, and not dim. Secondly, the DRLs should turn off immediately, without delay. That is, all options do not comply with the requirements of UNECE Rules No. 48 and GOST R 41.48-2004 and cannot be used in a car.
The next three options do not operate in automatic mode - control is carried out manually, which immediately contradicts the requirements of the operating mode.
In addition to the points described above, all 7 varieties do not have voltage stabilization.
Build quality
There is not much to say about the quality of Chinese DRL control modules - it fully corresponds to the price. The cheapest options use the cheapest possible components. If you take the best-selling sample, you will immediately notice two things:
- very thin, short and flimsy wires;
- lack of protection from moisture.
If you look closely at the device's board, you can find flux residues and the absence of protective diodes.
In more expensive models the situation is a little better, but still far from acceptable.
Where do the rave reviews come from?
There is nothing unusual here. Most buyers leave feedback immediately upon receiving the product, just for the fact of receiving it. Some buyers quickly check the product and also leave a good review. And only a small category of people leave a review some time after actually using the product. If the product breaks, then, as a rule, no one writes additional reviews.
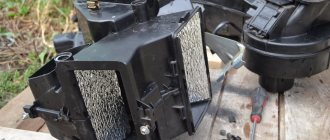
Installation of the DRL control unit
You can find out which wire to the headlight is connected by the standard system as follows. With the headlight off but the ignition on, you need to use a tester to measure the voltage at any of the headlight terminals relative to ground. If the tester shows +12V, then the headlight is switched with a ground wire. If it shows 0V, then the “positive” wire.
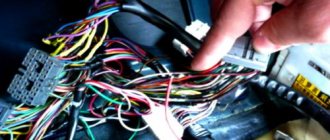
Wires connected to the Eclipse-A DRL control unit
- “+12V” wire, power supply for lamps connected to ground. It can be connected either directly to the battery (via a fuse, of course) or after the ignition switch. When the ignition is turned off, there is practically no current through this wire.
- “Ignition” wire, low-current power supply to the device itself and information about the fact that the ignition is turned on.
- The ground wire, the low-current power supply of the device itself, is always connected first during installation and disconnected last.
- Wire “on”, input signal, for example, about a running engine (“oil pressure” or “generator bias”). If you do not want to use this wire, it can be combined with the ignition wire.
- Two “off” wires, allowing the DRL to operate at a high level (by supplying a “plus”), and two “off” wires, allowing operation at a low voltage level (“ground”). It is convenient to connect these inputs to signals indicating that the car is parked (“handbrake”), or that the headlights are turned on normally. You can use other connection points or not connect them at all, except for one.
More information about the Eclipse DRL can be found in the Passport
Examples of installation diagrams for the DRL unit (Priora, Honda, Suzuki, Kia, Honda):
A little about the operating mode
According to the latest edition of UNECE Regulation No. 48, daytime running lights must turn on automatically when the vehicle engine is started and automatically go out when the vehicle is switched off. Also, the DRLs should automatically go out when the low or high beam headlights are turned on. The DRL control unit must satisfy these requirements first of all.
An important point that should be present in the DRL module is voltage stabilization at 12 volts. The fact is that the vast majority of running lights do not have a full-fledged current stabilizer. The current on the LEDs is limited using resistors, which, due to constant voltage drops in the vehicle's on-board network, are unable to limit it to the same level. Hence the appearance of “diseases” in the form of flickering and premature failure of navigation lights.
Thanks to the voltage stabilizer, using resistors, you can limit the current of the LEDs to the same level and significantly extend their service life.
Comparison of the luminosity of the high beam, Eclipse DRL (30%) and low beam:
| High beam | DRL "Eclipse" (30%) | Low beam |
Switching high beam headlights by changing the standard electrical wiring.
Almost all American and Scandinavian cars come with standard wiring, which allows a toggle switch (relay) to switch the high beam lamps from a parallel connection to a serial one. When turned on, the power of the lamps is approximately a third of the standard one.
In principle, nothing prevents us from modifying the wiring in our cars. Only in this case the standard wiring changes, at least slightly.
Normally the high beam headlights (DH) are connected like this:
The wiring from the mounting block can be either in separate harnesses or in one common one:
In both cases, a relay is inserted into the ground wire of one of the lamps, which, when turned off, switches the lamp instead of ground to “plus”. The relay is triggered either by the voltage of the dimensions, or by the total signal from the DS and BS.
For the first case, this one relay will be enough. But the circuit is bad in that it leaves the standard light relay attached. Often you can’t do this; you need to study the car’s electrical circuit.
In the second case, it is better to use three relays (or one for three contact groups), two of which disconnect the headlights from the standard light relay. This option is electrically safe for standard equipment. It is also applicable in the first case, but there the relay will have to be placed in two places and connected with an additional wire, and this greatly increases the cost of installation.
In any case, updating the electrical wiring takes a couple of standard service hours.
What is DRL controller?
DRL controller (or DRL controller)
is a device that automatically turns on the car's headlights.
The DRL controller only turns on the headlights. The side lights, license plate and instrument lights do not turn on. When the side lights are turned on (at night), the DRL controller stops working. Also, using the DRL controller, you can set the brightness of the light bulbs. Reduced brightness reduces the load on the generator, thereby saving fuel and having less impact on vehicle dynamics.
[Sometimes the “dRL controller” is understood as a device that controls the operation of additionally installed DRL headlights. All DRL controllers presented on our website do not require the installation of additional optics. Our controllers connect directly to standard halogen high or low beam lamps, or to fog lamps ].