Home » VAZ repair
Reading time: 3 minutes. Updated 08/04/2019
Car seats in all cars are primarily designed to carry passengers, thanks to their special anatomical shape and softness. However, the rear seat in tandem with the trunk can also be used as a place for transporting large cargo and other things. In this article we will take a detailed look at the design of the rear seat and the procedure for dismantling it to increase space and cargo.
Purpose and design of the rear seats
The voluminous design in the form of a wide cushion for seating and a backrest with soft filling provides all passengers with a comfortable position in it.
These elements are very rigidly fixed inside the cabin, and the profile, rigid frame on the back is not only designed to increase elasticity, but also to hold the padding inside it. The backrest can be folded, increasing the space in the rear of the car.
Headrests
The rear seats are equipped with another element that is responsible for the comfortable position of passengers in the cabin - head restraints . There are two of them in the back seat, and they are installed on the left and right sides, which allows them not to interfere with the driver’s view in the rearview mirror.
To make it easier to unfold or dismantle the chair, you must first remove the headrests, adjusting their position with special pins.
This is what the headrests on a Niva Chevrolet look like.
Sound insulation of the trunk Kalina 2 (VAZ 2192, 2194)
At the moment, the new Kalina is available in two versions: hatchback and station wagon. These body types are very practical, but they also have a drawback - noise, because the trunk is essentially located in the car's interior. To improve sound insulation, it is proposed to make sound insulation for the trunk of Kalina 2 with your own hands.
Car soundproofing technology is the same for all brands and types of cars, however, specific cases have their own characteristics. In the case of the Lada Kalina 2, the whole process begins with removing the trunk trim and tailgate trim, which does not cause difficulties. Next, the entire surface should be cleaned and degreased with White Spirit.
The first layer of trunk sound insulation is vibration isolation material. It is recommended to start installing sound insulation from the rear arches; it is through them that the main noise from the road is transmitted. To soundproof arches, it is recommended to use material with the highest vibration absorption coefficient, for example, 'Bimast Bomb'. We cut sheets of a suitable size (the larger the pieces, the better), and heat the bitumen side with a hairdryer. We apply the material to the cleaned metal of the body and roll it out with a hard (plastic/iron) roller. Glue the next sheet of vibration isolator overlapping or at the joint
After this, we move on to soundproofing the horizontal surface of the trunk, paying special attention to the part where the muffler resonator passes (for Lada Kalina 2 this is the left side)
The second layer is sound-absorbing material. Most often, due to its availability and low price, SPLEN (a largely thermal insulating material) is used, but we recommend that you use an accent. Both materials have a self-adhesive base, so their installation will require significantly less time. We glue 100% of the surface, joint to joint. The only exceptions are technological openings (openings for interior ventilation).
The trunk lid of Kalina 2 must also be soundproofed. Unlike the trunk, you should use a lighter material for vibration isolation, for example, StP Aero. We glue the material between the stiffeners. We set the accent on top in the same way.
Fighting squeaks and crickets
It is worth paying special attention to the sound insulation of the rear shelf. To prevent it from making squeaks, you should stick an anti-squeak (modelin) on all rubbing surfaces, for example, places where the trunk shelf is attached, the fifth door trim, etc.
The soundproofing of the trunk of the Kalina 2 hatchback is completed, we carry out the assembly in the reverse order. The station wagon trunk is treated in a similar way.
It will take one working day to soundproof the trunk, as well as:
- On the trunk shvi there are 8 sheets of 'Bimast Bomb' (0.53*0.75m) and 2 accent sheets (1.0x0.75m)
- On the trunk lid there are 2 sheets of Vibroplast and 1 sheet of accent.
The effect of sound insulation is significant; firstly, the exhaust pipe becomes less audible. Secondly, it became almost inaudible how the rear suspension worked. And also, if you have tuned the trunk of Kalina and installed a subwoofer there, then soundproofing the trunk is required!
Remember that the best sound insulation is when a set of works has been carried out aimed not only at insulating from external noise (noise from wheels, wind, etc.), but also eliminating creaks and crickets inside the car.
Rear seat removal process
It may be necessary to dismantle the rear seats for several reasons, such as the need to replace some parts, modernize them, install covers, or reupholster the seats in general.
Step-by-step removal procedure
- Open the trunk door and remove the rubber mat.
Trunk mat and trunk itself on Niva Chevrolet.
Removing Priora seats
Operations carried out when removing and installing the rear seat on a VAZ 2170 2171 2172 LADA Priora (Lada Priora). Hatchback and station wagon
- In these types of bodies, the sofa is divided into two parts; each part is attached to two hinges, which are screwed to the body with an M6 bolt with a 10mm head.
- To dismantle you need to pull the loop and open the lock securing the sofa. Then unscrew the 4 bolts and remove both parts of the sofa from the hinges.
READ Mazda 3 rear wheel bearing replacement
Sequence of operations when removing and installing the rear seat on a VAZ 2170 2171 2172 LADA Priora (Lada Priora)
Press the seat cushion lock handle...
...and lift the edge of the pillow.
Similarly, release the 2nd edge of the cushion... 4. ...and remove the seat cushion. The photo below also shows the rear seats from the luggage compartment side of the LADA Priora hatchback and station wagon. For these cars, all operations are similar.
How to fold out the rear seats on a Chevrolet Niva
If from all of the above it became clear to you that the entire seat can be easily removed from the interior, it can also be simply unfolded.
In order to do this, you need to find a special lock that holds it in a locking position, pull the loop and release the lock. However, before this, make sure that there is free space under the backrest; to do this, we slightly raise the backrest and move it straight to the front seat, and the backrest simply reclines, thereby providing free space for transporting all kinds of cargo.
Adjusting the front seats of the car
longitudinal: to adjust, pull the lever under the seat up. Move the seat, release the lever.
Note to the driver. Do not adjust the seat while the vehicle is moving. Even the slightest jerk with your hand will provoke an accident.
vertical : adjustment with the handle located on the left side of the seat. By rotating your hand, you select the most optimal position for the backrest.
conclusions
To sum up all of the above, we can confidently say that in order to make more space in the back seat of a Niva Chevrolet, you don’t need much experience, the main thing is to carefully read our article.
I often have to go on business trips for work, but it’s not always possible to rent a room or a hotel room, so I often have to spend the night in the car. But sleeping in a Chevrolet Niva is not very comfortable, because the seats do not fully recline. In the morning my back hurts as if I had been loading cars all night. But to finalize it, we only need five minutes of time, no more. I tried to sleep on the back sofa, but it’s the same story, you have to bend over backwards, so you can’t get enough sleep.
At first I wasn’t happy with the heating in the car, it was using a lot of gasoline, but it was of little use, and it was still cool in the car. I completely changed all the seals, then changed the thermostat, then replaced the heater radiator. Now we need to modify the seats. For work we need a regular cutting board. However, my wife refused to give it to me, because then she would leave me without breakfast, lunch, and, at the same time, without dinner. So we buy a new cutting board.
After this, we move the seats as far forward as possible and remove the headrests. After this, we lower the back of the seat along the board, and at the same time raise the chair cushion. What else? And nothing else is needed, the modification of the front seats is completed, you can immediately experience the result for yourself.
We also don’t leave the rear sofa without attention. We take a 13-size wrench plus a screwdriver with a reversible head, onto which we place the 13-size head. If you don’t want to suffer in the future, then I recommend replacing the regular nuts with wing nuts, so that later you don’t need a wrench, you can unscrew them with your bare hands.
Priora - analogues of heated seats. Installation of standard seat heating on LADA Priora
The set of standard seat heating for Priora should include:
- Heating elements (4 in total, two for each seat);
- Block for the control unit with wires;
- Priora seat heating unit.
With all this, the article number for heated seats for LADA Priora must certainly contain the numbers 2170 - this, as any Priora owner understands, is the model number. It is worth distinguishing the standard heating set for Priora 2 by catalog number - they are different in comparison with the set for Priora 1. It is better to outline the entire installation of heated seats on a Priora using a detailed step-by-step method, which has been tested by time and by other car owners:
- We remove the front seats. Remove the factory covers from the seats, which are secured with an iron spoke and 3 plastic latches. You can disassemble the seats without dismantling them, removing only the covers, but then the process will be a little more complicated - it will be awkward to deal with the wiring and laying out the heating parts;
- We attach heating elements to the seats - one on the lower part, the second on the backs, in the lumbar area. Some people recommend strengthening it with double-sided tape, but over time it can come off. It would be safer to sew the heating element to the pillow so that it does not move out of its place;
- Pull the wires from the heating parts through the hole in the mount under the cushion (run the wires from the lumbar heating parts to the place where the seat upholstery is attached). The piece of wire that passes through the hole can be protected from chafing using some kind of plastic tube. The power plugs for all 4 parts are out, all that remains is to connect them;
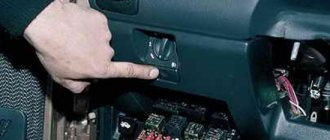
- Disassemble the central tunnel. Buttons for heated seats will be in place of the plug near the handbrake;
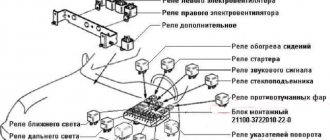
- The wiring is connected strictly according to the seat heating connection diagram. Before doing this, it is recommended to disconnect the battery from the network. We install a terminal block to the heating control unit. The dark-colored (-) wire is attached under the bolt near the handbrake. A gray-red wire (for aesthetes, it is responsible for illuminating the buttons) is connected to the lighting of the cigarette lighter rim. A reddish 12V wire is pulled to the mounting block. You can't do without a fuse. Then everything goes strictly “by the numbers”. Connect pin 87 to the reddish wire, pin 86 to the black wire. Connect the blue-black 12 V wire to pin 85, the pink wire to pin 30. You can connect to the mounting block through cut-in clamps so that the wires are held tighter;
- Assemble the tunnel back, install covers on the seats.
READ Replacement Rear Wheel Bearing for Kia Rio
The standard seat heating on Priora is guaranteed to last for several seasons if it is connected correctly. And if the heating does not work immediately after installation, it means the wiring connection was incorrect.
Chevrolet Niva | Reclining seats | Chevrolet Niva
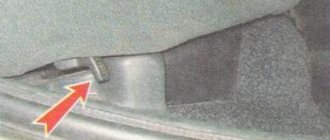
Niva Chevy. The lock of the rear seat back is jammed. Disassembly
In order to do this, you need to find a special lock that holds it in a locking position, pull the loop and release the lock.
On a Chevrolet Niva, the rear seat is a removable structure consisting of a backrest and Important!…
To disassemble them, you need to pull the latches. This circumstance allows you to freely use the work, while respecting personal non-property rights - the right of authorship, the right to a name, the right to protection from any distortion and the right to protect the author's reputation - since these rights are protected indefinitely.
As a rule, they have an L-shape, which allows you to select the optimal height position and, when recessed, are almost completely hidden without obstructing the driver’s view.
Video instructions: how to fold out the rear seat of a Chevrolet Niva
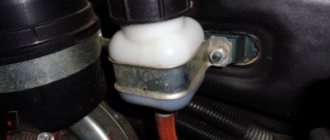
Owners of Niva Chevrolet from time to time complain about such an unpleasant situation as the failure of the backrest lock. Despite the fact that the price barely exceeds rubles, a breakdown at the most inopportune moment will leave the most unpleasant sensations. Therefore, it is sometimes worth paying increased attention to this part, and at the slightest sign, replace it, and this is done as follows: The old lock must be dismantled, having first unscrewed two bolts from its body.
Next, loosen its clamps and remove it from its seat. We insert the new part in the same order as removal. Conclusions Summarizing all of the above, we can say with confidence that in order to make more space in the back seat of a Chevrolet Niva, you don’t need much experience, the main thing is to carefully read our article.
After this, using a 8 key, unscrew the rear seat fastenings.
Shniva. How to organize a sleeping place in a Chevrolet Niva. Chevrolet Niva.
Then the bolts of the slide located in the middle part are unscrewed. A spring washer will be located under it. After this, you can remove the seat from the passenger compartment and, if necessary, dismantle or repair the front slide of the Chevrolet Niva. In order to remove the slide, you need to unscrew the bolt that secures it to the seat. Now you can unscrew the rear bolt securing it to the seat. If necessary, the slides can be lubricated or replaced with new ones.
The rear seatbacks fold forward to provide additional cargo space and access to the luggage compartment.
• To fold the rear seatback(s), pull the release lever, then fold the seatbacks forward and down.
• To the normal position, the backrest should be lifted and pulled until it clicks into place.
If the back of the chair is fixed in a vertical position, the red part of the button will be recessed.
• With the backrest back in place, adjust the rear seat belts for subsequent use by rear seat passengers.
4 Door (if equipped)
1. Pull out and position the front seat upright in the forward position.
2. Lower the head restraint to its lowest position.
3. To retract the rear center seat belt, press the belt release button (B) located on the latch with a key or similar small hard object. Pull the seat belt (A) up and release until it retracts automatically (4-door version, if equipped).
4. Pull the lock release lever (1). If the back of the chair is unlocked, the red part(s) of the button will appear.
5. Move the rear lap/shoulder belt outward (2) so that it does not interfere with the lowering (3) of the seatback.
6. With a confident movement, fold the seat backs forward and down (4).
5 Door (if equipped)
1. Pull out and position the front seat upright in the forward position.
2. Lift the front of the seat cushion (1) up.
3. Lift the back of the seat cushion up (2).
4. Move the seat cushion (3) firmly.
5. Remove the head restraint and insert the head restraint support pins into the holes in the rear of the seat cushion (4).
6. Pull the lock release lever (5).
7. Fold the seat back firmly forward and down (6).
1JBA3507
NOTICE: If you fold down the rear seatbacks or place luggage on the rear seat cushion, insert the buckle into the pocket located between the rear seatback and the rear seat cushion. This prevents the buckle from being crushed under the weight of the backrest or luggage.
WARNING Passing the seat belt webbing through the rear seat belt guides will help prevent the belts from getting caught behind or under the seats. When returning the rear seatbacks to the up position, be sure to return the rear shoulder belts to the appropriate position.
To expand the rear view:
1. Move the rear lap/shoulder belt (1, if equipped) sideways until it is clear of the seatback.
2. Lift and firmly push the seatback back until it clicks into place (2).
3. Move and firmly push down the headrest and seat cushion until they reach the desired position (5 Door, if equipped).
4. Return the rear seat belt to the appropriate position.
WARNING • If you return the rear seatbacks to their original position, be sure to also ensure that the shoulder seat belts are positioned correctly.
• Do not remove the mat from the floor because the exhaust pipe located under the floor is hot.
WARNING—Cargo Loads should always be secured to prevent them from being thrown around the vehicle in the event of a collision that could result in injury to vehicle occupants.
WARNING • When loading or unloading cargo, make sure the engine is off, the transmission is in P, and the parking brake is off. The vehicle may start moving if the gearbox is accidentally switched to a different position.
• Be careful when loading luggage through the rear seat to avoid damaging the interior of the vehicle.
• After loading luggage through the rear seat, make sure it is securely secured to prevent it from moving while driving. Unsecured cargo inside the vehicle can cause damage to the vehicle or injury to passengers.
Installing the headrest, armrest (if equipped)
Installing the headrest Height adjustment The headrest not only provides comfort for the driver and passenger, but also serves to protect the head and neck in the event of an accident. To raise the headrest...
Rear seat - Armrest, headrest
Armrest (if equipped) The armrest is located in the middle of the rear seat. Pull the armrest out of the rear seat. Installing the headrest (if equipped) Setting the height Headrest...
Other on the site:
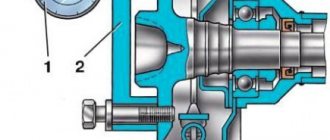
Removing the drive shafts PERFORMANCE ORDER During assembly, you will need a new hub nut, as well as a replacement nut for the ball joint pinch bolt of the lower suspension arm.
1. Remove the decorative wheel hub/wheel cap, with... Starting from an external battery (“lighting up”) If the battery is low, you can use the battery of another car to start the engine. Any wrong action will result in battery explosion, injury and failure. Moreover, elect...
Replacement of muffler assemblies (resonator or muffler) Marks on the muffler pipe 1 – muffler pipe; 2 – resonator; 3 – connecting sleeve; A, B, C – marks on the pipe The muffler assembly is a non-separable unit, but if necessary it can be ...