Removal on VAZ 2110 cars
1. We prepare the car for repair work.
2. Having opened the rear door of the car, use your finger to move the handle of the right lock of the rear seat cushion back.
. and slightly raise the right edge of the pillow up.
3. Similarly, release the left edge of the seat cushion.
4. Move the pillow forward a little, bringing its rear edge out from under the back of the seat and remove the pillow.
5. By pressing the buttons of the two headrest clamps, lift it up and remove it from the backrest section.
6. By pulling the loop, we release the upper part of the backrest section and move it forward as far as the trunk trim allows.
7. Detach the trunk trim from the rear seat back section.
8. Lifting the back section up, remove its loops from engagement with the floor hooks.
. and remove the rear seat back section from the car.
9. Remove the right section of the seat back in the same way as the left.
10. Using a 10 mm socket wrench, unscrew the two nuts securing the armrest hinges to the body.
11. Remove the armrest.
How to remove the rear backrest on a VAZ 2110
The rear seats on VAZ 2110, 2111 and 2112 cars are slightly different in their mounting design, so the procedure for removing them will also be different. In this example, the 2110 will be considered, since I had this particular machine on hand.
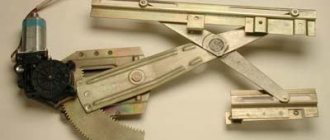
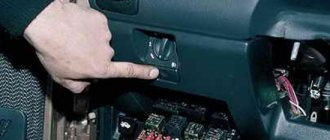
So, the first thing you need to do is remove the lower part of the “sofa”. To do this, on both one and the other side from below, you need to move a special lever to the side and move the seat.
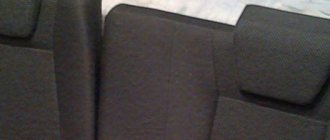
The final result on one side is shown in the photo below:
On the other hand, everything is done in the same way, so there is no point in considering everything separately.
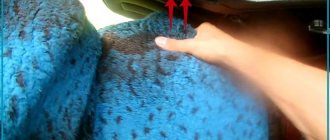
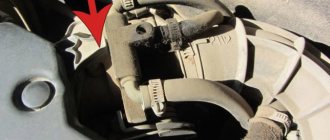
Regarding the back, everything is also quite simple. The first step is to pull the loop up to open the lock:
And at the same time we move the back forward, as is clearly shown below.
And to finally remove the back, lift it up a little, thereby removing it from the lower hinges:
The second half of the backrest is removed in the same way.
Now all that remains is to remove the armrest, which is attached separately from the backrests. To do this, you need to unscrew one screw attaching to the brackets from below, on both one side and the other:
There should be no problems with the installation, since everything is done in the reverse order.
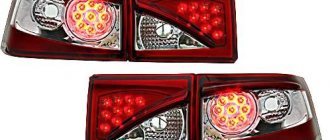
If for any reason you need to replace the rear vision on a VAZ 2110, then it’s worth talking about the cost of these parts. The price of a new set of seats is about 5,000 rubles - this is the back row assembled.
Note. On VAZ 2110 sedan cars, the rear seat consists of a cushion, a two-section backrest with an armrest built into it and two removable headrests.
Removal on VAZ 2110 cars
1. We prepare the car for repair work.
2. Having opened the rear door of the car, use your finger to move the handle of the right lock of the rear seat cushion back.
. and slightly raise the right edge of the pillow up.
3. Similarly, release the left edge of the seat cushion.
4. Move the pillow forward a little, bringing its rear edge out from under the back of the seat and remove the pillow.
5. By pressing the buttons of the two headrest clamps, lift it up and remove it from the backrest section.
6. By pulling the loop, we release the upper part of the backrest section and move it forward as far as the trunk trim allows.
7. Detach the trunk trim from the rear seat back section.
8. Lifting the back section up, remove its loops from engagement with the floor hooks.
. and remove the rear seat back section from the car.
9. Remove the right section of the seat back in the same way as the left.
10. Using a 10 mm socket wrench, unscrew the two nuts securing the armrest hinges to the body.
11. Remove the armrest.
Installation
We install the armrest, rear seat and all previously removed parts on the car in reverse order.
Removal on VAZ 2112 and VAZ 2111 cars
On VAZ 2112 hatchback cars and VAZ 2111 station wagon, the rear seat cushion and backrest are divided into two parts in a ratio of 1/2. Any part of the pillow or backrest can be folded independently of the second part. Both parts of the rear seat backrest are equipped with head restraints. All elements of the rear seat can be removed independently of each other.
1. We prepare the car for repair work.
2. By pulling the loop, we fold the right side of the seat cushion forward.
3. Using a 10 mm spanner, unscrew the two nuts securing the hinges of the right side of the pillow to the floor and remove it.
4. Similarly, remove the left side of the seat cushion.
5. Using a 13 mm socket wrench, unscrew the two lower nuts securing the hinges on the right side of the backrest.
6. Raise the locking lever on the right side of the backrest up.
7. Fold the seat back forward.
8. Using a 13 mm socket wrench, unscrew the nut (1) and bolt (2) of the upper fastening of the hinges on the right side of the seat back.
9. Remove the right side of the rear seat back.
10. Remove the left side of the backrest in the same way.
Installation
We install the rear seat and all previously removed parts on the car in reverse order.
(Ku - all other words, short Patsa-Chatlan dictionary)
Monday, November 21, 2021
Removing the backrests of the rear seats on a VAZ 2110 when the loop got inside the backrest.
(photo blatantly stolen from the Internet).
If the loop gets between the seat back and the lock, the task of removing the back is greatly complicated, because It is not easy to pull it out when the backrest is clamped. There are at least two ways to solve this problem:
- use a wire hook to pry the loop from the interior and pull it up (I was not able to do this);
- From the trunk, examine the lock mechanism through the gap between the backrest and the car body element, and use a screwdriver to press (the direction of force is towards the roof of the car) on the lever to which the hinge is attached.
Removal on VAZ 2112 and VAZ 2111 cars
On VAZ 2112 hatchback cars and VAZ 2111 station wagon, the rear seat cushion and backrest are divided into two parts in a ratio of 1/2. Any part of the pillow or backrest can be folded independently of the second part. Both parts of the rear seat backrest are equipped with head restraints. All elements of the rear seat can be removed independently of each other.
1. We prepare the car for repair work.
2. By pulling the loop, we fold the right side of the seat cushion forward.
3. Using a 10 mm spanner, unscrew the two nuts securing the hinges of the right side of the pillow to the floor and remove it.
4. Similarly, remove the left side of the seat cushion.
5. Using a 13 mm socket wrench, unscrew the two lower nuts securing the hinges on the right side of the backrest.
6. Raise the locking lever on the right side of the backrest up.
7. Fold the seat back forward.
8. Using a 13 mm socket wrench, unscrew the nut (1) and bolt (2) of the upper fastening of the hinges on the right side of the seat back.
9. Remove the right side of the rear seat back.
10. Remove the left side of the backrest in the same way.
How to lower the back seat on a VAZ 2112
The rear seat of the VAZ-2111 and VAZ-2112 cars is made of two parts: the right part is a folding single seat, the left part is a folding double seat.
By folding the left or right side of the seat, you can significantly increase the volume of the luggage compartment. 10.6. Rear seat: 1 – hinge; 2 – belt; 3 – pillow; 4 – back; 5 – back lock handle; 6 – lock retainer
To fold the seat, pull the belt 2 (Fig. 10.6) and lift the cushion 3 to a vertical position. Remove the head restraints, pull up handle 5 and unlock the backrest fastening lock 4. Lower the backrest horizontally.
To remove the rear seat you will need a 10mm wrench.
1. Fold down the seat cushion.
2. . and, unscrewing the hinge fastening nuts, remove the pillow.
3. Release the seatback latch (as when folding it).
4. . and, having unscrewed the four nuts securing the hinges to the body, remove the seat back.
5. Remove the second half of the seat in the same way.
6. Install the parts in the reverse order of removal.
Reference manual for servicing VAZ, LADA 110 cars.
Ignition adjustment 2110. Engine compression for VAZ 2112, immobilizer for VAZ 2111. Valve cover for VAZ 2112, cylinder block gasket for VAZ video. The cost of a generator for a VAZ. replacement of fuses for VAZ 2112, design of the oil receiver for VAZ 2112. oil recommended by the factory for the box of VAZ 2112. replacement of the water pump (pump) for VAZ 2112. Replacement of valve stem seals for VAZ 2110.
The rear seats on VAZ 2110, 2111 and 2112 cars are slightly different in their mounting design, so the procedure for removing them will also be different. In this example, the 2110 will be considered, since I had this particular machine on hand.
So, the first thing you need to do is remove the lower part of the “sofa”. To do this, on both one and the other side from below, you need to move a special lever to the side and move the seat.
The final result on one side is shown in the photo below:
On the other hand, everything is done in the same way, so there is no point in considering everything separately.
Regarding the back, everything is also quite simple. The first step is to pull the loop up to open the lock:
And at the same time we move the back forward, as is clearly shown below.
And to finally remove the back, lift it up a little, thereby removing it from the lower hinges:
The second half of the backrest is removed in the same way.
Now all that remains is to remove the armrest, which is attached separately from the backrests. To do this, you need to unscrew one screw attaching to the brackets from below, on both one side and the other:
There should be no problems with the installation, since everything is done in the reverse order.
If for any reason you need to replace the rear vision on a VAZ 2110, then it’s worth talking about the cost of these parts. The price of a new set of seats is about 5,000 rubles - this is the back row assembled.
website about repair and tuning of your favorite cars
How to remove and install the rear seat on a VAZ 2110, 2111, 2112
Photo and video materials on how to independently remove the rear seats on a VAZ 2110, 2111, 2112 car.
Withdrawal procedure
1. First of all, you need to climb into the trunk and unfasten the upholstery buttons from the back of the rear seat.
2. Pull the loop and unfasten the back latch.
3. Take and remove the backrest hooks from the brackets on the body and remove it.
4. Now take a screwdriver and unscrew the 3 screws that secure the armrest frame to the body.
5. Take the head for ten and unscrew the 2 nuts securing the armrest to the body of the ten.
6. Now you can remove the armrest and plastic frame.
7.Press the latches on both sides of the seat cushion and remove it.
8. Using a screwdriver, unscrew the screw securing the seat cushion lock.
9. Remove the lock
10. After dismantling the threshold cover, you can also remove the base of the lock.
11. To remove the base, take the 10mm head and unscrew the 2 fastening nuts.
Seat removal video:
How to remove the rear seats on a VAZ 2110 and 2112? When you really need it
Before removing the rear seats on the VAZ 2110 and 2112, check all the nuances of this work.
This is not difficult to do, but it has its own peculiarities. Although this model is the progenitor of several models, from 2111 to Lada Priora, it still differs from its brothers in some elements. True, not too much. At one time, the Ten was positioned as a completely modern car. For the first time, a carburetor with automatic choke and many other new products were used on domestic cars. How to remove the rear seats on a VAZ 2110 and 2112 is a question often asked by the owners of this car. The design of the seats and their fastenings is as simple as possible, but at the same time reliable. This allows you to remove the seats at the right time. At one time, entrepreneurs who used the car for work pulled out the seats when they needed to travel for goods. After which they were easily and quickly put back.
How to remove the rear backrest on a VAZ 2110
- Lada Largus
- VAZ-2110
- VAZ-1118 Kalina
- VAZ-2106
- VAZ-2108
- VAZ-2121 Niva
- VAZ-2123 Niva
- VAZ-21090 Granta
- VAZ-2192 Kalina 2
- Lada XRAY
- VAZ-2180 Vesta
- Chevrolet Lanos
- Chevrolet Aveo
- Chevrolet Lacetti
- Chevrolet Cruze
- VAZ-2107
- VAZ-2170 Priora
- VAZ-2109
- VAZ-2112
- VAZ-2101
- Renault Sandero
- Renault Logan
- VAZ-2191 Granta
- VAZ-11196 Sport
- VAZ-2131 Niva
- VAZ-1117 Kalina
- VAZ-2113
- VAZ-1119 Kalina
- VAZ-2114
- VAZ-2111
- VAZ-2103
- Daewoo Matiz
- Datsun on-DO
- Chevrolet Captiva
- VAZ-2105
- VAZ-2104
- Bumper
- Bolts
- Silencers
- Engine
- Body parts
- Harnesses
- Foreign cars
- Transmission
- Light bulbs
- Motor oil
- Hardware
- Optics
- Plastic
- Bearings
- Gaskets
- Other
- Radiators
- Transfer case
- Rubber products
- Glass
- Clutch
- cable
- Tuning
- Filter
- Electrical equipment
- Electrical equipment
The front seats have to be removed to install covers, additional sound insulation on the floor and other modifications. The rear seat can also be removed to gain access to the fuel pump. Let's look at the process of replacing seats on the Lada XRAY crossover/hatchback.
FRONT SEATS Everything is the same as on other Lada models, only we unscrew the fastening bolts with a Torx T40 wrench (asterisk).
- Unscrew the two bolts (No. 1) of the front fastening, move the seat as far back as possible, pulling the lever (No. 3) up;
- Unscrew the two bolts (No. 1) of the rear mounting, moving the seat forward all the way.
Remove the front seats by disconnecting the block from the heating wires.
REAR SOFA AND BACKrest Remove the sofa by tilting it forward, removing the bracket (No. 4).
Unscrew the bolts (No. 4 and 9) of the rear seat backs using a 16mm wrench. Loosen the bolt (No. 5 and 8) using a 17 key;
Press the folding latch, slide the bracket back, remove the bolt head through the hole and remove the seat back.
Removal
Disassembly should begin by loosening the backrest upholstery.
. It is secured using buttons located on the side of the trunk. Next, pay attention to the seat. First, the pillow lock handle is moved to the right. After this, you need to raise the seat on the right side. They do the same on the left. Next, move the seat cushion forward and remove it. Half the work is already done.
The head restraints are removed from the clamps. To do this, press the fastening buttons and pull the headrest up. The second section is treated similarly. Don't lose the release buttons. Next, the upholstery is completely removed, otherwise it will not be possible to remove the seat. The seat lock is pulled out through the loop. It is located behind the backrest. The right side of the backrest is raised, and its fastening loops are removed from the hooks located on the floor of the car. The left side is removed in the same way.
After this, remove the armrest. To do this you will need a 10mm socket wrench. Using a wrench, unscrew the two fastening nuts. The armrest is then removed. If necessary, you can also remove the seat belts. Installation is carried out in reverse order.
Other models
On the VAZ 2111 and VAZ 2112, the seat mountings are slightly different in design. Therefore, their dismantling is slightly different from similar work for dozens. Here both the seat and back are divided in half. Each part can be folded independently of the other half. This makes the hatchback and station wagon more comfortable. They can also be removed separately. The seats are equipped with headrests, this increases the safety of the car. In addition, it is simply much more convenient for passengers.
By pulling a specially designed loop, we lift the left seat, after which it tilts forward. Using a spanner wrench (10 mm), unscrew the two hinged nuts. After this, you can remove the seat from the car. The right side is dismantled in the same way.
Using a 13 mm socket wrench, unscrew the nuts located at the bottom of the left seat fastening hinges. There are only two nuts. Next, the backrest fastening clamp rises up. After this, the backrest folds forward. Unscrew the nut and bolt located at the top of the fastening hinges. The right side is removed in the same way.
Tuning
Modifications to the rear seat of the VAZ 2110 are not that common. In this case, these structural elements are most often heated. This is quite easy to do. It turns out that such a modification is not too expensive in terms of money. And it becomes much more comfortable for passengers to travel. This thing will seem especially useful to drivers with large families living in the northern regions of the country.
For installation, you can use a commercially available heating kit - “Emelya”. You can also use a heater removed from another car. This element from Priora is best suited. The heating should have two parts (for the seat and backrest). To install, it is not necessary to completely remove the seats; partial dismantling is sufficient.
Heating is installed under the casing. The connection is made in the same way as on the front ones. The power buttons are located on the rear doors. It is best to display the power indicators on the dashboard. This will allow you to control the operation of the device. You also need to monitor the position of the device. It should not touch the seat springs.
Conclusion
. For various reasons, any driver has to deal with the need to remove seats. Therefore, it is important to know how to remove the rear seats on a VAZ 2110 and 2112. This will make your task much easier. Like any seat assembly, they can break; this happens rarely, but it does happen. You can always fix the problem yourself.
Removing the rear seat on a VAZ-2110
To start doing the work, you will need to loosen the upholstery on the back row.
- It is attached using buttons located in the trunk.
Unfasten the upholstery from the back of the seat.
Then you will need to move the cushion lock handle and raise the seat.
Unsnap the back latch by pulling the loop.
Such procedures should be carried out on the right and left.
To remove the backrest, you need to remove the hooks from the body brackets.
Then you will need to remove the pillow and pull it forward.
The pillow is held on by clamps, press them and lift the pillow.
- Half the work has already been done.
- Then the headrests are removed from the clamps.
- Next, the upholstery is dismantled.
- Using the loop, remove the backrest lock latch. It is located behind the back itself.
- The backrest is raised and its fastenings are removed from the latches.
- This must be done with the left and right parts of the backrest.
- Then the armrests are removed. To do this, you can use the key at “10”.
Unscrew the three screws securing the frame.
Using a 10mm socket, unscrew the two bolts.
Remove the armrest along with the frame.
- If necessary, the seat belts can also be removed. Installation is carried out in reverse order.
Removing the backrest separately
Experts say that the backrests can be removed separately by pulling the latch located behind the seat.
If you press on this hook from the trunk, the backrest should recline.
But at the same time, there are many complaints that the clamps are made of low-quality material , and therefore can often break. Therefore, to avoid such troubles, it is recommended to remove the backrests only with a pillow. This increases the service life of the chairs.
How to remove the rear backrest on a VAZ 2110
The rear seats on VAZ 2110, 2111 and 2112 cars are slightly different in their mounting design, so the procedure for removing them will also be different. In this example, the 2110 will be considered, since I had this particular machine on hand.
So, the first thing you need to do is remove the lower part of the “sofa”. To do this, on both one and the other side from below, you need to move a special lever to the side and move the seat.
The final result on one side is shown in the photo below:
On the other hand, everything is done in the same way, so there is no point in considering everything separately.
Regarding the back, everything is also quite simple. The first step is to pull the loop up to open the lock:
And at the same time we move the back forward, as is clearly shown below.
And to finally remove the back, lift it up a little, thereby removing it from the lower hinges:
The second half of the backrest is removed in the same way.
Now all that remains is to remove the armrest, which is attached separately from the backrests. To do this, you need to unscrew one screw attaching to the brackets from below, on both one side and the other:
There should be no problems with the installation, since everything is done in the reverse order.
Be sure to remember! When installing the rear seat backs, make sure that the hinges (which we pulled at the beginning to unlock) are always on the outside, otherwise it later becomes extremely inconvenient to remove them to unlock the locks.
If for any reason you need to replace the rear vision on a VAZ 2110, then it’s worth talking about the cost of these parts. The price of a new set of seats is about 5,000 rubles - this is the back row assembled.
Car seats not only provide a comfortable ride, but are also responsible for the safety of the driver and passengers. When a breakdown occurs in the structure of the rear seats of a VAZ 2110 or the need to clean them, it is not necessary to spend money on a trip to a car service center to remove them. You can do this yourself.
When is it necessary to remove the rear seats?
Over the years of use of the car, all elements of the interior wear out. The seats are upholstered in fabric, so they need to be cleaned periodically to remove dust and dirt.
It is best to do it after dismantling them, in this case the cleaning will be really high-quality and effective.
Rear seat removal may also be necessary for repairs in the following situations:
- after an accident;
- if the backrest lowering mechanism breaks down;
- if the armrests are faulty;
- for tightening fastening mechanisms.
Step-by-step instructions for dismantling
Before starting work, we prepare the necessary tools. To remove the seats we will need:
- flat and Phillips screwdrivers;
- key to 10;
- pliers;
- repair kit (depending on the situation).
It is better to work with gloves so as not to accidentally injure your hand on sharp metal corners.
The procedure is as follows:
Video: How to remove the rear seats on a VAZ 2110
Can the backrests be removed separately?
This is not difficult to do; you also need to pull the loop behind the headrest, and then unfasten the upholstery and remove the backrest from the lower fastenings. Many car enthusiasts complain that the locks are made of low-quality materials, and after several removals the latches no longer hold the parts properly. Therefore, unless absolutely necessary, it is recommended to remove the backrests along with the bottom pillow.
This will increase the service life of the seats.
In the VAZ 2110 model, the seat fastenings are made quite simply. Dismantling these structures requires tools that every car enthusiast can find.
Before removing the rear seats on a VAZ-2110, you will need to clarify the details of the work, since there are some nuances, even though it itself is simple.
To start doing the work, you will need to loosen the upholstery on the back row.
- It is attached using buttons located in the trunk.
Unfasten the upholstery from the back of the seat.
Then you will need to move the cushion lock handle and raise the seat.
Unsnap the back latch by pulling the loop.
Such procedures should be carried out on the right and left.
To remove the backrest, you need to remove the hooks from the body brackets.
Then you will need to remove the pillow and pull it forward.
The pillow is held on by clamps, press them and lift the pillow.
- Half the work has already been done.
- Then the headrests are removed from the clamps.
- Next, the upholstery is dismantled.
- Using the loop, remove the backrest lock latch. It is located behind the back itself.
- The backrest is raised and its fastenings are removed from the latches.
- This must be done with the left and right parts of the backrest.
- Then the armrests are removed. To do this, you can use the key at “10”.
- If necessary, the seat belts can also be removed. Installation is carried out in reverse order.
Removing the backrest separately
Experts say that the backrests can be removed separately by pulling the latch located behind the seat.
If you press on this hook from the trunk, the backrest should recline.
But at the same time, there are many complaints that the clamps are made of low-quality material
, and therefore can often break down. Therefore, to avoid such troubles, it is recommended to remove the backrests only with a pillow. This increases the service life of the chairs.
conclusions
As you can see, the work can be done quite simply. To do this you need to know its nuances. Such a procedure may be required at any time, and therefore you need to be prepared for it in order to fix the breakdown yourself.
Step-by-step instructions for dismantling
Before starting work, we prepare the necessary tools. To remove the seats we will need:
It is better to work with gloves so as not to accidentally injure your hand on sharp metal corners.
The procedure is as follows:
- Unfasten the rear seat upholstery buttons on the trunk side.
- Pull back the loop and remove the latch near the headrest.
To get to the latch, you need to pull the loop near the headrest
We pull out the hooks on the back from the metal brackets that are on the body.
Remove the hooks that hold the seats to the body
Use a 10mm wrench to remove the armrest fastening nut.
The mounting pad is secured with two latches; we press them out with a flat-head screwdriver.
To remove the mounting pad, press the two latches
Unscrew the fastening bolt and pull out the seat cushion lock.
After unscrewing the mounting bolt, the lock can be easily removed
How to remove the rear seats on a VAZ 2110? Valuable information about tuning VAZ seats
A detailed guide on how to remove the rear seats on a VAZ 2110 allows you to complete all repair work without outside help. For example, you decide to repair the seats, install new ones instead of old ones, or reupholster them with leather. But how to remove this element without damaging the mount and other parts? The “Ten” is the progenitor of the “Priora”, but differs from it in certain components. It was once considered a powerful, modern car, equipped with a carburetor with automatic choke. How to remove the rear seats on a VAZ 2110 when you need to go pick up goods, transport bulky cargo, and so on? You can do all the work yourself. We will tell you step by step what nuances you should pay attention to, what tool to arm yourself with and what actions to perform. Removing the seats in 9 minutes The driver will need exactly 9 minutes to remove the “tens” seats. Don't believe me? Try it! Disassembly begins with slightly loosening the upholstery. Just press the buttons located near the trunk. Then move the lock handle on the right to the side and lift the seat. The procedure on the left side will be similar. The seat cushion can be easily moved forward and removed. You have already done half the work, and further actions are performed in the following sequence:
- Removing head restraints. Press the fastening buttons and pull the headrest up. We perform similar actions with the other section. Make sure that the buttons are not lost anywhere. They will also be useful to you during reassembly.
- Remove the upholstery completely so that there is nothing obstructing the removal of the seats. When you see a loop, pull it. This will allow you to pull out the locking lock located at the back of the backrest.
- Slightly lift the right side of the backrest and remove the fastening loops from each hook. They are right on the floor. By analogy with the right part, remove the left one.
- All that’s left is to remove the armrests, and if necessary, the seat belts. Armed with a 10 mm socket wrench, unscrew the 2 nuts. This will allow you to remove the armrest.
So you have completed the task. And it took you no more than 9 minutes. Installing the seats is done in reverse order. We hope you remember everything? What to do with the seats of VAZ 2111 and 2112? VAZ 2111, 2112 cars are far from random “guests” of the article. All three cars, including the “ten” described above, belong to the same class of cars. But the problem is that their seats are removed in completely different ways. Therefore, the removal instructions for the VAZ 2110 are not suitable for car enthusiasts who drive 2111, 2112 models. Let's figure out what the dismantling process will look like on “younger” models.
- The back and seat are divided into two halves. Therefore, you can also remove them separately. For additional safety of the driver and passengers, the seats are equipped with head restraints. And you will agree that driving with them is much more convenient.
- Let's start disassembling. Pull the loop to raise the seat on the left. Tip it forward. Then unscrew the nuts with a 10 mm spanner. Pull the seat out of the passenger compartment. Repeat the operation with another element.
- Take a socket wrench - now 13 mm. Unscrew the nuts that are located under the seat mounting hinges on the left. There are two nuts - you can do it in a couple of minutes. Lift the fastener upward to fold the backrest forward. All that remains is to unscrew the last nut and bolt. They are located above the hinges. By analogy with the left side, the right side is also removed.
- The backrest latches may break. It's okay - you can easily install new ones. The plastic bushing of the lock may also fail. Plastic is plastic, no comment needed. We just buy a new bushing and install it in place of the old one. You won't have any more problems with VAZ seats.
The reasons for dismantling seats can be different, and one of them is tuning. The rear passenger seats of the VAZ 2110 are rarely tuned. In most cases, all work comes down to installing heating. The costs are small, but long-distance trips will be much more comfortable. Especially when it comes to harsh winter. We recommend Emelya. This is a special heating kit, which is available for sale in any specialized store. Or you can save money and install a heating system removed from another car. The best option would be an element from Lada Priora. It is not necessary to completely remove the seats. Partial dismantling will be sufficient, since you will install heating under the casing.
As you can see, the work can be done quite simply. To do this you need to know its nuances. Such a procedure may be required at any time, and therefore you need to be prepared for it in order to fix the breakdown yourself.
How to remove the rear backrest on a VAZ 2110
- Registration
- Entrance
- To the beginning of the forum
- Forum Rules
- Old design
- FAQ
- Search
- Users
- List of forums AUTOLADA.RU
- “Tenth” family (VAZ-2110, VAZ-2111, VAZ-2112) and LADA PRIORA
It folds, but entirely.
First raise the pillow, then open the lock and lower the backrest. No one I know can look at it. I really don’t want to take the 2112 just because of this. And I don’t need a 16V motor.
Guys, can anyone just look and check in their sedan? I went to a couple of salons, the consultants unanimously said that it doesn’t work out and they refuse to show at least a little curiosity on the cars standing nearby, like what to check, the instructions say no, that means no.
Guys, can anyone just look and check in their sedan? I went to a couple of salons, the consultants unanimously said that it doesn’t work out and they refuse to show at least a little curiosity on the cars standing nearby, like what to check, the instructions say no, that means no.
We bought 21102 for a friend in March - nothing folds out there - I personally checked it. Everything is exactly as Koba says.
Why, it’s better to have a leather one, like in American cars, so that you can’t just sit there and move around.
Guys, can anyone just look and check in their sedan? I went to a couple of salons, the consultants unanimously said that it doesn’t work out and they refuse to show at least a little curiosity on the cars standing nearby, like what to check, the instructions say no, that means no.
Well, this is already concrete.