We carry out work when repairing and replacing the rear bumper.
We carry out the work with an assistant. We remove the rear lights (see Removing the rear light, replacing lamps)
Below the car...
...using a Torx T-20 wrench, unscrew the four screws of the lower bumper mounting. In the wheel arch of the left rear wheel...
...using the “7” head we unscrew the four self-tapping screws securing the mudguard to the bumper...
...and remove the rear wheel mudguard. Similarly, remove the mudguard of the right rear wheel.
Using a Torx T-20 wrench, unscrew the self-tapping screw securing the bumper to the body.
Similarly, unscrew the self-tapping screw in the arch of the right rear wheel. At the bottom of the luggage compartment opening...
...using a Torx T-30 wrench, unscrew the four screws securing the bumper to the body.
Overcoming the resistance of the clamps, we remove the right side of the bumper from engagement with the plastic clamp fixed to the body. We perform a similar operation on the left side of the car. Carefully remove the rear bumper from the body...
...and on the left side of the car we disconnect the wiring harness block for the rear parking sensors.
Remove the rear bumper. Install the rear bumper in reverse order.
Categories of products that may be of interest to you based on the article “Renault Duster. Removing the rear bumper":
Spare parts, maintenance
Products from the Dustershop77 range that may be of interest to you:
| Name | Manufacturer | Price | Availability | Add to cart |
| BR-001-GARD-URDP | Mud flaps enlarged (widened) Duster-GARD front | Duster-Guard | 1300 / 1100 rub. Discount: 1000 rub. | >10 |
| DC495 | Discount card (Dusterclubs.ru, Dustershop77.ru) | 700 / 500 rub. Discount: 500 rub. | >10 | |
| DC218 | Air deflector “Warm feet” for Duster, Logan, Sandero, Largus | 500 / 300 rub. Discount: 250 rub. | >10 | |
| patriot-001-1 | Gearbox coupling and gas tank protection (steel) | Patriot | 6000 / 5300 rub. Discount: 4800 rub. | >10 |
| 005-008502 | Trunk sill protection | Russian Artel | 1500 / 1300 rub. Discount: 1000 rub. | >10 |
| PT014-7010402-RDU112901 | Trunk sill trim PTGroup | Pt GROUP | 1300 / 1100 rub. Discount: 850 rub. | >10 |
| DC654 | Frill with fastening without 3M tape (Duster/Terrano) (ArtForm) | ArtForm (Yuago) | 3500 / 2500 rub. Discount: 1900 rub. | >10 |
| R12711 | Wind deflectors (window deflectors) COBRA/Autoplex | COBRA/Autoplex | 2000 / 1600 rub. Discount: 1500 rub. | >10 |
| NRD-009102 | Frill under the windshield (RA) | Russian Artel | 2500 / 2100 rub. Discount: 1800 rub. | 6 |
| RA0052 | Door sill trims (front+rear) RA | Russian Artel | 2500 / 2000 rub. Discount: 1700 rub. | >10 |
Bumper removal technique
Read more about dismantling the front bumper in the material: “removing the front bumper on a Renault Duster: nothing complicated.”
You will need a Torx wrench with T20 and T30 bits. First, remove the mudguards - they are attached with self-tapping screws, as well as with one plastic piston.
First steps for dismantling
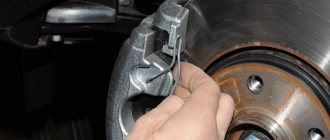
The piston is snapped off with a flat screwdriver. And when the mudguard is removed, you can unscrew the screw on the fender liner. It holds the bumper (part 13).
Don't forget that a similar screw (13) is located at the bottom of the bumper. In the second step, unscrew the screws in the trunk and also loosen the screws from below.
Loosen the screws, unscrew the screws
Our photo illustrates the last two actions.
A T30 bit fits the screw heads. And T20 is for self-tapping screws.
Plastic mount
On the Renault Duster crossover, removing the rear bumper includes the following steps:
- It is necessary to unscrew the fastening elements (12 and 13), loosen the screw clamps (part 9);
- The plastic bumper is moved away from brackets 2 and 3 to the side. The main thing is not to break the latch tabs.
You need to start removing the bumper from the latches from the wheel side. The photo shows the result.
Two final steps (dismantling completed)
When the bumper is not held in place by anything, it is simply pulled towards itself. It is better to carry out this operation together.
Article numbers of the original part and suitable replacement parts
The front bumper, supplied under part number 620930759r, has a standard design. Fans of more interesting models will like the article numbers 620220025r and 620220030r.
There are many parts that differ in appearance. When choosing a replacement, take into account that all fastenings must correspond to the design of the car.
A front bumper with a standard design and a bumper with part number 620220025r.
Removing the front bumper
All generations of Renault Duster use screws and self-tapping screws. Their main location:
- 4 screws at the top
- 2 self-tapping screws in fender liners
- 5 screws at the bottom
The restyled bumper is attached in a similar way, but to avoid unnecessary questions during operation, let’s take a closer look at each of the options:
Main stage
First of all, you need to remove the rear lights. This is done quite simply: the screws that hold them on the plane of the bumper are unscrewed, and then the parts are freely dismantled.
The main thing is to remember to disconnect the power terminals to avoid damaging the wiring.
Then a 20mm Torx wrench is used, with which the lower part of the bumper is unscrewed. There will be only four screws, and they are all located evenly along the bottom edge of the plastic. The next step is to look under the mudguards. Here you need to use a 7mm wrench and unscrew the four screws that secure the mudguard to the bumper body.
Next, a 20mm Torx wrench will come in handy again. Using it, you need to disconnect the fastenings to the body, which are located adjacent to both mudguards. Then, finally, using a 30mm Torx wrench, unscrew the four screws that are located on the rear surface of the bumper, next to the parking sensors.
Next comes the most sensitive stage of work - disconnecting the bumper from the body and releasing its plastic latches from engagement with it. If you follow the video and photographic materials, work should begin with the left and right sidewalls, since the resistance of the latches there is quite low. Then they smoothly move to the middle until dismantling is finally completed.
The difficulty is not to damage the already fragile hooks. To avoid this, do not apply too much force or put excessive pressure on the plastic parts when dismantling them.
Another problem may lie in fasteners that have become sour from dirt and moisture. This is where VD-40 or any other composition designed to dissolve rust and lubricate rusted screws comes to the rescue.
Removing the bumper on a Renault Duster: step-by-step instructions
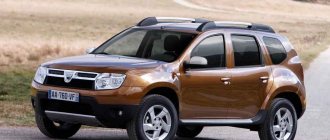
A car body kit is one of the most vulnerable vehicle body parts. It is easy to damage: running into a small obstacle, unsuccessful parking or a traffic accident. As a result, scratches, dents, chips, and cracks remain on the buffer. To repair the part, you need to remove the front and rear bumpers of the Renault Duster.
How to remove the front and rear bumper of Renault/Dacia Sandero (Sandero Stepway) 2 (from the year)
In this article we will try to sort out all the nuances, including finding out how to remove the bumper. First, study videos or photographs on this topic for a better understanding of how to remove the bumper.
In this way, you can avoid unnecessary questions that may arise during dismantling. This will also make it possible to find out what fasteners are used and where they are located, which will speed up the procedure. The main ones should be video reviews, removing the rear bumper of a Renault Sandero video, everything is described in detail. The Renault Duster heater does not work. Necessary tools To install a new part, only a couple of tools are used.
Dismantling is carried out with a set of screwdrivers. All work is carried out in-house, which saves money.
How to remove the rear bumper of Renault Sandero + (VIDEO)
To remove the rear bumper, you need to unscrew the screws and fasteners. The use of a lift or jack is not recommended in this case.
How to dismantle You must first immobilize the Renault Sandero before removing the rear bumper. The hand brake is placed in the working position, and chocks are placed under the wheels. This allows you to avoid spontaneous movement of the car. It also ensures the safety of the work for the car owner.
How to remove the rear or front bumper on a Renault Sandero
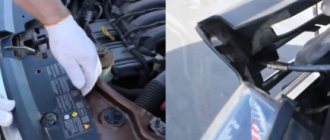
Now you can get started. First of all, the fog lights are removed - the initial stage when dismantling the rear part on a Renault. If you do not do this right away, difficulties may arise in the future.
The hood lid rises. After which you can see that the fasteners are located in the engine compartment. Don't forget to connect the wiring harness socket to the PTF. Tighten the fasteners tightly, as in production, to avoid damage to the machine and its individual elements.
Replacement of the rear bumper To remove the rear bumper of Renault Sandero Stepway, the same set of screwdrivers is required. Removing the rear bumper of a Renault Sandero video, here are the screws that secure the main element and the fender liners at the rear.
They are located above the wheel, in an easily accessible place.
Then the Renault Sandero rear bumper is secured on both lower sides with lower clamps, which also need to be removed. In this area, it and the fender liner are attached together to the amplifier, which is located under the bumper.
Next, you need to open the trunk lid, since this is the only way to gain access to the remaining fasteners, which are located in the area under the seal. You definitely need to remove the license plate light, which is also located here, and then you can start dismantling the rear part. Installation of a new element is also carried out in the reverse order, not forgetting to return the backlight to its place and carefully screw in each fastener.
The bumper protects the car from collision, so removing the rear bumper of a Renault Sandero video shows that it is damaged the most.
In most cases, it is easier to replace it with a new one, and doing it at home is quite simple for anyone. Using a slotted screwdriver, unscrew the two plastic nuts securing the fender liner to the body.
Articles for the front
When replacing the Renault Duster front bumper or its individual elements, you may need spare parts.
The following is a list of them (original parts) for Renault Duster I with article numbers:
- One-piece part without technological openings for fog lights and with them - 620 220 025R and 620 220 030R.
- Left side mounting bracket – 622 230 010R, 622 231 300R, 622 236 764R.
- Right side mounting bracket – 622 220 011R, 622 229 216R, 622 223 926R.
- Left fog light clamp - 820 059 7649 or 600 154 9322.
- Right PTF lock – 8200597650, 600 154 9321.
- Plastic insert (adsorber) – 620 931 777R.
620 220 025R
As analogue options, you can use products from ASAM (the official supplier of Dacia) and NPA or Well, Breckner, which are leaders in the German car market:
- Buffer device without technological openings for fog lights and with them - respectively DC600 0000-0000 (Api), BK71 303 (Well, Breckner), NP 513-072 11 (NPA); DC600 0000-1000 (Api), NP 513-072 12 (NPA).
- Left and right side mounting bracket – 801 33 (ASAM), NP 513-072 35 (NPA); 801 32 (ASAM), NP 513-072 36 (NPA).
- Adsorber – RNDUS 10-240 (Taiwanese company Body Parts).
DC600 0000-0000 (Api)
For updated versions of Renault Daster, finding analog parts is currently problematic. The following are the article numbers of original spare parts:
- bumper – 620224 960R;
- mounting bracket for the left and right sides - 622 239 404R, respectively; 622 229 960R;
- assembled radiator grille – 623 103 564R or 623 827 948R;
- lower grille – 622 542 036R.
- The article number of the plastic insert is identical to the models before the update.
620224 960R
The design of the unit called “rear bumper”
The bumper itself is “part 1”. It is supplemented with trim 7. When dismantling, remove the bumper with the trim.
The number of fastening elements is 14
Absorber 5 is another integral part. The entire assembly is supported by brackets designated 3 and 2.
The number of screws securing the bumper is eight: 4 on top (part 12) and 4 on the bottom (item 13). Don't forget about the other screw fasteners that will need to be loosened - we are talking about part 9. Screws 9 press the trim to the body (see photo).
Dismantling of 1st generation cars
For this procedure, you will need Torx keys 20 and 30, a cloth or rags to wipe the trim and the place where the fender liner is attached.
Now you can unscrew the screws holding the front bumper of the Renault Duster. Their location is indicated by arrows in the photo. There are a total of 5 screws around the perimeter, one located at the bottom, under the decorative trim.
After this, using a T20 key, you need to unscrew the screws holding the fender liner. One is located near the junction of the fender and bumper.
There are 2 screws on each side of the fender liner. The second one can be found at the bottom. After this, the T20 key will no longer be needed. You need to take the T30 key.
The most powerful fasteners are located at the top. After these screws are unscrewed, you must carefully move the plastic to the side to disconnect the part from the latches located on special brackets. If during the removal process the brackets are damaged or bent, it is better to replace them with new ones.
After this, it remains to perform a few simple steps.
- Move the top part of the plastic a little
- Pull the bumper towards you, releasing it from its seats
- Disconnect the PTF power connector
How to properly disconnect the PTF connector on a Renault Duster.
The length of the cable is designed in such a way that you can remove the bumper and then disconnect the connector located on the right bracket.
The connector is 4-channel, providing power to two PTFs at once.
Preparation for dismantling
Before removing the body element, you need to purchase a set of tools, including 20 and 30 mm TOPX keys, flat-head and Phillips-head screwdrivers, a jack, and a wire brush. Additionally, you will need an anti-corrosion solution and rags.
In preparation for dismantling, perform the following steps:
- They drive the car onto a viewing hole or overpass. If this is not possible, the front part of the car is lifted with a jack. This makes it easier to remove fasteners from underneath the SUV.
- Use a damp cloth to clean the body kit from dust, dirt and rust. Use an iron brush to clean the wheel arches and the front part of the underbody. This will prevent dirt and rust from falling off when removing parts.
- Treat bolts and screws with WD 40 solution. This will make it easier to remove fasteners that have become corroded during long-term use of the vehicle. After half an hour, the product will take effect, the bolts can be easily unscrewed with a wrench. If this method does not work, cut off the fasteners with a grinder. New bolts will be used during installation to ensure a secure fit.
We drive the car into the pit and unscrew the bumper mounting bolts.
Removing and installing the rear body kit
Removing the Renault Duster rear bumper is carried out in the following order:
- The license plate light bulb and rear lights are removed. The car is first de-energized by disconnecting the terminal from the battery.
- Remove the four screws located at the top of the buffer. To access them, you need to open the trunk lid.
- In each fender liner, the screws that secure the body kit are removed, and the mudguards are dismantled using this action.
- Next you have to remove the body kit from the car body. The process begins with the left and right sidewalls, since there the latches have the least resistance.
- Unclip the body kit fasteners in the center and finally remove the bumper. Using a flat-tip screwdriver, unclip the clips and remove the pins.
- Installation of the body part is carried out in the reverse order of removal.
Renault Duster rear bumper replacement
To perform repair procedures on the rear bumper, it is almost always necessary to remove it. Carrying out this procedure without first studying the photo and video instructions is quite problematic. First of all, this is due to various fastening methods, which differ from each manufacturer. And many are interested in how to remove it correctly. Today we will talk about the features of dismantling the rear bumper of a Renault Duster, and without having any knowledge, certain difficulties may arise when performing this procedure, because the rear bumper is not a simple thing, and replacing it is a crucial moment.
Preparatory work
Preliminary selection of tools and location will significantly reduce time costs and avoid the expenditure of excessive effort. It is more rational to use a garage box with a jack, an inspection pit, or carry out work on an overpass, because Most of the operations are carried out under the bottom of the Renault Duster car and in the space of the wheel arches of the rear axle.
The set of tools to be used for Renault Duster consists of:
- 20mm Torx key
- 30mm Torx key
- Hexagon, preferably a screwdriver, with a 7 mm socket
To create normal conditions and unscrew the fasteners without the use of special efforts, it is necessary, before starting work, to clean the car from dirt. To do this, the car is simply washed. The rear bumper is washed thoroughly. Then you can begin the main set of works.