For a long time, environmental problems were out of public view. The situation began to change after the advent of the era of plastic and herbicides, and today only the lazy would not criticize the state of the natural environment. All the more surprising is the fact that caring for the health of drivers and passengers of passenger cars began relatively recently, some 20 years ago. Today, cabin filters, which provide comprehensive protection for people inside the vehicle from pollutants present in the outside air, are becoming a generally accepted standard even for budget cars. And even if the car’s equipment does not provide for the installation of a SF, the designers must provide a place for its installation, and this can be done independently at any convenient time.
Where is the Toyota Prado cabin filter located?
All of the above fully applies to the Japanese SUV. First generation models (70/90), produced before 2000, were not equipped with SF. Later modifications, as well as all second-generation models, already had a full-fledged factory cabin filter. Regardless of the presence or absence of air conditioning, this car accessory regularly performs the function of cleaning the air supplied to the cabin from most types of particles of mineral and organic origin. The only drawback of the cabin filter is that, like other types of filter elements, it tends to become clogged and become unusable. Strictly speaking, it belongs to consumables, and, if we talk about a car, then to the most in demand - no other consumable changes so often.
The replacement process itself will differ depending on the model and year of manufacture of the SUV.
The fact is that the Prado 70/90 has a cabin filter located in the engine compartment, and replacing it is associated with certain inconveniences. By the way, when asked where the Prado 95 cabin filter is located, you will receive a negative answer - this model, intermediate between the first and second generations, was not equipped with a cabin filter, although there is also a place for its installation here. For the Prado 120, produced since 2002, as well as the Prado 150, the production of which started in 2009, the designers have already provided for the installation of a filter element behind the glove box, which is the de facto standard for most modern cars.
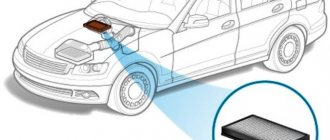
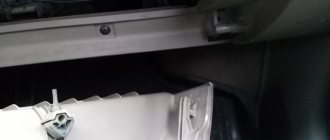
Location of the cabin filter on Toyota Prado
Replacing the air filter for Toyota Prado 150
Today, replacing a particular auto part on a car does not require special knowledge, tools or investments. Most often, this is a minimum amount of time, desire and dexterity of the car owner. In order to correctly organize the procedure for replacing the Prado 150 diesel air filter, you must carefully adhere to a special algorithm of actions, which will be proposed later in the article.
When is replacement required?
Every owner of a particular car can recognize signs of the need for replacement First of all this:
- Active reduction in power of a car like Toyota.
- Increased fuel consumption of Toyota.
- Increased concentration of exhaust gases in the internal combustion system of the engine.
- Deterioration in the overall performance of the car when driving, which is expressed in the sagging of the car.
- A noticeable layer of dirt and dust that interferes with the functioning of the air purification system.
The air element should be replaced as often as possible, especially when driving on highways and in extreme conditions. Experts have noticed that when driving outside the city, a large amount of dust and dirt can accumulate in the air purification system. Many car enthusiasts underestimate the air purification system, but it is the basis for the operation of the main mechanism, which prevents the engine system from wearing out. Thanks to the air filter, there is no metal corrosion, which in the future can aggravate the overall performance of the car.
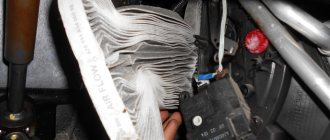
Replacing the engine air filter on a Toyota Prado 150
The location of the air filter in the specified vehicle can be easily found in the vehicle's service manual. The air cleaning element is located on the left side of the engine compartment, near the right headlight. In order to replace the air element, no special knowledge, tools or spare parts are required, except for the filter element.
Preparing for work
Choosing an air filter is a responsible decision and, first of all, you need to pay attention to the following basic criteria:
- The density of the gasket, which is designed to protect the engine from dirt and dust that accumulates as the car is used while driving.
- Certified filter element. Experts recommend choosing an air filter that is considered original and from the manufacturer. Preference should be given to countries producing filters such as Poland, Germany, Japan.
- Strength of the filter element. In order for the air filter to clean the space and prevent the appearance of dirt and dust in the internal combustion engine system, it is necessary to select an element with an increased level of strength, which will actively protect all existing elements of the system.
The necessary tools for replacing the air filter are just the hands of the car owner. No special screwdrivers or anything else is required.
Replacement steps
The sequence of actions when replacing parts is extremely important. First of all, you need to decide on the location of the car’s air cleaning system. The air filter in the Toyota Prado 50 is located in the engine compartment on the left side in a special box that protects the filter from mechanical influences from the outside.
Step-by-step instructions include the following steps :
- Unsnap the 2 clips on the back of the box to replace the filter.
- Cleaning the surface under the old filter and blowing it thoroughly. It is under the old filter element that the main place where dirt and dust accumulates is located.
- Removing the old filter and installing a new one.
How often should you change the cabin filter?
Here, the automaker advises focusing on the scheduled maintenance periods: according to the user manual, the filter should be cleaned every 10 thousand kilometers, replaced after 30 thousand. Of course, today the term “cleaning” is hardly applicable, especially to carbon varieties of SF - cleaning the layer with activated carbon will not do anything, since it is an absorbent type of adsorbent that binds harmful substances at the molecular level.
As for the restoration of conventional dust filters, today it is known for certain that such an event is ineffective, since the filter element becomes clogged almost immediately after installation.
But even taking this into account, it is not worth focusing on the regulatory deadlines, since they are calculated based on road conditions characteristic of Western countries with their almost ideal road conditions. In Russia, it is the road factor that has a decisive influence on the total resource of the cabin filter. For normal operating conditions, it should be halved, and if the SUV is used intensively, with frequent off-road trips, then even more.
Experienced drivers rarely look at mileage, because they also need to remember it. The fact that the time has come to change this car accessory will be indicated by very specific signs:
- the appearance of dust in the cabin, clearly visible on the plastic parts of the interior;
- frequent fogging of windows, directly related to a critical deterioration in the capacity of the solar filter;
- penetration of foreign odors into the cabin as a result of the accumulation of organic debris on the filter and its rotting.
And, of course, the main symptom of a clogged cabin filter should be considered a significant deterioration in the power of the air flow blowing from the deflectors, up to its almost complete absence. In this case, we are not talking about any warmth in the cabin in winter and saving coolness in summer. The Prado 120/150 cabin filter should be replaced without waiting for its throughput to drop to zero - as soon as the microclimate in the cabin no longer meets the standard parameters, you should think about purchasing a new filter element.
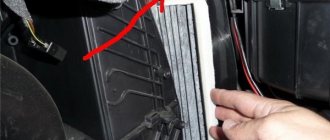
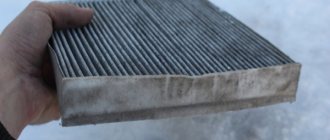
Removing a dirty cabin filter
How to choose a cabin filter for Toyota Prado
Original Toyota filters are not cheap, but many car owners try to purchase only original consumables. Considering that there are currently a huge number of models on the market that are fully or partially compatible in size with factory products, the selection of SF often turns into real torture. Meanwhile, there is a fairly simple and reliable way to avoid getting into trouble - use the catalog number found on the original part as a guide. An increasing number of auto stores, both regular and online, provide the opportunity to search for original or manufacturer-recommended components by VIN code. Take advantage of this opportunity if difficulties arise. Well, the most reliable strategy is to buy consumables from official dealers - here you have a guarantee that you will not be offered a filter of dubious quality and origin.
For Prado 120, refer to the following catalog numbers:
- 08888020090 (simple SF, cost from 800 rubles);
- 0871394701083 (downtime, 800 rubles);
- 08713908030 (downtime, 800 rubles);
- 08713947010 (with antibacterial coating, 1200 rubles);
- 00897400830 (coal, 1600 rubles and above).
For 150 Prado:
- 08713902020 (downtime, 800 rubles);
- 08713950100 (anti-dust, 800 rubles);
- 00897400820 (regular, 800 rubles);
- 08713907020 (antibacterial, 1200 rubles);
- 8713902150 (antibacterial, 1200 rubles).
However, no one forbids installing analogs that are compatible in size, much cheaper and often not inferior in quality, but here you need to rely only on yourself.
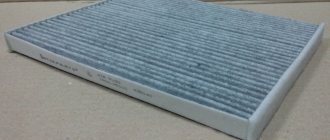
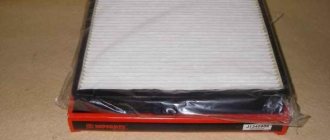
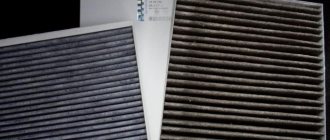
New carbon filter element
How to change the cabin filter yourself
Here is a complete algorithm for replacing the Prado 150 cabin filter (diesel/gasoline), for the Prado 120 it is absolutely identical. You don't even need a screwdriver - just a new filter, some rags and a vacuum cleaner, preferably a car one.
So let's get started:
- place the machine on a level surface;
- tighten the parking brake lever;
- turn off the engine;
- we enter the salon from the front passenger side;
- lower the glove compartment lid;
- unfasten the left side stop (microlift);
- press out the stop chips holding the glove box on the left and right;
- take out the glove compartment by pulling it down;
- we see the plastic decorative cover, pull it towards us and see the end of the cabin filter;
- remove the spent filter element;
- since a lot of large debris usually accumulates in front of the filter, we remove what can be reached by hand, and remove the rest with a vacuum cleaner;
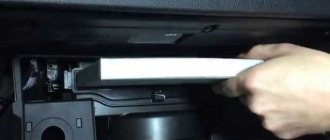
- install a new filter;
- We put the decorative lid and glove compartment in place.
As you can see, there is absolutely nothing complicated, the notorious “blonde” can easily cope with such a task, and a trained user will spend a maximum of 10 minutes on this.
see also
Comments 11
Without starting the video, the article is written on the splash screen. K1210A