01/13/2021 19,048 VAZ 2114
Author: Ivan Baranov
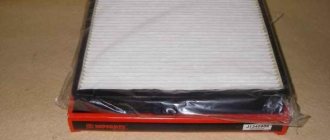
As you know, the VAZ 2114 cabin filter is installed on cars to clean the air entering the car’s interior from outside. First, the cabin air filter is designed to prevent dirt, dust, and leaves from entering the cabin. Secondly, the element is necessary to eliminate condensation that appears on the glass in damp weather. Regular replacement of this element of the cleaning system is also necessary to ensure that the driver breathes only clean air.
[Hide]
What types of cabin filters are there?
This modern modification is divided into two main types:
- Conventional filters that are used to combat dust. Their main purpose is to filter the air coming from the street from dust and small debris. They are two-layer, consisting of special filter paper or synthetic fiber. The purpose of the first layer is that it provides rough cleaning, and the second for finishing cleaning. Two layers do an excellent job of removing dust, keeping it out of the cabin.
- Filters with an additional third layer, which contains activated carbon. This filter is able to protect the car interior from the penetration of bacteria and hazardous substances, from unpleasant odors, and all thanks to the carbon layer.
- Modern filters protect the interior by 90%, and this is an excellent result. Complete, thorough cleaning using filter elements is not possible, because if you try to increase the density of the paper, the filter will begin to pass air worse.
- When the ventilation in the VAZ-2114 is turned on, it is capable of passing 180 thousand liters of air through itself; too much load falls on it, so it is necessary to maintain the throughput in good shape.
The reason for changing the cabin filter is debris that gets clogged in its layers, and this cannot be prevented in any way. VAZ owners say that the original filter is not effective, and therefore decide to install a new additional layer.
With such an upgrade, the quality of filtration improves, but the air flow becomes much worse, and you should not expect any benefit from such an upgrade.
How much does a cabin filter cost for a VAZ 2114?
Based on this, there is no need to experiment with this modification. By purchasing a non-original filter, you can save money, and the quality of filtration will be much better. You can try to purchase a car filtration element of a different brand, and it is quite possible that it will work. The main thing is that its size matches the filter you need. The VF-014 product is very popular among car enthusiasts, since its cost is 250 rubles, but this filter is not a carbon filter.
The average cost of a cabin filter is 250 rubles.
When to change, what interior to install
How to replace the cabin filter kia rio 4 c 2017
To perform scheduled maintenance operations, there are regulations, as well as manufacturer recommendations. According to them, replacing the cabin filter of the Hyundai Sonata VI YF heating and air conditioning system should be done every 15,000 kilometers or once a year.
Considering that the operating conditions of the car in most cases will be far from ideal, experts advise performing this operation approximately twice as often, in spring and autumn.
Characteristic symptoms:
- Windows often fog up;
- the appearance of unpleasant odors in the cabin when the airflow is turned on;
- deterioration of the stove and air conditioner;
They may make you doubt that the filter element is coping with its tasks and an unscheduled replacement will be required. In principle, these symptoms should be relied upon when choosing the correct replacement interval.
Suitable sizes
When choosing a filter element, owners do not always use products recommended by the car manufacturer. Everyone has their own reasons for this, some say that the original is unreasonably expensive. Some people in the region sell only analogues, so there is a need to know the sizes by which you can subsequently make a selection:
- Height: 20 mm
- Width: 225 mm
- Length: 254 mm
As a rule, sometimes analogues for the Hyundai Sonata VI YF may be a few millimeters larger or smaller than the original, there is nothing wrong with that. And if the difference is measured in centimeters, then of course it’s worth looking for another option.
Selecting an original cabin filter
The manufacturer recommends using exclusively original consumables, which, in general, is not surprising. They themselves are of good quality and are widely available in car dealerships, but their price may seem overpriced to many car owners.
Regardless of the configuration, on all sixth-generation Hyundai Sonatas (including the restyled version), the manufacturer recommends installing a cabin air filter with article number 97133-3SAA0 (971333SAA0). But you can also install the original analogue with number 97133-2W000, the dimensions are the same, the width and height are the same.
It is worth noting that sometimes consumables and other spare parts may be supplied to dealerships under different part numbers. Which can sometimes confuse those who want to purchase an original product.
When choosing between a dust and carbon product, car owners are advised to use a carbon filter element. This filter is more expensive, but it cleans the air much better.
It is easy to distinguish - the paper filter accordion is impregnated with a carbon composition, and therefore has a dark gray color. The filter cleans the air flow from dust, fine dirt, germs, bacteria and enhances the protection of your lungs.
Which analogues to choose
In addition to simple cabin filters, there are also carbon filters that filter the air more effectively, but they are more expensive. The advantage of coal SF is that it does not allow foreign odors coming from the road (street) to penetrate into the car interior.
But this filter element also has a drawback - air does not pass through it well. GodWill and Corteco carbon filters are of fairly high quality and are a good replacement for the original.
However, in some retail outlets the price of the original cabin filter for the sixth generation Hyundai Sonata may be greatly inflated. In this case, it makes sense to purchase a non-original consumable item. In particular, cabin filters are considered quite popular:
Conventional dust cabin filters
- Mann Filter CU 26 017 – high-tech consumables from a well-known manufacturer
- BIG filter GB-9985 – popular brand, good fine cleaning
- Nevsky filter NF-6459 - Russian manufacturer with an affordable price
Carbon cabin filters
- Mann Filter CUK 26 017 – high-quality and thick carbon coating
- BIG filter GB9985/C – activated carbon
- Goodwill AG 401 CFC – normal quality, affordable price
It makes sense to take a closer look at the products of other companies - they also specialize in the production of high-quality consumables for passenger cars:
- Corteco
- Filtron
- SCT
- Sakura
- GoodWill
- Fram
- JS Asakashi
- Champion
- Zekkert
- Masuma
- Nipparts
- Purflux
- Knecht Mahle
- RU54
It is quite possible that sellers may recommend replacing the Sonata VI YF cabin filter with non-original cheap substitutes with a much smaller thickness. They are not worth buying, since their filtering characteristics are unlikely to be at the proper level.
How do you know when the filter needs to be replaced?
Manufacturers of the cabin filter say that it must be replaced once every 201 thousand kilometers. Of course, this value is optimistic, because the condition of our domestic roads is very poor.
How long the filter will last depends not only on the mileage of the car, but also on other factors:
- Under what conditions does the vehicle operate? If the car will be used for driving in rural areas, then you do not need to install a carbon filter, since air pollution from exhausts from other cars is minimal. Well, in a megalopolis, it is best not to use a regular filter, but to purchase a carbon one in order to be completely safe from carbon dioxide and dangerous bacteria getting into the cabin.
- Vehicle speed. Active, fast driving has a negative impact on the condition of the filter, because such driving clogs it much faster.
- Frequency of vehicle use. When the owner of a car uses it only on weekends, to go with his family to a store or cafe, then the filter will not be subject to a large load. During everyday use of a vehicle, the impact on the filter resource will be maximum.
Some motorists have to replace the filter element every 8 thousand kilometers, while others do it about twice a year, and this is quite enough. When a VAZ-2114 car experiences low air flow from the deflectors and the appearance of unacceptable odors, it is necessary to immediately begin installing a new filter.
Causes of pollution
Dust is the main cause of component contamination. Cabin filters deteriorate especially quickly in spring and summer, when there is a large amount of dust on the road.
It is recommended to replace it twice a year (in early spring and late summer). Carbon filters are more durable than ordinary ones, so there is a chance that they will last more than one warm season.
Why change the filter?
If you do not replace a worn-out filter, all the street dust will begin to penetrate into the car interior, and this will make breathing difficult, leading to unpleasant odors and fogging of the windows. In addition, the stove will blow much weaker, which means heating the interior in the cold season will take much longer.
Of course, a filter that has served its service life will not lead to any serious damage, but it will cause quite a bit of inconvenience during the trip. It is better to monitor the condition of this part and replace it regularly.
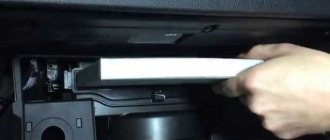
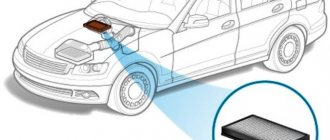
Where is the cabin filter of the VAZ 2114
Often, when you just got behind the wheel and are not yet particularly familiar with the various components and systems of the car, you need to find out where the cabin filter is located on the VAZ 2114. Below in the picture I tried to make out in as much detail as possible where the cabin filter is located on the VAZ 2114.
Where is the cabin filter of the VAZ 2114
Replacement algorithm
How to replace the cabin filter on a Skoda Octavia 3 A7, MK3
Replacing the filter will not take much time. For convenience, you can use a flashlight.
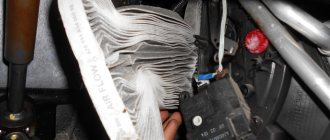
- We find the cabin filter cover. It is located under the glove compartment, near the passenger's left foot. The cabin filter is located under the front panel at the front passenger's feet.
- The cover is held in place by two clamping brackets. To remove it, you need to move the clamps to the center, and they will come off their guides. We bring the plastic clamps to the center.
- Next, simply remove the lid - it comes off without any problems. We take out the old filter by simply pulling it down. This arrangement of the part is very convenient, because when removing the old filter, debris will not get into the fan, as often happens in machines where the part is pulled towards itself or to the side. The cover can be easily removed with one hand.
- We install the new filter in place of the old one and close the lid. Install the new filter in the reverse order.
Before installing a new filter, it is advisable to perform an antibacterial treatment of the air conditioner evaporator.
Even with timely replacement of the filter, small particles of debris can get here, which become a breeding ground for bacteria in a humid environment. The evaporator is located immediately behind the cabin filter.
To treat it, you can use any disinfectant aerosol composition based on miramistin or chlorhexidine.
Spray the product through the free filter compartment. After this, close the lid and wait no more than 10 minutes. Turn on the interior ventilation for a couple of minutes. Now you can put the new filter in place.
Articles (original and analogues)
Original paper filter article number 6R0820367. Original carbon filter article number 6R0819653.
The Volkswagen Polo sedan is equipped with two types of standard cabin filters:
- Paper 6R0820367.
- Coal 6R0819653.
The cost of original filters is relatively low and amounts to up to 600 rubles. However, you can save money here too by purchasing a cheaper analogue. Since the design of the cabin filter is as simple as possible, it is not at all necessary to purchase an original part. You just need to keep the dimensions.
- A good paper filter from a well-known manufacturer is Bosch 1987435002. But you can also take a closer look at this option - Filtron K 1313.
- Among carbon filters, good options are the Champion CCF0320C and MANN CUK 26 010. Champion CCF0320C Carbon Filter. Carbon filter MANN CUK 26 010.
Most non-original spare parts cost three times less than standard parts. Therefore, under the condition of large seasonal mileage, the use of cheap analogues may be economically justified.
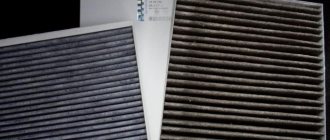
How often to replace the cabin filter
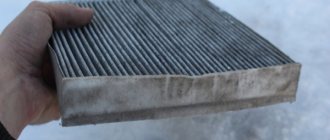
The frequency of replacing the cabin filter largely depends on the operating conditions of the vehicle. The photo shows the filter after a run of only 8,000 km, most of which was on dusty roads in rural areas.
The manufacturer recommends checking the filter at every maintenance and replacing it if necessary.
The average service life of a part is 30 thousand kilometers. Therefore, the change is most often performed during every even numbered maintenance.
It should be understood that the filter dimensions are no larger than in those cars where the recommended replacement interval is 15,000 kilometers. Therefore, the part is often clogged much earlier than its maximum service life.
Reasons for rapid wear and tear
Dirt in the folds of the filter is only large debris, but there are even smaller particles that we do not see, but we breathe in them.
The need to change the cabin filter more frequently arises due to the following reasons:
- For many owners, this is primarily a workhorse. Therefore, the car is used intensively during the summer season. As a result, a large amount of dust accumulates on the filter curtain, so it is recommended to change it every 10 thousand mileage.
- At high humidity, leaves and poplar fluff caught in the filter may rot. To prevent this from happening, it is recommended to periodically shake out the contents of the filter. Otherwise, the musty smell can only be overcome by replacing the part.
- Frequent idling in traffic jams leads to soot microparticles penetrating into the filter system. In industrial areas, the situation can be aggravated by the exhaust from factory chimneys. Carbon filters are primarily susceptible to such contaminants. When the sorbent is finally used, the driver begins to feel foreign odors even if the filter maintains sufficient throughput.
Cabin filter replacement technology
You should not save money by trying to install an old filter by cleaning it from dust; this will not lead to anything good, and the filter simply will not withstand washing. To replace the cabin filter, you will need a pair of screwdrivers (Phillips and straight), a ten-point socket wrench and an automatic vacuum cleaner. Although the filter element is located in a non-standard place, replacing it will not be so difficult, so there is no need to seek help from specialists at a service station.
The replacement sequence will be as follows:
- You need to open the hood.
- Then remove the rubber gasket along with the fastening part.
- Then we unscrew the screws that secure the plastic casing in the middle part of the front glass, using a Phillips screwdriver.
- Using a flat-head screwdriver, we tear off the plugs from the ventilation system to get to the casing mounting bolts.
- Remove the decorative mesh that covers the filter (it is secured with screws).
- We remove the used, old filter.
- We install the new element, and for a tighter fit we lubricate the edges with special sealants.
- We assemble the entire product, only in reverse order.
Well, replacing the filter is not anything supernatural, everything is quite easy and simple. Even people who have not performed this operation before will be able to complete it within half an hour and without any problems.
How often to change the oil filter in a car
How to replace the cabin filter on a Priora
To understand how often to change the oil filter in a car, you need to pay attention to the following:
- Engine Features
. Everything matters: what fuel it runs on, what the compression is, engine operating temperature, pressure, friction force of parts - these indicators significantly affect oil contamination. Therefore, in different engines, oil filters are stressed according to their characteristics. Powerful engine? This means you need to change the oil filter often. - Filter element
. It uses a special porous material similar to paper. It is laid in an accordion to increase the filtration area. The better the filter element and the larger its area, the longer the filter will be able to perform its function. As soon as it is completely dirty, the bypass valve will start working, which means it’s time to change the filter. How often this should be done depends on the rate of contamination. - Terms of Use
. One of the most important criteria that determines how often the filter needs to be changed. The change time depends on the mileage of the car, but it is necessary to note the fact that with the same mileage for cars with different purposes, filter wear can vary significantly. Thus, the oil filter of a city car will be much more loaded than that of a car that travels mainly on highways, which means that it may need to be replaced often.
According to the rules, you need to change the filter as often as you change the oil in a car engine. Each brand of car has its own oil service life, but usually it is within 10,000-15,000 km.
But there are times when it is necessary to change the oil filter ahead of time:
- After a major overhaul of a car engine, when the cylinder head (cylinder head) or sump is opened, the filter is changed along with the oil, regardless of whether they have expired or not.
- When the engine lubrication system is washed with a special compound, a temporary filter is installed, preferably a cheap one, since it cannot be used after the procedure is completed. After washing, they install a good quality part for regular work until the next shift.
- Happy owners of cars with powerful engines practice changing the filter ahead of time in order to avoid breakdowns. After all, it’s better to play it safe and spend extra money on a new filter and oil than to pay a considerable amount for repairing an engine with the latest technology.
- If the car has been sitting for a long time. Even if fresh oil was poured into it before downtime, it has an expiration date and loses its lubricating properties, and also releases oxidation products that impregnate the filter materials. Therefore, if you decide to drive a car that has previously been parked for at least a couple of years, be sure to fill the engine with fresh oil and install a new filter.
Special adapter for cabin filter VAZ-2114
Special adapter for cabin filter VAZ-2114
Although the filter element is quite effective for air purification, many VAZ users complain that it does not at all correspond to the analogues of modern cars. And in order to create something modern from a standard filter element, you need to install an adapter.
An adapter is an adapter that matches the dimensions of the new filter and the geometric dimensions of the landing site. It can also be called a modernized ventilation housing, which also has space for a filter.
The adapter is designed in two parts: front and rear. A filter is installed in the front part, and both parts of the adapter are connected using special rubber gaskets. The advantage of this design is that when washing the car, the filter is completely protected from water entering it.
Photo gallery
Photos of filter replacement are shown below.
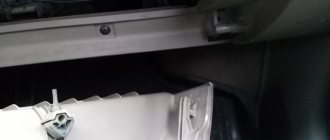
1. Remove the old cleaning device from its seat
2. Install a new filter, securing it with sealant to the frill
Where and how to buy a cabin filter?
Many car enthusiasts who have chosen a VAZ-2114 car have a question about how to become the owner of an adapter in order to make the ventilation system completely perfect.
There are several options here:
- You can purchase a ready-made adapter, and it will be a high quality product. Such store-bought products are made from high-quality material, but this option has only one drawback - the high price.
- If there are good craftsmen in your city who can make this device for you to order, then the price will be cheaper. But no one can guarantee the quality of the adapter.
- Making the adapter yourself is a good option, which will only require money for the necessary materials. However, you will have to spend a lot of time and make a lot of effort. If you have certain skills and experience in making such items, then you are in luck, as you can count on a quality product. Otherwise, you can ask for help from a friend who understands this so that he can help make an adapter.
Making your own adapter
If you are confident that you can make an adapter yourself, this will allow you to save a lot of money, which you can spend on purchasing a good carbon filter element. First, you need to find the adapter manufacturing diagrams on the Internet (taking into account the fact that this product is designed for installation in a VAZ-2114, since there are a great many such diagrams on the Internet for a wide variety of cars).
It is advisable to first make a paper model according to the diagram with exact dimensions - this will allow you to understand which part fits to which and in what order. To make the case you will need galvanized or stainless steel sheets. Plastic is also not bad, but processing it will require a special tool, and working with polyvinyl chloride itself is much more difficult than with metal, especially if curved surfaces and bends are required.
Since you have already cut out the parts for the layout, you should have no difficulty reading the drawing. All the required bends can be made using a large vice and a rubber (or, alternatively, a wooden) mallet. To connect metal parts, you can use either rivets or bolts. Rivets are good because they do not require drilling holes, but you need to know how to work with them - otherwise there is a risk of damaging the thin-walled metal.
When assembling the adapter, it is advisable to treat all connections, holes and other similar places with sealant, which is an excellent sound insulator and will not allow vibrations to occur when driving at high speed or on uneven roads. If you have enough experience, the process of making an adapter will take you a maximum of 5-6 hours, not counting the time spent searching and studying the circuits.
https://www.youtube.com/watch?v=eWi3Ruv3qPo