Hyundai Getz owners change the cabin filter element based on mileage, but this must be done twice a year - in spring and autumn. This will allow for better filtration of the cabin and avoid many negative consequences for the human body.
Video
The video will tell and show how to change the cabin filter in a car, and will also tell you about some of the subtleties and nuances of the procedure.
Replacement process
Replacing the cabin filter on a Getz with your own hands is quite simple. Changing the filter is not difficult - this is one of the components of the vehicle’s routine maintenance procedures. So, let's get started with the process:
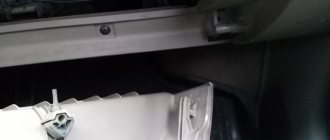
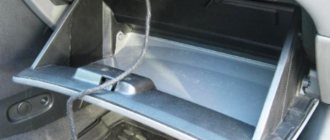
- We sit in the cabin on the front passenger side. First, you need to dismantle the glove compartment, since this element is located under it.
Location of the cabin filter. - Remove the glove compartment lid from the latches. They are located on the right and left.
- Remove the glove compartment lid according to the diagram described in the photo.
First of all, you need to remove all contents from the glove compartment - the glove box must be empty. Once you have freed up all the space in the glove compartment, you will see two latches on the sides. They need to be moved, after which you will be able to dismantle the glove box by lowering it down.
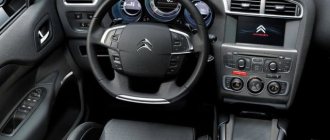
- We find a diagram of the location of ventilation and heating parts.
- Now, you need to unscrew the bar.
Having done this, you will see a wiring harness from below, and from above - the heater damper drive. Both the wires and the damper drive need to be removed from their mounting points, but do this carefully. Electrical wires must never be damaged, otherwise unexpected breakdowns may occur later - these wires are responsible for the operation of most elements of the electrical system. In particular: for the operation of power windows, central locking valves, heated mirrors, radio, backlight, heated rear window, wiper motor. Now you can remove the cover that holds the filter element itself. At the top you will see a tab that you need to press and pull the cleaning system element towards you. First you need to dismantle the top part of the component. It is attached from below using guide rails - pull out the lower part.
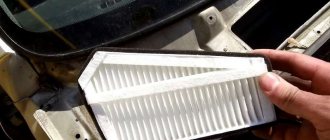
- The filter is located in the housing on the left.
- Pull the latch and remove the cover.
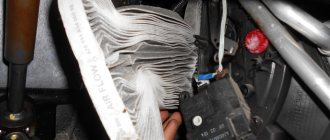
- Pull the filter towards you using the special cover.
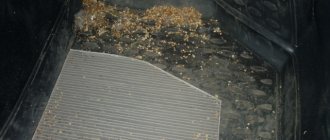
If the SF has been changed for a long time or has not been changed at all, then you will most likely have to remove leaves and other debris from the compartment. To make this process easier, you can use a slotted screwdriver or a utility knife. Now we take a new SF, and before installing it, look in which direction on the body the arrow for the direction of air flow points. You need to install the new SF into the compartment and reassemble everything in the reverse order, remembering to handle the wires carefully.
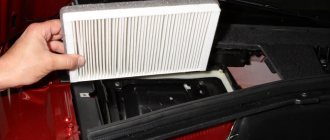
- We install the new filter in the seat.
- We carry out reverse assembly.
As you can see, changing the cabin filter of the Hyundai Getz is quite simple. This does not require special tools or other devices.
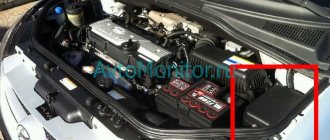
Where is the cabin filter located in the Hyundai Getz 1.4?
It is known that the environmental situation on our roads is somewhat worse than on European ones. The manufacturer's stated service life of the filter should not be taken literally every time. It is necessary to evaluate the condition of the filter elements periodically. After all, replacement may be needed after 10 thousand km.
This procedure should not be neglected, especially if you have to spend most of your time driving a car. In addition, SF is not one of the expensive components. Where is the filter located in the cabin of the Hyundai Getz? The Koreans didn’t split hairs in this case, placing the SF in the same place where most manufacturers place it - under the glove compartment.
Replacement instructions
The good thing about replacing it yourself is that you can clean the landing chamber at the same time. Most service stations do not carry out this work, or in rare cases, only for an additional fee. To carry out all the work, you do not need any special equipment; it is enough to have a handy tool on hand, which can be found in almost every garage. The procedure is as follows:
- Release the glove compartment and slide the two side latches;
- By snapping the latches, the glove compartment is completely removed from the connector;
- This then opens access to the filter, which is located behind a special cover;
- The air filter rod is released; there is a latch on the top of the cover that should also be released.
After which, behind the released cover you can find the SF, which consists of two parts. First of all, its upper part is dismantled, and then the lower part. It is advisable to clean the compartment itself using available tools.
If the filter element has not been changed for a long time, then there is a high probability that dirt and dust have also accumulated in the compartment. As a new copy, it is best to use an original filter or one from an official dealer.
There should be no difficulties with installing new elements. The filter components have special arrows that indicate how to install them in the compartment. Thus, the entire work takes about 10-15 minutes. Even a novice driver can cope with such work without much difficulty.
Source: https://avtooverview.ru/remont/zamena-salonnogo-filtra-na-xendaj-getc-1-4/
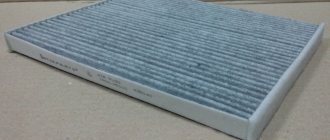
Filter selection
The choice of a cabin filter should be taken quite seriously, since this will determine how high-quality the air filtration in the cabin will be, as well as the direct impact on the human body.
97617-1C000 is the original catalog number of the Hyundai Getz cabin filter. The cost of the element is 1100 rubles.
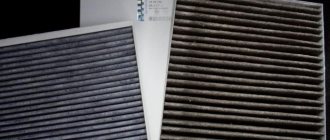
In addition to the original part, there are quite a large number of analogues:
| Manufacturer's name | vendor code | Cost in rubles |
| Mahle/Knecht | LA 195/S | 800 |
| Denso | DCF266P | 800 |
| Filtron | K1182-2x | 900 |
| Finwhale | AS738C | 900 |
| Champion | CCF0030 | 900 |
| Febi | 27943 | 900 |
| MANN-FILTER | CU 2506-2 | 1000 |
| Valeo | 715525 | 1000 |
Test method
The air filter test bench is built according to the ISO 5011 standard used to test these components - and uses all testing methods.
The filter being tested is installed in its original housing (ideal for testing). Next, using a fan, the injection of rarefied air is simulated, as during normal movement. The air flow should be what the engine uses at rated power.
First parameter
— initial resistance. (auxiliary, directly involved in determining dust capacity) It demonstrates what resistance the filter has to air flow, how “easy it is to breathe” for an engine equipped with such a filter. Its value directly determines the life of the filter element. The higher this value, the lower the resource. The initial resistance depends solely on the design of the engine air path, the size of the window covered by the filter element, the material used to make the curtain, and its parameters (the size of the corrugations and their number). Since the comparative tests used the same housing, adapters and feeder, the factors determining the initial resistance were the curtain material, the dimensions of the corrugations and the quality of workmanship.
Second parameter
- dust capacity. This is, in fact, a resource as such. This parameter has no lower limit. In principle, there is no upper one either, but the higher this indicator, the better. The car manufacturer regulates it with the requirement “not less than...”. The key factor determining this parameter is the filtering surface area of the curtain. As an integral indicator, it evaluates its shape, geometry and dimensions. The second most important factor is the properties of the curtain material (air permeability, average and maximum pore size). The division into “first” and “second” factors is very arbitrary in importance, since they largely influence one another. Geometry is determined earlier during design purely chronologically, which is why in this description this factor is declared first.
Third parameter
— filtration efficiency. It shows how much dust supplied to the input was retained by the filter. The higher this parameter, the better. In terms of significance, it is more important than the previous two; when comparing filter elements, it is rated first, and only with equal efficiency values can these elements be compared in other parameters.
Nuances when you need to change the filter
For any brand of car, including Hyundai Getz, it is recommended to change the cabin filter twice a year: in autumn and spring. Why is that?
Because it changes after the winter period, when dirt mixed with water has accumulated in it and it is forgotten and does not allow air to pass through well. Before winter, because in summer there is a lot of dust and dirt on the roads and the filter involuntarily gets clogged.
The cabin filter is changed because dust and foreign objects that enter the car interior are automatically inhaled by a person, and this can have a detrimental effect on health. This air can cause quite a lot of diseases, including cancer and pneumonia, so you shouldn’t skimp on your health and the health of your passengers.
We certify
How is an air filter certified? When testing filter elements in accordance with the requirements of regulatory documentation and the specifications of the customer (motor or automobile plant), four parameters are checked:
• resistance of the air cleaner assembly;
• average dust transmission coefficient;
• duration of operation until the maximum resistance is reached at a certain dust content of the air at the inlet;
• tightness of the filter element.
“Proper” air is needed not only by a motor, an air conditioner or a person. Before us is a filter drier for the pneumatic brake system of trucks
Standard according to RD 37.001.622–95 “Air purifiers for internal combustion engines. General technical requirements" states: for passenger vehicles, the average dust transmission rate should be no more than 1%; for cargo - no more than 0.6%. It must be admitted that these standards are outdated today. KamAZ technical specifications for Euro 3 engines set more stringent requirements: no more than 0.2%, and this, of course, is not the limit.
The Test Center for Automotive Products of the Federal State Unitary Enterprise "NAMI" has a non-motorized stand, created in accordance with regulatory documentation. The filter assembly is installed on a measuring pipeline through which air is sucked. Test dust is supplied to the filter inlet through a special pipe. By the way, this dust is prepared in special vibrating mills by grinding foundry sand containing 96% quartz - the strongest abrasive. The test dust must have a specific specific surface area, measured in square centimeters per gram.
A laboratory (control) filter is installed on the output line after the element being tested, which completely filters out the passing dust. Based on the number of hours of operation of the filter until the maximum resistance is reached, as well as the ratio of the mass of dust retained by the control filter to the mass of dust supplied to the air cleaner, a conclusion is made about the quality of the filter. In fact, the installation simulates road tests.
If the product meets the standards, it receives a certificate. Usually, either the manufacturer's catalog or a batch of a specific product is certified.
An interesting detail: abroad, sand from the desert of Arizona (USA) is used to prepare test dust. This is stipulated in ISO standards, so European laboratories import it from overseas. It must be said that our quartz sand is more aggressive in abrasive properties than American sand, which has “soft” impurities.
Features of the procedure
Undoubtedly, such work has many nuances. And they need to be taken into account immediately before analysis. For example:
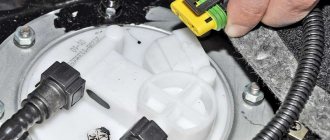
- The fuel hose has a strong clamp. This is specifically done for safety purposes so that it does not fly off during trips. Be prepared that in order to remove it you will have to work hard.
- You don't have to crawl under your car to change the filter. The process takes place through the salon. Under the rear seat there is a small hatch secured with eight nuts. Below it is the Getz fuel filter.
- For safety reasons, namely to prevent static electricity from occurring and a spark not to enter the gas tank, it is necessary to ground the body and yourself. While the fuel hose is in place, it is necessary to release the pressure so that gasoline does not splash inside the car. When you remove the assembled fuel pump, cover the resulting hole with a rag.
- It must be removed from the workbench or table where you plan to disassemble the fuel pump. Namely, there should be no flammable objects there. After all, in any case, during disassembly, gasoline will leak out of the part, which can easily catch fire.
- When you unscrew the lid, you will find a lot of dust. You'll have to blow everything out yourself. However, there is another way. Before starting the replacement procedure, you can contact a car dealership, pay from 1,500 to 2,000 rubles for the work, and qualified mechanics will do everything.
- The part is white. However, after work it should turn black and gray.
This is interesting: Area of operation and designation of the “No Stopping” sign: rules and fines in 2021
Important! The manufacturer warns that the Getz fuel filter should be replaced every 60 thousand kilometers. However, replacement may be necessary sooner if the driver notices that the vehicle is not operating as usual.
Hyundai Getz 2011 l. With. — scheduled maintenance
Barnaul
Hyundai Getz, 2004
289 000 ₽
Omsk
Hyundai Getz, 2006
325 000 ₽
Belovo
Hyundai Getz, 2007
255 000 ₽
Anapa
Hyundai Getz, 2007
355 000 ₽
See more cars on Drome
Participate in the discussion can only registered users.
Login Register