A car battery is designed to provide the vehicle's on-board power supply and store the energy generated by the generator. For more than a century, lead-acid batteries have been used in the automotive industry and continue to hold a leading position. The reason for longevity is simple - high efficiency at low cost. Such batteries consist of galvanic cells that interact with an aqueous solution of sulfuric acid to generate electrical energy. Such power supplies have a stable electrolyte density in the battery, are characterized by high frost resistance and a long service life.
Electrolyte density
The electrolyte is the main component of the battery, namely, the substance that conducts electric current due to its breakdown into ions in solution. The main property that you need to know when using a battery in a car is the density of the electrolyte - in science, this term means the ratio of the mass of the liquid to the occupied volume. In a battery, the role of solution is played by an electrolyte consisting of acid and distilled water.
The density directly depends on the temperature of the electrolyte (the lower the temperature, the higher the density). Battery operation involves alternating cycles of discharging and charging, during which a wide range of chemical reactions occur. When a battery is discharged, chemical energy is transformed into electrical current; when charging, electricity is converted into chemical energy. These processes have a serious impact on the density of the electrolytic solution. The charging process increases the density of the electrolyte, while discharging the battery lowers this value.
Electrolyte freezing point depending on density - Table 1
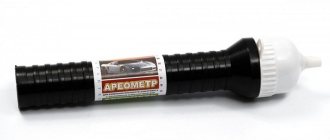
Using a hydrometer device, you can measure the density of the electrolyte in the battery, as well as accurately determine the state of charge of the battery. When the battery is completely discharged, the density drops so much that almost distilled water remains between the plates. Lead sulfate, which is produced in excess during discharge, is not fully consumed when charging the battery and covers the lead plates with a white coating. Sulfation negatively affects the battery capacity, reducing the working life of the power source. The lead plates begin to crumble over time, which leads to a short circuit inside the battery.
Since the electrolyte is a mixture of water and acid, the density of the electrolyte in the battery may increase. When charging the battery, electrolysis occurs - distilled water boils away from the case, due to which the concentration of acid in the solution increases, increasing its density. The sad prospect of electrolysis is obvious. Loss of water will inevitably lead to a decrease in fluid levels. The lead plates will be exposed and enter into a chemical reaction with oxygen, which will lead to shedding of lead and failure of the battery. That is why it is important to stop charging the battery at the first sign of boiling liquid and promptly add distillate when the electrolyte level in the batteries being serviced is low.
Dangers of Low and High Acid Concentrations
An increased electrolyte concentration causes premature battery failure. Acid destroys metal plates. Even steel is sensitive to the effects of sulfuric acid-based compounds.
Low concentration leads to the following problems:
- Sulfation. A coating consisting of lead sulfate appears on the plates. The battery becomes unable to accept a charge.
- Increasing the freezing threshold. The liquid crystallizes already at -5°C. Ice moves and damages metal parts. If the plates are deformed and the capacitors are short-circuited, the battery cannot be restored. With a density of 1.28 g/cm³, the electrolyte will freeze only at -58°C.
- Problems starting the engine. This symptom is most pronounced in winter.
To check the density of the electrolyte, use a densimeter (right).
What should be the density of the electrolyte in the battery?
Domestic car owners are in a desperate debate about the rules for using batteries. The number of cars is growing rapidly, and every driver is trying to formulate his position on this issue. Even among specialized experts, opinions vary significantly. Therefore, we will build on the recommendations of manufacturers, because only battery developers are able to formulate the nuances of operating their own products. Any new battery has an accompanying instruction manual that specifically outlines maintenance activities.
The battery reacts negatively to both increased and decreased electrolyte density. A high density indicator activates chemical processes, making the electrolyte “aggressive”, which leads to a significant reduction in the working life of the product. Low density will reduce the battery capacity, which contributes to problems starting the power unit, especially in winter. It is for this reason that it is necessary to adhere to the values recommended by the manufacturer. The density of a fully charged new battery should be 1.27 g/cm3 at a temperature of +25 °C. In hot climates, a decrease in density by 0.01 g/cm3 is allowed, and in frosty climates - by 0.01 - 0.02 g/cm3 more.
Tips and tricks
How to increase the density in a car battery - there are at least three ways to do this. But for the procedure to proceed correctly, several rules must be followed.
Firstly, measurements should be carried out only at T = 20-25°C. All values should be measured only with a fully charged battery. Secondly, for adjustments they take a specific solution. It is forbidden to pour acid with a more saturated concentration. Thirdly, adjustments are needed for each jar. In this case, the values in them should not differ by 0.01. The plates should be immersed in the liquid to a maximum of 2 cm.
Sometimes the driver cannot compare the density in different banks in any way. Typically, this occurs due to a complete battery failure. For this reason, it cannot hold density. If after the procedure the values fall and do not return to normal after charging, then the battery should be replaced.
Electrolyte density in the battery in winter and summer
A modern battery is a balanced device and there is no point in adjusting the electrolyte for no reason. The density of the electrolyte in the battery is 1.27 g/cm3 and will not allow the liquid to crystallize down to –50°C. Such extreme temperatures are found only in the far north. In such regions, the density is increased to prevent the electrolyte from freezing. It is better to charge the battery in a timely manner and prevent discharge, so that the density indicator remains at the nominal value. Since the ambient temperature is variable, we suggest using a special table with corrections to measure the density of the electrolyte.
Electrolyte density in the battery in winter and summer - Table 2
Let's sum it up
It is within the power of every car owner to extend the battery life through regular and high-quality maintenance. To do this, it is enough not to leave it for a long period without a charge, make sure that it does not boil, use it exclusively for its intended purpose and systematically check the density of the electrolyte in it. Density restoration procedures are a task that requires special work skills or special scrupulousness, therefore, if you are not convinced of your abilities, in order to avoid absolute damage to the unit, entrust this process to specialists.
How to check the electrolyte density in a battery
This procedure must be performed every three months or every 15-20 thousand km in order to monitor the performance of the battery. Measurements are also taken when purchasing a new battery or if problems arise when starting the engine. The check can be performed at a service station or independently in a garage. Before checking the electrolyte level, you should fully charge the battery and take a temporary break of six hours. After all, during charging, the density of the electrolyte increases and the information will be incorrect. For the measurement procedure, you will need a hydrometer, which can be purchased at any auto store. This device is quite affordable due to its low price.
To work you will need:
- Hydrometer
- Protective glasses
- Dry cotton cloth
- Latex gloves.
Before measurement, the power source must be placed on a flat surface and the plugs must be unscrewed. Next, you should squeeze the rubber bulb of the device with your hand and lower the tip of the hydrometer into the outermost battery jar. After immersing the device in the electrolyte, the bulb can be released. The rarefied air in the flask will begin to suck liquid from the jar. Now you need to visually assess the level of the solution in the hydrometer. The amount of liquid should allow the measuring float to float freely inside the device.
After the float stops oscillating, you can record the density of the electrolyte, which should be 1.24 - 1.29 g/cm3. If the numbers differ significantly, then the density of the solution should be corrected. Similar procedures must be performed with all battery banks. It should be remembered that any operations with electrolyte must be performed with protective gloves and glasses. After completing the work, it is recommended to wipe the plastic battery case dry with a clean cloth to prevent self-discharge of the battery.
How to measure electrolyte density and level
We have already decided that the density needs to be checked periodically. Now let's figure out how to do this.
Fortunately, there is nothing difficult about this. To measure, you will need a special device - a hydrometer. If you don't have one, it's better to buy one. Moreover, it costs between 100-200 rubles.
To obtain the correct values for the density of the electrolyte in the battery, you need to follow the rules:
- the battery is placed on a flat surface;
- the liquid level in the jars should be normal;
- The battery should be at room temperature (+20 - +25 degrees);
- The density in the battery is checked in all banks;
- it must be fully charged.
If, after checking the level, it needs to be adjusted, the battery is recharged. After adding distilled water, you cannot immediately measure the concentration. It will take at least 2-3 hours to completely mix the liquid. It’s better to wait even longer - this way normal acidity will be established in the jars, and the readings will be more accurate.
The liquid level in jars is measured very simply. To do this you will need a hollow tube with a diameter of 4-5 mm. You need to lower it all the way into the jar and close the top hole with your finger. By pulling out the flask of the jar, you will see a level - this will be the height of the liquid in the tube.
It is worth knowing that the normal figure is 1-1.5 cm above the plates. Neither increased nor decreased levels should be allowed.
Correction of electrolyte density
Operating a car involves a cyclic load on the battery, during which the catalyst for the electrochemical process changes its structure. Since the electrolyte consists of acid (35%) and distilled water (65%), this ratio can change depending on the degree of charge of the energy source. While the vehicle is moving, the generator constantly supplies electrical current to the battery.
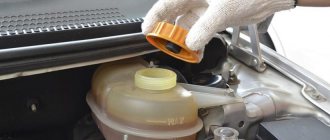
When the capacity is restored, the electrolysis process begins, during which the electrolyte boils and evaporates. A similar process occurs during long-term charging with a special device. The amount of water in the solution decreases, which causes the density to increase and the volume of the liquid to decrease. To restore the nominal value, you need to add distilled water to each battery jar.
Reasons for reducing electrolyte density
To maintain battery performance, car owners add distilled water to the battery, forgetting to check the density indicators. A high concentration of water leads to strong electrolysis, during which sulfuric acid begins to evaporate along with water, which reduces the density of the electrolyte. Over time, the acid content in the solution becomes critical and the solution ceases to act as a catalyst for chemical processes, which negatively affects the functionality of the battery.
Design and principle of operation of the battery
In order to properly service the battery and ensure its proper operation, it is necessary to at least approximately understand what is inside it and how it all works. Therefore, before moving on to questions about the electrolyte, it is necessary to understand how a car battery works and on what principle it works.
Battery design
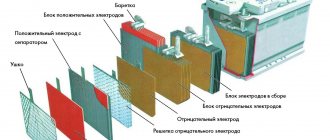
Almost all lead-acid batteries have the same design. They consist of separate sections (cans), each of which has a set of positive and negative plates. The first are called cathode and are made of metal lead. The second, anode, are made of lead dioxide. The plates are collected in a bag and placed in an acid-resistant container, into which the working fluid is subsequently poured - an aqueous solution of sulfuric acid or the so-called electrolyte.
Lead-acid battery section design:
- 1 – jar lid;
- 2 – can body;
- 3 – ribbed settling tank;
- 4 – plates collected in a package;
- 5 – negative (anode) terminal;
- 6 – negative (anode) plates;
- 7 – dielectric gasket – separator;
- 8 – positive (cathode) terminal;
- 9 – positive (cathode) plates.
The finished sections connected in series are the battery. There are three such sections in six-volt batteries, and six in 12-volt batteries.
How it works
So, the design of the battery is quite simple, but how does voltage appear at its terminals? Indeed, if you take a battery straight from the store and connect a voltmeter to it, the device will show “0”. The lack of current is due to the fact that the electrolyte is not poured into the battery immediately after manufacture, and the plates in the battery standing on the store shelf are dry. The working fluid is poured into the battery after purchase.
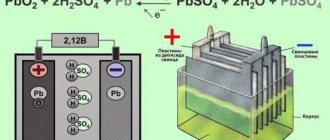
It's time to find out what the electrolyte is for . Since the positive and negative plates have different chemical compositions, a potential difference arises between them when immersed in an acid solution (about 2 V per section, which determines the number of sections in the battery). When a load is connected to the battery terminals, current begins to flow between the plates due to the high electrical conductivity of the electrolyte. At the same time, the chemical process of converting lead dioxide into lead sulfate begins with the participation of sulfuric acid. As soon as the amount of dioxide and sulfuric acid drops to a certain level, the process will stop and the battery will stop producing current - it will be discharged.
During the discharge process, sulfuric acid and lead dioxide are consumed to form lead sulfate
We recommend: Main characteristics of AGM (Absorbent Glass Mat) batteries
But batteries, unlike galvanic cells (batteries), can restore their chemical properties. If you connect the battery to a DC source, then under its influence the sulfate will begin to decompose into lead dioxide and sulfuric acid. The battery will begin to charge, converting electrical energy into chemical energy. As soon as the amount of dioxide and acid reaches the initial values, the battery can be considered charged.
Chemical processes that occur in a battery when it is discharged and charged
Sulfuric acid, which is part of the electrolyte, plays one of the main roles in the operation of the battery. The quality and long-term operation of the battery as a whole will depend on its properties.
How to increase the density of electrolyte in a battery at home
Any battery consists of several cans, therefore, in order to increase the density of the electrolyte in the battery, you will have to adjust the electrolytic solution in each individual container. Using a syringe, the liquid is pumped out and sent into a measuring container. After that, a similar amount of new electrolyte is poured into the jar, which can be purchased in finished form in the store. This operation is performed with each jar, after which the battery must be charged for 30 minutes to mix the solution. Then, after a two-hour pause, we re-measure the density indicators. If necessary, you need to repeat the electrolyte correction. It is important to remember that the difference in density in the jars should not exceed 0.01 g/cm3.
There are situations when the density indicator drops below 1.18 g/cm3. In such cases, the technology described above will not help restore the functionality of the battery - a complete replacement of the electrolytic solution is necessary.
Reasons for distorting battery solution density criteria
Often, the variability in the density of the electrolyte in the battery is due to its decrease. Facts of an increase in the ratio of water and acid are very rarely diagnosed by car owners, most often as a result of incorrect addition of the acid solution when adjusting the concentration. Before you begin restoring the standard concentration of solution in battery jars, it is worth understanding why the density of the electrolyte in the battery drops, since understanding the reasons for the precedent often determines options for eliminating them. It is worth understanding that changing the electrolyte concentration in the power source is a natural procedure, since, by default, the density increases after charging the unit and gradually decreases during the discharging process. The problem is diagnosed only in situations where, after fully charging the unit, it is unable to hold a charge - this is a signal that the density of the electrolyte in the battery has dropped.
Low density of the electrolyte in the battery is an alarming indicator, which without restoration procedures can lead to total failure of the unit and requires immediate measures to restore the concentration of the solution. Often the reasons for a drop in electrolyte density are the following factors:
- The battery is discharged due to prolonged inactivity.
- The solution partially boiled away during the recharging process.
- The distillate was added incorrectly, control measurements of the density of the solution were not carried out or were done incorrectly.
In the first case, to solve the problem, we simply charge the battery: if it works properly after recharging, you can check its density to control it and continue to operate without performing additional manipulations. Low electrolyte concentration in the second case is provoked by chemical reactions that occur during the operation of the device. It is possible to reduce the risk of the battery boiling by disconnecting it from the on-board network during prolonged inactivity of the car. The occurrence of the last situation from the list is relevant when topping up the distillate is carried out incorrectly: without performing a control measurement after the operation, or performing the process with technical errors, without waiting time for the complete mixing of the components of the solution.
If you uncontrollably add water to the battery, the concentration of the liquid will gradually decrease, which will cause unconditional breakdown of the battery, making it impossible to further operate the device.
How to increase the electrolyte density with a charger
There is another way that should be shared. It requires less labor and more time. The essence of the process is simple - you need to charge the battery, setting the minimum current (no more than 1A). Having reached a full charge, the battery will begin to “boil”. In this case, distilled water will actively evaporate. The fluid level in the housing will gradually decrease. Instead of evaporated water, add electrolyte of nominal density. The process is very long, however, in a few days you can achieve the desired result.
How to boost using a charger
If the acid concentration has dropped over the winter, it can be restored by applying a weak current. Charging takes at least 3 days, it is considered effective if it is impossible to restore the battery using other methods. The contents of a battery that has reached full power begins to boil when charging. A sign of water evaporation is the formation of small bubbles on the surface.
Excess liquid will evaporate, the acid concentration will increase. The total fill level will become low, so you will have to add a ready-made battery solution. After completing the procedure, use a hydrometer. If the device readings are too low, repeat charging and adding electrolyte.
How to replace the electrolyte in a battery
By replacing the electrolyte in the battery, the car owner can significantly extend the battery life. Replacement will require the following components:
- Glass ruler with narrow neck
- Container with distillate
- Electrolyte of required density
- Charger
- Hydrometer
- Baking soda
- Protective equipment: (gloves, apron, glasses)
- Rubber bulb
- Clean rags.
Wipe the battery removed from the car thoroughly with a clean rag, removing dirt and dust from the surface. It is recommended to replace at room temperature. After removing the lids from the jars, the solution is pumped out. It is strictly forbidden to turn the battery over, because the chemical deposits accumulated on the bottom can cause a short circuit in the plates, after which the battery will become unusable. To remove electrolyte residues, it is necessary to drill a small hole at the bottom of each jar through which the remaining liquid will flow out.
Now distillate is poured into empty jars to thoroughly rinse the insides of the battery. Next, you need to seal the holes with special acid-resistant plastic. Using a glass funnel, fill the new electrolyte to the required level, after which the battery is charged. To restore optimal capacity, the power source must be discharged and recharged. A fully charged battery should produce a voltage of 12.7 V. The replacement process is completed, the battery can be installed in the car.
Used electrolyte must be disposed of correctly. For this purpose, you will need soda, which is an alkali and can neutralize the destructive effects of sulfuric acid. Pour half a pack of soda into the container with the solution and observe a violent chemical reaction. After the boiling is complete, the resulting substance can be poured into the sewer.
And finally, advice: check the electrolyte density of your battery in a timely manner and charge the battery regularly. Then the power source will “thank” its owner with long-term and uninterrupted operation.
How to store a battery in winter
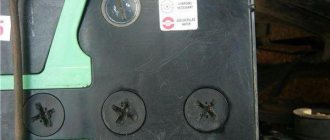
What to do if you are not going to use your car in winter? It is necessary to create the right conditions for storing the battery. If it is a maintenance-free battery, then storing it in a garage without any special preparation is suitable. But with serviceable ones, everything is a little more complicated - it’s better to remove them to keep them warm.
When storing a battery, you must follow several rules:
- Before storage, you need to top up the battery with electrolyte and charge it.
- If you store the battery in a residential building, it is better to prepare a ventilated area for it.
- The air temperature should not exceed 25 °C. Do not leave the battery near heating radiators.
- Do not store the battery in a damp environment.
The best place for a battery is a heated garage, closed balcony, loggia, terrace or veranda.
Tips for storing your battery in winter
If you will be storing the battery separately from the vehicle, follow these tips:
- When refilling, use ready-made electrolyte or distilled water. Tap water cannot be used - it will destroy the battery.
- If there is a high level of humidity in the house, you need to treat the terminals with lithol. After this, it is recommended to close them with special caps or wrap them in oiled paper.
- After installing the battery in the car, let the car run idle for half an hour. For one day, try to use electrical appliances as little as possible.
- If the battery loses its properties, you can try to refill it and charge it again. However, the best way is professional diagnosis.
- Sediment at the bottom of the jar, which appears as a result of the destruction of the electrodes, indicates the need to replace the battery.
Correct proportion in electrolyte
During the operation of vehicles, drivers often encounter a situation where the car starter does not turn from the battery, the crankshaft rotation speed from the starter is insufficient to start the engine, etc. In other words, the battery is severely discharged.
An equally common situation is that a battery fully charged from a charger quickly discharges, and recharging (even taking into account all the rules and recommendations regarding how to charge the battery) still fails to eliminate the problem.
It should be noted that electrolyte density and battery discharge are interrelated. The electrolyte is one of the main components in the battery device, allowing it to accumulate and retain a charge.
It turns out that it is the low density of the electrolyte in the battery after charging that does not allow the battery to retain the accumulated energy, and the charge is not restored from the car generator after installing the battery in the car.
If this happens, then the element requires maintenance, which involves equalizing the density of the electrolyte in the battery or completely replacing it. Let us note that in some cases, to restore the functionality of the battery, it is enough that the density of the electrolyte in the battery banks is brought back to normal.
In this article we will look at why the density decreases, how and in what way the density of the electrolyte in the battery is measured. We will also talk about what a driver should do if a low density of electrolyte in the battery was detected during measurements.
We recommend: Which ignition is better - early or late?
This is interesting: Nickel-cadmium batteries - what they are and where they are used
The electrolyte density in the battery has dropped: causes and consequences
As a rule, a decrease in density occurs as a result of evaporation of the water-acid solution in the battery sections. In this case, we are talking about boiling of the electrolyte in the banks, which occurs when the battery is recharged. Also, water gradually evaporates from the battery for natural reasons, and the process proceeds slowly, allowing the battery to remain in working condition for a long time.
- Taking into account the above, it becomes clear why serviced batteries are needed. Access to the banks allows you to control the electrolyte level. Often this level is maintained within specified limits by adding distilled water. Many car owners are familiar with this process.
- However, not everyone understands that adding water alone cannot solve the problem in all cases, since at the same time it is necessary to check the density of the resulting solution. The fact is that the electrolyte itself partially evaporates along with the water. For this reason, you need to add not only water, but also an electrolytic solution.
- Afterwards, it is mandatory to measure the density of the electrolyte in the battery with a hydrometer. It must be taken into account that the correct density of the electrolyte in the battery will not only effectively accumulate and retain a charge, but will also protect the battery from freezing when cold weather sets in.
In practice, this means that if the driver regularly added only water to the jars and did not monitor the density of the solution, then in winter such a battery may freeze and/or fail.
The fact is that when in winter the temperature of the battery electrolyte in the sections decreases, and the solution itself is not dense enough, then the water in its composition turns into ice.
It is quite obvious that the summer or winter density of the electrolyte in the battery is a relative concept.
It is necessary to constantly maintain the recommended density, regardless of the season. Also, the density for regions with cold climates can be increased slightly, while leaving the value within the acceptable limits, that is, without exceeding.
It is also important to understand that the minimum density of electrolyte in the battery may not cause problems in the warm season, however, with the onset of cold weather, the battery fails even with a normal level of solution in the jars. We also note that the electrolyte in the battery may turn black or become cloudy. In this case, replacing it helps, during which the density is also adjusted.
How to properly increase the electrolyte density in a battery
As you can see, the need to increase battery density may arise for various reasons. First of all, you need to figure out what density of electrolyte to pour into the battery in a given case. Please note that solutions are available for sale, the density of which is initially somewhat overestimated.
This means that during the adjustment process, distilled water may be needed to reduce the density. It should be taken into account that filling with ordinary running water, technical water, etc. is not allowed. So, let's move on. To determine what density is required, we recommend that you familiarize yourself with the electrolyte density table (see above).
The next step is to prepare the necessary equipment, tools and basic components to create the solution:
- hydrometer;
- glass (measuring);
- container for draining;
- rubber bulb;
- distilled water;
- battery electrolyte;
Before you begin, please note that performing operations with acid requires compliance with safety precautions. It is advisable to use rubber gloves and safety glasses to protect your skin and eyes.
Also, in cases where the electrolyte solution is diluted independently, it is prohibited to add water to the acid! It is necessary to first pour in water, after which acid is carefully and carefully added to it! This will avoid injuries and chemical burns.
If the electrolyte is completely replaced or the liquid needs to be drained, do not turn the battery over or tilt it too much. The fact is that such actions can lead to shedding of lead plates, after which a short circuit occurs and the battery fails.
As for density measurements, it is necessary to take measurements when the outside air temperature is around 20 degrees Celsius. It turns out that if it’s cold outside, you must first bring the battery into a heated room and give it a chance to warm up.
It is also important to remember that battery density decreases with discharge and increases after charging. For this reason, to obtain the most reliable indicators, you need to fully charge the battery before taking measurements.
If it is not possible to replace the battery, and there is a maintenance-free type of battery available (that is, work is carried out with a maintenance-free battery), then to gain access to the banks you will need to drill holes in the case using a drill. You also need to prepare a soldering iron for further sealing of the cans.
The plastic that will be used for sealing must be acid resistant.
To drain the old electrolyte or collect its excess, you need to prepare a container in advance. Glass jars or bottles are best suited for such purposes. You will also need to take care of further disposal.
Do not pour electrolyte down the drain, onto the ground or into water bodies!
The acidic solution must first be neutralized with alkali. If you do not have certain skills, then you need to consult with specialists in advance, study the issue on specialized forums, contact a similar question at collection points for old batteries, etc.
We recommend: The radio does not read the flash drive - the cause of the malfunction, methods for eliminating it
After all the nuances have been taken into account, you can proceed to servicing the battery. Next we will look at the process using an acid battery as an example. Note that if the battery is alkaline, then some indicators will differ from those given below.
How to increase electrolyte density
So, density is measured in grams per cubic centimeter, that is, g/cm3. Density measurements must be made in each battery bank. The density of the solution should be from 1.25 to 1.29.
The spread of indicators across battery sections should not be higher than 0.01. In cases where the indicator has dropped to about 1.20, then the density in the banks can be increased by adding electrolyte, which has a density of 1.27.
To implement the task you will need to perform the following steps:
- Topping is done in each individual jar. To do this, use a bulb to pump out as much of the old electrolyte as possible from the jar.
- The electrolyte is then poured into a measuring cup, allowing its quantity to be measured.
- Next, fresh electrolyte is poured into the jar, and only ½ of the volume that was previously pumped out needs to be poured.
- Next, the battery needs to be rocked from side to side, avoiding strong tilts and overturning. Such actions will allow the remaining fluid in the battery to mix with fresh fluid.
- Now you can measure the density. If the value does not reach the desired value, you can add another half of the volume that was previously pumped out.
- Such actions are repeated until the desired density is achieved.
- After the density has returned to normal, you need to add distilled water to the level, and then move on to working with another jar.
If the density in the battery is reduced to 1.18, then you need to add battery acid rather than electrolyte. The density of such an acid is much higher. In cases where it was not possible to immediately increase the density, the process is repeated until the desired value is obtained.
When work with all sections of the battery is completed, the battery can be charged.
After charging the battery, the density of the electrolyte is measured again, and if necessary, the indicator is adjusted using distilled water or electrolyte.
Tips and tricks
In some cases, you may encounter a situation where the density of the electrolyte is initially very low, but after topping up it is not possible to increase it. Also, the electrolyte is gray, black, cloudy or red in one jar or in all sections at once. This indicates the need for a complete fluid change.
- To replace the electrolyte with a pear, you need to completely remove the liquid from the cans.
- Next, you will need to close the control ventilation plugs on the sections.
- After this, the battery is placed on its side or propped up.
- Then a small hole (diameter 3-5 mm) is drilled in the bottom of each section one by one.
- Through the indicated holes, the remaining electrolyte in the battery case is drained into a previously prepared container.
- Then the plugs are unscrewed and the jars are thoroughly washed with distilled water.
- The next step is to seal the holes with acid-resistant plastic.
- Next, you can pour fresh electrolyte into the battery, repeating the steps described above to adjust the density of the solution.
Finally, we would like to add that in some cases such operations make it possible to restore the battery’s functionality for a fairly long period of time, but this does not always happen. Certain chemical processes in the battery, as well as the gradual shedding of the plates, lead to the fact that even after a complete replacement of the electrolyte, the battery may not hold a charge.
If, after all the work done, the density of the liquid still drops quickly or does not rise to the required values after charging, then you should think about replacing the battery.
The driver may also notice that during the operation of the battery, the fresh solution turns black again, becomes cloudy, and boils away (taking into account that the battery is correctly charged from the charger, and the generator and relay regulator on the car are working properly), then such a battery will need to be replaced.
Check instructions
Checking the density level is not a difficult task. To perform it, you just need to acquire a special device. Some auto experts recommend a densimeter, others a hydrometer.
This material will provide instructions on how to check the density using a hydrometer.
We recommend: Why does the engine oil turn black?
Before proceeding directly to checking the density, you need to remember that it is advisable to do this at a temperature of +25°C. And also, in addition to the hydrometer, you will need a measuring cup and an enema bulb, the electrolyte itself, but always fresh, also distilled water and, if necessary, which will be discussed a little later, battery acid, a soldering iron and a drill.
So, step-by-step instructions for correctly checking the density parameter in the battery:
- Separately for each jar, measure the electrolyte parameters.
- Using an enema bulb, pump out the maximum amount of old solution from each jar in turn. In this case, you also need to measure its volume.
- Add fresh electrolyte in the amount of half the volume previously pumped out.
- Shake/rock the battery vigorously to ensure mixing of the fluids.
- Check the analyzed parameter by immersing the hydrometer in the electrolyte through the filler hole in the battery housing. In this case, the electrolyte will flow into the glass tube, and the float of the device will float up in the body without touching the walls of the tube. After the hydrometer stops oscillating, the density level will be shown on the scale. If the value has not reached the optimal value, the previously listed operations should be repeated until the indicators are normal.
- Top up the remainder with distilled water.
Features of a maintenance-free battery
Maintenance-free batteries are a modern type of battery; many of them have cans sealed and a plastic cap sealed on top. Electrolyte is poured into such a battery for its entire service life; caring for the battery is simple; for this you need:
- check the reliability of the terminals and the battery itself;
- clean the housing when it is dirty;
- periodically recharge the battery.
The need for recharging is determined by the indicator, most often green if the battery is in good condition. A red or dark indication indicates a low battery and needs to be recharged. Colors may vary depending on the specific device model.
Maintenance-free batteries have their advantages:
- distilled water does not evaporate in them, there is no need to top it up;
- with proper maintenance, the battery lasts a long time;
- no need to check electrolyte level.
But this design also has disadvantages:
- If there is a problem with the electrical part of the car, the battery will fail faster;
- overcharging negatively affects the condition of the battery, the solution boils away, but it is impossible to add distilled water;
- it is impossible to check the density of the electrolyte;
- maintenance-free batteries are more demanding on charge and discharge, so all rules for timely recharging must be followed, otherwise the battery will fail prematurely.