05/28/2021 158 710 116 VAZ 2115
Author: Ivan Baranov
Following the example of foreign automobile companies, it introduces advanced technologies into its vehicles. One such example is an on-board computer, designed to detect a malfunction in the machine using a digital code. We invite you to find out how the on-board computer of the VAZ 2115 is diagnosed - the error codes will also be deciphered in this article.
[Hide]
Meaning and decoding of codes
During self-diagnosis of a VAZ 2115 with an injector, only numbers or flashes that code the error will be shown on the instrument panel. When reading trouble codes from an electromechanical instrument cluster, it is necessary to record the number of flashes and calculate error numbers from them. Their purposes can be deciphered using a special list. Most of these faults can be resolved independently by replacing failed sensors.
When performing diagnostics, it is necessary to take into account that the number on the screen may indicate two summed errors. For example, 9 indicates the presence of two faults - numbered 1 and 8.
| Numeric combination | Decoding |
| 1 | ECU problem |
| 2 | Incorrect data from the fuel level sensor |
| 4 or 8 | Network power problems |
| 12 | Malfunction of the error lamp circuit in the instrument cluster |
| 13 | No signal from lambda probe |
| 14 or 15 | Incorrect data from temperature sensor |
| 16 or 17 | Problems with the network power supply, it is necessary to check for short circuits |
| 19 | Motor shaft position sensor error |
| 21 or 22 | Throttle sensor error |
| 23 or 25 | Incorrect operation of the intake air temperature sensor |
| 24 | Speed sensor faulty |
| 27 or 28 | No signal from lambda probe |
| 33 or 34 | No air flow data available |
| 35 | Idle speed control sensor is faulty |
| 42 | Ignition control circuit problem |
| 43 | Knock sensor failure |
| 44 or 45 | Violation of the composition of the mixture |
| 51 or 52 | ECU memory errors |
| 53 | Error in CO setting sensor (installed on cars without converter) |
| 54 | Octane corrector sensor (installed on cars without a converter) |
| 55 | Violation of the composition of the mixture |
| 61 | Failure of the lambda probe |
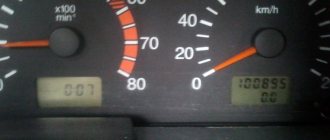
An example of error 14 appearing on the panel
Table of decoding codes for flashes calculated during diagnostics.
| Error code | Flash combination | Decoding |
| 12 | Long-pause-two short | Diagnostic circuit malfunction |
| 14 | Long-pause-four short | Engine temperature sensor malfunction |
| 15 | Long-pause-five short | Likewise |
| 16 | Long-pause-six short | Abnormally high mains voltage |
| 17 | Long-pause-seven short | Abnormally low mains voltage |
| 19 | Long-pause-nine short | Crankshaft position sensor failure |
| 21 | Two long, pause, one short | Incorrect data from the throttle position sensor |
| 22 | Two long, pause, two short | Likewise |
| 24 | Two long, pause, four short | Problem with the speed sensor |
| 27 | Two long, pause, seven short | Lambda probe failure |
| 28 | Two long, pause, eight short | Likewise |
| 33 | Three long, pause, three short | Air flow meter needs to be checked |
| 34 | Three long, pause, four short | Likewise |
| 35 | Three long, pause, five short | Idle speed outside the tolerance range |
| 43 | Four long, pause, three short | No signal from knock sensor |
| 51 | Five long, pause, one short | Memory error in block |
| 52 | Five long, pause, two short | Error in controller |
| 53 | Five long, pause, three short | Memory error in block |
| 61 | Six long-pause-one short | No signal from the immobilizer |
The data obtained allows you to quickly find the faulty element and eliminate the cause of the error.
We recommend: Popping sounds in the muffler - how to fix it yourself?
The video from the Garage channel shows diagnostics on a VAZ 2115 using a scanner and laptop.
Controller errors
The most common controller errors encountered during diagnostics are listed in the table.
| Program error number | Decoding |
| R 0030-0038, 0141 | Malfunction of the lambda probe heating system |
| R 0102 and 0103 | Incorrect signal from the air supply sensor |
| R 0112 and 0113 | Error in data from intake air temperature sensor |
| R 0115-0118 and 0217 | Problems detecting engine temperature or overheating |
| R 2122 and 2123, 0222 and 0223, and 2138 | Incorrect signal from the gas pedal and throttle position sensor |
| R 0171-0172 | Incorrect mixture parameters |
| R 0201-0204 | Faulty injectors (each cylinder has its own code) |
| R 0261-0272 | Problems with injector control |
| R 0130-0134 | Problems with the functioning of the lambda probe before the converter |
| R 0136-0140 | Problems with the functioning of the lambda probe after the converter |
| R 0300 | Multiple misfires |
| R 0301-0304 | Cylinder misfires |
| R 0326-0328 | Knock sensor failure |
| R 0351-0352, 2301 and 2304 | Monitoring the operation of ignition coils |
| R 0422 | Failure of the neutralizer |
| R 0691-0692 and 0693-0694 | Failure of the first and second cooling fan start relays |
| R 0560-0563 | Problems with power supply |
| R 0627-0629 | Indicates incorrect operation of the fuel pump control circuit |
| R 1602 | Malfunction in the engine parameters control controller |
Reset errors
To do this, go to the error viewing menu, press the odometer reset key and wait a few seconds. The number 0 will light up on the screen - the error has been reset. In this case, data about problems is stored in the unit’s memory and must be deleted. If left, the “Check Engine” light will light up in the instrument cluster.
To reset the error, do the following:
- Turn on the ignition.
- Open the hood and remove the negative terminal from the battery. Wait about a minute, connect the wire back and close the hood.
- Turn off the ignition.
- Turn on the ignition again and start the engine. The Check Engine light may come on briefly and then go off.
If the symbol remains illuminated, there is an ongoing problem with some sensor or wiring in the vehicle. It can only be found out using a special scanner. It is necessary to conduct additional diagnostics to determine the problem node. Then carry out repairs and clear any existing errors using a computer diagnostic program for the ECU.
Resetting errors on cars with an electromechanical instrument cluster is carried out by disconnecting the negative terminal of the battery from the on-board network for 10 seconds. The ignition must be turned off.
As stated above, without deciphering error codes, diagnosing a vehicle is meaningless. Therefore, deciphering combinations should also be given attention. Especially if you don’t want to pay a lot of money to specialists at the service station for this. So, let's start with the combinations that appear during self-diagnosis of the car.
What does error 14 mean on the odometer display of the VAZ-2114 during self-diagnosis
How to grind valves at home
Often, many car enthusiasts strive to solve all problems with their car on their own, going for service only in particularly serious cases. This approach in relation to the VAZ “fourteenth” model is completely justified. The design of the car is quite simple, because it is a restyling of the well-known “nine”, to which the designers made some changes. Well, the undoubted advantage of self-diagnosis and repair is the absence of the need to pay, in addition to spare parts, for the work of car service technicians.
The car has become more modern, it now has the ability to conduct self-diagnosis. Let's look at this procedure in a little more detail. First of all, you should find the odometer button on the instrument panel, which is responsible for mileage (total and daily) - you need to press it and hold it in this position. Next, turn the key in the ignition switch - you need it to be in position 1. After this, release the odometer button. You will see arrows start running on the panel. Then we press the odometer button again, but no longer hold it, but immediately release it. You will see information about the firmware.
There is a special table to decipher them. For example, the appearance of code 14 means the signal level coming from the coolant temperature sensor is too high. Accordingly, to eliminate the problem, you should check its performance and, if necessary, replace it with a new one.
You can do this yourself, there is nothing complicated here. At the same time, there is no need to delay solving the problem. The thing is that a problem with the coolant temperature sensor leads to such unpleasant moments in the car’s operation as:
- significant increase in fuel consumption;
- startup problems;
- uneven engine operation;
- change in the composition of exhaust gases.
You can check the functionality of the sensor using a multimeter or voltmeter. This must be done in two modes - with the engine just started, cold, and warmed up to operating temperature (the corresponding indicator will indicate it). In the first case, the voltage when the ignition is on should be 2 Volts, in the second - 0.5. Any deviation from these numbers indicates a sensor malfunction.
However, even after fixing the problem, an error code still appears on the display after self-diagnosis. This phenomenon is explained by the fact that they are simply stored in memory and are not erased. To reset the error code, you need to do one simple manipulation. In particular, you need to turn on the ignition and then disconnect the positive terminal from the battery. After pausing for a few seconds, we put it back. In the vast majority of cases, the error will no longer appear after such a simple manipulation.
By the way, if you plan to go to a car service center, be sure to follow this procedure. Unscrupulous craftsmen often take advantage of this situation. They show the client the problem he allegedly has, and then charge him money to fix it. At the same time, they simply reset the error in a few seconds using the above method. In order not to pay money just like that, it is better to do it yourself.
You should draw your attention to one more, very important point. In some cases, the self-diagnosis procedure is quite capable of misleading you.
The thing is that the processor can sum the codes when two errors are detected. For example, if the microprocessor fails (code 1) and there is no signal from the oxygen indicator. During self-diagnosis, the number 14 (1+13) will appear on the odometer display. Therefore, also pay attention to the behavior of the car, since this method of determining breakdowns is not always 100 percent correct.
However, it is still better to know the error codes. After all, self-diagnosis, despite certain shortcomings, is still your assistant. Often this simple procedure helps direct the search in the right direction, thereby saving you time. As already mentioned, you shouldn’t completely rely on it alone, but this function can safely be called very useful, if only for its simplicity. Of course, reading the on-board computer is a more reliable option. But this requires a special cord, laptop and software. That is, you can’t do without a visit to the service. Self-diagnosis helps you identify the problem yourself – even if not with 100% accuracy.
Diagnostic principles
If a fault check is done at a service station, a special device is connected to the on-board computer, which displays errors in a four-digit format. However, domestic manufacturers have provided another way to obtain information about the condition of the car - to do this, it is enough to run self-diagnosis. It’s easy to do it yourself if you follow the following instructions:
- Below the speedometer on the dashboard there is a dedicated odometer button.
- Press it and turn the ignition key to the first position.
- Immediately after turning the ignition key, release the button.
- After these actions, the instrument needles should begin to move.
- Press the button again and release immediately. If you did everything correctly, data about the firmware version of the on-board computer will appear on the speedometer.
- Press the button one last time and release it. After this action, fault codes should appear on the display.
According to reviews from experienced VAZ-2115 owners, the on-board computer on this model cannot be called perfect. They recommend not relying entirely on self-diagnosis, since the data obtained from it does not accurately indicate problems with transport nodes.
The self-diagnosis system is based on signal processing from common sensors. They are unable to convey the specific data needed to accurately identify the problem. There are imperfections in almost every node. Several controllers are located on the air system and the fuel injection mechanism. They can fail both in the event of a serious breakdown or in the event of a broken conductor.
Most often, VAZ-2115 owners have to deal with incorrect operation of the generator. It is this unit that often produces too low or high voltage, which causes malfunctions of all controllers.
Of course, it is impossible to detect a malfunction in the operation of a vehicle without diagnostics. This can be done using special equipment, which can be found at every specialized service station. But you can also check your car for faults on your own. Note that when checking the car yourself, the error codes will not be the same as when diagnosing on the equipment.
Car VAZ 2115 tuning
So, how can you independently diagnose the state of the VAZ 2115 on-board computer? This question came to the mind of every owner of these car models. Now we will tell you about this in more detail. But diagnosing the car is half the battle, because the resulting combinations of faults also need to be deciphered.
Self-diagnosis of VAZ:
- Find the odometer button on the instrument panel. You need to clamp it down.
- Then turn the ignition key to position 1.
- Having done this, the odometer button will need to be released.
- When you release the button, the arrows on the instrument panel will start jumping.
- Press and release the odometer button again. Numbers will appear on the speedometer indicating the firmware version of the on-board computer.
- Finally, hold and release the odometer button for the third time and you can see the fault combination. In the case of self-checking, error codes will be presented in two-digit form, in contrast to diagnostics on equipment, where faults are presented in four-digit form.
Pressing the odometer button to carry out self-diagnosis of the VAZ 2115
The self-diagnosis procedure is performed as follows:
- When the ignition is turned off, the odometer daily mileage reset button is pressed.
- Then the key is installed in the switch and turned. It is rotated to the first position to activate the ignition system.
- After turning the key, the mileage reset button is released. The arrows on the speedometer, tachometer, fuel and engine temperature gauge will begin to move from the minimum value to the maximum.
- The daily mileage reset button is pressed again. An inscription with the board firmware version will be displayed on the instrument cluster.
- The button is pressed again. After this, VAZ 2114 error codes will begin to be displayed on the dashboard screen.
Deciphering the VAZ 2114 self-diagnosis error codes will help you identify vehicle malfunctions and understand what actions need to be taken.
The channel “Your Own Mechanic” talked about carrying out a self-diagnosis procedure on a VAZ 2114 car.
If the trouble codes have been corrected, you need to erase the Receipt from the ECU (electronic control unit) memory. Otherwise, the indicator will light up on the dashboard when there are actually no errors.
Step-by-step instruction:
- The ignition is activated, but the car engine does not start.
- The engine compartment of the car opens. Use a wrench to loosen the bolt that secures the terminal clamp to the negative terminal of the battery.
- Then you need to wait about a minute, then the battery terminal must be connected back.
- The engine compartment of the car is closed and the ignition is turned off.
- Then the power unit of the machine is started.
If the Check indicator continues to light, then you need to wait a while, it should disappear on its own. If the Check Engine light does not disappear from the dashboard, we can conclude that troubleshooting has not been performed.
User Ravil Shayakhmetov showed the procedure for independently removing the Check error from the dashboard of a VAZ car.
To delete the data remaining in the memory of the control unit, a repeated self-diagnosis of all systems is performed. Once error codes are displayed, the information is recorded. Pressing the daily mileage reset button again will delete the fault data from the ECU memory.
The Glaz Szalg channel spoke in detail about resetting errors in VAZ cars.
As practice shows, and the manufacturers of the VAZ-2115 themselves confirm, the on-board computer installed in this model, unfortunately, is not the most accurate, since the simplest sensor models are responsible for various problems. Self-diagnosis of the technical condition of the car allows you to get a two-digit code, that is, get a general idea of the car’s malfunction. To launch the analysis of the car's condition, it is enough to activate the odometer located on the instrument panel of the dashboard.
Even the designers of the VAZ plant admit that the model 2115 does not have the most accurate version of the on-board computer. The fact is that fairly simple sensors that do not provide specific data are responsible for detecting problems. Self-diagnosis gives two-digit codes and a general idea of the malfunction. To start it, just look at the instrument panel and find the special odometer button.
More detailed data can be obtained by connecting special equipment to the car’s computer or when it has issued an emergency code - during operation. In this case, four-digit codes are issued that indicate incorrect operation of the sensors in a particular node. For example, the air supply system involves several controllers that can indicate a problem with the engine's oxygen consumption.
| City | Company name | Address | Phone number | Price |
| Moscow | North Motors | St. Dubninskaya, 83 | 7 | 2500 rub. |
| Silver elephant | St. Pyalovskaya, 7 | 7 | 3500 rub. | |
| Saint Petersburg | Automagic | St. Uchitelskaya, 23 | 7 | 2000 rub. |
| ClinliCar | Bolshoy Sampsonievsky Ave., 61k2 | 7 | 3000 rub. |
Self-diagnosis of faults on the VAZ 2115
Of course, it is impossible to detect a malfunction in the operation of a vehicle without diagnostics. This can be done using special equipment, which can be found at every specialized service station. But you can also check your car for faults on your own. Note that when checking the car yourself, the error codes will not be the same as when diagnosing on the equipment.
Car VAZ 2115 tuning
So, how can you independently diagnose the state of the VAZ 2115 on-board computer? This question came to the mind of every owner of these car models. Now we will tell you about this in more detail. But diagnosing the car is half the battle, because the resulting combinations of faults also need to be deciphered.
Self-diagnosis of VAZ:
Pressing the odometer button to carry out self-diagnosis of the VAZ 2115
Which one should I install?
Which oxygen sensor for the VAZ-2114 is worth buying? About the second generation there are two types of sensors. Old cars with 1.5 engines and an eight-valve cylinder head have sensors with code 0 258 005 133.
And models that were produced after 2004 were equipped with elements with code 0 258 006 537. What is noteworthy is that both lambda probes are produced by Bosch (at least that’s what it says on the label). The cost of a new sensor is about 1.2-1.8 thousand rubles.
Technical specifications
Let's look at the main technical characteristics of the VAZ engines with which the 16-valve model 2110 was equipped:
VAZ 21120
| Name | Index |
| Volume | 1.5 liter (1499 cm3) |
| Number of cylinders | 4 |
| Number of valves | 16 |
| Fuel | Petrol |
| Injection system | Injector |
| Power | 93 hp |
| Fuel consumption | 7.0 l/100 km |
| Cylinder diameter | 82 mm |
Not a very popular version of the power unit. Although the engine power is high, as practice has shown, this engine did not take root on the VAZ 2110, since it had a number of design flaws. Basically, the engine was installed on a car marked VAZ 21103.
VAZ 21124
| Name | Index |
| Volume | 1.6 liter (1599 cc) |
| Number of cylinders | 4 |
| Number of valves | 16 |
| Fuel | Petrol |
| Injection system | Injector |
| Power | 89.1 hp |
| Fuel consumption | 7.0 l/100 km |
| Cylinder diameter | 82 mm |
A sixteen-valve version of the power unit, which received almost 100 horsepower and had high technical characteristics.
https://youtube.com/watch?v=zEPxE6CZZIo
What codes should you pay special attention to?
Every VAZ-2115 car owner must pay attention when connecting automotive wall equipment to the following codes:
- P0562 or P0563, indicating a low or high voltage level in the electrical on-board circuit.
- P0506 or P0507 will indicate an incorrect idle speed setting, in particular, this error applies to the VAZ-2115 8-valve injector.
- P1301 or P1304 will help the car owner find out about a faulty car cylinder.
- If the cylinder injectors are not operating correctly, the on-board computer monitor will display codes starting with the value P0201 and ending with the code P0204.
- If the car computer displays code P0217, you should immediately stop operating the car, as the error will indicate engine overheating.
- P0300 will indicate a serious engine breakdown, which manifests itself as periodic fuel ignitions.
- Code P0304 will indicate a misfire occurring in the fourth car cylinder.
Every VAZ-2115 owner must understand that system diagnostics, which use data generated by certain sensors, are far from perfect. Therefore, it is best to entrust this task to professionals working at the service station.
When connecting bench equipment, you must pay attention to the following numbers:
- Problems with the electrical circuit of the board at a low voltage level are displayed by the combination P0562, and at a high voltage level - P0563.
- Incorrect setting of the injector idle speed (on the VAZ-2115 it has 8 valves) manifests itself as code P0506 at too low speeds or P0507 at high speeds.
- If a malfunction occurs in one of the cylinders, this may be indicated by one of the errors from P1301 to P1304 (inclusive).
- If the injectors on each cylinder do not operate correctly, then errors will be in the range from P0201 to P0204 (inclusive).
- If combination P0217 occurs, you should stop using the car, as it indicates an increase in engine temperature.
- A dangerous symptom is the occurrence of error P0300, which means random and multiple misfires of the fuel. In this case, you may need major car repairs. A related fault is code P0304, which means misfire in the fourth cylinder.
At the service station, conclusions are drawn not only from the on-board computer, but also from data obtained from an independent study of the vehicle’s systems. In this case, repairs can be carried out in a shorter time and at lower costs.
The first character means:
- B - malfunction of car body elements;
- C - problems with the suspension or chassis;
- P - malfunction of the power and transmission units, as well as the engine control unit;
- U - problems in the operation of information exchange buses.
The second character in the code means:
- 0 - standard SAE type;
- 1, 2 - factory type of fault;
- 3 - reserved.
The third character identifies the system in which the problem is detected:
- 1 and 2 - problems with fuel units;
- 3 - ignition unit and mechanisms connected to it;
- 4 — system for reducing exhaust gas toxicity;
- 5 — idle speed of the power unit;
- 6 - electronic engine control module and wires connected to it;
- 7 and 8 - transmission unit.
The last two characters are a number that corresponds to the error number in the OBD system.
When malfunctions occur in the operation of the engine or other systems, the “Check Engine” indicator is always on on the VAZ dashboard. Its presence may be due not only to a malfunction of the power unit, but also to problems with the wiring or poor contact of one of the sensors.
Description of the error
The coolant temperature sensor itself is a thermistor, to which a power supply of 5 Volts is supplied from the ECU. As the temperature changes, the sensor returns a voltage that drops as the coolant temperature increases. Error p0118 indicates that the electronic engine control unit has detected a situation in which too high voltage comes from the coolant temperature sensor. The normal operating voltage that the temperature sensor produces is in the range from 1.5 to 2 Volts. For most modern vehicles, the corresponding highest threshold value is a signal voltage of 4.91 Volts. In this case, the control unit, in accordance with the logic embedded in it, forcibly turns off the DTOZH and turns on the emergency mode. In some machines, in addition to this, the cooling system fan is forced to turn on, which causes the radiator cooling fans to turn on and constantly operate.
Coolant temperature sensor
In particular, in emergency mode, the coolant temperature is forced to +80°C (176°F). In fact, this value may differ from machine to machine, for example it may be +92°C, which is set after 60 seconds, during which the temperature is assumed to be +20°C. In this case, the car can be operated, but there is a risk that if the actual coolant temperature exceeds a critical limit, there may be problems with the engine.
There may also be unstable operation of the cooling fan (it turns on and off spontaneously, and may not maintain constant speed), fuel consumption increases, the toxicity of exhaust gases increases, and accordingly, the load on the catalyst and the EGR system, if present, increases. Also, the coolant temperature sensor directly affects the operation of the canister purge valve, idle air control valve, cooling system electric fan, ignition system elements, and fuel supply. Therefore, it is better not to drive a car with this error for a long time, but instead carry out appropriate diagnostics and repairs.
How to decipher codes
If you do not know what the data displayed on the display means, then it is pointless to independently check the functionality of the sensors. Therefore, it is important to know how to decipher combinations. The following numbers appear most frequently:
- If code 1 appears, then the fault lies in the microprocessor of the on-board unit itself. This error can be corrected by changing the computer software. It is important to use only official firmware, otherwise you will damage the entire electrical system of the car.
- If the malfunction is hidden in the incorrect operation of the fuel sensor, then 2 will appear on the display. The same number means problems with the electrical wiring, especially if it is displayed in addition to 8.
- When the voltage in the network is high, error 4 appears, and when voltage is low, error 8 appears. If you notice these data, then you need to check the generator and battery. VAZ-2115 owners most often encounter generator malfunctions. It will need to be repaired or completely replaced.
- Malfunctions in the operation of the control lamp in the diagnostic circuit are displayed on the display in the form of a combination - 12.
- Failure of the oxygen level sensor is displayed as error 13. Check the filters, most often they are the cause of this combination. Combinations 33 and 34 indicate mass air flow. In this case, you may need to replace the sensor itself. A malfunction of the controller itself is indicated by code 61 displayed on the display. Experts recommend that if one of these combinations occurs, a full check of the functionality of the vehicle components is carried out. Start with the electrical wiring.
- Car enthusiasts often encounter combinations 14 and 15, which may appear along with an indicator indicating the need to add antifreeze. It is important to interpret this malfunction correctly - the appearance of this data on the display means that the temperature in the system is increased or decreased. The reason for this may be a malfunction of the thermostat. If the node is not damaged, then the problem most likely lies in the control unit.
- Combinations 16 and 17 are output when the voltage in the on-board network is insufficient or too high. It is necessary to check all wiring for short circuits and breaks.
- Code 19 occurs if the crankshaft position sensor does not respond correctly to the test. In this case, it is necessary to check the vehicle with an external device. If it shows a combination in the range from P0340 to P0343, then the breakdown may be hidden in the controller itself.
- With error 24, the on-board computer stopped receiving data about the vehicle speed.
We recommend: Poor car starting when cold - reasons and solutions
Reasons for error 8
For the latter, this most often indicates the need to replace the brushes, since the old ones are already worn out. In addition, the code may occur in such cases as:
- Poor contact at the battery terminals or generator contacts;
- Damage to battery or generator wires.
Sometimes an error indicates other problems. But this happens very rarely.
You can determine the exact reason for this behavior of the car on your own. First, you should visually inspect the battery and generator and their contacts. You may notice oxides and other defects on the terminals and connectors. There is often visible damage to the wiring. The battery terminals may not be properly tightened. In rare cases, you may notice that the battery is swollen.
It’s a good idea to check what the voltage is in the on-board network on the dashboard
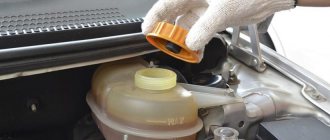
You need to pay attention at what point it decreases or constantly remains low. You should also diagnose the battery and generator with a multimeter in voltmeter mode
Battery diagnostics is performed as follows:
- Set the measuring device to voltmeter mode. Select a voltage of about 20 Volts;
- Connect the black probe to the negative terminal of the battery, and the red one to the positive terminal.
- Evaluate the device readings. If the battery is charged, the display should show at least 12 volts.
If the value is lower, then the battery needs to be charged. If after this, it does not charge completely or discharges quickly, it should be tested with a load fork. This can be done independently or at a car service center.
You should also check the operation of the generator. To do this you need:
- Take a multimeter and set it to voltmeter mode, set the voltage to approximately 20 Volts;
- Connect the black probe to the negative of the battery, and the red one to the positive;
- Start the power unit and wait until the speed stabilizes;
- Evaluate the value on the device display. During normal operation of the generator, it should be at least 13.5 Volts. If the multimeter shows a figure less than the specified one, the generator is not charging the battery well or is not charging at all.
Problems and encodings do not match
Sometimes error codes indicate known working components. This is a big problem for VAZ-2115 owners, so we will give examples of why this could be:
- the sensors themselves failed, not the units;
- low-quality fuel was poured into the tank (often leading to the occurrence of combination P0300);
- clogged fuel and air filters need to be replaced;
- changes in the subtleties of engine operation due to the use of unauthorized software for the on-board computer;
- replacement of parts with non-conforming ones;
- failure of the computer diagnostic system.
If you do not have the necessary firmware to operate gas equipment, you will not be able to use the car at all. The computer will block it. It is interesting that the VAZ-2115 power unit is capable of digesting any gasoline, but its sensors are more sensitive to the quality of the fuel. Perhaps the manufacturer was in a hurry when installing a modern system on the “fifteenth”. Reviews from most motorists say exactly this.
Purpose of the On-Board Computer
Those who have installed an on-board computer in their car, which is the name of this innovation that provides additional control, believe that its functions can satisfy the needs of even an avid car enthusiast. At first glance, this electronic device demonstrates characteristics that were previously presented on the control panel of various VAZ models, including the 2114. Every car already has a clock, as well as a speedometer (speed meter), tachometer (shows engine speed), odometer (responsible for mileage).
The picture shows the Multitronics on-board computer for the VAZ 2114
They, however, flaunt quite harmoniously before the driver’s eyes, properly decorated. Yes, and other parameters are present here: how much fuel is in the tank, there may even be thermometer indicators that display indicators of both external and internal air conditions. Everything is done to the highest standards of automotive design. But control systems (on-board computer) are not just different indicators brought together on one screen.
Errors that the injector may produce
The lifespan of the lambda probe for the “fourteenth”, declared by the manufacturer, is 80 thousand kilometers. But this does not mean at all that it cannot fail much earlier or last twice as long.
The cause of a malfunction of the VAZ-2114 lambda probe may be:
- overheating of the working element;
- violation of the tightness of the connection between the sensor and the exhaust manifold body;
- clogging of the device contacts due to the use of low-quality fuel, or oil (coolant) getting into gasoline.
Errors in the fuel injection unit and combinations associated with engine problems should be included in a separate group. During self-diagnosis, they may appear with the following signals:
- 35 – malfunction of the idle speed sensor, it will need to be replaced;
- 43 – incorrect signal from the detonation regulator, often appears when there is a break in the electrical circuit;
- 44 and 45 – problems with the injection system, fuel is excessively rich or, conversely, lean;
- 54 – the octane corrector controller does not respond;
- 55 – at high speeds the fuel mixture is lean.
It is worth considering combinations 44, 45 and 55 in more detail. If the malfunction is not hidden in the sensors themselves, then you can notice signs of it on the engine side:
- he will triple;
- Jerking may be felt when changing gears;
- in rare cases, the VAZ-2115 simply stalls for no reason.
If you notice one of these combinations on the display, then it is worth conducting a more thorough diagnosis of your car. In some cases, major repairs may be required. Those who are faced with the problems described should contact a service station, because often it will not be possible to repair the car on your own.
What are the errors that indicate a faulty phase sensor?
There are two error codes that indicate a faulty phase sensor:
- 0340;
- 0343.
Symptoms of problems will be as follows:
- the car moves jerkily, and the driving speed noticeably decreases;
- the power of the power unit decreases, in some cases the car cannot pick up speed above 60 km/h;
- the engine stalls when the gear is in neutral, for example, at traffic lights;
- the dynamics of the power unit decreases, shocks during acceleration, pops in the exhaust system;
- The ignition spark may completely disappear, as a result of which the car engine will not start.
Error code 0340
Error code 0340 indicates a faulty phase controller. The camshaft sensor needs to be checked for functionality. Sometimes error 0340 is associated with problems with the crankshaft position controller. The malfunction may be caused by the fact that the timing belt (gas distribution mechanism) has slipped by one tooth.
Error code 0343
Combination 0340 indicates an increased signal coming from the phase sensor. If the controller is working properly, then the contact elements on the device connector are subject to diagnostics. Perhaps the problem lies in their damage or oxidation. It is necessary to clean the contacts and ring the power line. There should always be a 12-volt voltage at the controller terminal (element A), and 0 at the other contacts.
The channel “In Sandro’s Garage” talked about troubleshooting a problem related to the operation of the camshaft sensor.
Fault 1602
Most often, car enthusiasts encounter the P1602 encoding. It means problems in the electrical circuit of the vehicle. This error may be associated with the computer, broken wiring, or a malfunction of the computer itself.
The vehicle condition monitoring system constantly tests the battery, so often on a frosty morning the owner of a VAZ-2115 may encounter an unpleasant surprise on the display in the form of an error. With it, the car simply will not start. If you often encounter problems with P1602, then it makes sense to try to fix the problem by changing the firmware. Remember that you should only use official versions.
However, although the above situation occurs frequently, it is not the only reason for the indicated code to appear on the display. It is worth checking the car for the following problems:
- low voltage in the network (additionally, the sensors may also respond with errors);
- dead battery (in this case, the functions of the VAZ-2115 are blocked);
- short circuits in the wiring or broken wires in one of the sections of the circuit;
- increased load on the electrical circuit (occurs when installing powerful speakers and a subwoofer);
- problems with the generator, in which it produces insufficient current, which leads to constant use of the battery;
- failure of power grid measuring sensors.
Often the failure of various sensors leads to the fact that when you try to start the engine, the computer issues a dozen different codes. A malfunction in the operation of the on-board system itself also manifests itself. Moreover, in some cases, the car may simply not start, since errors do not simply transmit information, but prevent the engine from starting.
The best way to protect against the appearance of unnecessary codes is to change the on-board electronics software. However, it is important to use only official versions. Poor-quality firmware can easily destroy the entire electrical system of the VAZ-2115. It can send strange commands to all controllers at once.
Recommendations
Comments 40
Contact them on their website: www.multitronics.ru/supp they always provided advice before.
I have exactly the same one. Write what happened
I think that my ECU January 7.2 Avtel is simply not compatible with it ((
I also have January, and it works. Judging by the video, it shows the voltage correctly. The temperature inside is 222, so the wire with the sensor is not connected. Did you connect to the diagnostic connector? Top row, second from the right, it seems
It will be useful: Priora fuel level sensor does not work
I have an x115 on-board vehicle and everything works (so of course I connected it)
Why didn’t you like the old one?)
It contains less information. missing (speedometer, instantaneous consumption, average consumption)
If my memory serves me correctly, then I have the same BC and it shows the average consumption, for which I don’t remember the instantaneous, but there are also l/hour. Why didn't you like the speedometer on the dashboard?)))
Don’t know))) I’m used to having it on the trip computer
I looked today, I have an X114, it’s probably different in some way)
You must have voiceover
that's all the difference))
clear) in extreme heat or cold, does the BC malfunction?
Ummmmm, definitely not in the heat. But I can’t say anything about the cold, because... I installed it in April)))))
find instructions on the internet (if you don’t have them) you need page nine! pull out the immobilizer block and see if you have a jumper as in the picture in the instructions, if not, then put it back in, plug the connector back in, try to start the BC again, if that doesn’t work, pull the connector back from the immobilizer without plugging it in, try again (THAT IS IF YOU HAVE AN IMOBILIZER YOU ARE INACTIVE!)
there are brains that are closed and need to be hacked
Removing the error from the device memory
This procedure is used in three cases:
- the occurrence of an error blocks the ability to operate the car (you need to get to the service station under your own power);
- a complete check of all components was carried out and no fault was found;
- The damaged part has been repaired or replaced.
To reset the on-board control system data, you must remove all terminals from the battery and then plug it back into the vehicle's power circuit. It will only take a few seconds to disconnect the battery. After this, the error record will be erased from the system memory. If you want to carry out this procedure for further operation of the vehicle, then remember that the trip should be short - to the nearest car service center.
How to fix the problem
After diagnosis, the problem should be repaired. When reading a signal, it is necessary to check the circuit and devices following it. The most accurate method is to replace the damaged part with a known good one (new). This will eliminate the possibility of incorrect repairs. If the device is in working condition, the lines are checked; usually a primitive test is sufficient. However, if the control unit or relay fails, you will need a special tester and the ability to use it.
Separately, it is necessary to take into account that factory terminals and blocks become loose and oxidize over time. If the contact on the hitch deteriorates, the on-board computer or laptop program will say that the part is damaged, even if it is not.
You can prevent this from happening in the following way.
Important!
You can diagnose VAZ 2114 error codes on the instrument panel and ECU yourself, only if you understand the essence of the process. If you don’t have confidence in your own abilities, it is recommended to contact a qualified technician.
If you have the appropriate knowledge and the necessary equipment, you can find and correctly decipher the error codes of the VAZ 2115 injector and other elements yourself. Due to the simplicity of the car's electrical circuit, the user does not require deep knowledge of mechanics or electronics.
Source
Is it possible to reset the error on the monitor yourself?
You can delete the error code from the memory of the VAZ control unit by disconnecting the terminal from the battery.
The reset procedure is performed as follows:
- The vehicle's ignition system is activated, but the power unit does not start.
- The engine compartment of the vehicle opens. Using a wrench, loosen the screw that secures the terminal clamp on the negative output of the battery.
- After about one minute the contact is reconnected.
- The engine compartment of the car is closed, the ignition system in the car is turned off.
- The car engine is starting. If the “Check” indicator remains lit on the dashboard, it should disappear on its own after a few kilometers.
If the fault monitoring system malfunctions, then another question arises: how to get to the service station. Of course, you can resort to the services of a tow truck, but this will require additional funds. If you are 100% sure that your car is working properly, then you can simply remove the failure records from the computer’s memory. To do this you will need to take the following steps:
- Stop the engine if it has been running.
- Turn off the ignition.
- Remove the terminals from the battery.
- After a few seconds, turn the battery back on, that is, return the terminals back.
In most cases this helps. If it’s frosty outside and the car won’t start because the battery has cooled down too much, then after disconnecting it, you should bring the battery into a warm place. In this case, you will not be able to immediately use your VAZ-2115.
The listed actions will help clear the memory of the on-board computer even after the breakdown has been eliminated. After you replace the faulty part, you will need to first try to start the car, and then follow the instructions given above. As a rule, after repairs, auto mechanics immediately reset the memory of the monitoring system.
First of all, the owner of a VAZ-2115, having discovered that the control system has begun to malfunction, asks the question: how to take his car to the nearest service station? Of course, the most convenient way is to order a tow truck to the desired address by telephone, but the cost of such a service will not satisfy everyone.
You can independently deliver your “iron four-wheeled horse” to a service station if you eliminate messages about previously detected failures from the on-board computer’s memory. But this method can only be used if the car owner is completely confident in the serviceability of his car.
- If the engine is running, it must be turned off.
- The car's ignition is also turned off.
- The connecting terminals are removed from the battery.
- After 30-40 seconds, the terminals are reconnected to the battery.
As practice shows, the above actions almost always help to remove a failure record from computer memory, which, in turn, will help the car owner eliminate the cause of the malfunction on his own or take the car to a service station.
Checking the generator and changing the brushes
Most often, brushes on a generator fail. They are replaced according to the instructions:
- Remove the negative terminal from the battery and unscrew the positive wire from the generator housing. Pull out the wire chip that transmits voltage to the winding.
- Now you need to release the latches and remove the casing from the generator. It is under it that the brush assembly is located.
- Unscrew the two screws and disconnect the wire leading to the brushes.
- Pull out the brush block and inspect it; if the surface is very worn, then you need to install a new similar part in its place.
Assembly of the unit is carried out in the reverse order. Before doing this, you need to check the condition of the anchor. If too much offset has formed on it at the point of contact with the brushes, then you need to remove this unit and grind it on a lathe. If you leave this point without attention, then very soon the new brushes will become unusable.
Recovery
Is it possible to restore a broken sensor? This can be done only in one case - if the cause of the malfunction is poor contact and the sensor itself is working normally. You can also try removing the carbon deposits inside. But to do this, you need to take the sensor out and lower it into an aggressive environment (white spirit or gasoline).
Please note: do not use sandpaper, needle files or other rough objects for cleaning. To avoid damaging the tip, use a soft cloth soaked in solvent. By treating the sensitive element with white spirit, you can restore the functionality of the sensor. But it is not a fact that after cleaning it will take accurate measurements. Ideally, this element should be changed entirely. Fortunately, the operation is simple, you can do it yourself. We’ll tell you exactly how below.
Connecting the On-Board Computer
The VAZ 2114 car model is already equipped with a prepared place for installing an on-board computer. As a rule, a “Multitronics” or “State” computer is very suitable for her. Many car enthusiasts who have experienced all their delights recommend choosing these brands. Moreover, there are versions of this device with a color screen - for amateurs. But this is nothing more than an additional convenience and, apart from “beauty,” is no different from its predecessors.
To connect the on-board computer, you will need to perform some mandatory operations:
- First of all, you should connect the device itself to power. For this, direct current +12V, which exists in the VAZ, is used.
- In order for the BC to start automatically simultaneously with the engine turning on, the power used to ignite the engine must be connected to it. If you connect the side lights to an electrical source, the computer screen will dim slightly, which is very convenient when it gets dark.
- Be sure to connect the ground.
- Whether or not to send a signal from the fuel level sensor (FLS) depends on the model of the BC used. Some of them themselves theoretically calculate how much has already been used, depending on the indicators of instantaneous fuel consumption and its initial presence in the tank.
- It also remains to connect the “K-line” controller diagnostic line.
On-board computer connection diagram
Electronics
Let's look at some especially annoying error codes, which, as if they don’t affect the speed, but constantly remind you that something may be wrong with the VAZ 2110. These include:
- error 1621, warning the driver that the RAM is disabled, that is, code 1621 indicates that the controller is not working, which means that errors are not read, you remain in the dark about what is happening with the systems of your car. Most often, when drivers see the numbers 1621, they ignore them, reset the RAM error (remove the terminal from the battery for a couple of minutes, then put it back on) and drive on. But, after turning off the car and starting it again, they see the same ill-fated code 1621. You can try to carefully inspect the twist near the ECU (to ground), and perhaps additionally solder the factory crimp. However, often even contacting specialists does not help; code 1621 remains on until the RAM memory is changed;
- Sometimes it happens that the injector light comes on. This is especially observed in winter, and when the engine warms up well, the light goes out. Although this is not so scary, it is somewhat unnerving, and the light bulb breaks down if it burns for a long time. It’s better to contact a service center where they can update the firmware, then the light bulb will stop bothering you.
VAZ error codes - table with a list of all errors
Very often, various errors occur in VAZ cars, and in fact, it is not necessary to go to a mechanic to diagnose them; it is enough to read the error code and look at its value in the error table.
The error codes are the same and apply to the following VAZ brands:
1118 Kalina, 2104, 21041, 2105, 2107, 21074, 2109, 21093, 21099, 2110, 21102, 21103, 2111, 2112, 2113, 2114, 21114, 21124, 21 15 with engine injector 8 and 16 valves, 21150 , 21154, 2131, 2170 Priora, 2190 Granta, 2123, 21214, 2131 Niva;