Most car owners know that it is necessary to regularly change the oil filter, fuel filter and air filter. The reason is quite obvious, since the life and stability of the engine directly depends on the condition of such filters. However, many often forget about the cabin filter, which plays an equally important role and is often present on all modern cars.
As for the popular Lada Kalina, this domestic model was also no exception, that is, the cabin filter of the Lada Kalina is also structurally provided and requires periodic replacement. Next, we will look at when you need to change the cabin filter, what signs indicate the need to replace it, and also how to replace the cabin filter on Kalina with your own hands.
How to replace the cabin filter on a Lada Kalina photo, video, articles
One of the simplest repair operations on the Lada Kalina is considered to be replacing the cabin filter. As a rule, the manufacturer skimps on such things and initially the owners themselves have to install it. As written in the maintenance and repair manuals, the cabin filter should be replaced every 15 thousand kilometers, and ideally 2 times a year.
Detailed video on replacing the cabin filter on a Lada Kalina:
Filter replacement process
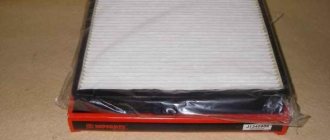
Cabin filter produced by AvtoVAZ
So, in order to replace the cabin filter, you will need some tools and knowledge of the location of the product in the car. Tools you need:
- Accordingly, the new filter itself.
- A T-20 screwdriver, which is found in almost every tool kit.
- Phillips and flathead screwdrivers.
- A rag.
When you are finished with the tools, you can proceed directly to the replacement process. Let's take a step-by-step look at how you can change the cabin filter:
- Open the hood.
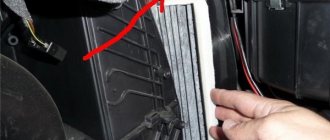
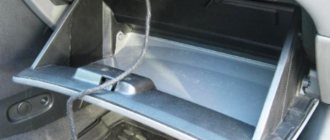
Open car hood - Under the plastic protective grille there is a cabin filter.
It needs to be dismantled. You can remove it by unscrewing the screws, of which there are 5 pieces. Unscrew the 5 screws that are hidden under the plugs - But before you get to the screw itself, you need to remove the plug.
This can be done by prying it with a screwdriver or other sharp object. Use a screwdriver to pry off the plugs to get to the screws - Carefully, so as not to break anywhere, remove the grille.
After the screws are unscrewed, move the grille - We dismantle the stove casing.
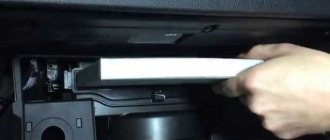
To do this, you need to unscrew the two screws that secure it. Remove the stove casing by first unscrewing the fastening screws - Now you can see the old filter itself.
Unclip the fasteners and carefully remove it. We dismantle the old filter - Install a new filter.
We install a new filter instead of the old one - We carry out assembly in the reverse order from disassembly.
Now, a new cabin filter is installed, and you can forget about it for the next 15 thousand km.
Selecting a filter for Lada Kalina (original and analogues)
11180-8122010 is the original catalog number of the cabin filter for the Lada Kalina. It is produced at the AvtoVAZ plant under the model range 1117-1119. There are analogues of this part, which are produced by the companies Livny, Citron and Neva, under identical article numbers.
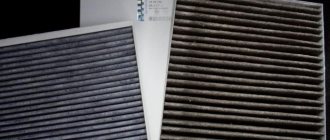
Carbon cabin filter produced by Livny
Nuances when you need to change the filter
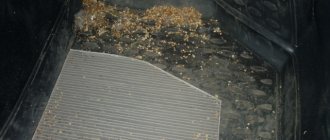
Because it changes after the winter period, when dirt mixed with water has accumulated in it and it is forgotten and does not allow air to pass through well. Before winter, because in summer there is a lot of dust and dirt on the roads and the filter involuntarily gets clogged.
This is what a very used cabin filter looks like, you breathe it in!
The cabin filter is changed because dust and foreign objects that enter the car interior are automatically inhaled by a person, and this can have a detrimental effect on health. This air can cause quite a lot of diseases, including cancer and pneumonia, so you shouldn’t skimp on your health and the health of your passengers.
conclusions
Replacing the cabin filter on the Lada Kalina is quite easy and simple. Every car enthusiast can easily carry out this operation, which does not require special knowledge and skills.
The operating principle of the unit.
The CCGT is mounted on the cabin panel. The clutch accelerator is connected to the unit via a pusher. When the clutch is disengaged, the rod is pressed against the piston of the pneumatic cylinder. When you press the accelerator, fluid flows through the channel into the amplifier. The movement of the pusher opens the valve of the pneumatic system. When the required pressure is reached, the inlet valve opens completely and air enters the pneumatic cylinder chamber. The piston, together with the clutch release pusher, reaches the top point. A feature of the piston’s operation is the effect of two forces on it. On the one hand, it is exerted by the pressure of the compressed air of the pneumatic system, on the other, by the action of the working fluid of the hydraulic booster. The systems are designed in such a way as to provide maximum comfort for the driver to control the clutch mechanism. When the pedal is released, the pressure of the power steering fluid decreases and the pneumatic cylinder stops its operation. The exhaust valve opens and the air escapes to the atmosphere. If the unit breaks down, the clutch is disengaged only through the operation of the hydraulic booster.
Pneumatic system design.
The mechanism consists of a tank mounted on a frame, a single safety valve and lines. The air supply to the amplifier is carried out through a separate circuit of the system. The valve is located on the reservoir and separates the air lines leading to the clutch mechanism and other components. There is a tap to drain the condensate formed in the cylinders.
PGU device.
The amplifier consists of a housing, inside of which there is a piston and a pusher. The piston has a cuff and moves in the axial direction. The amplifier housing is closed on top with a lid through which the pusher passes. To protect against dirt and dust, a wiper is installed in the mechanism on the amplifier cover. The pusher is connected to the clutch release accelerator by a fork mechanism. The accelerator is installed on the axis of the bracket. Air is supplied to the unit from cylinders through the operation of a valve mechanism.
Main malfunctions of the mechanism.
Ural 5557 PGU and hydraulic booster fail for the following reasons:
- Swelling of the sealing ring.
- Incorrect adjustment of the mechanism.
- Wear of cuffs and other elements.
- Release cylinder fork bend
- Fork axle wear.
- Pedal failure.
- Drive jammed.
- Valve wear.
If the mechanism jams, it is worth disassembling it and rinsing it in gasoline or kerosene. Wear of sealing rings and valves leads to leakage of compressed air from the cylinders. This problem can be noticed by the constant “hissing” of the unit. If the problems of the clutch PSU are not corrected in a timely manner, breakdowns of the hydraulic booster may occur in the future, which will lead to a stop in the operation of the vehicle and the need to install new spare parts from the Ural plant.
In what cases is it necessary to replace the unit?
Intensive use of the vehicle in urban conditions, where acceleration and braking often occurs, entails rapid wear of the transmission mechanisms. Frequently pressing the clutch accelerator entails wear on the amplifier itself. Ultimately, when the mechanism wears out, the smoothness of starting and shifting gears significantly deteriorates. In addition, sharp vibrations are transmitted from the engine through the transmission to the car frame. The PSU solves many problems, so its malfunction entails loss of comfort in controlling the mechanism and the vehicle as a whole.
Adjusting the clutch pedal.
One of the problems with the operation of the amplifier is incorrect installation of the accelerator. To fix the problem, adjustments must be made. It is carried out in several stages:
- Bleed the air from the cylinders.
- Move the pneumatic cylinder to the upper position and fix it.
- Press the clutch accelerator to the floor.
- Adjust free play.
- Measure the stroke of the pusher with the engine running.
If the accelerator stroke is adjusted incorrectly, the amplifier will not be able to ensure smooth gear changes and starting the car.
Replacing the cabin filter Lada Kalina, no more dust in the car interior
18.06.2018
The cabin filter serves to protect the driver and passengers from dust and other contaminants getting inside the vehicle, which, at best, can cause an allergic reaction, and at worst, lead to pneumonia and other respiratory diseases. The filter is protection against all street dirt: sand, dust, leaves, pollen and other contaminants.
How to replace the air filter on Lada Kalina.
Purpose of the cabin filter
As many believe, this type of filter material is needed in order to prevent dust and other larger particles from entering the car interior (leaving their marks on the panel, glass, seats, and upholstery). Yes, they're right. Nevertheless, the positive properties of this automotive component do not end there.
Thus, the main task of the filter is to prevent foreign particles from entering the heater engine (whose cost is approximately 2 thousand rubles, and to replace it you will have to remove the entire dashboard, for which the technicians will ask a considerable amount). Note that it is cheaper to prevent a problem than to solve it later.
The duration of replacing the cabin filter for an experienced technician will be no more than 15 minutes, for an amateur (30-40 minutes on his own).
When to change
It is recommended to replace this type of filter material every 15 thousand kilometers. Nevertheless, this figure cannot be called residual.
It all depends on where (exclusively in the city or more often on the highway) and how (with or without air conditioning) you operate your vehicle.
If in most cases you move around a dusty city, then you need to replace it after no more than 10 thousand kilometers.
Signs of a Replacement Needed
- It became harder to breathe inside the car;
- The stove and air conditioner are too loud;
- Windows quickly fog up;
- In the summer, the air conditioner does not cool properly, and in the winter the stove practically does not heat;
- The appearance of an unpleasant odor (due to the accumulation of dirt and bacteria).
Replacement feature
Replacing the cabin filter of a Lada Kalina is a fairly simple operation for a professional, which cannot be said for an amateur. Before you change the filter, you need to know where it is, how to remove it, and what tools you need to use.
Discounts on new cars! Advantageous loan from 9.9% Installment plan 0%
Tools
To get to the filter, you will need only three tools: an asterisk wrench and two screwdrivers (slotted and Phillips).
How to find it
Under the hood - with it open, look for the filter on the passenger side between the engine compartment and the windshield. It is protected by a grille made of plastic.
How to remove
When removing the cabin filter, you need to proceed according to the following “scheme”:
- first of all, remove the plastic grille by unscrewing 5 screws (2 of which are protected by plugs that can be easily removed by using a flat screwdriver);
- remove the wipers or leave them raised;
- unscrew the screws securing the casing;
- take it out;
- dismantle the filter by pushing away the plastic retainer with your fingers.
How to install
- There should be an arrow on the new filter - look for it;
- Then install the filter element with the arrow pointing towards the hood;
- Close all latches;
- Assemble the structure in the opposite order to disassembly.
We hope this article was useful to you.
We have tried to cover each question as much as possible, thereby providing you with valuable information. And as they say, “he who knows what is at stake is the one who rules.” Now you know how to remove the cabin filter on Kalina yourself and perform the replacement procedure without professional help.
Good luck!
Goals and tasks that we solved
We looked at how to replace a part called the cabin filter. In principle, you can not change anything, but simply clean it and return everything to its place. How best to accomplish this, the owner will decide for himself. Also, the instructions will be useful if the owner decides that it is necessary to change the stove radiator. First, the filter is removed, then the dashboard is removed, and then access to the radiator appears.
When dismantling the filter element, be careful. All kinds of debris or dust should not get into the compartment under the filter. It will no longer be possible to remove them from there, and the debris will end up on the fan of the heater unit.
The filter element, if not changed for a long time, can crumble from any touch. In such cases, there is no need to take unnecessary risks. For those who are not confident in their abilities, it is easier to entrust all actions to professional repairmen.
It is better to solve an existing problem rather than create additional ones. And in some cases, it is more advisable to contact a service station rather than try to fix everything yourself. We open the compartment, we see the destroyed filter - then we return everything to its place and go to the service center.
Replacing the cabin filter in a Lada Kalina car begins with removing the old device.
To do this, you need to clearly know where the device is located:
- Open the hood of the car.
- Look from the front passenger side, between the windshield and the engine compartment.
- The cabin filter is covered with a grille made of plastic.
Replacing the cabin filter Lada Kalina 1.2 photo and video
How to replace the Lada Kalina cabin filter yourself. Step-by-step instructions, video.
Many car owners do not attach much importance to the cabin filter, explaining this by the fact that previously cars were produced without this element. But the modern world requires a more attentive attitude to health and safety. Gas pollution, dust and other things that negatively affect the condition of the driver and passengers can lead to dire consequences.
For example, the most common pollen entering the cabin can cause breathing problems or tearing. Allergic reactions manifest themselves in various ways, which pose a real threat to the person driving the vehicle. If you just take your eyes off the road for a few seconds, an accident can happen.
The problem that inexperienced car enthusiasts face is knowledge of filter replacement technology.
.
If you perform these manipulations once, then next time you will spend much less time servicing the machine. The manufacturer recommends
changing the cabin filter every ten thousand kilometers.
But with severe air pollution and poor operating conditions of the car, this figure is reduced to seven to eight thousand kilometers.
Choice of consumables: classic or coal?
Please note that there are two types of filtration systems:
Most car owners recommend a carbon cabin filter, since it is characterized by the presence of two dense layers of synthetics, between which a carbon absorbent is located. It effectively traps dust and other small particles so that they do not enter the cabin. This is especially true in large cities and megalopolises, where the level of air pollution is simply off the charts.
Replacing the cabin filter on Kalina
The essence of replacing the cabin filter on Kalina is clear; all that remains is to figure out how to replace the filter correctly. The whole process is described to the smallest detail in this short photo session, to which we can only add that to dismantle the grille you will need a Torx bit, which every motorist most likely has.
Replacing the cabin filter Lada Kalina step by step instructions. Leading auto portal
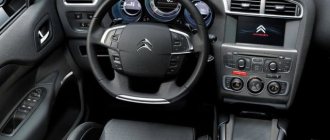
The interior of the second generation Lada Kalina has become more modern: the original seats with a heating system are easily adjustable and can be folded out comfortably. Positive changes also affected the instrument panel. One thing is bad - new plastic panels, upholstery and finishing varnish emit several dozen volatile toxic compounds, including carcinogenic substances (benzene, formaldehyde).
Harmful substances are also contained in exhaust gases that enter the cabin from the environment while driving or standing in traffic jams. They can cause various diseases, such as headaches, allergies, bronchitis, pneumonia, and even cancer.
The only protection against toxic substances is the cabin filter and the tightness of the car door seals. A conventional filter can only capture large dust particles. It is preferable to install carbon filters, but they also have disadvantages:
- The efficiency of air purification in the cabin due to the filter does not exceed 5%, according to experts.
- Short service life of carbon filters to neutralize harmful substances.
Signs of an urgent need to replace the cabin filter.
- 1. Fogging of car windows.
- 2. Poor air circulation in the cabin when the fan is on.
- 3. The appearance of unpleasant odors.
Step-by-step instructions for replacing the cabin filter Lada Kalina 2
1. Select and buy a new cabin filter.
It is advisable to purchase a filter in a plastic case and with an additional seal, which will ensure that debris does not enter the cabin heater.
The data in the table will provide assistance in choosing a carbon filter at an affordable price from different manufacturers.
Table 1.
| Cabin filter brand | ||
| Cost of 1 piece (in rubles) | 151 -183,97 | 669-810 |
Sometimes it is not possible to find a replacement standard cabin filter. In this case, you can use filters from the Chevrolet Niva (Filtron 1229 costing 340 rubles) or an analog cabin filter from other manufacturers Mann and NF (see table). You can find out how to install non-original filters and what problems may arise by watching the video.
2.Remove the supply ventilation grille (frill).
We fix the windshield wiper blades in a vertical position.
We take out two plugs from the right side of the frill.
Unscrew the five screws.
Carefully pull out the plastic grill (jabot).
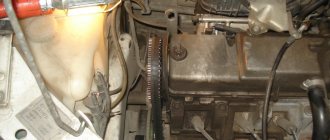
3.Remove the waterproof filter housing.
To do this, unscrew the three screws, then move the casing to the right and pull it at an angle and towards you.
4.Pull out the old filter.
We press on the side latches that hold the filter in the box and carefully pull out the filter.
5.Insert a new cabin filter.
6.Reassemble the removed parts in reverse order.
7. Write down the date of filter replacement and speedometer mileage.
Replacing the cabin filter for Lada Kalina 1 and Lada Kalina 2 differs only in the removal of the protective casing. On second-generation cars, removing the waterproof cover requires unscrewing two screws, not three.
After replacing the filter, not only the air quality inside the car improves, but also the operation of the interior heater - in cold weather, the air in the car heats up faster.
Useful tips
Please note that when replacing the filter, it is necessary to simultaneously clean the drainage hole of the drainage box. You need to clean both from the side of the box and from the side of the front right wheel niche.
Let us remind you once again that when installing the filter, the pointer arrow (on the original filter and a number of analogues) should be directed downwards, and the “front” inscription should be directed towards the front of the car.
We also recommend reading the article on how to replace the thermostat on Kalina with your own hands. From this article you will learn about the signs of a thermostat malfunction, how to check it, and also how to change the thermostat on a Lada Kalina.
Also, when installing the right windshield trim, both protrusions of the trim must extend beyond the front fender flange. In practice, the Kalina cabin filter with a plastic circuit, which also has an additional seal, is best suited for replacement. This type of filter element means that the protection will be better and no debris will get into the stove.
After installing a new cabin filter, do not rush to tighten the cap and begin reassembly. First you need to check that the latches securely fix the element, since a filter that is not fastened well enough can fly off when driving.
When to change the cabin filter on Kalina
The more often the better. The manufacturer recommends replacing the filter element every 15 thousand, but it is not the manufacturer who breathes, but we who breathe. Therefore, it is better not to bring the situation in the air ducts to such a state until it begins to show signs of poisoning:
- unpleasant smell in the cabin;
- heavy drawing of air through the filter by the stove engine in heating or ventilation mode;
- rapid fogging of interior windows;
- decrease in the performance of the ventilation and heating system.
To avoid the first signs of smelly germs, it is best to replace the filter ahead of time rather than hanging up a new fragrance. Based on experience, the cabin filter already requires replacement when exhaust gas odors penetrate into the cabin. This is the first sign. It’s better not to wait for the rest of the flock, but to spend these couple of hundred wisely and protect yourself and your passengers from allergies and other diseases. And being in a fresh car is much more pleasant.