Replacing the engine air filter on an Opel Astra N can be done quite easily. Even a car enthusiast ignorant of periodic maintenance procedures can change the filter with his own hands.
The Opel Astra H air filter is located under the hood on the passenger side . There are 4 screws on the case that need to be removed. Then loosen the clamp on the air pipe and remove the pipe.
Having taken out the old filter, it is advisable to clean the housing from dust and debris. And only then install a new filter and assemble everything in reverse order.
You can see how to replace the air filter in an Opel Astra H using these instructions with photos.
Where is the SF on the Opel Astra
The Opel Astra h filter on all models (hatchback, sedan and station wagon) is located in a special compartment, which can be accessed through the glove compartment for small items on the car’s dashboard. The filter element is multilayer. Each layer performs its own task:
- 1st – carries out “rough” cleaning of large debris;
- 2nd – is a synthetic fiber that attracts dirt;
- 3rd – absorbent carbon layer eliminates pungent unpleasant odors coming from outside the car.
In Astra h cars with an exhaust air conditioning system after 2013, the unit should be replaced more often, otherwise expensive components may fail. For example, cold air coming from outside can damage the evaporator and require expensive repairs or the purchase of a new part.
How often to replace the cabin filter
Proper operation of the purifier is important for:
- performance of the car air conditioner and climate control system;
- supplying clean air to the car interior to create comfortable driving conditions.
On cars with an air conditioning system, a dust cabin filter is installed, which is suitable for gtc and opc modifications. Opel Astra h cars without air conditioning are equipped with carbon purifiers. For all types of filters, the manufacturer sets a certain replacement frequency, which is 15,000 km or at least once a year.
The replacement period depends on the product manufacturer and the conditions in which the vehicle is operated.
If the car is constantly used in urban conditions with dusty road surfaces and a large amount of exhaust gases, then it is advisable to reduce the frequency of replacing the filter element to 10 - 12 thousand kilometers.
Features of replacing the air filter in the Opel Astra G
If a car owner discovers that his air filter is dirty, he can change it himself.
Simple instructions:
- The automotive element is located to the left of the Opel Astra G engine.
- The metal fasteners at the corners of the air filter housing open up. For a more convenient replacement, it is recommended to remove the clasp located in the left corner from the bracket.
- The next step is to lift the cover and pull out the old element.
- The element is blown out of dust or replaced with a new one.
- The procedure is completed by screwing the bolts.
Important! Check that the rubber bands of the new element fit well to the body and that nothing is loose.
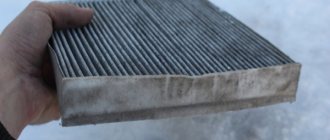
Signs of a clogged filter element
If you constantly operate the car, the filter will quickly become dirty, negatively affecting the operation of the car's air system. Therefore, an important point is to promptly identify the first signs of a clogged filter element. Here are some of them:
- over time, the strength of the air flow coming out of the deflectors decreases;
- there are remains of leaves and grass;
- if you turn on the air flow into the cabin, you will notice a bad smell;
- when it rains outside and the windows inside fog up;
- Dust quickly accumulates on plastic parts inside the machine.
If you notice at least one of these signs, then it’s worth changing the cabin filter on your Opel Astra h. All that remains is to choose the right cleaner.
How to replace the Opel Astra cabin filter with your own hands
Concern for the environment and the health of road users is a trend in the global automotive industry of the last decade. Most major automakers allocate huge amounts of money to develop new systems and modernize existing ones in order to meet modern ideas about the safety and environmental friendliness of vehicles. The cabin filter is not something innovative in this aspect, but without it the health of people inside the car is exposed to much greater risks. Unfortunately, any filter element does not last forever, requiring periodic replacement as it becomes dirty. Today we will tell you how to carry out this operation yourself for owners of Opel Astra cars of different generations, fortunately it is not complicated and can be performed literally in a matter of minutes.
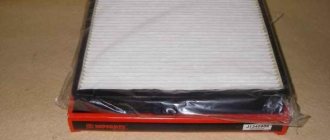
Choosing a cabin filter for Opel Astra
Here the choice is up to the car owner. The original for the Opel car has its GM number 93182436. It is rarely found in retail sales and has to be ordered from the dealers of the manufacturer. Therefore, many drivers purchase a non-original spare part, which does its job well, and its cost is lower than the original filter. Such salon cleaners include products from leading companies TSN, Bosch, Filtron, Delphi, Champion, Mahle, MANN.
Of course, it is better to install a carbon filter; it is a little more expensive than a regular one, but has significant advantages. The design of the product allows you to more effectively purify incoming air, eliminates unpleasant odors coming from outside the car, and removes harmful bacteria
If you order a new part, pay attention to the product article number. A match means that the purchased filter will fit your vehicle perfectly.
Choosing an air filter for an Opel Astra
In order to increase the period of trouble-free operation of the car, technicians recommend purchasing parts and spare parts with original catalog numbers. Below is a list of verified manufacturers:
- Opel Astra Bosch, article number 01457433281, price from 600 rubles;
- Mann, C030130, price from 600 rubles;
- UFI, 03010700, price from 600 rubles;
- Mahle, LX0735, price from 600 rubles;
- Filtron, AP051/8, price from 450 rubles;
- Mann, C26106, from 500 rubles;
- Filtron, AP051/9, from 500 rubles;
- Filtron, AP051/7, from 500 rubles;
- GM (Opel Astra J 1.6), 0834761, from 600 rubles;
- Dello, 5834282, from 560 rubles;
- GM (17), 5834282, from 600 rubles;
- GM (Opel Astra J 1.6), 5834281, from 600 rubles;
- Dello, 5834281, from 500 rubles;
- Filtron, 000031981, from 500 rubles;
- MAHLE (Opel Astra N 1.8), 0000-44401, from 600 rubles;
- FRAM, CA5970 (Opel Astra J 1.6), from 6,500 rubles;
- Opel Astra BOSCH, 1457433281, from 600 rubles.
The filter material is an elastic polymer along the outer perimeter; inside there is a cleaning element made of paper with hygroscopic fiber. Rectangular shape, dimensions 29.3 x 23.7 x 4.20 cm.
It is safest to purchase original products in certified stores, car markets, and points of sale. However, there is a certain risk of buying counterfeit goods. Recently, ordering consumables for repairs in authorized workshops has become popular. So to speak, in one fell swoop you can benefit from prompt installation, quality assurance, and an affordable price.
The third method is successfully practiced - ordering components and consumables via the Internet. This has a number of advantages: the average cost is lower than the market price, prompt delivery, and a wide range of products. At the same time, the risk of supplying low-quality, non-original spare parts increases significantly. The cases are not isolated, they occur quite often. It is not always possible to return money spent or exchange goods.
Replacement process
The air purifier that comes with any vehicle is designed to filter the air flow entering through the vehicle's heating system. After some time, it will become clogged with dirt and dust penetrating from outside. Replacing the cabin filter on an Opel Astra h is a mandatory part of car maintenance.
If you are faced with the need to replace the cabin filter for the first time, you don’t have to immediately go to a service station and spend your money; you can do it yourself and at home, using a universal tool kit. Changing it is not difficult; this procedure will only take about half an hour.
- Check for dirt under the hood of the car; if it is present, it must be cleaned.
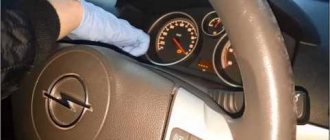
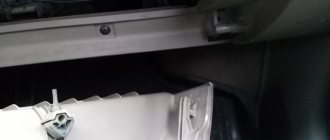
- Open the glove compartment and unscrew the 4 mounting screws using a Torx T20 screwdriver.
- Using a “toward” movement, pull out the drawer for small items.
Please note that when pulling out, the upper part of the glove compartment body may cling to the decorative trim panel.
- On the left side, wires are released to illuminate the interior of the glove compartment. They are carefully disconnected.
- For convenience, disconnect the plastic trim at the bottom of the glove compartment so that it does not interfere later when dismantling the bottom filter cover. To do this, release 2 clip-latches by turning them by hand. If this cannot be done, then unscrew the fasteners with a flat screwdriver (the clips have special grooves).
- Next, using a 5.5 wrench, unscrew the 3 screws of the bottom filter cover, as well as 3 plastic clips (one on the bottom side and two on the top). The steps are as follows: first disconnect the lower fastening, then, lifting the cover, release the 2 upper ones. The procedure should be performed very carefully so that the plastic does not break.
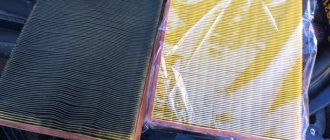
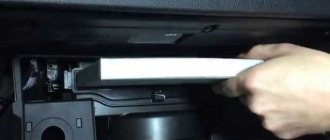
- Take out the contaminated cleaner and wipe the inside of the accumulated dirt.
- Follow the arrow pointing inside the car, install a new filter, moving it until it stops.
How to change the cabin filter in Opel Astra H
Even without any significant experience in car repair, any driver can independently replace the SF. Let us describe step by step the algorithm for this operation, which requires dismantling the glove box:
- completely empty the glove compartment of its contents;
- the storage box is attached to the dashboard using four screws located on the front side in the corners - unscrew them using a Phillips screwdriver;
- Removing the glove compartment will be interfered with by the backlight lamp. It is also easy to dismantle - you just need to pry it off, for example, with a flat-tip screwdriver, and pull it towards you. After removing the lampshade, you need to disconnect the connector and move it to the side;
- Now you can remove the glove box itself by pulling it towards you and up. A plug for the cabin filter will open in front of us, attached to the torpedo body with three bolts;
- unscrew them using a socket wrench or 8mm wrench;
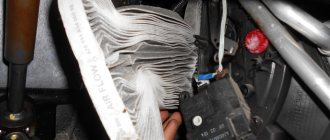
- dismantle the plug. This gives access to the filter element, which can be removed by simply pulling it towards the passenger door. This must be done as carefully as possible, since a lot of dust and debris accumulate on the filter;
- We install the new FS in its regular place and perform all the operations in reverse order.
As you can see, there is nothing complicated - on average, the entire operation will take 10-20 minutes. Note that in a car service, the same work will take much longer and will cost about 500-700 rubles. So, by performing the operation yourself, you get double the benefits. After removing the clogged cartridge, it is recommended to clean the compartment, since leaves often accumulate here, which over time begin to rot, spreading an unpleasant odor that even a carbon filter element cannot cope with.
It is best to perform this operation with a vacuum cleaner, for which, most likely, you will have to remove the fan that prevents the vacuum cleaner nozzle from penetrating into the compartment. You can do without this by using a suitable device (for example, a curved plastic spatula). But if we are going to take care of the prevention of the climate system, then it is also advisable to clean the radiator of the air conditioning system, and in this case you definitely cannot do without dismantling the fan.
The recommended period for radiator treatment is once a year, but usually this procedure is performed just when replacing the cabin filter. Cleaning should be done with a special aerosol cleaner. You can prepare it yourself, using pharmacy chlorhexidine as a base, to which a small amount of flavoring (for example, cologne) is added. After spraying the walls of the radiator with a cleaning composition, you need to let it drain into the drainage hole - this will take about 10-12 minutes.
When installing a new SF, you need to pay attention to the presence of an arrow that indicates the direction of air flow. It is usually present on original filters. There is also an option when the direction of the arrow is reversed, but in this case the inscription UP (up) must be present.