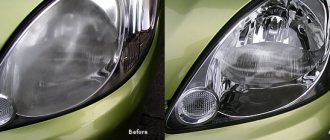
The article is recommended for those car owners who really want to improve the appearance of their car. But instead of popularizing all kinds of angel eyes, bi-xenon strobe lights under the radiator grille and wheel arch lighting, we will offer a more important method for improving the performance of lighting devices - polishing the headlights .
A couple of hours of work along with preparation and the headlights will regain their lost transparency
After all, if you look at modern cars with mileage on our roads, especially at night, many have headlights that “shine brightly,” but this brightness is of little use, because the light spot on the road surface is blurry, and the KIA Spectra headlight range control cannot help in this case. And why this happens - let's figure it out together.
Differences between plastic and glass
Plastic headlights
The fundamental difference between modern block headlights and classic ones is the abundance of plastic . You could even say that plastic has replaced the metal and glass used in headlights of yesteryear.
Modern look of the KIA Spectra headlights
There are several reasons for this:
- Plastic can be easily shaped into any shape;
- Plastic does not rust;
- Easily tolerates temperature changes;
- Withstands light impacts.
Headlights with glass do not have these parameters; in addition, automotive fashion dictates its own trends, experimenting with sizes and shapes, which led to automakers refusing to use them, thereby giving the green light to plastic.
For reference: Often special automotive polycarbonate is used for headlights.
Mechanical properties of plastic
Now let's digress a little and look at our mobile phones - touch or push-button, it doesn't matter. We are interested in their external condition.
Surely you will be able to distinguish a new device from an old one, because:
- The body of the old one will have scuffs;
- Visibility on the screen of the old one will also be reduced due to loss of transparency.
The same thing happens with car lighting - every day the KIA Spectra headlight is bombarded with road dust, exposure to ultraviolet radiation, covered with dirt, midges, etc.
And the fog lights of the KIA Spectra even work in the most severe conditions, as you can read about in our article.
The right headlight gets more dust and dirt
And no matter how durable the plastic of the headlight is, very soon its surface will be covered with marks and scratches, reducing its lighting parameters:
- The top layer will no longer transmit light;
- It will not concentrate on the road surface;
- The headlight will begin to blind oncoming drivers;
- Adjusting the KIA Spectra headlights is powerless to change anything in this situation.
Tip: Making headlight stickers will help extend the life of your lighting fixtures. This transparent film will not only act as a barrier to road dust, but also in the event of serious collisions with large stones, it can save the plastic from destruction.
Installing a film on a KIA Seed headlight
Preparation for polishing
Let's clarify that you can return the lost headlight parameters in two ways:
- Buying a new one, which is in no way justified, because... the price of such work is too high, but the old headlight is in good condition and can last for many more years;
- By polishing, which is less expensive (the cost of work and automotive chemicals will not exceed 10-15% of the cost of a new headlight).
And now is the time to be puzzled by the way this works. If you do not have sufficient experience and skills, we recommend removing the headlight from the car while polishing.
Tip: You can read about how to adjust the headlights on a KIA Spectra after dismantling in the article KIA headlight repair on our website.
If a grinder and grinder don't give you awe, then you can polish the headlights directly on the car.
In the photo - a way to really help a car
Note! Such tuning of KIA Spectra headlights will not only allow you to return the lost parameters with your own hands, but will also set the right tone in your relationship with your car.
Removing headlights
So, for safety reasons, let’s remove the headlight from the car. Which one will be first - left or right, it makes absolutely no difference, because... the work algorithm will be the same.
- Open the hood;
- Disconnect the battery by removing the terminals from its terminals;
- We arm ourselves with a 10-open-end wrench and, from the engine side, unscrew the 3 bolts holding the headlight;
We dismantle from the hood side
Tip: If you have eyelashes installed on the KIA Spectra headlights, then you need to remove them before dismantling so as not to damage them. Most often they are attached with double-sided tape.
- Don't forget to disconnect the wiring and remove the lamp;
- We disconnect the drive with which the KIA Spectra headlight range control is activated;
- Carefully push the headlight forward, preventing it from falling to the ground;
- We repeat the same procedure for the second headlight.
Both headlights are ready for polishing
Useful information: for those who do not know how to remove the headlight on a KIA Spectra and will be performing this operation for the first time, we inform you that the screw parameters indicated on the body do not correspond to reality. Instead of a key for 8, it fits for 10.
Tools and auto chemical goods
For polishing we need:
- Angle grinder, better known as an angle grinder;
- Grinding wheels;
- Special polishing solution, for example Anti-scratch;
- Clean rags that do not leave streaks or lint.
Mandatory polishing kit
How to disassemble a headlight?
Articles Loading...
Welcome to the kuzov.info blog!
p, blockquote 1,0,0,0,0 —>
Disassembling the headlight may be necessary for cleaning, replacing a broken internal element, painting the inside, or installing additional components (for example, angel eyes, LED strips). For most car enthusiasts, the thought of disassembling a headlight can be intimidating.
However, this process is not too difficult if you study the information first and do everything correctly. In this article we will figure out how to disassemble the headlight. Most modern headlights have an adhesive connection between the headlight housing and its lens (the transparent part of the headlight).
Let's look at ways to disconnect this connection, their advantages and disadvantages, as well as restoring the tightness when putting the headlight back together.
p, blockquote 2,0,0,0,0 —>
Preparing to disassemble the headlight
To remove the headlight, you may first need to remove the front bumper, since on most cars it will interfere with the removal of the headlight. After removing the bumper, you need to unscrew the bolts on the headlight mounts. After this, disconnect all connectors from the headlight.
p, blockquote 3,0,0,0,0 —>
Next, thoroughly wash and dry the headlights before further operations.
p, blockquote 4,0,0,0,0 —>
p, blockquote 5,0,0,0,0 —>
Disassemble the headlight using a soft cloth to avoid accidentally scratching the transparent part (lens) and internal chrome parts. After disassembly, there will be many different threaded fasteners left. To avoid confusion, it is better to sign the pieces of paper and put fasteners on them. This will make it much easier to put everything back together.
p, blockquote 6,0,0,0,0 —>
Remove the light bulbs, remove the sealing rubber bands covering the holes for the light bulbs, remove the headlight ventilation tubes. The headlight may have metal brackets that hold the parts of the headlight together around the perimeter. They also need to be removed by picking them up with a screwdriver. They are of secondary importance when the two parts of the headlight are connected. Once these parts are well glued together, these parts are not necessary.
p, blockquote 7,0,1,0,0 —>
How to disassemble a headlight with your own hands
Different headlights have different designs and may be disassembled differently. Most modern headlights have a sealed adhesive connection between the housing and the transparent part (lens). To disassemble the headlight, you need to heat this connection. This will soften the sealant adhesive and allow you to separate the two parts of the headlight.
p, blockquote 8,0,0,0,0 —>
The most acceptable heating methods are a hair dryer or an oven.
p, blockquote 9,0,0,0,0 —>
Let's look at the advantages and disadvantages of these two methods:
p, blockquote 10,0,0,0,0 —>
- The hairdryer method is quite risky. A hair dryer can heat up from 300 to 500 (and above) degrees Celsius. More expensive hair dryers may have precise temperature control. The transparent part of the headlight is made of polycarbonate. Its melting point is 267 degrees Celsius. This can easily melt part of the headlight. If the hair dryer has only two modes, then set the temperature to a lower temperature. The advantage is control of the heating location. You can direct warm air directly to the connection between the two parts of the headlight.
- Using the oven, you can leave the headlight in it and forget about it for a few minutes. You just need to keep track of the time if there is no automatic timer. You gain control over the heating by setting the desired temperature on the stove. An oven produces more even heat than a hairdryer. If you have doubts about the correct temperature at which the oven operates, buy a thermometer (preferably digital) that will show the real temperature inside the oven.
Now let's look in detail at how to properly use these two heating methods.
p, blockquote 11,0,0,0,0 —>
Using a hair dryer
p, blockquote 12,0,0,0,0 —>
Let's look at how to disassemble a headlight using a hair dryer. Do not forget that a hair dryer heats the air to a high temperature and if you leave it in one place for a little while, the plastic of the headlight may be damaged. Keep the hairdryer 10–15 cm away from the headlight. You can get closer, but then you need to be especially careful. Do not concentrate the heat on one place, move the hair dryer along the joint. Heat for a minute and try to split the joint with a flat tool (you can use a rounded butter knife). If the heating is not sufficient, then heat further, then try again.
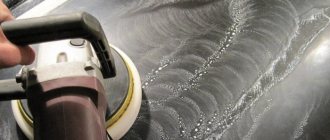
Polishing process
Now you need to fix the headlight while polishing. The best fit for fixing is the back cover of the KIA Spectra headlight, which must be secured to the table so that there is access to the surface that we will polish.
Advice: if you don’t have an angle grinder on your household, you can rent one from construction companies or supermarkets that sell equipment and tools.
Be sure to check the reliability of fastening the circle.
The work instructions are as follows:
- We install an adapter for the grinding wheel on the grinder;
- Let's adjust it to the lowest speed;
- Install a 600 grit sanding wheel;
- With its help, we will remove the oxidized layer of plastic (first stage);
- Let's replace the circle with a smaller one - 1200 grit;
- Using a spray bottle, apply water to the headlight;
- We continue cleaning the surface;
- Wash off and apply a little polishing paste to the surface of the headlight;
- Set up the polishing wheel and start polishing.
The described method is also suitable for other brands and models of cars. If you want to learn how to repair fog lights on a Suzuki SX4, you can also read the material on the website.
Masters recommend the following cycle of polishing operations:
- First, rub the paste over the entire surface of the headlight;
- At low speeds, walk twice over the entire surface;
- Increase speed and repeat the cycle.
At the end of the process, all that remains is to wash off the remaining polishing paste and wipe the headlight with a special polish . Do not forget that after installation on the car you will need to adjust the headlights on the KIA Spectra .
KIA Spectra SQ 56 ♫ › Logbook › Sound insulation under the dashboard, etc. part 1 analysis
It has long been in the plans:
-Improve the sound insulation of the floor.
-Improve the sound insulation of the engine shield. -Wrap all wires in anti-squeak material. -Lay new speaker wires and transfer crossovers under the seats (rough audio). -Prepare (remove crooked joints) and drag the panel into Khortytsia eco-leather, as well as the seats. Naturally, we start with disassembling the interior. There’s nothing complicated to break or build). We unscrew the front seats, remove the rear sofa. We remove the plastic sills and what’s in the way. We remove the beard and dashboard and pull out the carpet. I cut off some of the interfering wires, then I’ll route them differently.
I am attaching instructions for removing the torpedo from the Internet:
The panel is attached with 8 bolts: 1.2 - under the plastic insert (it is latched, just pull it towards you, it will come off) on the driver's side, 3.4 - on the passenger side, 5.6, 7.8 - two at the bottom of the gearbox on the left and right sides.
Removal in order: 1. “-” from the battery 2. front panel, where the controls for the heater, emergency lights, and mirrors are. Above the dashboard, unscrew the two screws, remove the panel from the latches (carefully towards yourself, and it will come off), disconnect all the wires, and move the panel to the side. 3. Remove the central panel where the handbrake is. It is attached to 4 screws on the bottom left and right, near the rugs. There are two bolts in the box, under the rubber mat, a self-tapping screw under the round rubber mat, which is under the glasses. We disconnect the heating wires from the bottom. 4. Remove the panel under the steering wheel. Three screws and latches. 5. Unscrew the 8 bolts that I wrote about at the beginning. The panel is now loose. 6. Disconnect all the waving wires. All input/output wires are individual, so it is not possible to mix them up. THE CUSHIONS WILL NOT JOP OUT. 7. Unscrew the 2 bolts from the bottom of the steering wheel on the left and right sides, lower the steering wheel down. 8. Remove the panel. HERE you can clearly see how to remove the panel, in the BZ Nafffanya ————————————————————————————————————————— ———- There turned out to be a lot more business than I thought, so think a hundred times before you go to sort it out! QUICK NAVIGATION IN BZ
Source
Features of polishing without removing headlights from the car
Let's consider a situation where you do not remove the headlight and perform all operations directly on the car. Before carrying out similar tuning of the headlights on the KIA Spectra, the following parts and components must be secured before starting work:
- Cover the surface of the hood with newspapers and masking tape;
Preparing for work - protecting the hood and bumper with tape and old newspapers
Tip: Pre-wash the hood, bumper and headlight glass.
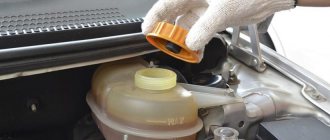
- Using a soft rag, apply polishing compound to the headlight ;
- Pick up a grinder with a polishing wheel and start rubbing the paste;
Applying paste to the surface of the headlight
Advice: at first, the speed should be minimal so that the particles contained in the paste do not scatter under the influence of centrifugal force, but fill all the scratches on the plastic.
There is no need to rush this process.
- Check the instructions for the polishing paste - it indicates the time required for polishing;
- Make sure the surface becomes more transparent. You can increase the speed, avoiding strong pressure;
- At the end, be sure to apply a protective polish to protect the surface from exposure to ultraviolet rays.
Polish is a must!
Note! After any work on the headlights, adjusting the KIA Spectra headlights is mandatory. As a result of vibrations caused by the sander, the direction of the light flux may shift.
Dismantling and disassembling optics
It is not possible to disassemble the headlight directly in the car, so the optics will have to be removed. Cars use different mounting systems; many models will require the front bumper to be removed.
Typically, the optics are mounted with 1 or 2 bolts on top and several latches on the bottom, under the bumper. To remove the part you need to do the following:
- Open the hood and remove the negative terminal from the battery.
- Unscrew the screws holding the headlights.
- Disassemble the back cover and remove the chips and wires.
- Remove lighting fixtures.
Some manufacturers use a latch system that does not require the use of bolts. It is quite easy to disassemble and remove such a part.
To install lenses, we must disassemble the optics. To do this you need:
- Unscrew all the screws along the contour of the glass on the back side.
- Disassemble the retaining clips and latches.
- Take out all the light bulbs.
- Place the part in a box of suitable size with a small hole for a hair dryer.
- Close the box and heat the headlight for 5–8 minutes.
- The softened sealant will easily come off if you carefully pry the glass with a flat-head screwdriver.
Often the headlight is assembled using a special rubber glue, which is easily softened in a box with a hairdryer. You should carefully remove any remaining compound that will interfere with the assembly of the headlight.
To remove the reflector from the headlight housing, screw in the adjusting screw to the end of the thread and remove the plastic fastener.
Useful tips
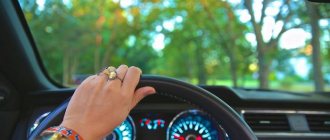
Make one useful rule for yourself - do not wipe dirty headlights dry on any car or motorcycle, be it an expensive foreign car or an old IZH! If you don’t have water, then spend time looking for it rather than using a dry rag or newspaper to wipe off the dirt.
Important: From such actions, the surface of the headlights, whether rear or front, will quickly become cloudy and covered with scratches. This is clearly visible in the photo below.
Visual comparison of the rear lights - the headlight on the top was “washed” without water, on the bottom – only with water