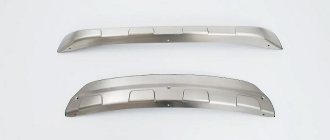
The bumper lip is a rubber splitter designed to be mounted on the front bumper, rear bumper or on the door sills of a car. In its initial state, the universal lip looks like a U-shaped strip of dense rubber. When installed, one of the edges of the lip is attached to the bottom of the bumper, as a result of which the lower part of the car looks stylish and acquires a certain completeness.
Comes from motorsport
Another name for this part is splitter. In big motorsport, a splitter is a special limiter in the form of a plane, thanks to which a vacuum is created under the bottom of the car by limiting its flow under the front part of the bumper. The thinner air under the car provides a kind of cushion on which the car acquires greater lightness and, accordingly, speed.
This technology is complex; it is hardly possible to achieve a similar aerodynamic result using a rubber lip at a speed of 90 km/h. However, the universal rubber lip has its own advantages; it makes the operation of the car more comfortable and somewhat special for the car enthusiast.
Video “How to attach a lip to a car bumper”
The recording shows how to install a lip on the front bumper of a foreign car "Honda Airwave".
Dear subscribers and guests, good afternoon everyone
.
Today's post is about installing a rubber trim on the front bumper. Consider installation options. (will be useful for those who are going to bet)
Brief description of installation
1) Two sockets on each side, select the face of the machine. 2) Apply lip and curl it. Both are very convenient to do together because one lies under the car and spins, the other overlaps and aligns (it is advisable to be sober so that everything goes smoothly) Summary Slowly, Raymond and I installed this device on our cars. The photo is small because our cars were dirty). Although two sports, one white and the other black, would look good together!
Now the most important thing!
The most difficult thing. This is to understand how it needs to be attached, Raymond and I twisted and twisted, looked at photos on the Internet, and in the end we twisted it the way we liked)
Some observations
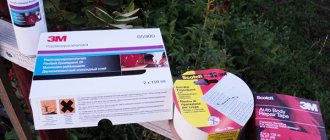
There are two types of lips: 1) With 3M adhesive tape, as practice shows, this is not bad 2) Without 3M tape (we had it without tape)
As it turns out, there are many installation options!
My opinion is also expressed, I really like how we got it.)
Good luck to everyone along the way, don’t switch, there are many plans ahead)
Traditionally a photo report. The results of our work. ))) Also in the last 4 photos are OPTIONS THAT CAN BE EXHIBITED.
Source
Unexpected features
It would seem what changes a 2.5 meter long rubber band can make when using a car. And they exist and, indeed, are very worthy of listing them.
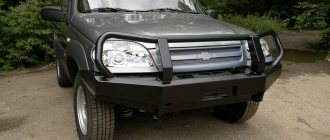
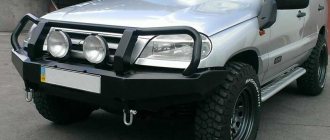
Lip with bumper
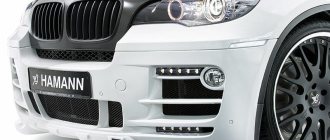
- The universal splitter gives the car a new look - more aggressive and sporty. The front of the car seems more predatory due to the fact that it becomes wider due to the lip, and the visual decrease in ground clearance evokes thoughts of a sports car.
- The splitter looks especially organic when combined with other sports body kits. Alternatively, the lip can be attached around the perimeter of the car: above the wheel arches, on the rear bumper and along the side line of the car.
- When operating a car in bad weather, the space under the hood of the car gets dirty much less. In addition, when falling into deep puddles, a significant part of the water is “extinguished” by the lip on the bumper, so much less dirty water gets onto the windshield.
- The universal rubber lip will appeal to those who, when parking, rely on the bumper scraping against the curb. The rubber lip will protect the bumper from chips, scratches, and tears. This universal part costs tens of times less than a bumper, and, if necessary, will take a damaging blow. The lining material rarely tears, never breaks, and quickly returns to shape after deformation.
Disadvantages of a splitter
An obstacle to the movement of a vehicle is not only the aerodynamic resistance of its shape, but also the process of filling the space it has just left with air, which creates vortex flows of a lower density than the vehicle encounters.
The vortices cause braking forces and, accordingly, an increase in the load on the “front” of the body. This is where the mounted splitter on the bumper helps. It directs appropriate air flows along other trajectories and helps solve problems with aerodynamics and effective braking of the vehicle.
Relevant experts strongly recommend either not installing splitters at all, or installing them directly on the front and rear buffers. And that's why:
- If you install only the splitter on the front bumper, the down pressure will act only in the front part of the vehicle, while the rear wheels will receive worse traction than the front wheels. And for vehicles with rear-wheel drive, power will significantly decrease and fuel consumption will increase.
- Installing a splitter only on the rear buffer will create a similar situation at the rear of the vehicle, which will certainly reduce the load on the front steering wheels. This will obviously not be to the taste of drivers of vehicles with front-wheel drive.
Features of choice
The part is produced by several manufacturers in China, the USA and Korea. Products differ in the quality of rubber, the width of the tape, and the curvature of the contour along the width. Some manufacturers supply their creations with soldered decor of various colors - so that you can choose a lip to match the car body.
As already mentioned, the finished part is a tape of various lengths. The length of the rubber lip in the standard version is 2.3 meters. This length is quite sufficient for standard sedan cars. If a splitter is purchased for GAZelles, KAMAZs and jeeps, it makes sense to pay attention to tapes with a length of 250, 280, 300 or 330 centimeters. Just keep in mind that the longer the tape, the higher the cost.
In order not to get into trouble with choosing the length of the product, it makes sense to use a tape measure to measure the required length of the part of the car that you plan to refine: bumper, wheel arches, sills, rear bumper. Manufacturers recommend buying a lip 10 centimeters longer than the figure obtained as a result of the measurement.
Types of splitters
The materials from which splitters are made are very diverse:
- Fiberglass. A very cheap material made from synthetic resins with a fiberglass mesh placed inside to increase strength. It is not widely used in production, as it is unprofitable for manufacturers.
- ABS plastic. It is also a very cheap material, which (with the addition of various impurities) is widely used by automakers, but the service life of parts made from it is relatively short due to the evaporation of volatile phenol compounds from it.
- Silicone. It has recently found application in the automotive industry. This polymer is valued for its ductility, heat resistance and long service life.
- Carbon or carbon fiber. This material is good for everyone, but has one drawback - its high price, so it is usually used for expensive and prestigious vehicles.
- Steel or aluminum. In the 21st century, completely steel and aluminum parts are practically no longer manufactured. In the case of splitters, they are mainly used to make spoiler “blades”.
Installation: simple but delicate
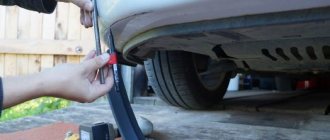
In the simplest version, installation will involve attaching the apron to the bumper using double-sided tape. However, this method is not the most reliable; there is a risk of losing the apron at high speed or when the car is used harshly.
An alternative option involves attaching the skirt using a construction stapler. This method is more successful. During the work, you must ensure that brackets are placed at least 1 bracket per 10 cm.
The ideal, but also the most labor-intensive installation method involves fixing the product using self-tapping screws and plastic washers. The fastening step is also 10 cm. It will take a little more time, but you definitely won’t have to redo it!
When installing, it is recommended to make cuts along the edge of the tape so that it fits neatly in the bend areas. It is better to make cuts in the shape of the letter A.
The installation is most conveniently carried out on an overpass.
Nowadays, car stores offer a considerable variety of all kinds of spoilers. However, often those that you like in appearance are partially not suitable in size. Or those that fit perfectly fall somewhat short in terms of characteristics.
How to make a bumper splitter yourself?
Here is a short description of how to install a skirt (splitter) yourself. In any case, the splitter is attached to the bottom of the bumper, adjacent to its rear edge.
- We carry out a thorough fitting of the purchased splitter to the vehicle bumper. After this, we make adjustments so that the lip fits tightly, there are no distortions, unnecessary tension, and so on.
- Determine and draw the sealant application line. It is easier to work with modern primerless sealants.
- We carefully process all necessary surfaces in order to remove factory varnish and other particles and substances. We degrease the surfaces to be bonded with a special or regular detergent.
- We paint by spraying paint in the required places. Of course, the shade may not be suitable, but we are not at a service station. We save money.
- We apply primer and primer to the surfaces to be bonded, and sealant to the corresponding places on the splitter. In such a way that you can then remove excess glue, and not try to fill the voids that have arisen with it.
- Together with an assistant, we press the surfaces to be glued together and patiently hold them for a quarter of an hour. It is better to secure the bottom and edges of the skirt with self-tapping screws. It wouldn’t hurt to connect its top to the bumper with tape, which can be removed in a day.
- The resulting seam is sealed with transparent silicone sealant.
The splitter on the bumper is installed, now it’s the turn of the other bumper.
Important! It is better to carry out the above work in the absence of a special room in dry, windless weather at an air temperature of about 20 degrees.
What can you make a car spoiler from with your own hands?
If you encounter similar problems, then, of course, there is an option to buy a ready-made spoiler, and if there is not enough length, simply saw the object and make an insert. The time required is minimal, but here the cost of the material and paint is added to the cost of the spoiler itself. And this turns out to be quite expensive.
Creating a spoiler from scratch is profitable (the average cost is about 25-35 dollars) and convenient. In order to make a spoiler yourself according to your taste and necessary requirements, we will need:
- Styrofoam; - epoxy adhesive; - Sheet steel; - fiberglass or old silk-look shirts; - paint of the required color.
Materials and tools
After creating the project, you should decide on the materials and tools for the work. The final result depends on this.
Depending on the selected materials, the set of tools required for work and the nuances of changing the body kit depend.
Also, before you start upgrading the body kit, you will need to use a mock-up or create a matrix; its peculiarity is that it is a “negative” in relation to an existing part. When designing a bumper, the material of the future body part is applied to the matrix, and a “cast” is obtained. It is used when upgrading or repairing an original body element.
To create a matrix, it is recommended to use technical plasticine. The material is not afraid of exposure to high temperatures and is easy to process.
Polyurethane foam
The material is used both to create a bumper from scratch and to modify an existing one. To construct the part, you will need the following materials and tools:
- Polyurethane foam (approximately 3 to 5 cylinders),
- foam gun,
- Masking tape,
- Epoxy resin,
- fiberglass,
- culinary foil,
- fiberglass,
- Sharp stationery knife and replaceable blades,
- Sandpaper of different grits,
- Automotive putty.
To create a bumper from polyurethane foam, it is important to have a developed eye, “straight hands”, patience, accuracy and master the skills of manual processing of materials. Only in this case, the quality of the manufactured element will be at its best.
To make a bumper from polyurethane foam yourself, follow the following steps:
- Creating a base from polyurethane foam.
- Use of fiberglass.
- Primer and painting.
Spoiler creation process
Working with polystyrene foam is quite simple, but there is one caveat. After cutting, a lot of debris remains, which is very well electrified and can stick to the drying element at the most crucial moments. Therefore, try to remove the crumbs immediately.
We cut a sheet of foam plastic measuring 1x1 and 4.5 cm thick (sellers usually say 5 cm) diagonally. Cut out the wing blade. So the width of the foam sheet will definitely be enough for you. Next we move on to the fastenings. It is necessary to cut 1.5 mm plates from sheet steel. We drill 3 mm holes with a distance of approximately 2-3 cm. In order to reduce weight and improve adhesion, bend them with the letter L. After these manipulations, weld two 6 mm nuts to the base. Now you can glue them into foam blanks.
We glue the wing blade with epoxy glue and two layers of fabric. Then we assemble the structure.
Working on the lip
The lip is done the same way - not very difficult. Remove the bumper and turn it over. Next, you need to glue the blank from foam plastic. We give it a shape and wrap it in plastic bags. Ideally, it is better to find ordinary nylon women's tights, pull them onto the form and coat them with epoxy glue. When the two layers of tights are dry, you need to pull the blank out of the lip. The bags are needed just so that the blank can come off easily, since the epoxy glue does not stick to them. We leave the structure for several days so that the epoxy completely polymerizes.
Tuning a car bumper using building materials
At the very beginning of the work, you need to clearly understand the technique of its implementation.
To make the body kit look unique, you are allowed to tune the front or rear bumper yourself or make changes to the factory model.
For understanding, we will describe both of the above versions.
Initially, it is necessary to remove the body kit from the vehicle for its subsequent cleaning. Do-it-yourself tuning of the rear and front bumpers is no different from each other.
In those areas where the product will be transformed, it is necessary to attach the cut pieces of foam. The middle of the bumper needs to be taped with masking tape.
It is necessary to fix thick cardboard on the right and left edges, so that the mounting foam will be concentrated in one place.
When using foam, you need to take into account that when drying, it expands and becomes voluminous. After filling the product with this mounting agent, let the foam dry, and then make the desired shape of the body kit.
To work you will need a knife and sandpaper. The body kit should then be properly treated with fiberglass and epoxy resin. After applying the putty, the layer is re-treated with sandpaper.
The final step will be priming and painting the finished product.
The hardest thing is to make the body kit yourself. Let's take a closer look at the bumper manufacturing process.
What is it for?
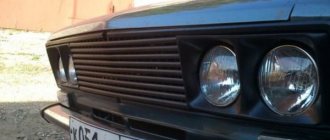
Contrary to the fairly widespread belief that the lip on the VAZ 2114 bumper is purely a tribute to fashion or a desire to stand out, it is completely wrong.
Of course, such an element adds individuality to the car and changes its appearance, but at the same time the lip also has a direct functional purpose - it changes the aerodynamics of the car and its behavior on the road (which is why in foreign countries, and often here too, it is directly related to aerodynamic elements such as spoilers).
In addition, they also perform some protective function of the bumper itself.
Foam bumper
Based on the experience of specialists, the easiest way to process polystyrene foam. Compared to it, polyurethane foam requires more effort to work with.
First, draw the product on a piece of paper, or look for a ready-made sketch on the Internet. Based on the external data of the drawing, it will become much easier to complete the task.
Nail 6-8 sheets of foam together using liquid nails. Mark with a felt-tip pen according to the existing drawing. Cut off any excess foam with a knife.
The completed product should be covered with putty, making several layers. Afterwards the product is processed with sandpaper.
The next layer is the application of resin and fiberglass. When all the layers are dry, you can start priming and applying paint to the bumper.
Despite the fragility of foam, the material has excellent shock-absorbing properties. Thanks to this, the bumper will serve you for a long period of time. At the same time, its technical characteristics will be at the highest level.
With your own hands
Of course, going and buying (or ordering) a bumper lip is the simplest solution, but it is quite possible to make such a body kit element yourself - this requires a minimum of tools and basic skills in working with them.
Of course, more advanced craftsmen can make a lip from scratch from sheet plastic, cutting and bending it to size, but now we will look at the simplest, and accessible to absolutely everyone, method - making it from the front bumper. In this case, the lip of the VAZ 2114 is made from a bumper also for the VAZ 2114.
Disadvantages when installing splitters
In order of appearance of disadvantages when installing splitters, their list is as follows:
- Material costs. Minimum - when purchasing cheap bumper splitters. When they are installed by the vehicle owner himself (especially if this is done for beauty, including from rubberized materials). Quite decent - if the material is expensive, the splitter is not universal, but special (especially expensive - individual) and the work is performed at a service station.
- Reduced vehicle clearance.