In any collision, be it an accident or bad parking, the bumper takes the blow. Gluing is used as one of the options for repairing cracks and holes. Glue for a car bumper requires a special, mechanically stable one. It should have good and fast adhesion, not spread when applied, fill and restore large damaged areas.
Which glue to choose for the bumper
Automotive stores sell a large number of adhesives that can be used to glue a cracked plastic bumper. You should not choose ordinary household products for this purpose. The specialized composition has a higher degree of adhesion and a lot of other advantages: it does not leave stains, is not afraid of moisture and vibration.
To glue plastic on a car bumper, you can buy the following adhesives:
- Weicon Construction. Structural two-component adhesive based on methyl methacrylate, sold complete with an activator. It is suitable for gluing metal, plastic, composites, ultra-strong, does not emit toxic fumes. The glue does not require drying in special ovens; it hardens at room temperature in just 4 minutes.
- Akfix-705. The product is ideal for gluing small pieces, sealing defects on plastic bumpers, moldings, fenders, and is suitable for spot application. Does not require preliminary priming, ensures reliable fixation and long service life of the repaired item. For polymerization, contact of the glue with moisture from the air is sufficient, because, like superglues, it is made on the basis of cyanoacrylate. The kit also contains an activator aerosol, which is used when there is insufficient air humidity or to accelerate the polymerization of the seam.
- Good glue for all types of plastic, fiberglass. They can easily glue cracked plastic parts, remove small chips and dents. Thanks to its reliability and moisture resistance, the product allows you to carry out other types of body repairs and eliminate radiator leaks.
Also, car bumper adhesive can be made based on epoxy resin. It can be used to glue even large pieces, chips, and fill holes in fiberglass parts of a car. For this purpose, epoxy glue is used in conjunction with fiberglass.
After drying, a monolithic compound is formed, which is no different in properties and strength from the bumper itself. Immediately after using the composition, it is important to paint the problem area. Examples of high-quality epoxy-based adhesives include Moment, Mannol, and SeaLine.
Surface preparation
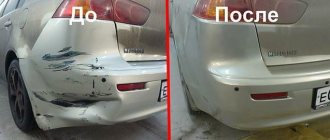
Glue the bumper (click to enlarge)
- It is necessary to remove the damaged bumper from the car.
- Carefully wash and clean the coating from dirt.
- We check the stamp (it is applied to the inside of the part) to determine the material before gluing the bumper.
- We remove the coating of the area being repaired (paint, varnish, possible rust).
- It would be wise to drill out the ends of the crack in the bumper, thereby preventing it from further expanding.
- Degrease the damaged part with acetone, alcohol, or regular vodka, then sand thoroughly.
- We prime the damaged area and leave it until it dries completely.
- It is better to make grooves (in the shape of a Latin V) at the edges of the crack on the bumper with a milling machine, for the convenience of future repairs and reliable adhesion.
- Be sure to coat it with a professional chemical composition for plastic, which will increase adhesion (gluing strength).
To check the quality of the processed part, an assessment is carried out by wetting it with a solution of any alcohol: 60% alcohol is dripped, after which the maximum “span” of the mark should be no more than 35 mm. Gluing a car bumper with professional adhesives is as reliable and effective as welding a cracked part.
Watch the video to find out how to do this:
Tools and materials
To dismantle the bumper and carry out repairs at home, you will need a number of tools. Some of them are quite expensive, although they can always be replaced with manual tools. Here is a sample list of what a master might need:
- keys, screwdrivers;
- sandpaper with different grain sizes and a block;
- grinding machine with wheels;
- electric drill (mini drill);
- rubber spatula;
- clamps for fixation;
- construction hair dryer;
- soldering iron;
- metal tape (rigid adhesive tape);
- a sharp knife (for example, a stationery knife).
As consumables, you need to purchase putty, primer and paint for the bumper, and, if necessary, mesh to reinforce the crack. You will also need a solvent to degrease the part, high-quality glue, and rags. In order to comply with safety precautions, you need to prepare gloves and safety glasses.
General repair rules
How to repair a plastic bumper
Before starting work, you need to fix the edges of the crack, giving the part a shape that at least approximately corresponds to the original one. For this purpose, small clamps or coarse packing tape are suitable, which are glued to the side that will be repaired last. This is usually done outside.
If the plastic is viscous - it is planed without much effort, long, soft chips are formed, then the ends of the cracks do not need to be drilled. This is usually done with polyethylene parts. Rigid polycarbonate and ABS plastic are prone to further cracking, so try to determine as accurately as possible where the crack ends and drill a hole there with a diameter of no more than 1 mm.
All parts must be at least washed and dried, and if you are going to use glue, they must be degreased. Do not use gasoline as a solvent and cleaner; it is now not of the quality to be trusted recklessly. An aerosol can with foam cleaner is ideal. It consists of 90 percent acetone and is easy to apply - no jars or brushes are needed.
How to glue a bumper: instructions
If the bumper is cracked, it is better to carry out repairs without delay so that the defect area does not become clogged with dirt. First, the part must be removed by first removing the plugs and disconnecting the fasteners. Severely broken body kits do not need to be removed immediately; they should first be fastened together and then disconnected from the car. Before work, it is important to double-check what material the bumper is made of in order to choose a truly suitable adhesive for it.
Novice craftsmen are wondering whether it is possible not to remove the bumper before repairing and painting? If the product is not properly dismantled, it may burst during manipulation. Only removing the part will eliminate excess stress in the area of cracks and their further increase.
Preparatory work
First, it is important to carefully prepare the base that will be subject to application of glue. This will directly affect the service life of the adhesive joint. First of all, wash the bumper, clearing it of dirt and oil, and dry it well. Then do the following:
- remove the coating (varnish, paint) using a grinding machine or a block with sandpaper;
- remove all rust, if any (it cannot appear on a plastic bumper);
- the edges of the crack are drilled with grooves in the shape of a Latin V so that it does not continue to expand, and also for the purpose of more reliable adhesion of the glue;
- degrease the bumper using acetone, alcohol or another solvent;
- sand the product and prime it or coat it with a special adhesion improver;
- leave until completely dry.
Repairing cracks on bumper
First, primary gluing is carried out on the inside of the bumper, using the selected adhesive with powerful bonding properties. Next, the composition is applied to the front part of the part, acting carefully and accurately. If necessary, the areas around the crack can be covered with foil, which will prevent contact of the glue with undamaged areas. From the “wrong side”, if there are large chips, you can apply a mixture of adhesive and soda, since these components turn into durable acrylic-like plastic upon contact.
If the bumper is cracked so that it falls apart into two parts, the individual pieces are combined with each other with an exact fit and secured with metal tape. If necessary, after gluing, clamps are used to clamp the fragments. For reliability, a reinforcing mesh made of metal or synthetics is glued onto large cracks from the inside, impregnated with glue. Wait until the product dries completely according to the instructions. After the clamps are removed, the adhesive seam is sanded to the level of the surface of the part.
Puttying and painting
The sealed bumper needs to be painted with high quality so that its appearance does not cause any complaints. Sometimes puttying is first carried out with a special means for plastic, which will smooth out minimal defects. The layer of putty must be very thin, otherwise it will not stick.
After the putty has dried, the surface is sanded with P1000 sandpaper and primed in 2 layers, the drying time of the first is at least 15 minutes. Then the bumper is painted with decorative auto enamel to match the body color.
Apply the paint in 3-4 layers with intermediate drying cycles of 15-20 minutes. The last step is to varnish the bumper to give the repaired part a flawless look. Strict implementation of the entire sequence of actions will help you save on the work of professionals and learn how to fix minor problems with your car yourself.
Sealing process - preparation
Before sealing the bumper with fiberglass, we recommend conducting a trial compatibility test on a small area of the damage.
To determine how to glue the body bumper, carefully study the manufacturer's instructions. The adhesive material must match the surface type of the part. If there are body kits at the site of damage, they must first be secured and only then removed. At the same stage, accurately determine the material of the spare part to select the desired adhesive base.
This information is on a stamp on the inside of the product. When the mixture is selected, all that remains is to use it correctly in order to correctly restore the spare part after damage.
In order for the repair to last as long as possible, the bumper will have to be pre-treated. The part is disconnected in advance.
Carry out mandatory training:
- thoroughly clean the car buffer from dirt accumulations;
- remove residual oil and dust;
- let the parts dry;
- wipe it with a chemical to degrease it;
- grind the broken surface with an abrasive or a grinding machine;
- if the cracks are too deep, we recommend drilling them out, protecting the spare part from increasing damage.
With the listed procedures, you will achieve stronger adhesion of the glue to the surface, which will guarantee the quality and long service life of the part.
How to glue a bumper: let's get started
Once the surface has been pre-treated, it is time to begin the bulk of the restoration process. Cover the damaged area of the spare part with a primer and wait until the substance dries completely.
The second option: seal the crack on the bumper from the outside so that glue does not leak out of it. To do this, use foil. Once the adhesive has dried, the material must be removed.
Primary gluing from the inner surface of the buffer is carried out with a composition having reinforcing properties. To do this, we recommend using a composition based on epoxy resin with a high degree of adhesion.
If you have previously decided to abandon priming work, then carefully move the damaged areas towards each other
Sometimes the cracked parts are held together with metal staples. However, fixing the two parts from the outside is done with standard paper tape. He will carefully secure the edges of the surface at the same level before painting. After gluing the hole from the inside, the tape will be easier to remove than the staples.
When both parts of the car are securely fixed, apply the adhesive mixture to both parts of the damaged part. Before it dries, glue a metal or synthetic mesh to strengthen the seam.
This can be a painting mesh, which also needs to be treated with adhesive on top. It is impossible to predict the drying time, since each chemical composition takes its own time to dry.
Final stage
When the crack is glued and the adhesive solution is completely dry, the car buffer remains visually unattractive. There is no need to sound the alarm - this is natural, because there is still finishing work ahead.
Let's get started:
- Remove any excess compound on the plastic, carefully cut it off or sand it.
- Prepare the surface of the spare part for further painting. To do this, use a primer, putty or other materials for this purpose.
- The car buffer must be painted according to technology. Such paints are available in car dealerships.
Detailed work on painting a bumper with your own hands in the video:
Results
Repairing a buffer at home is not a difficult task. Therefore, if you have minimal experience in this matter and follow all the instructions, you can quickly restore the part. And you won’t have to spend money on paying a car mechanic.
Glue for car parts has significant advantages. It is cheap, its purchase will not affect the family budget. The method of sealing a cracked buffer with an adhesive mixture is in no way inferior to sealing.
We recommend watching the video instructions on how to glue a bumper with glue yourself:
Cosmofen CA 12
Another product from America, but this time the price is in the middle price range. The bottle is distinguished by its ergonomic shape and fairly large volume.
The instructions are clear, there is a translation into Russian. On the other hand, the gluing performance here is very mediocre, and even after use there is some glue left on the cap.
3M Scotch-Weld
The composition is produced in England. Its advantages include a large packaging volume, ease of operation, as well as excellent adhesion performance in the case of glossy surfaces. However, if the edges are rough, the effectiveness is greatly reduced.
Another disadvantage is that the glue in the dispenser hardens very quickly. The cost here is quite high, this should also be regarded as a disadvantage.
It may also be interesting: I fill the spark plugs with gasoline on the injector: what to do?
Don’t know what to seal your car with after an accident?! adhesive tape from Fix Price is the best option!
Good day !
Not much background. The day before the accident, I was walking around the city and on the street I met a car with a completely damaged hood, I noticed how it was sealed with ordinary tape. The next day I was kissed on the rear bumper by a truck, I was very upset, the trunk was crumpled and there were large gaps into which rain and dirt from the street could easily get in. I remembered the car I saw the other day covered with tape and decided to do the same taping.
As a result, after opening the trunk several times during various inspections and examinations, the tape that repeatedly came off and overheated left unsightly marks. The third time I decided that it was impossible to glue with tape, and in the Fix Pras store in the repair department I came across adhesive moisture-resistant tape, which is exactly what I needed. I need it, because no matter how well and tightly I sealed it with tape, water still penetrated under the tape and peeled it off.
Where to buy : Fix Price (repair department)
Price : 47 rubles
Length : 10 meters
Color : gray
Purpose :
Result : The adhesive tape adheres perfectly, is dense, does not tear or come off like tape, and leaves no traces when peeled off. I RECOMMEND .
Source
Let's sum it up
If you decide to repair plastic elements in your vehicle, then you should purchase the best plastic adhesive possible. At the moment, you can buy quite a lot of different compositions on the market, so you should carefully familiarize yourself with the operating features of a particular model.
You may also be interested in: Subwoofer for a car: choosing the best subwoofer for a car
At the same time, you should not choose too cheap models, as well as products from little-known brands, since their quality often leaves much to be desired. It should be taken into account that most products are extremely ineffective, so it is better to overpay a little than to then run to the store for a new composition.
Next is a video about quick glue for plastic:
Hosch
The cost here is quite high, but the efficiency is decent. At the same time, this two-component plastic adhesive performs well on both smooth and rough surfaces.
To increase gluing parameters, flux powder should be used.
True, the tube is very small, and applying the composition on an inclined plane is very difficult, since the powder will simply crumble.
ABRO Super Glue
The production is carried out by the world famous American brand ABRO. The cost is one of the lowest (you can buy it for just a couple of tens of rubles), however, that’s where the advantages end.
The quality is very low, the instructions in Russian are very unclear. It may be suitable for small elements, but it is not recommended to glue anything important with ABRO Super Glue.
Rules for choosing an adhesive composition
It is necessary to begin repairs by choosing an adhesive composition, which, after hardening, should:
- form an integral structure with the bumper;
- do not burst in the cold;
- do not peel off under high temperatures;
- be resistant to the ingress of aggressive reagents, gasoline, oil.
To glue a plastic bumper on a car with your own hands, use the following compounds:
- Weicon Construction. The glue has high elasticity and strength. After hardening it does not crack. To strengthen the structure when repairing large cracks and faults, it is used with fiberglass.
- AKFIX. Spot bonding adhesive. Suitable if the crack or through dent is no more than 3 cm. When using, primer does not need to be applied.
- Power Plast. Firmly seals large cracks. The composition is resistant to aggressive reagents and water. One-component adhesive is toxic; it is necessary to work with gloves and a respirator.
Thermoplastic and thermoactive adhesives are used if the bumper will be painted immediately after repair, in which case the composition will fix the crack as reliably as possible.
Hot melt adhesive
A special composition that is capable of connecting plastic elements. Supplied in rod form. The distinctive features here are as follows:
- gluing is possible only in case of strong heating;
- A special gun is required for operation.
Basically, such a product is used for creativity, since the strength of the finished items is not too high, as a result of which the repaired products will not serve for a long period.
The choice of a specific model is influenced by the dimensions of the rod, the level of transparency of the substance, viscosity, operating temperature, etc.
How to restore the shine and uniformity of paintwork at the site of a crack
Sanding and priming are the last stage of work before painting. The difficulty of local painting is that it is almost impossible to choose the original color. Even if you choose auto enamel of the original marking, class and type, the color will still not match. The reason is simple - the paintwork color of the body kit changed during use.
Completely painting the bumper is the easiest way to update the part. After painting, the part is polished with soft circles and a colorless acrylic varnish is applied, which preserves the gloss of the paintwork for a long time and evens out the discrepancy in tone if it was not possible to choose the original shade.
Source
Liqui Moly
This German manufacturer is one of the most popular manufacturers of vehicle consumables. The glue perfectly connects rough overlapping elements. The dispenser is very convenient to use, and the composition itself dries quickly.
The instructions precisely describe what precautions must be taken when working with the substance. The disadvantage is that it is not very durable.
Possible damage
Main damage to bumpers:
Penetrating damage to metal bumpers and their reinforcements is repaired by welding, patching, and, less commonly, with epoxy resin. Plastic, fiberglass, made by hot and cold molding - gluing using special compounds. Non-through damage (scratches, dents) are pulled out and straightened after removing the part from the car.
Each bumper is marked by the manufacturer. International certification letters help to quickly determine what material the part is made of.
| Marking letters | Material |
| ABS (ABS plastic) | Polymer alloys of butadiene styrene, characterized by increased rigidity |
| RS | Polycarbonate |
| RVT | Polybutylene |
| RR | Regular polypropylene, medium hardness |
| PUR | Polyurethane, minimum weight |
| RA | Polyamide, nylon |
| PVC | Polyvinyl chloride |
| GRP/SMC | Fiberglass, has minimal weight with increased rigidity |
| RE | Polyethylene |
Why do cracks appear?
What types of damage cannot be repaired on your own?
Since 2005, one of the leading research technical centers AZT continues to test manufacturers' bodies for repairs. According to studies of plastic bumpers, the center confirmed the recommendations of automakers for the repair of plastic and fiberglass body elements and issued a directory with catalog numbers of repair kits. According to experts, any damage to a plastic bumper can be repaired.