How to spot a faulty fuel pressure regulator?
The regulator is installed on the fuel rail and is necessary to maintain a certain pressure drop. It includes the following parts: tank, injectors, fuel drive and pump, switch and control unit pump. The principle of operation of the fuel pressure regulator can be represented as follows: at the very beginning of the pump operation, the fuel leaves the tank and passes through the cleaning system in the filter. After this, it enters the regulator, where a uniform pressure in the system is maintained non-stop. In a non-recirculation system, this part must be located in the tank. Its function remains the same, it must maintain fuel pressure.
A malfunction of the fuel pressure regulator can be noticed due to certain car problems . Your engine may stall while idling, or you may begin to notice the engine losing power while driving. If your car starts to accelerate poorly when changing gears, the problem may also be in the fuel pressure regulator. When driving, if sudden jerks occur, the engine begins to choke, or there is practically no response to the gas pedal, all these are prerequisites for the regulator to break down. The most common symptom: when fuel consumption increases sharply. To do this, you don’t even need to make any calculations; you yourself will notice how it has rapidly increased.
Causes of fuel regulator malfunction
In fact, there are not many reasons why the fuel pressure regulator has failed. Let's list them in order:
- Natural wear and tear . This is the most common reason for RTD failure. As a rule, this happens when the car's mileage is about 100...200 thousand kilometers. A mechanical malfunction of the fuel pressure regulator results in the membrane losing its elasticity, the valve may jam, and the spring weakens over time.
- Defective parts . This does not happen so often, but often there are defects on products from domestic manufacturers. Therefore, it is advisable to buy original spare parts from imported manufacturers or check them before purchasing (be sure to pay attention to the warranty).
- Poor quality fuel . Unfortunately, domestic gasoline and diesel fuel often contain excessive moisture, as well as debris and harmful chemical elements. Due to moisture, rust spots may appear on the metal elements of the regulator, which spread over time and interfere with its normal operation, for example, the spring weakens.
- Clogged fuel filter . If there is a large amount of debris in the fuel system, it will also lead to clogging of the RTD. Most often, in such cases, the valve begins to jam or the spring wears out.
As a rule, if the fuel pressure regulator is faulty, it is not repaired, but replaced with a new one. However, before throwing it away, in some cases (especially when talking), you can try cleaning the RTD.
Fuel pressure regulator - why can it break?
To verify the malfunction, you can use one of the testing methods. Many mechanics can tell you the easiest and fastest way to check the fuel pressure regulator with a pressure gauge; we will do this a little lower. Problems usually occur due to the fact that after a certain time the spring that holds the pressure in the pump sags. Thus, it no longer creates the necessary pressure, and as a result, part of the fuel returns back to the tank, and, consequently, the pressure in the fuel rail decreases. As a result, we have a large lack of fuel and loss of power during engine operation.
Also, a number of problems can arise if the pressure valve begins to jam. In this case, the pressure in the fuel frame will begin to change sharply, this will not happen naturally. From here, unstable and unreliable engine operation will be immediately noticeable. You will immediately feel a jerk during acceleration or one of those malfunctions that you could find out above. So, it’s time to figure out step by step how to replace the fuel pressure regulator. First we will also look at how to test the regulator and then remove it.
Why do you need an RDT?
Fuel pressure regulator is a sensor that keeps the fuel pressure in the fuel injector within specified limits. Thus, the correct operation of the RTD determines the volume and speed of fuel supplied to the cylinders of the car’s internal combustion engine.
We recommend: Symbols, icons, indicators and symbols of the car dashboard
How much fuel enters the engine depends on the pressure inside the fuel rail (rail) and the length of the pulse to open the injectors, and the vacuum (pressure reduction) in the intake manifold.
The accuracy of the dosage of the supplied fuel and maintaining the pressure at the required value depends on the diaphragm control valve. The control valve experiences fuel pressure on one side and springs on the other.
The RTD is installed on the fuel rail - this is the most common installation scheme. The regulator is used in structural systems where there is a return ramp - return. If there is no return line in the system, then the RTD can be installed in the fuel tank.
So, the RTD can be installed:
- on the fuel rail;
- in the fuel tank;
Consider the diagram when the RTD is installed on the rail. The operating principle of the sensor with this arrangement is as follows:
- The fuel pump supplies gasoline from the tank through the line.
- Gasoline pressure acts on the fuel pressure regulator. The regulator consists of two chambers: spring and fuel, which are separated by a membrane.
- The valve diaphragm is acted upon by fuel on one side and a spring with pressure at the manifold inlet on the other. If the fuel force is greater than the spring force and the pressure of the intake manifold, then the valve opens and releases (bleeds pressure) part of the fuel into the return line. Through the return line, excess fuel returns to the fuel tank.
Now let's look at the diagram when the RTD is installed in the tank. The operating principle with this arrangement will be as follows:
- Fuel injectors are capable of delivering just the right amount of fuel directly from the tank. Since there is no excess fuel supplied, there is no need to supply it back to the tank. The absence of a return line in this case is an advantage. The fuel moves less, heating and evaporation does not occur.
There is also a way to regulate fuel pressure - an electronic circuit (the design does not have a mechanical regulator). The electronic fuel pump control system calculates the voltage and regulates the volume of fuel pumped - hence the ability to adjust the pressure within specified limits. The fuel pressure regulator sensor (FPSR) reduces fuel heating, volatility, and ensures that fuel consumption is maintained at an optimal level.
The fuel pump supplies fuel to the injectors in a strictly required volume, but still, if excess pressure occurs above normal, the excess pressure will be released due to the installed excess pressure relief valve
How to replace the fuel pressure regulator?
We take the time, put on our work clothes and get under the hood. We unscrew the fitting plug to control the fuel pressure at the end. Using a special metal protective cap, carefully unscrew the spool valve from the inner cavity of the fitting. Next you need to attach a hose with a pressure gauge to it. We secure this same hose to the fitting using a clamp. Next, we start the engine and check the pressure shown on the pressure gauge.
The pressure that the device will display should not exceed 325 kPa. Then disconnect the vacuum hose from the regulator - the pressure on the pressure gauge will increase.
By all rules, it should increase by 20 or 70 kPa. If there is no increase, then you will simply need to replace the regulator. If an increase occurs, then the test of the fuel pressure regulator was successful, and there is no point in replacing it. Now we move on to the actual removal of the regulator. The first step is to reduce the pressure in the power system. Then we smoothly remove the vacuum hose from the fuel pressure regulator and unscrew the nut securing the fuel drain pipe. It is attached directly to it. Next, we unscrew the two bolts that serve to tightly fasten this unit to the fuel frame, and remove the fitting from the hole.
How does the fuel pressure regulator (FPR) work and where is it installed?
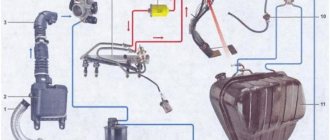
Vehicle fuel system design
The RTD device is a vacuum valve. Its general structure is a body with a valve, a membrane and a spring. There are three holes in the housing - two of them are the fuel outlet, the third leads to the intake manifold. The principle of operation of the fuel pressure regulator is as follows: when the engine picks up speed, fuel consumption increases significantly and, as a result, a vacuum is created in the third outlet, which collects the spring, lifting the membrane. This opens the valve in the fuel pressure regulator. After creating enough pressure for the set number of revolutions, the check valve redirects the fuel back to the tank through the return hose.
RTD is otherwise called “check valve”.
A decrease or increase in pressure in the fuel line of a car is required when the engine operates at different speeds. For example, at idle speed it requires a very small amount of fuel to operate. Accordingly, the pressure in the system will decrease. And the state of the fuel system takes on a completely different look during significant loads (car acceleration). For high-quality engine operation and sufficient fuel supply under these conditions, a sharp increase in pressure occurs. So where is the fuel pressure regulator located? As standard, it is located in the fuel rail. It happens that its location is changed - for example, the RTD is installed in the return hose or even in the tank. Installation in the gas tank allows you to avoid additional fuel lines, and the check valve simply does not allow excess fuel into the system. But, regardless of its location, the fuel pressure regulator performs the same function - maintaining the required and safe fuel pressure for the vehicle.
Where is the fuel pressure regulator located?
To find the installation location of the fuel pressure regulator, let’s figure out what it is and what it is needed for. This will help in further searches and diagnostics.
The first thing you need to know is that there are two main types of RDTs - mechanical (old type) and electrical (new type). In the first case, this is a vacuum valve, the task of which is to transfer excess fuel under excessive pressure back into the fuel tank through the corresponding hose. In the second, it is a fuel pressure sensor that transmits relevant information to the ECU.
Typically, the fuel pressure regulator is located directly on the fuel rail. Another option for its placement is the fuel return hose of the power system. Another option is to locate the regulator directly in the fuel tank on the pump module. In such systems there is no fuel return hose as unnecessary. Such an implementation has several advantages, including simplified design (no extra pipeline), excess fuel does not enter the engine compartment, fuel heats up less and does not evaporate as much.
How does the fuel pressure regulator work?
Structurally, the old-style valve (installed on gasoline cars) has its own body, inside which there is a valve, a membrane and a spring. The housing has three fuel outlets. Through two of them, gasoline passes through the pressure regulator, and the third outlet is directly connected to the intake manifold. At low (including idle) engine speeds, the fuel pressure in the system is low and it all goes into the engine. As the speed increases, the corresponding pressure increases in the manifold, that is, at the third terminal of the RTD, a vacuum (vacuum) is created, which, at a certain value, overcomes the resistance force of its spring. This creates the movement of the membrane and the opening of the valve. Accordingly, excess fuel gains access to the second outlet of the regulator and goes back into the fuel tank through the return hose. Due to the described algorithm, the fuel pressure regulator is often called a check valve.
As for the fuel pressure sensor, it is a little more complicated. So, it consists of two parts - mechanical and electrical. The first part is a metal membrane that bends under the influence of force caused by pressure in the fuel system. The thickness of the membrane depends on the pressure for which the fuel system is designed. The electrical part of the sensor consists of four strain gauges connected according to a “Winston bridge” circuit. Voltage is applied to them, and the more the membrane bends, the greater the output voltage from them will be. And this signal is sent to the ECU. As a result, the electronic control unit sends the appropriate command to the pump so that it supplies only the amount of fuel required at the moment.
Diesel engines have a slightly different fuel pressure regulator design. In particular, they consist of a solenoid (coil) and a rod, which rests against the ball to shut off the reverse flow. This was done for the reason that the diesel engine vibrates very strongly during its operation, which affects the wear of the classic (gasoline) fuel regulator, that is, partial and even complete compensation of hydraulic vibrations occurs. However, its installation location is similar - in the engine fuel rail. Another option is on the fuel pump housing.
RTD in a diesel engine
Fuel pressure sensor in diesel engines
Cars with diesel engines have a check valve of a slightly different structure in the fuel system. Its components are a solenoid and a rod, which rests against the ball to shut off the reverse flow. In this way, the motor is protected from rapid wear, since hydraulic vibrations are reduced. Repair of the fuel pressure regulator on a diesel engine is carried out similarly to a gasoline one, and its location is either in the fuel rail or on the pump housing.
What could be the cause of RTD failure?
The fuel pressure regulator most often breaks down due to wear. This happens after one or two hundred thousand mileage. In this case, the membrane becomes thinner or dries out, the spring may weaken, and the valve jams. A failure of the check valve before one hundred thousand mileage most likely indicates its poor quality assembly, or a defective part. Unfortunately, this happens.
The cost of an RTD is small, and you can cope with its replacement yourself, without visiting a car service center.
Another reason for the breakdown of the adjustable fuel pressure regulator is poor quality fuel or untimely replacement of fuel filters. In this case, foreign impurities entering the vehicle’s fuel system also clog the RTD. Then most often the valve in it begins to act up. There is no cleaning of the fuel pressure regulator, just as there is no need to repair it - it is cheaper and easier to install a new one.
Signs of RTD malfunction
The mechanical regulator is a reliable element due to its simplicity of design. But it also breaks. A malfunction of the RTD is manifested by a number of symptoms:
- Difficulty starting the engine.
- Instability and “swimming” of revolutions.
- Reduced power and dynamic performance of the car.
- Spontaneous stop of the unit at idle.
- Jerks and jerking of the car when changing the engine operating mode.
Malfunctions of other components of the injection system also give the same symptoms, which makes it difficult to identify the cause of incorrect operation of the power unit. At the same time, when searching for a problem, car owners do not even pay attention to the RTD, believing that there is nothing to break in it.
Regulator malfunctions:
- reduction in spring stiffness;
- valve jamming (RDT functions spontaneously and haphazardly);
- valve jamming;
- clogged channels;
The pressure regulator is considered maintenance-free, and if a malfunction is detected, it is replaced.
How to detect a malfunction?
There are a number of features in the operation of a vehicle that may indicate failure of the RTD. Consider these signs of a poor fuel pressure regulator:
- When starting the engine, you need to turn the starter for a long time and at the same time keep the gas pedal depressed.
- At idle or low speeds, extremely unstable operation of the engine is observed, to the point that it may stall. An attempt to apply more gas does not lead to the desired result - the power practically does not increase.
- Sharp changes in engine speed at idle are noticeable.
- Loss of acceleration after changing gears or sudden jerking of the car while driving.
- Significant increase in fuel consumption.
- Fuel leaks on the system hoses. However, replacing them and installing new clamps does not lead to a better result.
If one or more of the listed symptoms occur in the vehicle's operation, a malfunction of the fuel pressure regulator can be suspected. How can I check this? Since the fuel pressure regulator sensor cannot be classified as an electronic or electrical element and there is no way to check its operation using the car’s instruments, you will need to resort to additional tools.
Signs of RTD malfunction
When the regulator is faulty, the normal operation of the internal combustion engine is disrupted. This RTD condition can be assumed when the following signs are present:
- the motor runs unevenly;
- the engine stalls at idle speed;
- slow response to pressing the accelerator;
- when you press the accelerator sharply, there is a noticeable dip in the engine’s operation;
- jerks when moving, the engine choke;
- fuel consumption increases sharply.
A phenomenon such as difficulty starting the engine may also indicate a malfunction of the regulator.
Why did the RTD fail?
There are several reasons why the fuel pressure regulator fails. They may be:
- weakening of the spring;
- mechanical damage to the membrane;
- wear or jamming of the check valve;
- clogging with foreign particles.
The durability of the RTD is influenced primarily by the quality of the fuel being poured and compliance with the replacement interval for fuel filters: electric fuel pump mesh and fine cleaning. Prolonged downtime of the vehicle can also negatively affect the performance of the device.
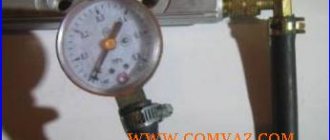
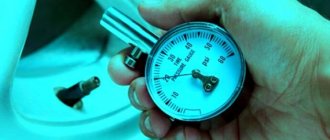
Measurement of pressure in the system
Measuring pressure in a vehicle's fuel system
The effectiveness of the check valve can be determined by measuring the fuel pressure in the system. A device for measuring the existing pressure in the fuel rail is called a mechanical pressure gauge. To correctly determine the indicators, it is connected to the system as follows:
- We unscrew the fitting plug - this action will allow you to control the fuel pressure at the end.
- We turn the spool out of the fitting cavity.
- We attach the pressure gauge hose to the fitting. We secure it with a clamp.
- Let's start the engine.
After its launch, the readings of the device are studied. Thus, a pressure gauge for measuring pressure in the fuel rail allows you to determine how much the fuel pressure is outside the permissible limits (the norm is up to 3 kg/cm2). After stopping the engine, there should not be a sharp decrease in pressure, since a properly functioning check valve blocks the reverse outflow of fuel and maintains its level. If the pressure gauge shows that the level drops sharply, then the RTD has failed. Without using a pressure gauge, you can also check the pressure in the fuel rail with your own hands. To do this, try to pinch the return hose while the engine is running. When the hose is pinched, the engine, with the universal fuel pressure regulator not working (if the engine is running very hard), gains power and all cylinders start working. However, it is not always possible to pinch the return hose on modern cars - they are equipped with metal tubes or hoses of insufficient length. If the question arises of how to check the fuel pressure regulator on the injector, then there is only one way - using a pressure gauge. Other options are not feasible on this type of engine.
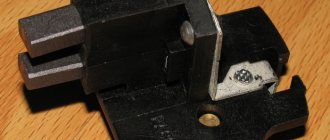
Replacing the check valve
Removing the fuel pressure regulator
When checking the fuel pressure regulator shows a malfunction, it is recommended to replace it immediately to avoid rapid wear of engine parts.
We replace the fuel pressure regulator:
- Reduce pressure in the fuel line;
- Carefully pull off the vacuum hose from the RTD;
- Unscrew the fastening nut from the fuel drain tube (it is attached to the hose);
- We unscrew the bolts that secure the check valve to the fuel rail;
- Now you can remove the fitting from the hole;
- Next, you need to remove the check valve from the fuel drain pipe (pay attention to the O-ring, which will be useful for installing a new part);
- We install the new RTD in the reverse order.
The failed part has been replaced, and then its operation must be checked using the method indicated above. The main thing to remember: timely diagnosis of a malfunction of the fuel pressure sensor will allow you to avoid serious consequences
The fuel pressure regulator is a diaphragm valve. Fuel presses on it from one end, and the intake manifold spring presses on it from the other. At lower speeds, the valve opens, accompanied by the draining of residual fuel from the engine into the tank. The next time fuel is supplied, the pump starts, drawing the liquid through the filter. There is a special stabilizer on the fuel rail, whose task is to maintain optimal pressure in the system.
Instructions for replacing the fuel pressure regulator using the example of an Audi A6 C5
Access to the regulator on these machines is easy; it is installed on the fuel rail of the injectors.
- Remove the decorative plastic cover from the top of the engine by unscrewing the twist latches counterclockwise.
- Use a screwdriver to pry up and remove the retaining spring bracket on the regulator body.
- The vacuum hose is disconnected from the regulator fitting.
- The residual pressure in the rail can be relieved in various ways by letting the engine run with the fuel pump turned off, pressing on the spool of the pressure gauge valve on the rail, or simply disconnecting the halves of the regulator housing. In the last two cases, you need to use a rag to absorb the escaping gasoline.
- With the lock removed, the regulator is simply removed from the body, after which it can be washed, replaced with a new one, and everything reassembled in the reverse order.
Before installation, it is recommended to lubricate the rubber O-rings so as not to damage them when immersed in the socket.
Signs of a malfunctioning fuel pressure regulator
If your car's engine stalls at idle or engine power drops while driving, these may be symptoms of a faulty fuel pressure regulator. Most often, a sudden increase in fuel consumption is a signal of RTD failure.
There are other signs of breakdowns:
- the engine runs unevenly;
- at idle speed the engine stops;
- the crankshaft speed suddenly increases or decreases;
- The cooling system does not work well;
- the engine noticeably loses power;
- when you press the gas pedal there is partial or complete response;
- the engine seems to choke;
- poor acceleration of the car when changing gears;
- vehicles begin to move frequently in jerks;
- rapid fuel consumption occurs.
The presence of even one of these signs requires checking the condition of this device.
Fuel pressure regulator: locking type design
While proper tuning helps get the most out of the engine and the vehicle as a whole, incorrect tuning can lead to serious problems. Accordingly, it is important for every car owner to understand the operating principle of such devices and it is advisable to be able to make adjustments if necessary.
Thanks to the blocking type regulator, gasoline enters through the inlet port (1) and then passes through the control valve (2). Gasoline is then distributed through the outlet channel directly into the carburetor area.
The device diagram below shows two output ports (3, 8). Fuel flow and pressure level are controlled by a control valve actuated by a diaphragm (4).
The up/down movement of the diaphragm is limited by a spring (6). The fuel pressure (rated at 0.07 ATI) inside the carburetor is regulated using a threaded adjustment mechanism (5).
The vacuum/boost reference port allows the regulator to compensate for boost when using forced induction (7). Blocking type regulators prevent fuel from returning back to the fuel tank.
Operating principle of a blocking type device
Gasoline is passed through the regulator into the carburetor system. On the way from the pump to the regulator, the pressure in the line increases, but then decreases on the way from the regulator to the carburetor.
As fuel pressure increases in the carburetor float chamber, an increase is also noted inside the fuel regulator. As a result, the fuel is pushed upward towards the membrane.
Blocking type system: 1 – input channel; 2 – control valve; 3, 8 – output ports; 4 – membrane; 5 – threaded regulator; 6 – spring; 7 - inductor Increasing fuel pressure moves the membrane upward. With the supply control valve moving to a closed state, flow and pressure are gradually reduced.
Once the level set on the regulator is reached (usually the maximum specified by the carburetor manufacturer for optimal performance), the diaphragm approaches the valve closing point.
As the car engine consumes gasoline, the float chamber empties. The pressure in the fuel line decreases. Accordingly, the regulator diaphragm lowers, slightly opening the fuel control valve. The flow and pressure of gasoline inside the pipeline increases.
The threaded adjustment mechanism used in the design to increase the tension of the membrane spring, meanwhile, exerts resistance. It is necessary to increase the fuel pressure to push the membrane.
Thus, increasing the tension of the membrane spring using a threaded adjustment mechanism is tuning the regulator to increase throughput. Conversely, reducing the spring tension is a setting for a decrease in throughput.
Turbocharging - Vacuum/Boost reference port function
The function of the vacuum/boost reference port should be taken into account when turbocharging. In boost mode, the air compressed by the turbocharger is forced through the carburetor. Some pressure is created inside the carburetor and the float chamber for fuel supplied to the carburetor.
For example, the carburetor requires 0.56 ATI, and the engine currently consumes 0.49 ATI from boost. The carburetor is at a boost potential of 0.049 ATI, which counteracts the potential of 0.56 ATI coming from the regulator.
That is, to overcome the resistance, it is necessary to supply a fuel potential of 0.49 ATI to the carburetor. In fact, only 0.07 ATI is supplied. This condition is accompanied by the float chamber running dry, plus there is instability in the fuel supply to the engine cylinders.
To provide the carburetor with a potential of 0.56 ATI on the engine side, an additional 0.49 ATI must be passed through the regulator to eliminate resistance. That is, the potential inside the fuel line should be ensured at a total level of 1.05 ATI.
Meanwhile, the membrane is adjusted to move the fuel control valve to the closed position when the line reaches 0.56 ATI. This is where the vacuum/boost check tube comes into play.
The reference line increase runs from the carburetor box (hood) to the vacuum/boost reference port. As much as boost pressure is applied to the carburetor, the same potential is applied to the boost reference line, influencing the governor diaphragm.
This potential is applied to the top of the membrane, promoting an increase in pressure in the fuel line and inhibiting the upward movement of the membrane. Thus, by acting on the diaphragm spring, it is permissible to increase the level of fuel pressure (spring 0.56 ATI + auxiliary potential 0.49 ATI = 1.05 ATI).
The reference boost ensures an increase in fuel pressure in a 1:1 ratio with the boost parameter, overcoming the force potential of the incoming air and ensuring the filling of the float chamber.
Blocking type fuel pressure regulators - advantages
The device does not require installation of a fuel return pipe with fittings on the path between the regulator and the fuel tank. Also worth noting:
- low weight and dimensions of the structure,
- low level of complexity,
- low installation costs.
However, a blocking type fuel regulator requires an internal or external relief valve installed on the fuel pump.
It is possible to install several regulators (adjustable to different values, for example, in a nitrous oxide system) that can be used with one pump.
Disadvantages of a blocking type fuel pressure regulator
When the fuel pressure reaches the maximum regulator setting, the internal valve closes the inlet side from the outlet side. This action requires additional force to completely close the valve.
The result is a surge in fuel pressure when the valve reaches the closed position and a slightly higher amplitude output. This situation can lead to excess force inside the carburetor and overflow of the float chamber.
Often, fuel pressure readings with the control valve fully closed and the engine off (but with the fuel pump on) will show a contradiction. The engine can be started and stopped several times, and the readings taken between each start/shutdown cycle will be different.
For this reason, adjustment of blocking type fuel regulators should be performed immediately while the engine is idling. This approach ensures that a small amount of fuel flows steadily through the regulator, thereby ensuring better tuning consistency.
Blocking type fuel regulators seem to be a poor choice for purge through forced induction systems. This is explained by the fact that the internal design of the fuel control valve is capable of creating a significant difference in pressure between the inlet and outlet.
However, the identified problem relates to practical applications that require high flow and pressure of motor fuel. For practical applications with low consumption/pressure of motor fuel, such a problem, as a rule, does not appear.
How to check the fuel pressure regulator?
There are several simple ways to determine the causes of problems and defective components:
- Visual method. A simple inspection without the use of any fancy tools is fine for carburetor engines. Pinch or disconnect the valve and observe the flow of fuel. The intensity of the fuel flow will help identify the malfunction. This method of verification is effective in its own way, but one cannot count on absolute accuracy.
- Method using a pressure gauge. Place a pressure gauge between the fuel hose and the fitting. To do this, temporarily disconnect the vacuum hose. The pressure level should change from 0.3 to 0.7 Bar. If the pressure indicator has not changed, repeat the operation with another hose.
- Hose clamping method. The pressure regulator is checked by pinching the return hose. A pressure gauge connected to the fuel system should give an immediate response. If the motor does not develop normal speed, you can determine the inoperability of the RTD without the device. Start the engine and clamp the return hose. Then track the RPM and listen to the engine. If the engine starts to run smoothly, then the problem lies in a faulty control valve that needs to be replaced.
How to check the serviceability of the fuel pressure sensor
There are two ways to check the serviceability of the fuel pressure regulator: with or without dismantling the fuel rail along with the regulator. The first method is more complex, but with its help you can check not only the operation of the pressure regulator, but also other elements of the fuel system. In addition, such a check requires a special stand, which is available only in specialized auto repair shops, in particular, at official representatives of a particular automaker. Although some car enthusiasts assemble similar homemade ones in their garage.
Checking old-style sensors
The old-style fuel pressure regulators mentioned above could be checked by simply pressing the fuel “return” for a short time. This method is old and therefore suitable for older cars. This check must be performed “cold”, when the engine has not yet warmed up. It is best to do this within approximately one minute after starting the engine. Relevant for gasoline engines.
The main action in this case is to pinch the fuel return hose using pliers for a few seconds. If, at the same time, the throbbing and poorly functioning engine regains speed and begins to operate normally, it means that the fuel pressure regulator has failed. However, remember that you should not pinch the hose for a long time, as this can cause wear on the fuel pump to the point of failure or tearing off any clamp at the place where the fuel hoses are attached. However, this method is only suitable for those cars that use long rubber hoses in the return fuel line. And on many modern foreign cars these elements are made of metal, so it is impossible to mechanically compress them.
Checking with a multimeter
Checking the electronic fuel pressure sensor installed on the ramp requires checking that there is power to it. To do this, you need to remove the “chip” from it and, using an electronic multimeter set to voltage measurement mode, check the corresponding values. The black probe is installed on any “minus”, and the red one is installed on the leg on the “chip”. If everything is working properly, then the multimeter screen should read 5 Volts DC. The next step of checking is that the red probe is installed on the “plus” of the battery (or the nearest point where you can take the voltage), and the black probe is installed on the negative leg on the “chip”. In good condition, the value should be -12.3 Volts (or simply 12 Volts). If everything is so, then the sensor wiring is intact. You can return the “chip” to its seat on the sensor.
The next step is to check the signal level from the sensor. To do this, the black wire of the multimeter must be placed on the negative terminal of the battery, and the red wire on the third signal wire (usually located in the middle). Next, you need to start the engine and let it run at idle speed (minimum). In this case, the output voltage should also be minimal. As stated above, this value will be approximately 1.3 Volts. When you press the accelerator pedal (increase engine speed), the corresponding value will increase up to 4.5...5 Volts (at maximum speed). This change can be tracked over time. If the voltage changes, the regulator is working properly. If the voltage value does not change, it needs to be changed to a new one.
However, after checking the “chip”, you also need to check the wire that goes directly to the electronic control unit. This can also be done using a multimeter. If, as the engine speed changes, the corresponding value changes dynamically, then the pressure regulator is working. In very rare cases, situations are possible when the ECU itself becomes a problem, in particular, so-called “glitches” in its software.
Checking with a pressure gauge
Currently, to check the serviceability of the fuel pressure regulator, a pressure gauge is used - a device for measuring pressure in the fuel system (and not only). A pressure gauge is connected between the fuel hose and the fitting. You must first disconnect the vacuum hose.
The operating pressure of a gasoline engine will be about 2.5...3 atmospheres; before measuring, this value must be further clarified in the manual or on the Internet. When re-gassing, the pressure drops slightly (by a few tenths of an atmosphere). After this, the valve should maintain pressure in the system for some time, which can be observed by the readings of the pressure gauge. Next, using pliers, you need to pinch the return fuel line, which helps to increase the pressure to 2.5...3.5 atmospheres.
Checking the pressure regulator of the Common Rail injection pump
First of all, you need to check the resistance value of the control inductive coil. The exact data should be taken from additional reference literature, however in most cases the corresponding value will be around 8 ohms. The resistance value is measured with the same electronic multimeter, but switched to the appropriate operating mode. If the measured value differs significantly in one direction or another, the sensor is obviously faulty and needs to be replaced.
For more detailed diagnostics, additional expensive equipment is used, which is used only in car services, since the average car owner simply does not need it. With its help, not only the tightness of the regulator valve is checked, but also the linearity of its control. If everything is clear about the tightness, then the linearity of the control ensures its smooth closing/opening, which facilitates the normal flow of diesel fuel through the main line to the return line. If mechanical jamming occurs, then the control characteristic will be nonlinear. To build it, special hardware and software are used.
In most cases, repairing the fuel pressure sensor itself is hardly possible, so it is simply replaced with a new one. However, for many cars the cost of this unit is quite high (even for domestic VAZs and their budget analogues). Therefore, before replacing this unit, you need to make sure that it is the fuel pressure sensor that has failed, otherwise it will be a waste of a lot of money.
Conclusion
The fuel pressure regulator is a simple, but important component of the fuel system, which directly affects the operation of the engine. This applies to both gasoline and diesel engines. It is worth considering that when it fails, the engine begins to operate in a less than optimal mode, which creates an air-fuel mixture with the wrong composition, and the fuel pump begins to wear out, which leads to a decrease in its overall service life. Therefore, if you suspect a failure of the fuel pressure sensor, it is necessary to carry out diagnostics as quickly as possible in order to return the engine to optimal operating parameters.
How to repair an RTD?
As part of component repair, the following work must be performed:
- Look under the hood of the car where there is a fitting plug designed to control fuel pressure. Unscrew it, then using a special protective metal cap, carefully unscrew the spool inside the fitting.
- Connect the hose with the pressure gauge and secure it to the fitting using a clamp. After starting the engine, check that the pressure reading on the measuring device does not exceed 3.25 Bar.
- Disconnect the vacuum hose from the RTD. This operation should be accompanied by an increase in pressure. If nothing happens, repairing the fuel pressure regulator is useless; you will have to replace the element with a new one.
If the part cannot be repaired, we proceed to install a new device.
- Disconnect the vacuum hose. The pressure will begin to increase. Having reduced the pressure in the power system, proceed to remove the vacuum hose. You will need to unscrew the securing nut on the fuel drain pipe, where diesel or gasoline flows through the fuel filter to the RTD.
- After unscrewing the two bolts securing the device to the fuel rail, you can safely remove the regulator from the fuel discharge tube itself. The ring remaining in the ramp can be easily removed by hand and placed on the regulator before installation.
- Install a new regulator and perform all previous steps in reverse order. Make sure the new device is in working order, only then proceed with complete assembly. Upon completion of installation, perform a control check of the operation and serviceability of the device.