December 23, 2014 Lada.Online 119 589 0
Fog lights (FTL) are an additional source of light. The flat and wide horizontal beam of these headlights extends directly above the road, which improves road illumination in foggy conditions. PTFs were not installed on the Lada Kalina in all modifications, so the question “how to install fog lights on Kalina” is still relevant.
Required
: PTF set.
Where can I buy?
PTFs for Kalina are presented in our online store.
Lada Kalina wagon Sauvignon › Logbook › Installing PTF on Kalina 1 with your own hands
I happened to get into a very strong fog during a trip to St. Petersburg.
After returning home I thought about installing additional light. At first I couldn’t decide for a long time which headlights to take, Bosch or Kirzhach. I went shopping, there aren’t really any Kirzhachs anywhere, and if there are, the price for one starts from 1500 - which is expensive. I decided to install Bosh ones, since my main headlights are also Bosch, and the price is nicer - 1500 per pair + unpainted masks with a narrow hole that covers part of the headlight (these masks, of course, were not useful to me). I found out that both Bosch and Kirzhach come complete with light bulbs (H11). But I decided to replace the light bulbs with white ones, which is why I didn’t need them either. Next I went to purchase: In order to install the PTF I needed:
1) 2 fog lights Automotive Lighting (Bosh) (1500 RUR) 2) kit for connecting PTF (350 RUR) 3) button for turning on the automatic light sensor (150 RUR) 4) 3 hanging fuses (150 RUR) 5) corrugated cable for wiring (I don’t remember the price) 6) PTF masks in body color (RUR 300) 7) set of H11 MTF Palladium bulbs (RUR 850) self-tapping screws for attaching headlights to the bumper 9) long clamps
First, I removed the bumper and the front left fender liners. To remove the bumper, you will need to unscrew the screws that connect it to the fender liner in the arch (2 pieces on each side), then we climb under the car and unscrew all visible bolts and screws from the bottom of the bumper. Then we remove the radiator grille (there are also self-tapping screws on top under the hood, and at the bottom inside it is attached with latches, you can crawl there with a long screwdriver and pry them off, under it there will be another 3 or 4 bolts in the bumper. You also need to unscrew 2 screws from lower grille, and pull it towards you. Then all that remains is to remove the bumper from engagement with the wings (just pull towards yourself, but not too much, so that it doesn’t jump out and catch the paint on the wing) You don’t have to remove the bumper, then you will need to remove the fender liners , and work through the freed-up space, but I decided for myself that it would be more convenient to remove the bumper. Then you need to remove the factory PTF masks-plugs from the bumper, they are held on by latches, just press the latches from the back side, and in the same way insert new ones onto place.
p/s a little about PTF masks - I was tormented by the question of which headlights are suitable for masks with wide holes, in fact it turned out that they fit both Boshevsky and Kirzhach. The headlights themselves do not differ in size. And those masks that come with Boshevsky ones can be thrown away right away, the hole is narrow, it covers part of the headlight.
Next, I opened the wiring kit for connecting the PTF. My kit did not include fuses, so I had to purchase them separately. We begin to pull the wiring.
Next, we stretch all the wires parallel to the standard wiring harness that runs under the left wing; to do this, you will need to remove the fender liner. We attach the new corrugation to the existing one with clamps. The wires enter the interior in the same place; to do this, you will need to make a hole in the rubber seal and insert the wires into the interior through it. (After finishing the work, I recommend sealing the hole with sealant) Since I decided to take a permanent plus for the relay from the battery, I laid the wire in the same way. The wire from under the hood into the fender also enters through the factory wiring harness, through the seal in the body between the hood and the fender. If you decide to do the power supply in the same way, do not forget about the fuse (30 amps)
Next we go to the salon. If you have a Delphi mounting block (gray) installed, then you won’t find terminals for connection for it (mostly only on order), so I made it a hinged installation. I tied all the wires together with clamps so that nothing would dangle.
After connecting according to this scheme, the PTF will work only with the ignition on
p/s Before installation, I advise you to coat the edges of the PTF glass with black sealant to prevent moisture from getting in, and it would also be a good idea to apply an armored film to the glass (protection from small stones). I do not recommend turning on the PTF during rain, because the glass It gets very hot and may crack if it gets into a puddle.
#installakaptf #ptfkalina #ptfkalina1 #ptfkirzhach #ptfbosh #ptfbosh #mtf #mtfpalladium
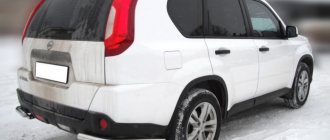
Lada Kalina Station wagon truffle modest › Logbook › The fog light is “sweating”, removing the PTF
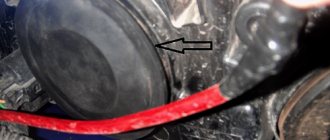
After rains, and more often after car washes, the right PTF began to “sweat”. and the most interesting thing is that it did not dry out. and within a month water appeared in the fog. It was decided to disassemble and deal with the problem.
Next you need to unscrew 6 screws in the arch and 1 screw under the bumper
With a slight movement of your hand in the counterclockwise direction, the light bulb comes out. This is where you can stop reading for those who decided to simply change the lamp in the PTF)))
To remove the PTF, you need to unscrew 3 screws
Here she is . I have already sealed the glass with sealant. So we need to think further.
I removed and cleaned the ventilation fungus))), it was clogged with dust and was not blown through (((
I pulled the o-ring ((( - it fell off. . Cleaned it up. Apply sealant. Removed excess. Dries)))
Reassemble in reverse order. By time. Hm . 30 minutes to disassemble and assemble)))
Eliminating the causes of water appearance
Removing fogging of taillights or headlights:
- The cables are disconnected and the corrector hose is disconnected.
- Remove the headlight, thoroughly clean the surfaces, check the technical holes and breathers.
- Be sure to check the O-rings that are located in the connectors and sockets of the lamps - any rings that are even slightly damaged must be replaced immediately.
- Carefully examine the surface for the formation of cracks. Small ones can be sealed with sealant.
- Check the seam for tightness. It is necessary to replace the seal, it is advisable to go around the sealant in a circle.
- If a lot of water collects in the housing or the headlight on the Granta Liftback constantly sweats heavily, some car owners drill a small hole in the glass at the bottom. This often helps, but it is not the best solution to the problem.
It is permissible to use only those compounds that are designed specifically for headlights. The sealant can be silicone, anaerobic, polyurethane and heat-resistant, with a liquid or paste consistency. The market offers sealants DoneDeal, Dow Corning 7091, ABRO WS-904 and others.
Only special sealants can withstand such operational loads, have good adhesion, and glue reliably. The compositions are very durable and elastic, do not allow water to pass through, can withstand high and low temperatures, the negative influence of petroleum products, and vibration.
At the same time, polyurethane sealants cannot be used for gluing joints and dismountable elements, and anaerobic sealants are intended for treating relatively flat surfaces. Can be used to seal shallow cracks.
see also
Comments 17
So, is it all over? We also have 2 fog lights.
It will be useful: How to open a metal door without a key
sweated sometimes, but dried quickly...
Well, let's see according to the circumstances. the previous owner says he took them apart...
Yes, he could have taken it apart many times, but he might not have achieved the effect... I pierced the plastic from below with a small drill, and the moisture quickly began to leave.
Thanks for the advice))
and I used a 3 mm drill to make another hole in the bottom of the headlight so that air could circulate, because the filter on top gets clogged with dust and doesn’t work as it should
in the end I did just that. obliquely and at the bottom. I think dust shouldn't get in.
dust? It’s unlikely, it’s just that I’ve been installing various additional fogs (both Chinese and Polish) on cars for a long time and most of them have a hole at the bottom, and when I took these off I was surprised that it was on top and then through the mesh and I was blowing into it with my mouth, the headlight is sealed, and the heating is strong. and the “dew point” falls in damp weather, so it will be just right for heat removal, time will tell. p.s. when I drilled it, 15-20 grams of water poured out
in the end I did just that. obliquely and at the bottom. I think dust shouldn't get in.
the hole works! tested at -15, the fog is clean!
Everything is clean for me))) and the fog doesn’t get damp. and sweated during heavy rain, even when I didn’t turn them on.
the hole works! tested at -15, the fog is clean!
Doesn’t it collect water from puddles?
I think it’s better not to drive a passenger car into a puddle more than 25 cm deep)) But in everyday use it doesn’t pick up anything, everything is fine
understandable))) I just bought xenon and now I’m thinking about how to deal with moisture. Now there are LED ones and they also sweat
Another tip: before installing new xenon lamps in the headlight, you need to “warm them up” for 20-30 minutes just from the battery, so that a kind of dirt film evaporates from them, otherwise this perspiration will all settle on the reflector and glass
And on the halogen the temperature was higher and the headlights never sweated, as soon as I installed the xenon it started ((...I made holes at the bottom and it became much better, in damp weather a little haze of fogging appears, well, at least the drops don’t appear, otherwise they will cause damage to the reflector later
People used to pour brake fluid into the headlights to prevent sweating
yes, I won’t expel the water, I’ll have to top it up))))
People used to pour brake fluid into the headlights to prevent sweating
How to install fog lights on Lada Kalina 1st generation
Fog lights (FTL) are an additional source of light. The flat and wide horizontal beam of these headlights extends directly above the road, which improves road illumination in foggy conditions. PTFs were not installed on the Lada Kalina in all modifications, so the question “how to install fog lights on Kalina” is still relevant.
Connecting Kalina fog lights
In addition to fog lights and mounts, the kit should include wiring, which is often missing. We recommend that you purchase several meters of wire with a cross-section of at least 0.75 sq. mm. We pull the wires from the engine compartment into the passenger compartment using a piece of wire on the starboard side through the hole above the clutch pedal. To gain access you will need to remove the front left wheel and fender liner.
The most practical places to install the PTF button are in the tunnel, or on the panel instead of the air conditioner button.
A less popular method is to connect the PTF to the light control module (LCM). We fix the relay with a hinged mount in the mounting block.
Connection diagram for PTF on Kalina
Installation instructions included:
And also a diagram (photo on the left). The circuit can be modified (photo on the right) by adding another relay, which will not allow the fog lights to light up after the ignition is turned off.
Connection diagram for the fog light button:
For owners of Lada Kalina with MUS, the fog light connection diagram is as follows:
Pinout of contacts of MUS Lada Kalina:
- Contact 1 – to the AFCP
- Contact 2 – control button of the AFCP
- Contact 3 – indicator (LED) of PTF status (on or off);
- Contact 4 – output for turning on the PTF relay
- Contact 30 – 12V (constant + coming from the battery)
- Contact 31 – Common minus (ground).
- Pin 56 – To low and high beam headlights.
- Pin 58 – To side lights.
- Contact 58b is an output (regulated voltage) for the illumination of knobs, buttons and instrument panel.
- Contact XZ – (+) from ignition switch
Let us remind you that you can find other photo reports in the Tuning Lada Kalina section.
Lighting system design
Optics for Kalina are manufactured at two factories:
Both types of optics have excellent characteristics and provide high-quality illumination of the road. You can recognize Bosch products by the missing cap on the lamp in the near module, as well as by the AL code on the glass.
The headlight design of the Lada Kalina is no different from most cars. The flashlight has low and high beam modules, blocks with turn signals and side lights. In the new Kalina body, the dimensions also play the role of running lights.
The following lamps are used in Kalina optics:
- low – H7, 55W;
- long range – H1, 55W;
- direction indicators – PY21W, 21W;
- Dimensions – W5W, 5W.
Light elements from the dimensions fit into the license plate lighting module on the trunk lid. Since 2013, modernized optics have been installed in Kalina, where part W21/5W is responsible for the clearance and daytime light. The fog lamps are equipped with H11 lamps with a power of 55W.
We independently install and connect fog lights on Kalina
Despite the fact that anti-fog optics illuminate the road for only 10 meters, it still allows for safe movement by car in bad weather. In the absence of this type of headlights, visibility of the road will be limited, which will affect the safety of the driver and passengers of the car. How to install fog lights on Kalina and what headlights can be used for this - read below.
Eliminating fogging of the front optics on a Ford Focus 3 car
It is worth noting that headlights usually do not fog up opposite the lamps; most often, condensation appears on the glass below. On a Ford Focus 3, moisture accumulates most in the turn signal area, let's look at how to eliminate the defect here
We purchase corrugated door wiring and a standard nylon tie. We carefully make a hole in the lower ebb of the turn signal, use a soldering iron, since when drilling, the chips will get inside the body.
We fake holes on the sides of the ebb and install a screed in them.
We put the corrugation on top and fill it with padding polyester inside.
To ensure that the corrugation does not dangle, we tighten it with another tie to the body.
We got a new ventilation hole next to the turn signal, and now the glass on the headlight will not fog up.
Which fogs to choose for Kalina?
Before installing fog lights on Kalina 2 or 1, you need to decide on the type of optics and its manufacturer. Every car enthusiast who has ever connected a PTF knows that a lot depends on the manufacturer and type of optics. For Lada Kalina cars of the first and second generation, you can find many types of headlights on sale. Moreover, they differ from each other not only in type and manufacturer, but also in the efficiency of the glow, as well as in the configuration.
It will be useful: How to replace the fuel filter in a Hyundai Tucson: step-by-step instructions
Connection diagram of optics with relay and button
The most common manufacturers of PTF for Kalina:
- the domestic company Kirzhach is one of the most trusted manufacturers, which boasts decent quality fogs;
- Luch is another domestic brand that has earned the trust of our compatriots;
- Bosch is a world-famous company that produces not only PTF, but also many other types of parts and components for cars;
- Prosport is a Chinese brand that entered the domestic market not so long ago.
As for the varieties, the optics may differ in appearance:
- headlights can be double;
- round shape;
- in the shape of a square;
- oval lanterns.
It is best to select optics that match the design of the plugs installed in the bumper (the author of the video is the Lada1119 channel).
Principle of operation
Before you do it yourself and install the purchased PTF kit on your car, you should understand the principles of operation of fog lights, and also find out what the car manufacturer recommends on this issue.
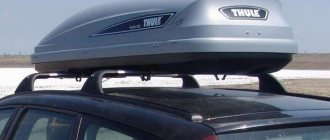
Advice: it would be useful to order the production of stickers for the headlights when purchasing foglights. They will protect the glass from branches and plant stems, as well as from stones flying from under the wheels.
Technical requirements
Current rules stipulate that fog lights should only work with side lights or low beam headlights (see also the article VAZ 21099 wiring diagram: carburetor with “Euro” panel). This is primarily due to current road safety requirements.
The second point that you should pay attention to is the installation location, determined by the provisions of GOST 8769-75:
- From the road - not lower than 250 mm;
- From external dimensions - no closer than 400 mm.
Note! In addition, clause 2.3.4. it was determined that PTFs should emit only white or only selective yellow light
But it must be the same for both headlights mounted on a given vehicle.
Technical features
Currently, there are two main types of PTF used on Lada Kalina, in which:
- The formation of a light spot is carried out on the headlight glass due to the marks applied to it. Such PTFs are considered classic and are commonly called a headlight with a reflector;
- The light spot is formed in a convex (parabolic) lens installed instead of glass. It is considered more progressive because it is equipped with halogen or xenon lamps. In everyday life they are called lensed.
Detailed instructions for replacing fog lights
Installation of fog lights on Kalina can be done either by specialists or in a garage. If you are reading this article, then most likely you are planning to install optics yourself. We are ready to help you with this - below are detailed instructions for installing lanterns, as well as a list of tools that you will need. In addition, you will need a wiring diagram for fog lights, usually it comes with the optics.
Tools and materials
To perform the work, prepare the following tool:
- set with a screwdriver - with Phillips and flat tips;
- a set of wrenches, in particular, you will need wrenches for 8 and 10, but you may need others;
- wire cutters;
- insulating tape.
Connecting contacts to relay terminals in the block
Step-by-step instruction
So, installation of fog lights is carried out as follows:
- First you need to open the hood, disconnect the battery, then unscrew the fasteners and remove the front bumper.
- Then, using a flat-blade screwdriver, you will need to bend the latches and remove the plugs from their seats. Then take the purchased fog lights and secure each of them with three self-tapping screws. Make sure that the optics are securely installed in the installation location - they should not be subject to vibrations while driving, as this will cause them to fail faster.
- Then climb into the car. There is a special seal under the clutch pedal; it must be removed. Once you have access to the access hole, you can push the wiring from the fog lights into the cabin.
- Now you need to connect the optics to the on-board network. If you want it to be activated separately from the main light, then you will need to move the button into the cabin and install it on the console in the car. In this case, you only need to connect the wiring from the fog lights to the main headlights, this will require cutting into their circuit. After connecting the wire, insulate the divided area with electrical tape, this will prevent possible short circuits in the future. After connecting, all wires must be secured with zip ties or the same electrical tape.
- There is another wire coming from the fog lights - ground. The negative leads must be connected to the bolts installed on the body of the car. They also need to be securely fixed, otherwise if they become detached while riding, the optics will not work.
- The next step will be to install a control button with a relay; it would be best to embed it into the center console. After the button is installed, the pink cable from the unit should be connected to the relay.
- When connecting, it is advisable to use a 15 amp safety device. The power relay contacts are also connected to this element, as well as the wiring from the fog lights; they are marked with numbers 30 and 87.
- When the headlights are installed, you need to diagnose the correct installation. Again, check the quality of fixation of the lights on the bumper, as this is very important. Check the functionality of the optics; if you did not make any mistakes during installation and connection, the lights will work.
- Now all you have to do is carefully assemble and reinstall the bumper. When installing, be careful not to damage the wiring. After installing the bumper, we recommend checking the functionality of the optics again.
Price issue
The cost of optics directly depends on its quality, efficiency and manufacturer. As you know, Chinese analogs are always an order of magnitude cheaper than more expensive European headlights. But you need to remember that cheaper headlights will work less efficiently, and their service life is usually shorter than that of their more expensive counterparts. Please take this into account when purchasing.
What to have on hand
To carry out the work, we will arm ourselves with the following items:
- keys 8 and 10;
- flat and Phillips screwdrivers;
- a 6-sided key that regulates the spread of light;
- electrical tape, wire cutters, pliers (possibly a soldering iron);
- ties for fastening the wiring and a piece of strong steel wire;
- actually, headlights;
- The most important thing you will need for repairs is a kit for connecting fog lights to Kalina.
Button, relay and wires with connectors
Although the included end caps are usually black, you can paint them to match the body color however you wish. High-quality fog lights are usually equipped with Philips bulbs that are quite good in their characteristics.
The kit, which includes a button for turning on Kalina's fog lights, as well as wires, connectors and connectors, and a turn-on relay will need to be purchased separately. However, if your car has an air conditioner, then the space for the button is automatically occupied.
Parts for installation in the front bumper
Sequence of work
So, below are detailed instructions, using which you can easily equip your pet with fog lights:
- as in a number of other electrical works, our actions begin by disconnecting the power from the battery (minus terminal);
- Now you can start dismantling the bumper. We need to unscrew the screws and remove the black plastic grilles. It may be necessary to remove the license plate;
We begin work on installing the PTF
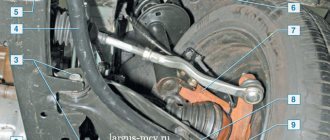
- the grilles and bumper are attached with screws and self-tapping screws - you can feel them with your hands, even without a hole. When you remove the bumper, you will see that the mounting points are indicated by arrows. This will allow such work to be completed much faster in the future;
- the wheel arches additionally hold the bumper with 3 self-tapping screws - do not forget to unscrew them as well;
- Now you can carefully begin to remove the sides of the bumper from under the arches, using rocking movements, and remove it entirely. Bend the plugs using a flat-head screwdriver;
- The fog lights themselves are attached to three screws each;
- now we need to extend the wiring into the cabin (as the video in this article shows). Many people recommend removing the driver's wheel and arch protection at this point;
- where the clutch pedal is located, we will find the place where the wires are collected in a bundle and push the seal outward;
- Now you can stretch the wiring using rigid steel wire. The idea is to tighten the wiring from the interior into the space under the hood. You can immediately provide wiring for connecting LED parking lights, alarms, remote hood opening and everything else that has not yet been installed;
PTF assembly
Our new wire blocks will go along with the factory ones, after which they can be tied together with plastic ties like clamps. If there is a need, a wiring diagram for fog lights on Kalina can help with this;
Assembling the headlight completely
We continue our PTF installation algorithm:
- We maintain the required length for the foglights and begin to screw the negative terminals to the bolts. For this purpose, you can use any bolts located on metal parts of the body, except for the engine crankcase mounting bolts, since through them there is no normal contact between the protection and the car body;
- It will be more convenient to run the wire to the right headlight under the radiator grille;
Connecting wires
- if it is necessary to lengthen the wires, twist them, or better yet, solder this place and insulate it;
- the power that the fog lights consume requires connection through a relay, which is controlled by a button (see photo);
- take power from the pink wire that leads to the fuse box (relay K7). It is designed to turn on the high beams, and voltage appears only when the ignition is on;
- use a 15 Amp fuse;
- contacts from the relay are connected via wires with a cross-section of at least 0.75 mm to the wires of the fog lights and to the relay;
- After making all the connections, we need to check how we assembled our kit and whether there is power in the circuit. To do this, connect the ground of the car and check how the headlights shine when turned on by the button;
Bumper with headlight installed
All that remains is to reassemble the bumper in reverse order, making sure that the wires do not get pinched anywhere. The price and degree of complexity of such repairs will be within the power of any Kalina owner. In order to adjust the headlight beam, there is access to the adjustment screw from below.
Fog lights for Kalina - how to choose and install the design
Fog lights for Kalina can be installed without the help of professionals, since the process is quite simple, and by following simple recommendations, you are guaranteed to achieve an excellent result.
In this review, we will consider both the features of installation work and the criteria for choosing high-quality PTFs and the basic rules for setting the light so that it is as effective as possible and does not blind oncoming drivers.
Due to their lower location and directional beam of light, fog lights are much more effective in low visibility conditions
Main design options and criteria affecting quality
The following types of products can be found in the retail chain:
- Products under the Bosch brand are always sold as a set (2 pieces) and are distinguished by fairly durable glass and good quality luminous flux. We can say that this is the most reliable option, but its price is noticeably higher than all other analogues.
- Production PTFs are in many ways similar to those described above, but in fact their quality is noticeably inferior to the first option. The only advantage is lower cost.
- Kirzhach fog lights on Kalina have lens-shaped convex glass, which allows you to concentrate the light flux and direct it exactly where it is required. Quite a good and reliable solution.
- Products under the ProSport brand and other similar brands are produced by Chinese factories. It is difficult to judge their reliability and quality, since one option can be excellent, while the second one will fail in a very short time.
It will be useful: Silicone grease - used for rubber and plastic parts in cars and households. properties, comparison, reviews of silicone-based lubricants
Bosch products play leading roles here too
The question of which fog lights are better for Kalina raises a number of disputes, so the decision is yours. As practice shows, the most popular options are Bosch and Kirzhach.
Important! All of the above options are excellent for installation, and you do not have to make any alterations to the design.
Features of installation and configuration
As noted above, you can install Lada Kalina fog lights with your own hands; this does not require special equipment and devices, everything is very simple.
Installation
We will consider the option of removing the bumper, as it is easier for novice craftsmen. In the future, if you suddenly need to replace the fog light on Kalina, you can do it without removing the bumper, since you will know how the element is attached and how it is connected.
In general, the installation instructions look like this:
- First, the bumper fastenings are unscrewed; all fastening points can be found in the instruction manual; the screws are located both along the grille and under the arches. To free the structure, the side parts are slightly removed from under the arches .
To remove the bumper fasteners, remove the latches securing the grille (green arrows)
- Next, using a flat screwdriver, the plugs are removed from the structure, after which you can attach the headlights themselves, which are most often framed according to the size of the hole. Fastening will not cause any difficulties, this is done using three self-tapping screws, the main thing is to do everything carefully so that the structure stands level and is fixed as firmly and reliably as possible.
- The next step is laying the wiring harness that comes with the kit. This is done from the interior: first, the carpet is removed, and in the area of the clutch pedal you can find a large bundle of wiring and a plug. The plug is pressed to clear the hole, after which the harness is tied to a piece of wire and pulled under the hood, the photo shows where the plug is located.
Finding a place to lay the wires under the hood is not difficult.
- Using plastic clamps, the wires are attached to the main bundle, after which the harness is pulled along the left side and along the front bumper so that the connection points are located near the location of the PTF. It is important that the wires are secured and not dangling.
- After laying the wiring in the car, you can connect the fog lights using connectors, and the negative wires are screwed to the nearest bolts on the car body.
Important! Don’t rush to screw the bumper on; if something is done wrong, you won’t have to disassemble the structure again.
- The system operates through a relay, which is best installed under the panel, and do not forget to securely fix the structure. Power is supplied through the pink wire from the fuse box, the fuse capacity should be 15A.
- To connect the PTF, pins 30 and 87 are used; all connections must be equipped with terminals to ensure the best contact.
The relay controls the operation of the entire system
- Next, a button is installed in the cabin, after which you need to check the operation of the fog lights. To do this, connect the battery terminal and turn on the PTF. If everything is fine, the system can be assembled, but Kalina’s fog lights still need to be adjusted.
How to adjust the light
For best performance in low visibility conditions, you need to adjust the light, this is quite simple:
- Before you adjust the fog lights on Kalina, you need to find an area with a flat surface and a wall or a solid fence in front of it. It is in this place that all necessary work will be carried out.
- First of all, check the tire pressure, it must be the same for the car to stand level. After this, measure the distance from the ground to the center of the PTF and draw a horizontal line on the wall at the same height. GOST standards stipulate that the driver’s seat must carry a weight weighing 75 kg; any person with approximately this weight can be seated.
- The work is carried out in the dark, the car is located at a distance of 5 meters from the wall, after which the fog lights are turned on. The adjustment itself is made using a screw, the location of which is shown in the photo. That is, for adjustment you only need a thin Phillips screwdriver.
The main advantage of this type of work is simplicity
- First, one headlight is covered with thick cardboard or other opaque material, after which the light flow is adjusted with a screwdriver so that its center is located on the line or slightly below it. The same thing is repeated with the second PTF, after which the adjustment can be considered complete.
To give additional reliability to the glass and protect it from falling stones, we recommend ordering the production of stickers for the headlights; they will protect the surface from scratches and cracks.
Installation summary
After installing the fog lights, you can adjust the direction and intensity of the lighting. It is enough to place the machine at a distance of 5 meters from the wall on a flat floor.
Cover one headlight with cardboard or a rag (like an ophthalmologist's eye) and turn the adjustment screw until the top level of the beam is 50 mm below the level of the headlights. Do the same with the other headlight. The most precise adjustment is done in a car service using a regoscope.
Any vehicle, not just a car, needs fog lights. Who knows, maybe they have already saved your life, and you don’t even know it. They, just like the main headlights, need care and inspection. Change lamps if they burn out. Love and value your vehicle, and it will serve you well and for a long time.