09 April 2018 Lada.Online 47 381 10
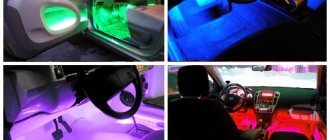
Some foreign cars have additional interior lighting installed from the factory, for example, illumination of door handles. At night, it makes the interior more attractive and makes the car more comfortable to operate. Let's figure out how to modify the interior of LADA cars in the same way with your own hands.
Before starting work, you will need to remove the door trim: (instructions for Lada Granta/Kalina, Vesta, XRAY, Largus, Priora, Lada 4×4).
Installation on Lada Granta, Kalina, Priora
- Treat the LED with fine sandpaper so that it shines not as a point, but as a scattering light.
- We make a hole in the plastic door handle of the required diameter (for example, 6 mm) using a drill.
- We install the LED in the hole and fix it with glue (for example, hot glue).
Result:
The installation process is also shown in the video:
Illuminated interior door handles – photo report
— detailed photo report of LED installation; — catalog numbers of light bulbs and prices; — nuances that you may encounter; — photo result;
— supplemented with more nuances and photos (23.10.14)
I decided to illuminate the interior door handles. I ordered LEDs from existential.
Price 3135 rub. Cat numbers: left - 3U0919173 - right - 3U0919174
Photos of the interior handle illumination bulbs.
There are already preparations for LEDs on the handle itself. You just need to drill holes or cut with a sharp knife.
I warn you right away, the work is labor-intensive.
The LEDs themselves have a bit short wires, so we lengthen them.
The easiest way to connect wires to button lights. But there is a minus here. When the power windows are locked, the backlight of the handles goes out along with the buttons. For myself, I consider this minus not significant, because it is very convenient even in the fact that if children are sitting in the back, then in the dark they simply will not be able to see where anything is. I can only say one thing about how it feels, it’s cool in the dark.
Nuances - 1
It is important to correctly connect the wires to the button illumination. Otherwise, it may turn out that the diodes will shine at half strength. When you open the doors, the diodes will burn brighter, when you close them they will dim again, and when you press the window lifter, the glass will dull and close jerkily.
I STRONGLY DO NOT ADVISE INSTALLING ANY DIODES ON A SKODA! update from 12/15/2016.
For those who really want to install diodes, read this article first, and then decide for yourself >>
And now, the photo report itself
Result
Nuances - 2
1. LEDs have black and blue wires.
2. Pay attention to the glow of the diodes. I came across the right ones with a blue tint. The left ones shine with a slightly greenish tint, they don’t really catch the eye, but if you look closely, you can see them. There is only one way out. Swap the diodes as I did - with a blue tint on the front, with a green tint on the rear doors. If anyone knows other solutions, write in the comments.
3. We connect the wires on all doors like this: black from diode to brown. On the plug it is listed as number 2. The blue wire from the diode to the gray-blue wire is numbered 6. See the photo below.
It is important not to mix up the wires, otherwise we will get problems such as:
— The diode lights up and does not go out when the low beam is turned off or the ignition is turned off. — The system for adjusting the rear view mirrors is not working. — When the low beam is turned on, the mirror adjustment does not work; after the low beam is turned off, the adjustment begins to work only after 2 minutes. — The diode is not adjustable in tone using the brightness adjustment wheel of the instrument panel.
Also, for those who love the color scheme, you can wrap the diodes in cellophane film with a green pattern taken from the Auchan store and at the output you will get a green glow that matches the color of all the interior buttons.
I decided to leave the original glow because... I prefer it.
After installing the diodes
Examination
1. Let's see if the diodes are lit everywhere. 2. We sit in the back seat and close/open the door, the diode should light up equally. 3. We lower the glass up and down, it should work as usual without brakes. The diode lights up normally. 4.Check the adjustment of the rear view mirrors with the low beams on. 5. We check the panel illumination with a roller; it should work in accordance with the tone of the panel instruments and all illuminated buttons in the cabin. 6.When the ignition is turned off, all diodes should go out.
Collections on the topic:
I installed LEDs on the DRLs and now the lamp fault sensor lights up all the time.
We replace the standard light bulbs with diodes in the front dimensions
There is a non-standard xenon and DIODES on a Skoda - how to preserve the electronics unit?
Replacing standard lamps with white ones in PTF and DRLs — Skoda Octavia 2 (A5 FL)
Diode strip for low beam headlights - Skoda A5 1.6
Do not install these diodes in the DRLs - review from a troubleshooter
Replacing standard light bulbs with diodes - interior lighting
LED illumination of the Skoda glove compartment - photo
Installation on Lada Vesta, XRAY
Required
: standard LED backlight module 8450031185.
Procedure
:
- Make a hole for the backlight module diffuser.
- Fix the LED backlight module.
- Connect to the connector in the doors, which is available on luxury versions, or stretch the wires from the door to the passenger compartment. See connection below.
photo profy55
We similarly modify the Lada XRAY door handles
Photo by walla03
Preparing and connecting wires
Illuminated door handles from the inside.
Now let's get to work. First you need to disassemble the door handle. This is done using appropriate screwdrivers. Now take the LED lamp and remove the plastic housing from it. There you will see pins at the end of the lamp that will need to be soldered to the wiring. But before this, it is advisable to lightly clean the wiring and put small terminals on them. This will make soldering much more convenient for you, and the quality of work will be better.
Related article: Do-it-yourself outdoor fireplace: oven, grill and barbecue (60 photos)
Don’t rush to put plastic plugs on the wires for protection just yet, since in any case you will still have to remove them until the work is completely finished. On the other side of the wires, it is also necessary to lightly strip and put terminals on the ends, but of a larger size.
When doing this kind of work, it is important to consider one important point. As a rule, any door light in a car has two sides: one is the lamp itself that will light, and the other is the part from which the main power will be supplied to this lamp. So this power can come either directly from the electrical part of the car (usually you need to open the box that is located near the steering wheel) or from the door card, if it has direct power (this is often observed in modern car brands).
In the first case, you need to calculate the length of the wires in advance so that it is completely enough to connect the backlight and at the same time for proper placement, so that in the end the wires do not get in the way under your feet. In the second case, small wires are usually used, since their location does not extend beyond the area of the handle. But still, in both the first and second cases, it is advisable to take long wires, since they can always be shortened.
After this, use an ammeter to check that all wiring is connected correctly. If you don’t understand electricity very well, then it is better to seek advice or direct help from an electrician so that in the future there are no unpleasant problems with a possible short circuit.
Connection
When using LEDs in interior lighting, do not forget to use resistors when connecting.
On Lada Vesta and XRAY in TOP trim levels there is a connector in the doors for connecting standard lighting:
Below are other connection diagrams.
Method No. 1: to illuminate the power windows
.
For Lada Vesta:
- driver's door: to the power window unit (Blue with a black stripe - +12V backlight, black - ground)
- in other doors: red (No. 5) - +12V backlight, blue (No. 6) - ground.
For Lada Granta:
- +12V backlight - white (No. 4).
- "Mass" - black (No. 5).
Method number 2: universal
.
Radio ISO connector contacts:
- A6 - +12V when the dimensions are turned on.
- A8 - “mass”.
Cigarette lighter connector pinout (Lada Vesta):
- black - mass.
- blue - +12V after turning on the dimensions.
We run the wires from the interior to the doors through standard rubber corrugations. If necessary, drill holes in the connector.
Features of LED strip installation
Installation of the LED strip in the leg area and in other places is carried out using glue. When forming the required length of the tape, it is cut with scissors; the cut must be made strictly along the round or oval marks.
Wires are soldered to the pieces of tape, and terminals are installed at the ends. All exposed wiring areas must be wrapped with electrical tape. The installation site of the tape is wiped with any degreasing liquid to ensure fastening strength.
It is necessary to connect the tape to the vehicle's electrical network in compliance with polarity.
Installing a diode in the handle
The main task is the correct choice of the place where the LED will be located. Sometimes it is placed on the top of the niche, where it is not visible and does not become an eyesore to either the driver or passengers. Often the installation location is chosen to be the front wall of the niche (towards the driver). This option is somewhat worse, since the lighting elements are noticeable, but it is more convenient for opening the door in the dark.
To install the LED, the door handle must be removed. Mark the center of the hole and carefully drill it with a 5 mm drill. If the handle is chrome and there is a danger of damaging the finishing layer, you should first cover it with masking tape. This is a short and effective procedure that allows you to reliably protect the surface from careless actions.
The LED is inserted into the hole, fixed in it with a glue gun, after which you should check the functionality of the backlight. It is useful to do this before the sheathing is installed, so that you do not have to remove it again in case of any problems. If the test was successful, we install the handle and trim in place and change the scope of work - move on to the next door.
Important! It is best to install decorative lighting on all 4 handles, although some drivers are limited to only the rear or front doors.