A door card (this name comes from the British English “door card”) or door panel is a door insert that covers its internal components.
On old machines they were made of thick cardboard covered with fabric, artificial or natural leather. Door cards on modern cars are made of molded plastic and may include textile inserts. This manufacturing method allows you to create three-dimensional three-dimensional panels of any design. The need to reupholster door elements arises from the desire to change the appearance of the interior, for example, in parallel with replacing seat upholstery, as well as due to wear or peeling of the material. It usually peels off due to the destruction of the foam backing. If you try to re-glue it without removing the dilapidated remains, the material will peel off again over time. Therefore, it is better to approach the process of reupholstering plastic door parts thoroughly. It is advisable to dismantle the insert with the glued material, remove the old material with foam residues, glue a new one with or without foam rubber and put everything back together.
This is not a very complicated process compared to upholstery of other parts of the interior, but it requires care. By doing the upholstery yourself, you can save money without paying it to a specialist for the work.
Reupholstering complex door panels that require the use of a sewing machine is not recommended for people without the appropriate experience. If you have such a machine and experience, then the trim for the door elements is made in the same way as new upholstery for car seats is sewn. You can combine leather of different colors together and add decorative seams.
In this article we will look at how the inserts of internal door panels are reupholstered. Basic rules and principles can be applied when covering individual armrests and other parts of the door trim.
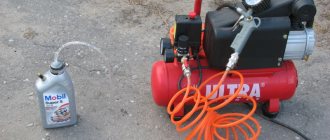
You need to choose good warm weather, or you need to do this in the garage at room temperature for the glue to work properly. At low temperatures, there will be a problem not only with its stickiness, but also with spraying. It must be warm before use. When using aerosol adhesive, there should be no open flame nearby.
Prepare a clean area. Use clean hands to avoid staining the new siding. You can also wear cloth gloves.
How to reupholster a car interior with your own hands
Almost every car owner, while operating his car, sooner or later is faced with the need to partially or completely replace its interior covering. There can be many reasons for this - from normal wear and tear of the material to a simple desire to change the interior of the vehicle.
However, given the high cost of such pleasure, car enthusiasts are increasingly thinking about reupholstering the interior themselves. And for good reason.
Hand-made car finishing allows you to significantly save on work and also opens up unlimited space for self-expression with color and texture. But before enthusiastically proceeding directly to reupholstery, it is necessary to carry out preliminary preparatory measures, approaching the issue with maximum responsibility.
Therefore, it is worth assessing your real capabilities in advance, creating a clear action plan and preparing the necessary material base.
Car audio, car accessories, car acoustics with delivery throughout Russia
If you are interested in installing car audio in the interior of your car, then start by choosing a sound system. Thus, it is customary to divide them into two directions. These are, respectively, coaxial or multi-band systems, as well as component or broadband car audio systems. What is the difference between the first and second? It’s quite simple to understand: in the first case, we have a system of different speakers, made of different materials, and having different degrees of frequency reproduction (high, medium, low). Thanks to their combination and separation, a complete car acoustics is built, which makes it possible to get great pleasure from listening to your favorite compositions, thanks to the high purity of sound and its strict distribution throughout the car interior. In the second case, we have one device that allows us to reproduce a huge range of sounds and, thus, form the internal scene of your car. High-quality car audio is impossible without a correct analysis of the design features of your car. In one case, you need to buy additional car accessories, while in the other you can install only one element and get excellent sound. The dimensions of the car, its sound insulation and interior trim material, the distance of the luggage compartment - all this is of great importance when choosing a particular sound system. Often you can deal with this on your own, but in some cases it is better to consult a professional adjuster. We also draw your attention to the fact that sometimes it is necessary to install an additional subwoofer for car audio. However, in each specific case, it is necessary to take into account the characteristics of the machine. Therefore, we strongly recommend that you get expert advice and ask clarifying questions by phone.
Interior tuning equipment
It is worth recalling that special upholstery is used for car interiors, which in its technical characteristics is fundamentally different from any other, for example, furniture. Therefore, you need to buy material for the interior of your car exclusively in specialized auto stores in accordance with its main criteria - aesthetics, convenience, practicality and functionality.
The modern car market offers a huge range of colors and types of finishing materials. This significantly expands the interior capabilities of the car, giving way to variability. Therefore, it is not at all necessary to tune the interior in a single color. On the contrary, different combinations of textures and shades will look more interesting and stylish.
The main thing is that all materials are harmoniously combined and complement each other. A short video on how to reupholster a car with Alcantara with your own hands.
The most famous and in demand among car mechanics today are:
- Alcantara or faux suede . Composite material. Properties - softness, comfort, wear resistance, reliability, resistance to external influences, ergonomics. Combination: artificial leather, vinyl, eco-leather. Application: seat center, ceiling, pillar, rear shelves.
- Almara or artificial Alcantara . Qualities - softness, velvety. Combination: eco-leather, vinyl, genuine leather. Uses: pillars, door cards, ceiling.
- Genuine Leather . Eternal classic! Properties - strength, durability, aesthetics, resistance to mechanical loads and temperature changes. It is compatible with all types of coatings and can be applied to all elements of the car showroom.
- Automotive leather . Combination - perforated leather, Alcantara, leatherette. Use - dashboards, handles, steering wheel, gearbox, handbrake, door cards, headrests, armrests, seats.
- Leatherette or vinyl . Properties - budget cost, strength, waterproofness, wear resistance. Combination: Alcantara, genuine leather, auto fabrics. Application: side surfaces of seats, armrests, doors, dashboards, car covers.
- Eco leather . New generation material. Properties: resistance to bending, various loads and temperatures, hypoallergenic, airtight, wear-resistant. Absolute combination with all types of coatings.
- Automotive fabric . Properties - functionality, wear resistance, fire resistance, ease of processing complex reliefs. Types - retro fabrics, tapestries, pile, jacquard, ceiling fabrics, etc. Applications - ceiling, seats, doors, racks, trunk, shelves.
However, when decorating yourself, it is best to use Alcantara as a convenient and inexpensive material.
In addition to upholstery material, for upholstery of the interior you will definitely need:
- keys;
- screwdriver;
- glue;
- knife or scissors for linoleum;
- special elastic threads;
- sewing machine - industrial or regular;
- construction hairdryer
Now that the entire tool base has been assembled, you can safely begin tuning the car dealership.
Results
Reupholstering a door card is a difficult but real task that requires minimal skills and expense. If desired, you can optimize the process and make the cladding in the form of relief diamonds. In this case, foam rubber with a thickness of about 5 mm is glued under the skin.
The diamond shape is formed by creating a seam on a sewing machine. In a similar way, you can make another shape and even a simple drawing. But in most cases, a simple reupholstery is enough without additional frills.
When is a reupholstery needed?
Door panels are reupholstered to change the appearance of the interior as part of planned tuning or due to wear and tear of the old trim. If a part peels off, it is better to remove it and install a new one. Minor repairs are possible, but they rarely produce long-term results.
Most often, the interior is upholstered using leatherette. Eco-leather is a practical, durable and inexpensive option.
Constriction technology
From this video, you will learn how to reupholster a car interior with leather with your own hands. Enjoy watching!
Whatever the interior decoration, complete or partial, it is simply impossible to do without dismantling the required elements. In addition, the amount of work will depend entirely on the financial capabilities of the car owner, the degree of need for tuning and the expected results.
The most common segments for upholstery are seats, door frames (cards), door inserts, ceiling, steering wheel, gear knob. Despite the difference in the dimensions of the parts and their functional purpose, the reupholstering technique is the same for all automotive elements and consists of a certain system of actions.
- Dismantling a part that requires reupholstery.
- Cleaning the element from old casing and any dirt, dust, or rust present on it.
- Creating a segment pattern in strict accordance with its contour, while maintaining a 10-centimeter margin of edges for further gluing.
- Sanding the surface of the part, followed by degreasing it with a special agent, gasoline or gasoline mixture.
- Coating the element with glue at the point of contact with the finishing material.
- Carefully gluing the material to the surface of the automobile segment using a hair dryer. In this case, special attention is paid to the bends of the part.
- Securing the edges by pulling tightly and gluing along the perimeter of the element.
For greater effectiveness, the joints of materials or the edges of the upholstery can be finished with hand stitching using a “Cross” or “Pigtail” seam.
Do-it-yourself subwoofer for the car. A unique article on our website will tell you how to do everything right. Alcantara autopilot covers. Here is all the information about them!
In this article, you will find a picture of a road crossing sign.
Do-it-yourself car interior reupholstery
Over the years, every motorist has a need to update their car interior. After all, reupholstering the interior is not only a beautiful look, but above all it is comfort. And comfort for the driver is the most important thing, especially for those who spend a lot of time on the road. Therefore, if you decide to reupholster the interior of your car, then you need to take this matter responsibly. Since there are quite a lot of finishing materials available at the moment, you can create your own unique style. Of course, most people prefer leather, but you can find cheaper analogues. In any case, your interior will take on a fresh, aesthetic look and your passengers will be reluctant to leave your car.
In order to update the interior of your car, you don’t have to go to an expensive car service center and shell out a lot of money. You can purchase materials for upholstery of the interior in auto stores or auto markets, which will significantly save you money. And you can do this work yourself. To do this, consider the stages of work that are provided below. All work should be done correctly and efficiently so that reupholstering the car interior with your own hands is pleasing to the eye and lasts for decades.
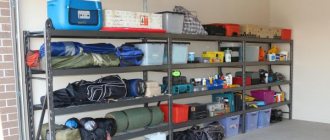
Substrate
Sheathing alone is often not enough to reupholster a door card. Additionally, a soft backing is used to provide volume. A common option is to use foam rubber with a thickness of 3 to 6 mm. It is not recommended to use a thicker product.
For reliability, it is better to choose foam rubber with a knitted backing, which ensures thread fixation and prevents the passage of fastening material.
There is no need to make a stock when cutting. On the contrary, the size of the substrate around the perimeter should be slightly smaller (by about 1 mm). This option provides a better appearance and sharper edges. It is better not to fold the back side of the insert, because otherwise it creates excessive volume at the edges.
When choosing foam rubber, it is better to give preference to hard and dense materials. The optimal solution is high-density matter with overlapped cells. This product lasts longer, retains its shape and characteristics.
We reupholster the car interior with leather ourselves
Sooner or later, the car owner begins to wonder: shouldn’t the interior of his “iron horse” be reupholstered with leather? The reason for these thoughts can be anything. For example, the car is already old and the standard interior covering has become unusable. Or the car got into an accident and the airbags deployed, destroying half of the dashboard. The reason is not so important, the answer to the question is important: is it possible to reupholster the interior yourself? Can! Let's try to figure out how to make a tight fit correctly.
Removing and disassembling the door
It is advisable to remove the door trim. Even if there is no need to remove the insert (sometimes you can do without removing it), it is better to remove the plastic from the door.
The door trim of different cars can be removed in different ways, so it is advisable to first study the information about the specific car model.
The basic principle of fastening is, in most cases, the same. The upper part of the door plastic, touching the glass, is put on the door frame, the rest is held on by clips that are inserted by applying slight pressure. Door inserts can additionally be screwed with self-tapping screws or bolts along the bottom and to the handle. You need to unscrew the screws, disconnect the clips, and then lift the panel up. The plastic rivets or flashings that secure the insert to the main panel can be cut off with a sharp blade.
Once the fasteners are ground or cut away, the insert will come off with little effort.
Selection of cladding material
When choosing genuine leather for interior trim, you should remember several important nuances. First of all, this material varies not only in quality, but also in physical properties.
Genuine leather: characteristics
On the surface of real, untreated genuine leather there are a lot of different defects: cuts, scratches, pockmarks. This leather is only lightly sanded and impregnated with acrylic emulsion. Due to impregnation, the material becomes more durable, but practically stops breathing.
There is a second option: leather without impregnation, with a completely preserved “natural pattern” (called mereya). This material is not very durable. But it is very convenient and incredibly expensive. The explanation for the high price is simple: only the highest quality skins that have passed the strictest selection are used to produce such leather. The material is not embossed or impregnated. And the resulting leather is only slightly colored with aniline dye.
The relationship between the durability of leather and the degree of its processing can be seen in the graph.
The graph shows how stain resistance varies depending on the type of leather treatment
On the top line is leather without aniline impregnation (aniline unprotected). And at the very bottom there is the so-called split leather (also known as split), which can hardly be called leather. But it is very durable. Today, the above options are used less and less for interior decoration.
Aniline and acrylic have been replaced by polyurethane impregnation, which makes automotive leather durable, resistant to temperature changes and mechanical damage.
Eco leather: reviews
Eco-leather is an artificial material created specifically for finishing car interiors. It appeared recently, but has already gained popularity among car enthusiasts. The reason is simple: in all respects, eco-leather is comparable to natural leather. And some characteristics of this material are even better than those of traditional leather (in particular, resistance to mechanical damage and temperature changes). It is for this reason that high-quality eco-leather, as a rule, costs more than natural leather.
The conclusion from all of the above is simple: the choice of material for upholstering the interior depends primarily on the financial capabilities of the car owner. If he needs an excellent result, it makes sense to spend once on eco-leather and forget about problems with the interior for many years. In cases where you do not plan to invest a lot of money in tuning the car, it is reasonable to upholster the interior with leatherette. Well, if a person is a supporter of everything natural, then you can “tighten up” with ordinary skin.
Car interior reupholstery process
Before moving on to actually replacing the existing coating, you should select everything you need for the job. Here it should be said that the amount of leather for covering the interior can vary from 8 to 15 square meters. Exactly how much material is required depends on the specific car model. The same rule applies to materials used for sound insulation (in our example it will be foam rubber).
Tools and Supplies
To carry out the work you will need:
- leather;
- foam;
- stapler;
- hacksaw;
- drill with a set of drills;
- knife;
- threads;
- universal glue;
- sewing machine;
- Phillips screwdriver;
- flat blade screwdriver;
- marker;
- pattern paper;
- sandpaper;
- plywood;
- construction hair dryer;
- masking tape.
The sequence of actions when reupholstering the interior with your own hands
Before proceeding, it should be noted that the process in question consists of three stages. This is the pulling of the doors, seats and ceiling of a passenger car.
Covering doors: instructions and photos
Do the work in this order:
- Using a damp cloth, the door trim is cleaned of dust and dirt. Then it is removed using a Phillips screwdriver.
The car door panel is cleaned of dust and dirt - The removed casing is covered with masking tape, all protruding parts (except the handle) are outlined with a black marker.
To make a pattern, the door panel is covered with masking tape. - Next, the tape is carefully peeled off. Holes are cut in it in accordance with the previously drawn lines. It turns out to be a kind of stencil or pattern.
A stencil made from masking tape removed from the door panel will help in the work - This stencil is placed on a sheet of plywood and outlined with the same black marker.
A stencil on a sheet of plywood is outlined with a black marker. - The resulting shape is cut out with a regular hacksaw, the edges of the plywood are carefully aligned and sanded with coarse sandpaper.
A hacksaw is used to cut out the shape of a plywood door panel along the lines. - Using a drill, holes are made in the plywood mold for the window handles.
Holes for the window lifter handle are drilled in the plywood mold. - Now a layer of foam rubber is applied to the sheet of plywood, followed by leather (the leather must be cut so that there is a margin of at least 2 centimeters along the edge).
A layer of foam rubber and leather is laid on the plywood panel - The above supply of leather is wrapped and stapled on the back of the plywood form.
Excess skin is tucked in and secured with a stapler from the inside. - Then holes for the door handle and for the window lifter handle are carefully cut in the leather with a knife.
- The resulting leather cover is carefully removed from the plywood blank.
Leather cover removed from a piece of plywood - The cover is stretched over the previously removed door trim, the edges of the cover are stitched manually from the reverse side.
- Similar actions are performed with other door panels of the car.
How to cover the interior ceiling panel
Covering a car ceiling is a little more difficult. However, if you do everything carefully, the result will please you. To do this, simply follow the algorithm below:
- The ceiling panel is unscrewed using a Phillips screwdriver and removed. The standard coating is cut off with a knife, then the panel is cleaned of dirt and glue residues.
The standard covering is cut off from the ceiling panel and accumulated dirt is removed from it. - After initial cleaning, the ceiling panel is sanded with fine sandpaper.
The ceiling panel of the machine is sanded with fine-grained sandpaper - The panel is applied to the skin and outlined with a marker. A piece of the required size is cut out of the leather (when cutting out a piece, you must leave a margin of at least 2 centimeters of material on each side).
- Universal glue is applied to the middle of the sanded panel. Then skin is applied to it and fixed.
- Now a strip of universal glue is applied to the edges of the ceiling panel (along the entire perimeter).
The adhesive is applied in an even layer around the entire perimeter of the car's ceiling panel. - The skin is carefully straightened from the center to the edges and glued to them (to do this, you just need to press it down firmly).
The leather is glued first in the center, and then fixed along the edges of the panel - The remaining supply of leather is tucked over the edge of the panel and glued to the back side. Using a knife, holes are cut in the leather for the mounting bolts.
- The leather-covered panel is mounted in its original place.
The ceiling panel is installed in its original place
Car seat reupholstery technology
More experienced craftsmen will be able to remake seat covers. If this is your first time starting this type of work, scrupulously follow the sequence of actions below:
- The seat is unscrewed and removed from the car interior.
The seat can be unscrewed and removed from the car interior - The old cover is carefully cut off from it. Moreover, the cover must be cut strictly along the seams (it is best to do this with a thin stationery knife).
The seat cover is carefully removed and cut at the seams - The resulting fragments of the old case will serve as a pattern. They are applied to the skin and outlined with a marker. Then fragments of a new cover are cut out of the leather (each fragment is cut with a mandatory margin of 2 centimeters around the entire perimeter - this is necessary for stitching the sections together).
Cutting new leather cover elements - The resulting pieces of leather are glued onto foam rubber. After the glue has dried, the foam rubber along the edges of the leather is cut off. Now the elements of the leather case have a foam lining.
Fragments of leather for the case are glued onto foam rubber - Pieces of leather with lining are sewn together using a sewing machine.
The elements of the cover and lining are sewn together on a machine with a thick needle - The resulting cover is placed on the seat, the resulting folds of the skin are slightly heated with a hair dryer and smoothed out manually.
The folds on the leather case are heated with a hairdryer and smoothed out manually - The reupholstered seat is installed back into the cabin.
The leather-covered seat is installed in the car's interior in its original place.
Video: reupholstering the seat with leather
Toyota Corolla BMW -Vlad's Fighting Machine › Logbook › Door cards reupholstered with leatherette
Good day to all!
The idea is not new, and not original, but I decided only now. Why all the silver? I have a moronic habit of constantly driving with the window open (I also smoke in the car). So I won’t say that the original cloth on the driver’s side has completely turned into sex, but I began to think that a more practical material with good organoleptic properties would not hurt here... I’ll say right away that the first time it turned out frankly... golimo... not good. This was caused by a lack of experience, coupled with the wrong choice of workspace. When I got excited about the idea, I called a friend (he makes Shumkas for people in his garage). I ask: “Anyway, I’m going to remove the skins, what should I use to cover the plastic?” Answer: “Don’t do the brain, come, take 2 sheets of vibra and 2 sheets of splen. While I’m making noise, you’ll stick your cards.” No sooner said than done. I removed the casings, Max Red (many thanks to him) started making noise, and I took apart the casings. Door cards are held in place by the fact that they have holes around the perimeter through which they fit plastic pins in the trim, which are subsequently melted (pins). It turns out to be a kind of “plastic rivet”. In general, here you need to work with side cutters. I cut off the skirts of the “rivets” and release the cards. I tear off the original fabric from the cards. I remove the remaining foam rubber with a knife and a rag with a solvent. This will happen to everyone... I lay out the cards on the prepared leatherette.
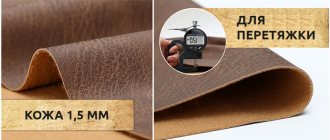
I selected the leatherette as close as possible in texture and color.
The interesting thing is that this particular one comes on a backing, apparently made of foamed polyethylene. Those. the material has its own thickness and “softness”. Convenient, practical, happy with the choice of material. I bought it on Rabochaya Square, where there is also a special one. glue. I bought 0.5 meters of leatherette (180 rubles), a 1 liter can of glue (either 300 or 400 rubles).
Photos are attached from the second successful attempt (I did everything at home, slowly and carefully). I apply glue with a brush to the torn and degreased cards and to the leatherette backing.
According to the instructions, dry for 15 minutes. and reactivate by warming it up with a hairdryer. This will happen to everyone. Should you? We heat it with a hairdryer and glue it! But... here are the first 2 mistakes! 1) Because Max was concerned about ridding my car of extraneous sounds; there was no room in the garage. I sat down on a stool in front of the garage. He threw plywood on the floor. I cut it and applied glue. Not very accurate in low light conditions. So, it turned out that the glue left over from application to the previous workpiece remained on the plywood, and then on the next workpiece, which I carefully placed on drops of glue for coating. I saw it when I pasted it on the card. I tried to carefully peel it off, but to no avail. And the solvent, which I resorted to later, naturally spoiled the appearance. This will not happen to everyone. 2) The glue is brutal! Essentially no room for error! This glue cannot be used
place the whole piece!
It is so strong that when trying to take the leatherette away from the card, the first one was torn to shreds! This will not happen to everyone. We paste over the cards. The torn leatherette is replaced with the remainder of a large piece. We twisted it and turned it... 1.5 cm is missing. Well, we think: “We’ll make it!” Heated it up, pulled it, pulled it some more and... HELLO STRETCHES! This will not happen to everyone. Phew... well, at least I didn’t come in vain. At least we'll make some noise at the doors. Actually, the next step is gluing the remaining cards and assembling the skins and installing them on the doors. I screwed the cards back with self-tapping screws. Short, shiny with a wide cap. BE CAREFUL!
In some places these screws turn out to be long. But, as a rule, in those places where it is not noticeable. I will say that after this assembly there was a slight creaking sound when the left leg rested on the skin. Aren't you tired?