Replacing the handle illumination lamps Opel Astra H
1. To replace the handle lamp, we need to remove the door card.
First we remove the handle. It's on the latches. To open the latches, carefully pull the handle up.
2. Use a flat-head screwdriver to pry out the plug in the door opening handle.
3. Lower the glass down.
4. Remove the plastic insert for the speaker from the latches and turn off the power from the speaker.
5. Unscrew the seven screws around the perimeter of the card.
6. Open four green clips at once, and the last red one. After the card has come out of the latches, disconnect the connector for the power window button and the backlight. After removing the connectors, the card is completely free.
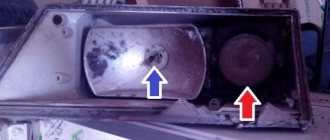
7. Remove the burnt out lamp; it is in a plastic case. To remove it, you need to pry it out with a flat screwdriver.
8. Insert the new lamp and snap it into place. The lamp cannot be replaced separately, only purchased as an assembly. I provided the ordering number above.
9. We perform reverse assembly; if you have any questions, watch the video; the reverse assembly is clearly shown there.
Replacing the glove compartment lamp in Opel Astra H
1. Use a flat plastic screwdriver to pry out the edge of the lampshade.
2. Disconnect the power connector from the lampshade.
3. Use a flat-head screwdriver to dig out and remove the burnt-out glove compartment lamp.
4. Install a new light bulb. Snap into the contacts by hand.
5. Connect power to the lampshade.
6. We insert the power cable into the hole and snap the lamp into place.
Make sure that the light does not come on after closing the glove compartment.
Replacing the brake light bulb Opel Astra H
1. Turn the latch to the left and open the hatch.
2. Turn off the power and unscrew the two plastic nuts by hand. Nuts secure the taillight.
3. Press the button marked below and pull the headlight out of the latches.
4. Use a Phillips screwdriver to unscrew the three screws securing the rear headlight cover. After unscrewing the screws, open the two latches.
5. Remove the cover and change the headlight bulb. To remove the lamp, you need to lightly press it and turn it to the left, you will feel it come free. We install it in the same way, press it and turn it to the right.
6. Install the cover, close the two latches and tighten the three screws.
7. There is a groove on the headlight, and a corresponding hole on the body. We install the headlight so that the groove fits into the hole on the body and snap it into place.
Snap it in by simply pressing it with your hands. It also happens that during installation the edges of the rubber button jam. We help it come up with a flat screwdriver.
8. Connect the power and tighten the two plastic nuts by hand.
9. Close the hatch and secure it by turning the latch to the right.
Replacing front headlight bulbs in Opel Astra H
1. Remove the rubber boot of the headlight.
2. We put our hand in and take out the lampshade with the lamp. It is on a latch and simply pulls out.
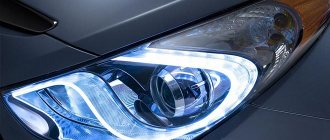
3. Remove the oversized lamp from the lampshade and install a new one.
It is better to change to an LED lamp.
4. Insert the lampshade with the new lamp into the seat and snap it into place.
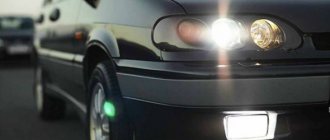
The difference between incandescent lamps and LED lamps is noticeable. Below is a before/after photo.
Replacing low beam lamps Opel Astra H
The low beam xenon lamp has burned out and needs to be replaced.
The first impulse is to replace it yourself. The hood is up, and there you can’t reach it with your hand; you have to remove the headlight. At the station, the cost of replacing a lamp is quite high. It is better to replace the D2S 4300k lamps in pairs. It's actually not that complicated. You need an appropriate set of sprockets and a 8mm wrench. To remove the headlight, you need to remove the grille and slide the bumper forward from the guides. After this, the headlight can be removed without problems, freeing up access to the lamp.
- So, in order.
- Unscrew the four screws securing the radiator grille.
- At the bottom of the grille, press the screwdriver one by one on the antennae of the guides and carefully pull the grille up.
- To remove the two plastic clips securing the bumper near the headlights, you must first pull out their central rods, and then the clips themselves.
Unscrew two screws on each side under the wheel arches. The wheel must be turned inward so that it does not interfere.
- Pull the top edge and side of the bumper towards you to remove it from the guides.
- We repeat the operation on the other side.
- We remove the central part of the bumper from the guides, using a screwdriver, pressing down the locking tendrils and gradually move the bumper forward.
The bumper comes out of the guides and remains hanging on the car on the lower protection. You can put something under it.
- Unscrew the two screws securing the headlights.
- Pull the headlight forward towards the center and up.
- We position the headlight in a more convenient way, with the hatch up, the length of the wires allows.
We unscrew the three self-tapping screws with a small star on the low beam hatch. Remove the hatch cover.
Turn the ignition unit in the direction of the arrow and remove it from the mount. The voltage wire is disconnected from the unit automatically.
The lamp is held in place by two wire clips. We remove the clamps, remove the lamp to be replaced and install a new one in its place. The lamp can be installed in only one position; there is a special groove for this.
We install the clamps in place. install the ignition unit by turning it in the direction of the arrow in the desired direction, connect the power wire (until the unit is installed, the wire will not go into its connector). We put the hatch in place and tighten the three screws. We put the headlight in its place. We tighten the screws securing the headlight to the body.
Similarly, we change the lamp on the second headlight.
We hang the bumper on the guides. We fasten it in the arches along the edges with self-tapping screws. We insert the central part into the plastic groove and put the clips in place.
- We install the radiator grille in place.
- We tighten the four self-tapping screws securing the grille.
- That's it, job done.
How to change a low beam lamp in an Opel Astra N
The replacement procedure will not take you much time and will not take much effort. This article describes and shows in the photo the replacement of the low beam lamp in the left headlight unit. No improvised means or tools are required to perform this operation.
We buy a lamp of the appropriate rating at the nearest auto store.
42 comments:
Thanks for the report, one of the best on the Internet.
Please. I'm glad that the article was useful to you.
Thank you. Just what I was looking for. Tomorrow I'll go try to change the lamp. By the way, it is really very sensibly written and shown.
thank you very much! I thought I needed to remove the bumper
Alexander speaks his mind. Like the first one burned out yesterday) Thank you!
Ahaha, I was already getting ready to take off the headlight. Thank you
Yes, there could be more such descriptions. For different replacements. Thanks to the author.
Thank you very much! Everything worked out the first time, I'm so glad! Everything is written so clearly
Thank you, dear man! The report saved a lot of time.
Please. Sometimes searching for an answer to a question takes longer than solving the problem itself.
Can you tell me what brand of light bulbs are there?
No. Unfortunately, I don't remember.
The article is good, BUT I would like to know more about how to put this evil rubber cap back. I can’t get it back into place for about 10 minutes. PS yes, my hands are crooked
Most likely, something is interfering. I got dressed easily, without any problems.
This is the first time I removed the radiator grille and almost unscrewed the bumper)))
And this, maybe, will have to be done later. Useful practice.
Tell me, does it matter how to insert the lamp into the socket? I can’t figure it out. There is a position there. If possible, please answer in detail.
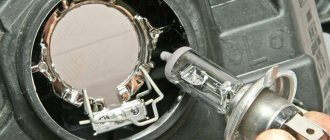
The lamp base and socket seat have a specific shape. It is impossible to put it any other way. Look at the photo of the H7 lamp above (if you click it, it will increase in size), the round base has a straight cut with a protrusion.
We cannot remove the lamp itself from the socket!! How to get it out?
If the design is as described above, then you can try to pry it with a thin screwdriver, the tip of a knife, between the lamp base and the seat. Just be careful not to bend the cartridge platform.
15 minutes. Thank you
Hooray! Despite the crooked hands I did! Thank you for the article! Among the unexpected difficulties - the wires from the cartridge are short, it is impossible to pull the cartridge “to the light”, so it was possible to either watch or do it, the hatch cover does not come off completely - it dangles right there on the cord and gets in the way. It is very difficult to install a new lamp without touching the bulb - it is inconvenient and not visible. Therefore, gloves are a must! or better yet, a pair - some for dismantling and others for installation, because everything there is grimy. How the cartridge is attached to the reflector - the cartridge has two rectangular whiskers. When latched they stand horizontally. Those. The algorithm is this: put the cartridge so that the mustache is diagonal. I checked it with my eyes, then pressed it a little and turned it clockwise so that the mustache was horizontal. Pressure is needed because The mustache is spring-loaded, and the cartridge does not simply turn.
Hands are “golden”, if you look at the prices of repairs in the service. Thank you for the addition.
Required Tools
Replacing low beam elements differs on different cars. A simple option is open access to the back of the lantern to remove the burnt part and install a new one. In this case, you only need a 10 or 12 key to disconnect the car battery.
On some models, replacement will require removing the bumper, headlight or front wheel to access a special mounting hole. In this case, you should prepare:
- set of wrenches;
- textile;
- several screwdrivers of different sizes.
Before removing the grille, bumper, wheel or headlight, the car should be washed in a car wash to avoid getting your hands dirty or scratching the paintwork with fine grains of dirt.
To change a light bulb, you need to carefully bend the clip or spring without using any tools.
How to change a light bulb on an Opel Astra N
Replacing Opel Astra H, J and GTC with adjacent beams
After purchasing a light bulb and contacting the nearest service station, you will be surprised to learn that replacing the low beam of an Opel Astra H is approximately twice as expensive as the optical part itself. This is the moment when you need to learn a new skill, especially since the lamps will be on more than once. In other words, you can save money every time.
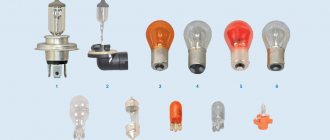
Different types of car lamps
But, having prepared the necessary tools and opened the hood, some froze in surprise to discover that they were unfamiliar with the engine compartment access to the corresponding headlight socket, and it turned out that it was no longer there. Where is he then?
Set of halogen lamps
To help car owners facing a similar problem, we will further explain which Astra H manufacturer has provided ways to access this bulb. By the way, the low beam of the Astra gtc changes about the same, in any case you need to get to it using the same method. Replacing Opel Astra J headlight with headlight. this is a slightly different method and we will talk about this solution.
How to replace a lamp on an Opel Astra n.
as a rental lamp for Opel Astra H and GTC
This type of lamp is replaced in the same way as the Opel Astra J and GTC. Therefore, this essay will be useful to owners of both types of cars.
Recommended literature on repair and maintenance of OPEL ASTRA:
Be sure to turn off the ignition and dimmer before replacing the lamp. When replacing an optical element, you do not need to grasp the glass part with your fingers. According to its characteristics, greasy stains remain on the glass of a halogen lamp, which, when evaporated when heated, contaminates the reflector, reducing its optical ability, in other words, the headlight light becomes weaker. If contact cannot be avoided, wipe the glass with a clean cloth moistened with ethyl alcohol.
OPEL ASTRA H DUMPER LAMP NOTES ON OPEL ASTRA H
OPEL ASTRA N
replacement of
PIPE
TURN ON LIGHT
OPEL ASTRA
N.
HOW TO REPLACE THE LIGHT WITH THE LIGHT OF THE WORLD
.
Now we are starting to replace the light bulb that provides dim light on the Opel Astra:
- The cover that blocks access to the headlight sockets and turn indicators is located on the wings of the Opel Astra GTC. Therefore, to facilitate access, the front wheels must rotate in the desired direction;
- Sometimes the fender liner is very dirty, so it should be cleaned thoroughly, after which the desired coating cannot be missed;
- There are latches on the top of the cover that are easy to unfasten, after which the protective device is removed;
- Behind the cover you can see the rear part of the headlight with a protective cap for the low beam lamp (which has a larger diameter). Another rubber cover hides the turn signal;
Protective cover for the low beam lamp. The cover is removable. For her. holder for the lamp we need. It should be turned a quarter turn counterclockwise. You can now carefully remove the holder from the hole in the reflector;
Unscrew the socket with the near lamp. We simply remove the light bulb from the lamp socket. it needs to be pulled, slightly swaying;
Pulling out the flask
from the reflector
- Before installing a new lamp into the socket socket, check the markings and power indicator. The type of both bulbs must match exactly. It is highly undesirable to install an optical element of higher power. This will shorten the life of both the lamp itself and the surrounding parts of the headlight, since its operating temperature will be much higher;
- The holder holder with the replaced lamp is inserted into the headlight reflector so that the recesses and projections coincide, after which it is turned to the right until it stops;
- Put on the protective cap;
- The cover is attached to the wing flap.
That's actually all there is to replacing a light bulb for a neighbor Opel AstraGTC. All work required, even if done for the first time, should not exceed 20 minutes.
How to change the headlight on an Opel Astra J
In the Opel Astra j, the low beam lamp is accessible from the engine compartment. However, this is difficult to get into.
To make access more convenient, you need to remove some parts, on the one hand, and the air filter, on the other. neck to fill the tank with flushing fluid.
The following is done as described above. Make sure the new lamp is the same type as the one previously installed.
Downloading a book
After successfully completing the payment (by any method) and returning to the KrutilVertel store from the payment system website, you will be taken to the successful payment page:
The book you purchased will be in your personal account, from where you can always download it.
Please note that after making the payment, you need to return back from the payment system website to the KrutilVertel website. If for some reason you did not return back to the site and closed the payment system tab with a message about the successful completion of the payment, please let us know - we will send you a letter indicating access to download the book
If for some reason you did not return back to the site and closed the payment system tab with a message about the successful completion of the payment, please let us know - we will send you a letter indicating access to download the book.
Payment via Yandex Cashier
After selecting payment via Yandex, the Yandex Cashier payment system will launch, where you need to select a convenient payment method (bank card, QIWI, Yandex Money account, etc.)
After specifying payment details and confirming payment, payment for the goods will occur.
If you have a bank card in a currency other than the ruble, then the money will be debited from the card at the rate of the Central Bank of Russia at the time of the purchase.
This payment method is optimal for residents of Russia, Kazakhstan and Belarus.
Replacement features for modifications H and J
The low beam lamp of the Opel Astra J is similar to the Astra modification in the H body, however, there are no windows in the fender liners for easy replacement. Therefore, there are several options for dismantling the lamp:
- Removing the radiator grille and bumper.
- Removing the air box on one side and the washer fluid tube on the other.
Removing the bumper is considered a long and labor-intensive method. This will require many tools and a lot of time. When removing parts in the engine compartment, replacing a lamp in an Opel does not take much time and is not very different from a similar operation in most cars.
Replacing the low beam lamp in the Opel Astra H is carried out by removing the wheels and accessing the cover through a special hole. Some car repair shops do not know about this method and require a large amount of money to remove the headlights.
Opel is equipped with two types of lights. To replace a burnt-out spare part, you will have to spend about an hour of your personal time and use a minimal set of tools. After completing the work, you should check the light angles and adjust them if necessary.
Selection options
If problems occur in the operation of the side headlight bulbs, running lights, rear brake lights, fog lights or headlights of the Vectra or Astra, the devices must be replaced.
Before replacing, you will need to buy new lamps, what you should pay attention to when purchasing:
- First, decide on the purpose of your purchase: do you want the lamps to work for a long time or to shine powerfully? If you install xenon, then the lighting flux from gas-discharge light sources will be really good. But due to the high power of such devices, their service life will be shorter. In practice, the average service life of halogen lamps is approximately 600 hours, but this parameter is also affected by the voltage in the vehicle’s electrical network. The best option would be to purchase and install light sources that consume 13.2 volts. If the power value is even 5% higher, this may cause more accelerated wear of the lamp. After all, with such power, its service life is immediately reduced by 40%. If the power is lower, by the same 5%, then the light bulb will be able to work 60% more.
- You also need to decide on the type of devices. These can be traditional incandescent lamps, halogen lamps, LEDs or gas discharge devices (xenon). If the diodes are inexpensive, then most likely they will shine much worse than good halogens. The same applies to xenon; cheap lamps will not work for long, their power will also be low. LED devices are characterized by low energy consumption and high-quality luminous flux.
- When purchasing bulbs for DRLs, fog lights or headlights, you also need to take into account the temperature. The most pleasant lighting can be produced by devices in which the light temperature varies in the region of 4000-6500 K. If we are talking about fog lights of an Opel Astra sedan, then in this case the value of the light temperature should be at least 3000 K. Keep in mind the lower this figure will be , the more yellow the light produced by the lamp will be. Accordingly, the higher it is, the bluer it will be (video author Artur Art).
How to change a light bulb on an Opel Astra N
Replacing Opel Astra H, J and GTC with adjacent beams
After purchasing a light bulb and contacting the nearest service station, you will be surprised to learn that replacing the low beam of an Opel Astra H is approximately twice as expensive as the optical part itself. This is the moment when you need to learn a new skill, especially since the lamps will be on more than once. In other words, you can save money every time.
Different types of car lamps
But, having prepared the necessary tools and opened the hood, some froze in surprise to discover that they were unfamiliar with the engine compartment access to the corresponding headlight socket, and it turned out that it was no longer there. Where is he then?
Set of halogen lamps
To help car owners facing a similar problem, we will further explain which Astra H manufacturer has provided ways to access this bulb. By the way, the low beam of the Astra gtc changes about the same, in any case you need to get to it using the same method. Replacing Opel Astra J headlight with headlight. this is a slightly different method and we will talk about this solution.
How to replace a lamp on an Opel Astra n.
as a rental lamp for Opel Astra H and GTC
This type of lamp is replaced in the same way as the Opel Astra J and GTC. Therefore, this essay will be useful to owners of both types of cars.
Recommended literature on repair and maintenance of OPEL ASTRA:
Be sure to turn off the ignition and dimmer before replacing the lamp. When replacing an optical element, you do not need to grasp the glass part with your fingers. According to its characteristics, greasy stains remain on the glass of a halogen lamp, which, when evaporated when heated, contaminates the reflector, reducing its optical ability, in other words, the headlight light becomes weaker. If contact cannot be avoided, wipe the glass with a clean cloth moistened with ethyl alcohol.
OPEL ASTRA H DUMPER LAMP NOTES ON OPEL ASTRA H
OPEL ASTRA N
replacement of
PIPE
TURN ON LIGHT
OPEL ASTRA
N.
HOW TO REPLACE THE LIGHT WITH THE LIGHT OF THE WORLD
.
Now we are starting to replace the light bulb that provides dim light on the Opel Astra:
- The cover that blocks access to the headlight sockets and turn indicators is located on the wings of the Opel Astra GTC. Therefore, to facilitate access, the front wheels must rotate in the desired direction;
- Sometimes the fender liner is very dirty, so it should be cleaned thoroughly, after which the desired coating cannot be missed;
- There are latches on the top of the cover that are easy to unfasten, after which the protective device is removed;
- Behind the cover you can see the rear part of the headlight with a protective cap for the low beam lamp (which has a larger diameter). Another rubber cover hides the turn signal;
Protective cover for the low beam lamp. The cover is removable. For her. holder for the lamp we need. It should be turned a quarter turn counterclockwise. You can now carefully remove the holder from the hole in the reflector;
Unscrew the socket with the near lamp. We simply remove the light bulb from the lamp socket. it needs to be pulled, slightly swaying;
Pulling out the flask
from the reflector
That's actually all there is to replacing a light bulb for a neighbor Opel Astra
GTC. All work required, even if done for the first time, should not exceed 20 minutes.
How to change the headlight on an Opel Astra J
In the Opel Astra j, the low beam lamp is accessible from the engine compartment. However, this is difficult to get into.
To make access more convenient, you need to remove some parts, on the one hand, and the air filter, on the other. neck to fill the tank with flushing fluid.
The following is done as described above. Make sure the new lamp is the same type as the one previously installed.
How to replace
To change a light bulb in Astra with your own hands, you will need to follow simple steps:
- Prepare a new light bulb, car and tools.
- Replace according to the instructions.
To make the work easier, the machine should be prepared. To do this, you need to thoroughly wash the front wheels, fenders, bumper and fender liner areas.
A clean workspace allows you to work without gloves, and also protects the headlight cavity from foreign objects such as dust, grains of sand, and moisture.
Required Tools
To replace the dimensions, direction indicator lamps and main light parts, you will need the following tools:
- jack;
- wheel wrench;
- flat screwdriver;
- Torx hex sprocket;
- clean cloth;
- soapy water.
Taking into account the removal of the wheels, the work will take about 40-60 minutes. Before starting work, turn off the engine and remove the negative terminal from the battery.
Step-by-step instruction
Replacement is carried out in a warm room or on a flat area in the absence of rain and strong wind.
Replacing the low beam bulb with your own hands in an Opel Astra:
- Place the Astra on a flat surface, disconnect the terminal and apply the handbrake.
- Raise one of the front sides using a jack and remove the wheel.
- For safety, the tire is placed under the Opel threshold.
- Use a screwdriver to pry up the technological window in the fender liner and remove the rubber cap.
- A headlight plug will appear in the hole, which must be unscrewed counterclockwise and pulled out. Some versions use three Torx screws to secure the cover.
- Disconnect the connector from the halogen lamp and move it to the side. Xenon equipment is powered by an ignition unit, which is rotated in the direction of the arrow on the housing.
- Unfold the spring fasteners.
- Carefully pull the lamp towards you.
Installing a new light bulb in the Astra is done in the reverse order.
When inserting a part, it is important not to make any effort and ensure that the base fits into the grooves. If you accidentally touch the flask, it must be degreased, otherwise the declared service life will be reduced.
When reassembling the hole in the fender liner, it should be washed with soap and water. This will ensure a tight fit and prevent contamination of the optics with dirt flying off the wheel.
How to change a lamp for Opel Astra J
In the Opel Astra j, access to the lamp, which is responsible for the low beam, is from the engine compartment of the body. It must be admitted that getting there can be quite difficult.
To make access more convenient, you have to remove some parts: on the one hand, the air filter, on the other, the neck for filling the tank with washer fluid.
Then everything is done as described above. Make sure that the new lamp is the same type as the one that was installed previously.
So, after spending a little time and effort, you can independently replace the light bulbs for your Opel Astra. The first time will be a little difficult, but the thought of the finances saved on such a simple task will help and inspire.
Author: Ekaterina
- Stas says:
Is it really so important that the light bulb is the same as the burnt out one or can you use another suitable light bulb? - Victor says:
If you mean that there will be two different low beam bulbs in the right and left headlights, then it seems to me that you shouldn’t do that. Because they can be different in power and one headlight will shine brighter, and the second will be dimmer. But if you put other bulbs on both headlights, they may burn out faster or another problem will occur. - Vladimir says:
There is nothing difficult about changing it yourself. In the Opel Astra, there are almost no problems with changing lamps. Only the light bulb was stuck, and there was no desire for it to burst there. It took the longest to get it. A separate conversation is about access to the light bulbs themselves in the car. It is located in an inconvenient place and does not open the first time. Probably, car designers do not face the problem of replacing low beam headlights. - Grigory says:
I’m also very indignant about the difficulty of accessing the light bulbs. You can't figure it out without a detailed map. It took a lot of time and attempts to be able to easily get to the area under the wheel. To be honest, everything was done by touch, hand under the wheel, and all attention to the headlight. - Valery says:
Wouldn't it be easier to change them through the hood? - Matvey says:
I wouldn't say that replacing light bulbs through the hood would be easier or faster. Immediately you just turn the wheel, open the door, use a screwdriver to pry the compartment door open to open it, and all that remains is to change the lamp. I completely agree with those who wrote about the difficult path to the light bulbs themselves.
We dismantle and replace optical elements with our own hands
The process of replacing light sources is not particularly difficult, so you can cope with this task on your own. Let us consider in turn the replacement process in the right and left lamps in each optical element.
Low beam lamps
To change light sources yourself, you need to do the following:
- First of all, you need to turn off the ignition; just in case, it is better to reset the terminal from the battery. Turn the plastic cap, which serves as protection for the optics, counterclockwise. Then just take it off.
- Next, you need to turn the socket on which the lamp is installed in the same direction. The chuck must be rotated until the device is completely dismantled. Subsequently, the cartridge is removed from the reflective element.
- Then you need to remove the light source itself and replace it with a working one. Mount the cartridge, then thread the two petals into the reflective device itself and secure it in place.
- After completing these steps, the holder should be turned fully clockwise. Replace the cap and the replacement procedure can be considered complete. Devices in other headlights are replaced in the same way.
PTF
How to change bulbs in fog lights:
- Climb under the bottom of the car from the front bumper. So you can see a small box located next to the washer expansion tank; this is a fog optics unit.
- Then unscrew the cover with the petals so you have access to the light source with the mount. You need to unfasten two latches and remove the lamp with mount.
- Now you need to disconnect the connector with wiring from the device. Change the light source to a new one and assemble the structure. Assembly steps are performed in reverse order.
Marker bulbs
Position of marker lamp
How to replace side light bulbs:
- The light source itself is located on the reflective element, next to the high beam bulb. To gain access to the device, you must remove the protective cover.
- The optical element socket itself needs to be pulled towards you, after which you can remove it from the seat, that is, the reflector.
- The light source is removed from the socket and replaced with a new one. Further assembly is carried out in reverse order.
DRL
Replacing daytime running light bulbs is also not difficult. In order to perform this task, you will need to use a long flat-tip screwdriver to press on one of the fasteners, in particular, we are talking about the antenna. In this case, with your free hand you will need to pull the cartridge and remove it. Then the power cord with the connector is disconnected from the device and replaced with a new one.
Two ways to replace lamps on an Opel Astra H
Since the Opel Astra H can have both halogen and xenon, it is logical to assume that the process of replacing these lamps will be different. In fact, this is the case, so first we will replace the halogen low beam bulb, and then the xenon one.
Halogen replacement
For this operation on the Opel Astra you will not need any tools. The only thing is that you need to stock up on clean gloves, since a halogen lamp cannot be grasped by the bulb with bare hands, and replacement will have to be done almost by touch.
To improve visibility somewhat, the Opel Astra can be jacked up by first putting the handbrake on and blocking the rear wheels with boots.
So, let's begin. We turn the steering wheel all the way to the right (for the left headlight) or to the left and find a hatch on the fender liner, closed with a lid with two latches.
Hatch for access to the headlight on Opel Astra H Low beam module boot on Opel Astra
We release the latches, remove the cover and get to the rubber boot covering the low beam module.
Low beam lamp for Opel Astra
We remove the boot and see under it a light bulb with a power socket attached to it.
We take the block and turn it together with the lamp counterclockwise until it clicks. The light bulb can now be removed from the socket.
Removed device
We take hold of the skirt of the light bulb base with one hand, and the power supply block with the other, and with some effort we separate them.
Disconnected power supply
Healthy! If the power wires are so short that it is impossible to remove the light bulb together with the socket, then first remove the socket, then, holding the device by the contacts, turn it and remove it.
Now we put on clean cotton gloves, take a new lamp, insert it into the socket and install the structure in place of the burnt one. It is fixed in the Opel Astra by lightly pressing (it cannot be turned without pressing) and turning it clockwise until it stops. We put the boot in place, close the fender liner hatch with a lid, making sure that its latches snap securely.
Replacing xenon
For owners of an Opel Astra with xenon light, the designers have prepared a surprise, since in order to replace the xenon source they are asked to “slightly” disassemble the car and remove the headlight. Of course, you can’t do this without tools. We will need:
- Torx key 20;
- Torx key 15;
- key to 8;
- flat screwdriver;
- cotton gloves;
- D2S lamps.
If everything is ready, we begin to disassemble our Opel Astra. Open the hood and remove the four radiator trim fastening pistons. As you can see from the picture below, the pistons have a clever design. To pull them out, you need to push the middle part down, and then crawl under the car in search of them.
Removing the upper part of the Opel Astra radiator trim
Now we arm ourselves with a flat-head screwdriver and one by one press out the locks indicated by the arrows in the figure below, while simultaneously lifting the sheathing in the place of the lock being pressed. After opening them all, the sheathing can be easily removed.
Removing the radiator trim on an Opel Astra
Now it's the turn of the bumper. It is also fastened with pistons, but of a completely different design. If the piston lock in the sheathing had to be pressed, then here you need to pull it out. This can be clearly seen in the figures below. So, we remove five pistons - two on top, three on bottom. We arm ourselves with the T20 wrench and unscrew the four screws securing the bumper to the fender liners.
Removing the Opel Astra bumper mounts
Using a flat-head screwdriver, press out the locks on the top of the bumper. Then we move the edges of the bumper apart, disengaging them from the fenders, and at the same time pull it towards ourselves. As a result, the structure will move forward, opening access to the headlight mounts.
Removing the Opel Astra bumper
Now the headlight. It is fastened with three 8mm wrench bolts. Unscrew the bolts, pull out the power connector, after pulling out the latch, remove the headlight.
Removing the headlight
The xenon lamp hatch is covered with a protective cover, which is secured with three T15 screws.
Removing the xenon headlight cover Opel Astra H
We unscrew the screws, remove the cover and get to the xenon lamp with the ignition unit attached to it.
Open hatch of low beam lamp in Opel Astra
Turn the block counterclockwise and remove it from the light bulb. The lighting fixture is secured using a spring bracket. We compress its edges in the direction of the arrows in the figure below and fold it back.
Fixing bracket for xenon light source on Opel Astra
We remove the burnt device and, wearing clean gloves, install a new one in its place. If you don’t have gloves, then hold the lamp only by the base, without touching the bulb with your bare hands.
Installing a lamp with bare hands is quite possible
We snap the fixing bracket, put the ignition block on the base of the light bulb and fix it by turning it clockwise until it stops.
On a note. There are arrows on the ignition unit that tell you which way to turn it to remove or put it on. According to them, to remove the block you need to turn it to the left, looking from the back of the headlight.
To remove the block, you need to turn it in the direction of the “Open” arrow.
We assemble the headlight and install it in place, connect the power supply. We check the operation of the headlight and, if everything is in order, replace the bumper and radiator trim.
Replacing low beam lamps Opel Astra H
1. Place the side where we will change the lamp on the jack and turn the wheels. You can, of course, not jack it up if you have a thin hand.
2. Open the hatch in the fender liner. It is used to change the low beam and turn signal lamps.
3. Remove the rubber cover of the low beam lamp boot.
4. Insert your hand into the hatch and turn the lamp socket with the lamp 30 degrees counterclockwise and remove it.
5. Remove the lamp from the socket. In order not to open the iron guide bracket, you can carefully pry the metal rim of the lamp with a flat screwdriver and it will come out.
6. Insert the lamp into the socket and press it by the metal rim.
7. Insert the lamp socket into the seat and turn it 30 degrees. We center the lamp visually.
8. Close the rubber cover.
9. Close the hatch.
This is interesting: Opel Astra where is the diagnostic connector: let’s break it down point by point
Main conclusions
To replace low beam lamps on an Opel Astra N, you first need to choose the right new one. Attention should be paid to such characteristics as:
- Brightness, power, durability.
- Modification (standard, xenon, halogen, LED).
- Color temperature.
To quickly and easily find the required light bulb, you can use the special Vin number of the car model. Before replacement, you need to prepare tools and consumables, and also take care of general safety - stop the machine on level ground and turn off the power. At the same time, you can change the lamp on an Opel Astra N either directly - through dismantling the optics, removing the radiator grille and bumper, or through a special hatch in the under-wheel arch.
Previous
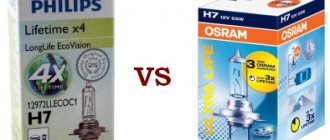
Car lightAll about the best H7 car lamps: characteristics, rating, recommendations for selection
Next
Car lightAll about connecting DRLs on a car
How to change a light bulb for Opel Astra H and GTC
Replacing a lamp of this type is done in approximately the same way, both in the Opel Astra j and in the gtc. Therefore, this instruction will be useful for owners of both types of cars.
Recommended literature on repair and maintenance of OPEL ASTRA:
Before changing the lamp, be sure to turn off the ignition and the toggle switch for switching to low beam. When replacing an optical element, it is not advisable to grasp it with your fingers by the glass part. They leave stains of grease on the glass of a halogen light bulb, which, evaporating when heated, will contaminate the reflector, reducing its optical capabilities, that is, the light of the headlight will become weaker. If contact cannot be avoided, wipe the glass with a clean rag soaked in ethyl alcohol.
Types of lamps for Opel Astra H
Now we proceed to replacing the light bulb that provides low-beam lighting in the Opel Astra:
- The cover, which blocks access to the sockets of the low beam bulbs and turn signal indicators, is located on the fender liners of the Opel Astra gtc. Therefore, to make it easier to get to it, you should turn the front wheels in the right direction;
- It happens that the fender liner is very dirty, so it is worth cleaning it thoroughly, after which it will be impossible not to notice the required cover;
- There are latches on the top of the cover that can be easily unfastened, after which the protective device is removed;
- Behind the cover you can see the back of the headlight with a protective cap for the low beam bulb (the one with a larger diameter). Another rubber cap hides the turn signal;
Protective cap for low beam lamp The cap is removable. Behind it is the socket holder for the lamp we need. It should be turned counterclockwise about ¼ turn. Now you can carefully remove the holder from the hole in the reflector;
We unscrew the low beam lamp socket. The light bulb is simply removed from the socket - you should pull it, slightly shaking it;
We remove the light bulb from the reflector
Before placing a new lamp in the socket of the socket, it is worth checking the markings and power indicator. The type of both bulbs must match exactly. It is highly undesirable to install an optical element of higher power. This will shorten the service life of both the light bulb itself and the surrounding parts of the headlight, since its operating temperature will be much higher; The holder-holder with the new replaced lamp is inserted into the headlight reflector so that the slots and protrusions coincide, after which it is turned to the right until it stops; The protective cap is put on; The cover is placed on the fender liner and snaps into place.
That, in fact, is the entire replacement of the light bulb for the Opel Astra gtc. All work takes no more than 20 minutes, even if this is done for the first time.
Replacing the low beam lamp in the Opel Astra H. When and how to do it
Download PDF
In some cases, you may need to replace the low beam lamp in your Opel Astra H; this work is not difficult. But, if you come to a car service center, the cost of repairs will be significant. It's all about the technical features of the replacement. The fact is that despite its simplicity, when replacing it you will have to perform a fairly large number of actions. This makes the work longer, and you have to pay for the master’s time. In this regard, it is much easier to carry out the replacement work yourself. In this case, you will not only save money, but also become less dependent on services. Still, it happens that light bulbs burn out completely unexpectedly, and if this happens on the weekend, then you will have to wait until the service works. At the same time, this service can be done without waiting for business days. Replacing the low beam lamp in the Opel Astra H may be necessary if it fails. This may happen with some regularity. Therefore, it is better to study the process once. Engineers, in an effort to protect the headlight electronics, have made access to the bulbs much more difficult. But this only made it necessary to make unnecessary movements. Overall, the process remains as simple as on earlier models.
History of the exchange
The beginning of the way
In May 1878, the first building of a new financial institution for Japan, the stock exchange, was opened in Tokyo. The first owners and managers of the Tokyo Stock Exchange were the Japanese Minister of Finance of those years, Okuma Shigenobu, and a corporate lawyer, Shibusawa Eiichi. At first, stock traders who gathered at the stock exchange wore exclusively national clothes - kimonos.
In the mid-1890s, the exchange moved to a new building, its structure changed - from a partnership of two partners to a joint-stock company with a limited number of owners. Over time, more and more government bonds appear - as in many countries of that time, the Japanese government became concerned about its military power and began to increase defense budgets by attracting funds from large capitalists.
Post-war years
By the beginning of World War II, 11 exchanges were operating in Japan. However, after the first war years, it became clear that having so many separate platforms trading securities was ineffective. In 1943, it was decided to unite all exchanges into one based on the Tokyo one. Although, as the near future showed, this could not have been done - the united exchange closed shortly after the bombing of Hiroshima and Nagasaki in August 1945.
The Tokyo Stock Exchange building was occupied by the American military. Until January 1948, it was the headquarters of the occupation forces, which ruled the country until the transfer of all power to the Japanese government in the early 1950s. At the same time, trading in securities in the country continued, although all transactions were concluded not publicly on a common exchange platform, but between specific investors and owners of shares and bonds.
The post-war Asian miracle - the rapid growth of the economic and financial systems of the largest countries in the region - naturally affected Japan. The country began to become a leader in the world economy due to its technological developments and progressive innovations. And although at the exchange itself there were not even electronic displays until 1974 and prices for all securities were written with ordinary chalk on a black board, the value of shares of Japanese companies has been constantly growing since 1968. It was at this time that the Japanese government introduced the necessary restrictions on the activities of brokers and some new rules for conducting exchange transactions.
The growth of securities became especially noticeable in the period from 1983 to 1990 - during these seven years, the Tokyo Stock Exchange became the first in the world in terms of market capitalization of companies listed here (60% of the volume of the world stock market was concentrated in the capital of Japan). The successful strategy of competitors from New York soon changed the situation, but second place was firmly entrenched in the Tokyo Exchange.
Electronic era
On April 30, 1999, the era of “live” trading ended on Japan’s largest stock exchange—the platforms where brokers were located to conduct transactions were closed. All trade has moved to the electronic market.
On several occasions, the use of electronic systems has led to serious disruptions in trading processes. So, on November 1, 2005, the exchange was able to work only for an hour and a half. 90 minutes after the opening of trading, the computer trading system installed the day before, developed by Fujitsu, failed. The operation of the stock exchange stopped for four and a half hours, which was a record downtime in the recent history of the Tokyo Stock Exchange. Another unpleasant incident occurred due to the fact that during the IPO of J-Com on December 8, 2005, an employee of Mizuho Securities, which provided technical support for the placement of shares, entered erroneous data when putting securities up for sale. Instead of setting the price for one share at 610,000 yen, he offered 610,000 shares for 1 yen. In the very first seconds of trading, the most resourceful and fast brokers began to buy J-Com shares for next to nothing. The exchange administrators realized the mistake and tried to cancel the completed transactions. However, despite the efforts made, J-Com's losses amounted to $347 million - this amount was reimbursed equally to the issuer by the Tokyo Stock Exchange and Mizuho Securities. The last major failure occurred on the Tokyo exchange in January 2006, when the number of transactions carried out on it reached 4.5 million and trading stopped for 20 minutes. The Japanese government ordered the exchange owners to prepare a program to improve the computer system, which would prevent such failures in the future.
The most famous stocks traded here
Shares traded on the Tokyo Stock Exchange:
- 11 largest Japanese automakers: Toyota, Honda, Mazda, Mitsubishi, Suzuki, Isuzu, Nissan, Subaru, Hino (“a subsidiary” of Toyota, which specializes in the production of trucks).
- 6 electronics manufacturers: Nikon, Olympus, Ricoh, Citizen, Konica.
- 12 Japanese banks: Bank of Yokohama, The Chiba Bank, Chuo Mitsui Trust Holdings, Fukuoka Financial Group, Mitsubishi UFJ Financial Group, Mizuho Financial Group.
- The largest insurance, pharmaceutical, construction, transport and other world-famous corporations.
What you should know when starting to replace Opel Astra N lamps
Lamps in the headlights of the Opel Astra N can be of two types: xenon or halogen. The lamps should be replaced with the same ones that were installed before replacement. In this case, you should not hold the lamp by the glass with your hands, since the contaminants left behind will evaporate and settle on the reflector. Accidental prints can be removed with a cloth soaked in alcohol.
Before replacing, you must turn off the headlights and disconnect the negative terminal from the battery.
The lamps installed on the outer side of the Astra N headlight are changed through the front wheel arches. To do this, you need to turn the steering wheel in the desired direction until it stops, then release the clamps and remove the service cover.
Replacement of lamps installed on the inside of the headlight assembly is carried out through the engine compartment.
After replacement, you should check the operation of the lamps and adjust the headlights.
Which lamps are better to choose?
Replacing the lamp in the low beam optics on the Opel Astra H model is primarily associated with the right choice when purchasing new lighting elements, which can be halogen, LED, standard and xenon. Here you need to be guided by the following considerations:
- What is expected from a new lamp - power and brightness or durability. If the choice is made towards the first factors, then it is better to choose xenon. However, the greater its luminous power, the lower the resource will be and vice versa. For example, exceeding the parameters by just 5% will reduce the service life by 40%, and reducing them by the same amount will increase it by 60%!
- What type of lamp will it be? Thus, traditional incandescent light bulbs do not last long; halogen and xenon analogues can be brighter and more durable, but at the same time they are much more expensive. LEDs can provide a combination of quality, high luminosity and long service life. However, they cannot be installed in every case.
- Color temperature is also important. For low beam lamps on the Opel Astra N, with any replacements, their tone indicators must fit within the framework of 4-6.5 thousand K.