07/14/2021 2,908 Fuel system
Author: Victor
To clean fuel from impurities and contaminants, fuel filters are used in cars. Failure of the cleaning devices will lead to incorrect operation of the motor, as well as difficulties in starting it. To prevent such complications, the driver must know how to replace the Accent fuel filter and how often it needs to be changed.
[Hide]
Where is the fuel filter located?
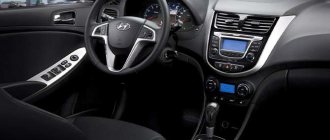
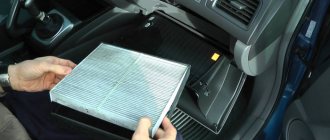
To remove and repair the fuel filter in the Hyundai Accent TagAZ 1995, 2007, 2008, 2011 and other model years, it is useful to know where this element is located on a diesel or gasoline engine. The device is installed in a special compartment under the rear passenger seat and secured using a bracket that is fixed to the gas tank. To gain access to the part, the front seats of the driver and passenger must be moved forward as much as possible and the rear ones must be removed. On diesel and gasoline, the filter element is located slightly to the left of the fuel pump device, which by design includes a cleaning component and a fuel level controller in the tank.
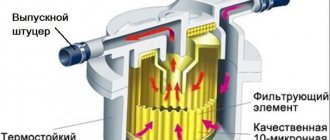
In the Hyundai Accent Tagaz model, the operating diagram of the filter device is as follows:
- The procedure for primary fuel cleaning is carried out when fuel first enters the tank from a canister or at a gas station. The fuel line has a special mesh for purifying gasoline.
- The coarse cleaning process is carried out directly in the pumping device. The filter is installed here.
- The system has another filtration process - spot cleaning. This happens in the main device, which is located further along the pump line.
Fuel filter location
When should you change?
According to the official Hyundai Accent technical manual, the filter device must be removed and changed at least every 25-30 thousand kilometers. At the same time, the manufacturer recommends diagnosing the fuel filter every 8-16 thousand km. If you ask an official dealer with this question, they will tell you that the service life of the part is 10 thousand kilometers. This is done to obtain additional profits from consumers. The need for replacement may occur sooner if you regularly fill your car with low-quality fuel.
Causes of rapid pollution
For what reasons does the fuel filter fail ahead of schedule:
- The appearance of corrosion inside the structure as a result of prolonged water condensation.
- Accumulation of contaminants in the design of the device, resulting from chemical reactions of fuel with oxygen and metal components.
- Formation of tar deposits.
- Constant use of low quality fuel.
- Blockage of fuel system lines with ice and frozen water crystals formed at low air temperatures.
User Andrey Florida showed in his video how to independently change the filter device in the Accent.
Blocks in the cabin
Layout diagram
Description
- Fuse box
- Relay block
- ETACS module or heated rear window relay
- Rear wiper relay (hatchback)
- Seat Belt Timer (without ETACS)
- Wiper relay (without ETACS)
- Open Door Module (Chime Bell)
Fuse box
It is located on the left pillar under the instrument panel, behind the protective cover.
Scheme
Purpose
| 1 | 10A Turn signals, reverse switch, gearbox range switch, automatic transmission selector |
| 2 | 10A Instrument Cluster, ETACM, Pre-Excitation Resistor, Seat Belt Warning Timer |
| 3 | 10A Instrument cluster |
| 4 | 15A Airbags |
| 5 | 10A ECM, PCM, automatic transmission selector, transmission range switch, mass air flow sensor, speed sensor, fuel filter lamp |
| 6 | 10A Central locking |
| 7 | 10A Emergency Alarm, ETACM (Time Delay and Alarm Control Module) |
| 8 | 10A Brake light, automatic transmission selector, automatic transmission lock solenoid |
| 9 | 20A Heated rear window |
| 10 | 10A Headlamp assembly, power windows, electric headlight range control, headlight washer, ETACM, front fog lights, air conditioning condenser heat exchanger fan, engine cooling fan, fuel filter relay, rear window washer |
| 11 | 20A Front wiper and washer |
| 12 | 20A Heated seats |
| 13 | 10A ABS - ABS |
| 14 | 10A Clock, audio, automatic transmission selector |
| 15 | 15A Cigarette lighter |
| 16 | 10A Electric mirrors |
| 17 | 10A Heated rear window, heated mirrors |
| 18 | 20A Rear wiper |
Fuse number 15 at 15A is responsible for the cigarette lighter.
Relay block
To access it, you need to remove the glove box.
Scheme
Designation
- electronic brake force distribution (EBD) relay;
- fog light relay in the rear lights;
- main relay of the engine control system (for clarity, the mount is disconnected);
- headlight relay;
- windshield wiper and washer relay;
- ABS relay;
- electric window lift relay;
- rear window heating relay;
- horn relay;
- turn signal and hazard warning relay.
Fuel filter replacement process
You can replace the device yourself or with the help of specialists at a service station. This is a simple process, so let’s look at the procedure for changing it yourself.
Preparation
To change a part, prepare the following tools:
- screwdrivers with Phillips and flat tips;
- pliers;
- wrench 10;
- 12 and 8 mm head;
- two ratchets - 3/8 and 1/4.
The Start channel published a video in which it showed the process of replacing the filter device in the Accent.
Stages of work
Changing the fuel filter:
- Due to the position of the filter device, a garage and a pit are not required to carry out the work. Unscrew the bolts that secure the rear seats in the car; to do this, use a 12 mm socket wrench and a 3/8 ratchet. Four screws are removed, two on each chair.
- Remove the special rivet on the panel. You can remove it by hand; if difficulties arise, use a flat-tip screwdriver.
- Dismantle the finishing coating. Remove the cap that covers the vehicle's gas tank. There are connectors with wires connected to it, they need to be disconnected.
- Once the plugs are disconnected, start your car's engine. It will work for a few minutes and then turn off on its own. This will relieve pressure in the fuel line of the machine. If work is carried out in a garage, we recommend opening the windows and doors. If you do not relieve pressure in the fuel lines, this will result in fuel spraying throughout the car interior as a result of removing the pump.
- Using a 10mm wrench, loosen the bolt that secures the negative terminal to the battery. The clamp itself must be disconnected. Move the front seats forward to provide additional access to the workspace. Move back and begin dismantling the filter. First you need to disconnect the first fuel line; to do this, you need to clamp the special protrusions located on the sides. When pressed, some of the fuel may escape from the fuel system, so prepare rags in advance. Using pliers, compress the clamp installed on the second line. Remove the clamp and disconnect the connected pipe. Wipe the device dry to remove any fuel. When performing work in the interior, starting the engine is not allowed. Smoking is prohibited during repairs.
- Using your hands to support the clamps, use a screwdriver to unscrew the eight bolts. If the bolts are broken, you will need a 1/4 ratchet with an 8mm socket. When all the screws are unscrewed, carefully remove the plastic ring and remove the rubber seal. Pay attention to the seal itself - if it is worn out or has signs of damage, it is better to replace the part.
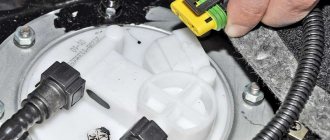
- After this, the unit is dismantled from the gas tank. To remove the pump, pull it towards you and then diagonally. This is done so that during dismantling, part of the fuel from the pumping device goes back into the tank. When dismantling, be careful not to allow dirt to get inside the gas tank. Because of this, the new filter can quickly become clogged and become unusable, and the tank itself will have to be dismantled and cleaned of contaminants.
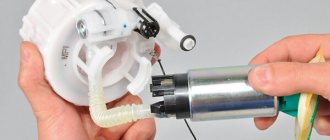
- Once the fuel pump is removed, it must be disassembled. To do this, disconnect the three fixing fasteners on the top of the device and carefully pull the structure up. After removing the cover, disconnect the harness with cables connected to the fuel pump.
- Use a screwdriver or pliers to remove the steel retainer that secures the block. After removing the mount, you can remove the device by pulling it towards you. It is not necessary to dismantle the hard plastic pipe, since it is quite difficult to connect and disconnect. We recommend leaving the device assembled.
- The filter device has two fasteners, which must be pulled back when dismantling the unit. This will allow you to completely dismantle the block. There is no need to disconnect the filter element and immediately throw it in the trash, since new devices are sold without plastic washers, rubber seals and a lid. All these components will need to be transferred from the old filter to the new one, otherwise the engine will not be able to start. When installing these components on a new device, you must follow the installation order. First, a white plastic washer is mounted, then a black rubberized ring, then another white washer and a second ring are installed. After installing these components on the new filter device, the entire structure can be covered with a lid.
- When the replacement procedure is completed, the filter element is mounted back into the fuel pump. Assembly steps are performed in reverse order. When starting the engine for the first time after replacement, difficulties may arise until sufficient pressure is built up in the system. See the replacement photo below.
Remove the rear seat by disconnecting the fasteners
Remove the cap covering the fuel pump
Dismantle the pumping device and remove the filter element
Price issue
The cost of a new original filter is about 400-800 rubles, depending on the store where you buy the part. Analogues are cheaper - from 150 to 500 rubles on average. But you can also find similar filters, the cost of which will be up to 800 rubles.
Location
The fuel filter of the Hyundai Accent is located under the rear seat in a special bracket attached to the fuel tank. This is especially convenient in winter, when the fuel filter can be replaced without prolonged exposure to frost and strong wind. The front seats move as far as possible towards the instrument panel, resulting in easy access to the replaceable filter. It is recommended to use gloves when replacing.
The Hyundai Accent fuel filter is located to the left of the fuel pump assembly, which consists of a coarse filter element and a fuel level sensor. In general, the Hyundai Accent fuel assembly consists of high-quality, reliable components, so few people have to remove and disassemble it during the entire life of the car.
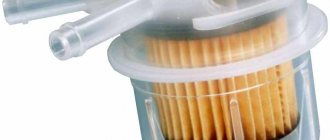
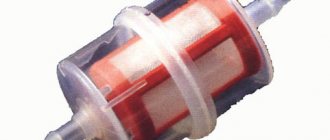
Fuel filter for Hyundai Accent
Consequences of untimely replacement
Untimely replacement will lead to failure of the filter and the inability of it to perform its assigned functions, which will manifest itself in:
- increased fuel consumption;
- the appearance of jolts and jerks when driving a car uphill;
- reduction in the power of the power unit as a whole;
- “tripping” of the engine when operating at different speeds;
- spontaneous engine stop when idling;
- the appearance of dips when you press the gas and increase the engine speed;
- spontaneous engine stop if the driver does not press on the gas.
If the filter becomes completely clogged, starting the engine will be impossible.
Step by step instructions
Let's take a step-by-step look at how to independently replace a part on a Hyundai Accent. If necessary, you can also watch the video instructions.
Replacing the fuel filter on a Hyundai Accent includes the following procedures.
- First, using a 3/8 ratchet and a 12mm socket, remove the rear seats. To do this, remove four 12 mm bolts, two bolts for each of the seats.
- Remove the panel rivet, which can be removed with bare fingers or with a flathead screwdriver.
- Remove the trim by opening the cover that provides access to the fuel tank and disconnecting the wires.
- After disconnecting the wires, start the Accent and allow it to idle until the engine is turned off. At this time, it is recommended to ensure a flow of fresh air into the garage by opening windows or gates. The engine stalls after 3-5 minutes, causing the fuel line to release pressure. Otherwise, the pressure in the fuel line will lead to splashing from the inside of the car.
- Using a 10 mm wrench, remove the negative terminal from the battery, then push the rear seats in, increasing the amount of space available for work. To turn off the first fuel line, press the protrusions on the sides. A little fuel leaks out of the system, which can be removed with a rag or waffle towels. Next, using pliers, squeeze the clamp on the second line and remove the clamp, making it possible to remove the hose, after which the excess fuel is wiped off again.
- While holding the fasteners, remove the eight screws using a screwdriver. These screws may become stripped - in this case, a 1/4 ratchet with an 8 mm head will come to the rescue. After removing all the screws, carefully remove the ring and gasket and set it aside. The most convenient option is to remove and lay the ring without turning it, and then install it back in the same way - this will make it easier to replace the holes for the screws.
- Next, you should pull the entire assembly out of the fuel tank. To do this, pull it up and then obliquely, clearing the hole in the tank. When the unit is tilted, fuel flows from it, so it is advisable to ensure that it flows back into the tank. Otherwise, remove spilled gasoline with rags.
- To remove the top of the assembly, the three retaining clips are unlocked and then gently pulled upward. By opening the cover, you can disconnect the wiring and harness attached to the fuel pump.
- You can use a screwdriver or the tip of a pair of pliers to twist the metal bracket that holds the block together. Once the bracket is detached, the device can be easily removed by normal pulling. In this case, you should not remove the rigid plastic hose, which is quite difficult to detach and install back - it is best to leave the structure assembled, with the original bracket holding it in place.
- The fuel filter has two clamps that, when the fuel filter unit is pulled out, are retracted so that the unit can be pulled out completely. You should not immediately throw away the old filter, since new Hyundai filters are supplied without plastic washers, rubber rings and a cover, without which the car simply will not start. When installing these elements on a new filter, it is important to strictly follow the order: a white plastic washer, a black rubber ring, another white washer and a second ring. Having installed the rings and washers in the new filter, you can close the structure with the original lid.
- Once the fuel filter assembly is complete, place it back into the fuel assembly and then perform all of the above procedures in reverse order.
Video “How to change the coarse filter in the pump on an Accent?”
The Repair with Accent channel offers you to watch a video that describes in detail the process of replacing the filter mesh in a gasoline filter with your own hands.
Do you have any questions? Specialists and readers of the AUTODVIG website will help you ask a question
Was this article helpful?
Thank you for your opinion!
The article was useful. Please share the information with your friends.
Yes (100.00%)
No
X
Please write what is wrong and leave recommendations on the article
Cancel reply
Rate this article: ( 3 votes, average: 5.00 out of 5)
Discuss the article:
Important!
Be sure to disconnect the ground wire block from the fuel filter only after the tube tips have been removed from the fuel module and filter cover to avoid the formation of a spark when disconnecting the fuel lines.
When you attach the fuel pipes to the new filter, make sure to insert them all the way. A characteristic click will sound. Otherwise, you risk stalling on the road just a couple of kilometers after you start driving, and in addition you will have to dry and wash the puddle of gasoline that has formed under the seat of the rear sofa.
Remember, smoking in the cabin during work related to replacing the fuel filter is strictly prohibited!