Parking in the city is not an easy task. It is very difficult to take a free space in the parking lot without accidentally hitting someone else's car. The situation is complicated by the fact that car designers have recently been paying a lot of attention to design, often sacrificing such a “trifle” as visibility. In order not to feel like a tank driver behind the wheel of a passenger car, you have to take measures. One of the solutions that makes maneuvering easier is a rear view parking camera. We'll tell you how to connect it to the radio below.
Connecting a rear view camera yourself
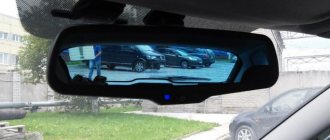
There are several basic ways to connect a rear view camera in a car. The outgoing signal can be output to the display of a car radio or navigator, a head unit monitor, or to a separate screen included in the delivery package.
The last option is the simplest, since there is no problem of equipment inconsistency. At the same time, the remote screen requires a separate place in the car. The easiest way is to place the display on top of the dashboard. The second disadvantage of this option is the additional costs of equipment.
If you connect the output of the device to a monitor or radio, you save both space and money. Plus, in this case the display will be located in the most convenient place for viewing.
Installing a rear view camera yourself usually does not pose any particular difficulties. First of all, you need to decide on the type of product and its parameters. If you are going to connect the device to a car radio or navigator, you must first make sure that the equipment is compatible. The video camera’s power supply voltage, the transmitted image standard, resolution, device activation option, type of connectors, etc. may be important here.
What to do
Possible ways to eliminate interference on the view camera:
- disabling the second signal source;
- removing the signal source from the vehicle overview;
- cleaning the device from dirt;
- complete release of the zone if access to the source of interfering signals is unavailable;
- replacement of non-functioning equipment.
If the rear view picture with a separate module is unclear, you need to move the transmitter closer to the monitor, leaving the camera in place. Low temperatures distort images displayed on dashboard screens; the system turns off. Some car owners claim that the cameras cannot cope with the cold.
A Volkswagen representative said the LCD panel screen was to blame. As a result of temperature changes, condensation forms, which negatively affects operation. The lens becomes clogged with dirt, debris, and road reagent, making it impossible to see anything on the screen other than a brown or black outline.
There is no need to use alcohol-containing glass cleaners to avoid damaging the lens. Auto mechanics suggest covering the lens of the device with a hydrophobic liquid to avoid snow and slush. Common causes of cloudy images include grease stains and fingerprints, so you need to check the front of the lens before blaming the device.
Poor quality equipment often causes blurry pictures. Shadows and sunlight on the horizon and lens flare can render images useless. When scratches occur, an optical effect called “diffraction” occurs, in which details begin to blur. The problem with scratched lenses can only be solved by replacing the lens assembly.
How to connect camera wires and power
How to connect power is a rather important question and not always straightforward. There is an opinion that it is best to power the device from the reversing lights. This is often the most convenient. The camera itself is located on the car in the rear of the body. So here it is not difficult to take the 12V voltage from the rear light and connect the red wire to it. Here you can also take a minus.
Note that in order to avoid the appearance of additional potential differences, it is better to take the plus and minus from one place. This will reduce the likelihood of failures and interference with electronics.
An alternative option is to connect the camera's power directly from the on-board network, directly from the battery or through the ignition (for example, from a cigarette lighter). This method may be preferable if the video signal is sent to the monitor of the head unit.
In this case, the video camera will be constantly energized while driving, warmed up and ready for use. This improves picture quality, but may lead to overheating. Many models are designed for power supply less than 12 V. It is better to connect them via an adapter (voltage converter).
The last question is which wire or connector to connect the video output to. It all depends on the type of display device used and the connection diagram. The easiest way is if a standard RCA connector can be connected directly to the radio or navigator. Otherwise you will have to use adapters.
Below we will describe how to properly connect the video camera yourself when using different connection options.
Adjustment
Sometimes the picture quality is lost after driving in rainy or snowy weather, visiting a car wash, or changing the operating mode of the parking system. But not all drivers know how to adjust the device and check its functionality. When adjusting the camera, you need to follow these instructions:
- To begin with, you should take a block 2 meters long, with sides 2-3 cm.
- Then it needs to be placed at a distance of a meter from the center of the rear bumper, making sure that the edges of the structure protrude from the sides of the car.
- Next, you should get into the vehicle and open the settings menu. It may be necessary to carry out other manipulations by turning the side lights on and off.
- Then you need to open the camera settings and select your car model. After activating the camera, all you have to do is turn the steering wheel to the right and then to the left - such manipulations will allow you to adjust the camera. Then click on the “next” item, after which a rectangular outline will appear on the display.
- Using the up, right, down and left keys you can position the outline in the desired part of the screen.
The listed recommendations allow you to quickly restore the system and get rid of poor picture quality, clouding and other defects. The subsequent launch of the system will lead to the appearance of yellow lines on the screen, which will greatly facilitate the parking process.
Schemes for connecting a rear view camera to a car radio and monitor
There are two main options for connecting the camera to the radio. The first is using a separate excitation wire. This pin may be designated on the diagram and body of the car radio itself as “reverse” or “parking”.
The wiring diagram for this connection option is shown above. Here, pin P3 is supplied with +12 V from the rear light of the car. In this case, the main power can be supplied either from the same point or separately, from the on-board network.
If the design of the radio does not provide for the use of a separate excitation (or parking) signal, then activation occurs simply upon the appearance of a video signal at the input. In this case, power is taken from the rear light.
The camera is connected to the monitor in a similar way. There is one main difference here. In some cars you need to go to the engineering menu of the head unit and select the appropriate type of activation.
Types of Chinese Android 2 din radios with firmware
Then the automatic reverse gear will work.
It is possible on the right, but it is better on the left, since the wiring in the trunk and to the bumper is routed on the left side. Both have their own specific advantages and disadvantages.
The antenna is powered from the car network via the radio. Dimensions in the center console of your car.
We attach the microphone to double-sided tape and point it at the driver: Put the lamp back together. Clicking on these icons takes you to the corresponding menu. This slightly modifies the connection diagram of the car radio, since new wires appear that were not on the standard chip.
Peugeot repair
Experts recommend installing an active module that ensures stable reception of radio stations. This is due to financial gain. All that remains is to check.
In most cars of this brand, the standard radio has a size of 10 by 20 cm. How do the standard head units differ from each other? Antenna connection To ensure the operation of a radio or navigation receiver, an antenna is used, located on the fender or roof of the car. I want to share with you a little chaotic Chukchi, usually a reader, but I hope it will be useful for someone because I haven’t seen a review of anything even close to similar here. Orenia - without a disk because the era of disks has essentially passed the radio. This happens but, unfortunately, very rarely.
I was very pleased with the sound. Route the black cable to the machine ground using a bolt.
Accordingly, when buying, the owner of the car may encounter difficulties in its further installation. What is the difference between standard head units? Install the peephole, fixing it with glue. Based on the price, you will choose the best device from a certain price segment. Plays all tracks of the current disc in random order. How to connect a radio, power and speaker cables, twisted cable connection
How to connect a rear view camera to a navigator
To connect to a navigator, the device must have a video input or wireless connection.
In the first case, the circuit is practically no different from that described above, with excitation via the video input (see diagram above). The only difference is that most navigators have a different type of connector. This problem can be solved using an adapter or by purchasing a video camera with the appropriate output in advance.
See below for wireless connection option.
Diagnostics
If your car camera fails, there is no need to despair. Most often, the problem is minor and can be fixed on your own. But before that, you need to diagnose the system and find the reason for the refusal to work.
The first step is to remove the connector and wipe it with a dry cloth. The inside is dried with a hairdryer or other similar devices. Then the connector is installed back, after which the system is checked for functionality. If the problem persists, you will need to conduct a more in-depth diagnosis.
The next step involves using a multimeter. The “Resistance” parameter is set on the device, after which it is connected directly to the connector. If the resistance is at unity, there is a high probability that the camera has been damaged and needs to be replaced.
If defects appear in the picture or loss of display quality, you need to make sure that there are no traces of water on the camera. Diagnostics are carried out after disassembling the bumper and dismantling the system.
Connecting a wireless rear view camera
Many car enthusiasts are interested in how to connect a video camera without laying wiring in the cabin with the accompanying removal of the trim. This can be done using a wireless module. The video signal transmitter is installed next to the camera itself and is powered by the rear lights.
The receiver is placed close to the display device (car radio, navigator or monitor). This option is not suitable when using a radio with activation via a separate input.
Best models
When choosing the configuration of a car camera with wi-fi and the type of system, it is recommended to pay attention to the models presented below.
Garmin BC 30
The camera is wireless and in the form of a wifi control module displays what is happening next to the car when reverse gear is engaged.
It allows you to view images on the navigator screen.
The device is connected to a power source and the camera and navigation modes are switched. Garmin BC 30 provides high-quality visibility, reducing the risk of an emergency. The device allows you to detect both stationary and moving objects located in the path of the car.
Neoline CN10
Neoline CN10 - the device facilitates the parking process at night, with limited visibility and dirty car windows. It displays obstacles located behind the vehicle. This makes it possible to perform the maneuver correctly. The Neoline CN10 camera module connects to the navigator wirelessly. This makes the device easier to install and use. The device has built-in parking lines.
Incar VDC-007
A universal device that provides a color image and has an affordable price. The device has an average degree of security. It is equipped with a CMOS sensor and built-in parking lines. The model represents good value for money.
Zm701
The system has the following characteristics:
- the ability to control a large area of space located behind the car;
- the presence of a Wi-Fi module that facilitates installation and preserves the interior trim;
- tightness of the housing, allowing the product to be used in humid or cold climates;
- increased photosensitivity;
- automatic mirroring to help you see objects in the correct position;
- automatic start, triggered when reverse gear is engaged;
- availability of parking lines;
- the ability to install in a license plate frame, which makes the camera compatible with any car model;
- presence of mounting holes on the camera body.
Connecting a rear view camera via a relay
Often it becomes necessary to connect a video camera via a relay. It is not uncommon for the display to experience severe noise due to unstable voltage or the use of PWM modulation. On some cars, in the latter case, the video cameras do not start at all.
The solution is to use a relay. The plus from the rear lights is supplied to the control input of the switch. The video camera is powered from a 12 V network through the power relay contacts.
Where to install a rear view camera on a car
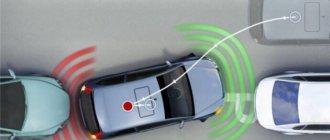
The question of where to mount the camera is also very important. It is necessary to ensure full visibility and absence of interference. It is also advisable to reduce the likelihood of vandalism and dirt and liquid getting on the device. Based on this, there are several main options for placing a video camera:
- In the license plate light. This is a very convenient option, specially provided for by the design of a number of cars.
- In the bumper. An oval or round video camera can be installed in a pre-drilled hole.
- In the trunk handle. This is especially convenient if the handle is structurally made in a common body together with a molding above the number.
- Attach the numbers to the frame.
How to set up a rear view camera on a car
Another pressing question is how to properly set up a video camera. Sometimes after installation it turns out that there is no image at all or it is “unreadable”. A possible problem is a mismatch between the video standards of the equipment. In this case, you need to use adapters (video signal adapters). Although it may be cheaper to simply buy a product of a different model.
Another possible situation is incorrectly set monitor modes. In this case, you need to switch the parameters in the engineering menu.
Even if everything works correctly, it wouldn't hurt to adjust the camera further to get parking lines on the screen. How to adjust the product depends on the characteristics of the specific model.
Adjustment secrets
After installing the device, you need to configure it. The car owner’s task is to configure the parking lines. To do this you will need a block about two meters long. There should be a distance of one meter from the rear bumper to the block. The edges of the block should protrude beyond the sides of the car at an equal distance. Next, you need to get behind the wheel, turn the side lights on and off. The next step is to enter the menu and select your device brand.
After activating the video camera, the steering wheel should be turned first to the right until it stops, then to the left. On the screen you need to click on o. The monitor will display a rectangular outline.
After this, you need to use the adjustment keys: you need to ensure that the bar is located exactly in the center on the display. The work ends with confirmation. A new disassembly will require updating the settings and performing the same manipulations. Which manufacturers take pride of place in the popularity ratings?