Lada 2110 FalcoN › Logbook › Replacing front struts and supports
struts - the supports are leaking - the balls are knocking - they are playing.
Changing the struts is quite an expensive proposition! And I decided to make myself collapsible racks so that I could only change the patrols =))) In my opinion, both better and cheaper. Since I had non-demountable racks up to this point, I had to buy rack housings.
The price tag turned out like this:
Ball forwards — 500 RUR Supports ss20 — 2600 RUR Spacers ss20 — 350 RUR Housings — 1000 RUR ss20 bumpers — 350 RUR Anthers — 200 RUR KYB cartridges — 3600 RUR
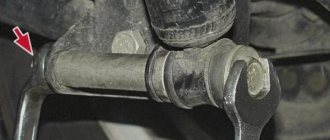
So the time is 15.00, I’m in the garage, I have to do everything before 18.00 and go pick up the girl from work =))) Before this I changed everything, I’m always happy, it was done quickly in about two hours, I think there won’t be any problems with the suspension, only in the fall I went through everything... So everything at first went as expected oil, drove into the garage in a good mood, drove the matte nine out, drove the StaFForda halfway, so that if anything could be climbed into the hole (poor location of the hole), turned on a small heater near me, put the car on bricks in front, removed the steering end, unscrewed the nuts on the camber bolts on top of the rack I unscrewed three, decided to change the struts first, without straining, I pulled out the lower camber bolt, and proceeded to the upper bolt; it won’t come out! Hit it, in place! And then it started!
In general, I don’t know how or why, but this upper camber bolt stuck like a child! At first I felt sorry for it, filled it with water and carefully tried to unscrew it and knock it out through the piece of wood, but all my efforts were in vain! He started hitting it with a hammer, then with a sledge, then with a sledge! Trying to unscrew it, I broke the cap! It's all useless!
He spat and went to do the other side, and it was the same story!
In general, the time is 18.00, I’m in despair, I’m alone, the bolts are broken but in place, I can’t get out of the garage (the car is half driven and disassembled), I don’t know what to do and how to knock them out, all attempts are in vain, the calluses on my hands are knocked down. I’m calling my beloved - I won’t come, I’m calling a mechanic I know - he says take it all off, including the hub and pump it out, damn it, how can I take it off alone! In general, my friend is just a hammer! Not only did he come and grab the breaker bolts, as well as a mechanic from the service station! =)))
Time 2.00, the grenade was assembled, the ball supports were installed, everything was installed =)))
PS I wanted to take pictures of the whole process specifically for the drive, but there was no time for that.
Source
Lada 2111 “1.6 atmospheric” › Logbook › Restoring the strut support on the VAZ!
We continue to write practical and useful things about car repairs that save your wallets, nerves, time, and most importantly trains your hands so that they don’t grow into another place where they need to be) This repair will help even owners of foreign cars, because they are primarily Due to the high cost of their spare parts, they constantly buy VAZ cars to replace their expensive ones.
If you have a collapsible support, and it can also be made collapsible using a grinder, welding and some kind of mother, then you have come to the right place. This is not my idea, it’s our Russian inquisitive mind that works wonders on how to bypass the system... And so... Everyone knows that now rubber is complete bullshit, they save at all stages, types and types of production, because of this the rubber quickly cracks, shrinks, and comes into disrepair. worthlessness in one word.
The strut supports are also not devoid of this, which is why we get this not-so-pleasant knocking sound with every bump. But not always, or rather in 80% of cases, it is not the support bearing that is to blame, but the damper rubber itself. Which shrinks, bounces, loses its shape and the entire structure inside the support begins to knock. The first solution is described here:
But I consider this solution with a metal washer not very productive, since not many people have a turner, you can, of course, cut it out with a grinder, but the design itself from such a washer is not very functional a priori, it is better to put rubber rings, which will increase the elasticity of the damper several times , and even during wear and tear the metal ring won’t rattle, and perhaps it will last even longer than the new support, in this way we greatly compress the damper, which, as a rule, has nowhere to shrink, it has already done this before)
Lada 2110 Monchicar › Logbook › Making a quiet and soft front suspension for the VAZ 2110.
1. Racks
Reason for replacing the front struts I had SAAZ struts. They died safely within 2 years. First there was a knocking noise, then the right pillar jammed. Selection of racks: 1. SAAZ 21100-2905402-03 Right rack 21100-2905403-03 Left rack 2. KYB 665503 cartridge – 2 pcs + “Stock-auto” rack body SA10-2905580-01 right, SA10-2905581-01 left + rack housing nut 2108-2905610 – 2 pcs.
SAAZ struts are moderately soft. The reliability of these racks leaves much to be desired. KYB cartridges are very soft and reliable, the main thing is to assemble everything correctly.
To assemble the stand we will need: 1. KYB 665503 cartridge – 2 pcs. 2. “Stock-auto” stand housing SA10-2905580-01 right, SA10-2905581-01 left. 3. Rack housing nut 2108-2905610 – 2 pcs. 4. Lanta fum – 1 piece 5. Transmission oil – 0.5 l 6. Blue thread locker PERMATEX medium fixation 10 ml.
Assembly of a stand based on a KYB 665503 cartridge
1. Pour ¼ (approximately 200 grams) of the total volume into the empty rack housing. This is done for additional cooling of the cartridge. 2. Wrap the top of the cartridge evenly with fum tape, so that you get a uniform ring.
The ring should be of such a diameter that it fits tightly (with slight resistance) into the rack body. This is done to accurately position the stand in the center of the cartridge.
3. Install the cartridge in the rack housing.
4. Apply blue locking compound to the threads of nut 2108-2905610.
5. Place the rack body in a vice and secure it. 6. Tighten the nut in a vice with a special wrench. (photo). The stands are ready!
Result:
If everything is done correctly, the stand will serve you faithfully for a long time. I have already completed 3 years without the slightest complaints. The suspension became quiet and very soft. When moving over various irregularities, the racks “eat up” everything. The knocks are gone. Some advantages.
If you install a cartridge without fum tape and oil, a metallic click will soon appear when you turn the steering wheel. This cartridge began to dangle inside the rack.
At the moment, there are many different manufacturers of racks for our cars. I heard positive reviews about the manufacturers Demfi and SACHS. So far I'm completely satisfied with KYB.
2. Upper pillar support
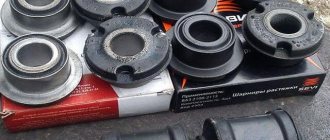
Reason for replacing the support On small bumps and uneven surfaces, a dull squelching sound came from the supports. When I pressed the car, a knock clearly came from the supports. Selection of supports: The following rack supports were selected for the experiment: 1. AvtoVAZ Article: 2110-2902820 2. MONROE MK192 3. Assomi A110.2902.820-31
3. Rubber salen blocks.
Front hinge cushion 2108-¬2904050 – 2 pcs. Lower arm joint 2108-2904040 — 2 pcs. Rear extension joint 2108-2904046 – 4 pcs. Rod cushion 2110-2906040 — 2 pcs. Stabilizer strut 2110-2906050 – 2 pcs. Reason for replacing the salenblocks: Visual deformation + deterioration of rubber parts. Selection of salen blocks Rubber salen blocks were all installed from the manufacturer BRT. There is also an alternative manufacturer that is not inferior in its characteristics, this is Rosteco. I really like Rosteco products, but not polyurethane. I am against polyurethane parts, because at low temperatures they begin to creak. Tested by personal experience.
4. Spring
Reason for replacing springs I changed the springs due to deformation of the coils. The paint on the old springs was all peeling off and they were rusty. Choice. I supplied the springs to AvtoVAZ Article 2112-2902712. The color of the springs is black with red markings. I wanted to install springs with blue markings, they seem to be softer, but I couldn’t find them. Overall I was pleased with the springs. When installing the springs on the strut, I used SS20 sound insulators. Result: The front of the car rose a couple of centimeters. The noise on the bumps has disappeared.
5. Compression stroke buffer (Chipper)
Reason for replacing the bumper The old bumper became unusable and simply fell apart.
Choice. I installed the bumpers from the manufacturer PromTehPlast, white. Article: 2110-2902816. There are also yellow bumpers made in Syzran. I liked them less in appearance. For the white bumpers, I can say that it’s been 3 years since they’ve been on my car, they’re like new. I periodically check the chassis, everything is fine with them. 6. Protective casing (Boots of the struts)
Reason for replacing the boots of the struts There were numerous cracks on the boot of the struts, which indicated that they had already seen a lot.
Choice. Anthers should only be installed on BRT and the original. Unfortunately, we came across a cooperative. The lifespan of cooperative ones is 2-3 months, after which they fall apart before our eyes. Article: 2110-2905681. 7. Ball joint
Reason for replacing the ball joint. The chassis had knocking noises on bumps. Having rested the pry bar between the ball joint pin and the lever, press the pry bar and see the play. Play in the ball joint is unacceptable. Selection For the experiment, the following ball joints were taken: 1. TRW Article No.: JBJ156 2. AvtoVAZ Article No.: 2110-¬2904192 3. Track Champion Article No.: 2108-2904185ТЧ Result: I did not notice any difference between the ball joints. Everything is of good quality. I drove the first two for about 3 months. The last ones were TRACK. They have been standing for 3 years already. There are no problems observed. The rest are in stock. We liked the track because of its transparent boot, which in turn makes it possible to control the presence of lubricant before installation and the ingress of water into the support during operation.
In what order should the telescopic stand be repaired:
1. First of all, read how to remove the telescopic stand from a VAZ 2110 car.
2. Clamp the stand in a vice, and then compress the spring using special ties. Then, using a tool, unscrew the upper nut of the strut support and the shock absorber rod, while keeping the latter from turning.
3. Remove the upper support from the car rack.
4. Remove the upper spring cup.
5. Remove the telescopic strut spring itself.
6. Release the shock absorber strut from the protective casing with the compression stroke buffer.
7. If the strut body, the spring cup located at the bottom, as well as the swing arm and bracket are subject to deformation and destruction, or cracks, then this condition indicates the need to replace the shock absorber strut. It is prohibited to carry out any welding on it; as a result, its performance will be impaired.
8. Next, you need to fix the shock absorber strut in a vertical position and raise and lower the shock absorber rod a couple of times until it stops. This is done in order to understand whether there are any jamming, knocking or failures along the way. If any are found, the telescopic stand requires replacement and cannot be repaired. The reasons for replacement may also be a failed thread in the upper part of the rod or fluid leakage (only slight sweating is acceptable).
In order to sort out the shock absorber strut, it is best to turn to the services of a specialized workshop, since repairing it requires a special tool and, importantly, skill.
10. You also need to pay attention to the condition of the protective casing and compression stroke buffer. If the latter is damaged, it must be replaced. If the rubber on the protective casing has peeled off from the metal reinforcement, and also if the casing has cracks, torn areas, and does not have the necessary elasticity, then it’s time for replacement.
11. The bearing requires replacement if there is axial movement in the support housing; it was noticed that grease is leaking from under the protective rings; when turning, the bearing jams; and also due to corrosion. It may be necessary to replace the upper support housing if cracks appear on it. Or you can replace the support assembly. The threads of the studs can also be worn and, needless to say, they need to be replaced.
Disassembly
2. Clamp the front pillar in a vice, as shown in the photo.
Warning. Be careful! A compressed spring has great force and when the tie breaks, it straightens out and can cause injury.
3. Install the tie springs on opposite sides and tighten the front strut spring evenly, without distortions, until the load is removed from the upper spring cup.
4. Using a slotted screwdriver, remove the rubber plug from the hole in the housing of the upper support of the front pillar.
5. Install the device on the nut and shock absorber rod.
6. While holding the shock absorber rod from turning with a 17 mm wrench, use a 27 mm wrench to unscrew its nut.
7. Remove the nut and washer from the shock absorber rod.
8. Remove the upper support from the rack.
9. Remove the upper support of the front strut spring.
10. Remove the suspension spring (without removing the tie from it).
11. Remove the compression bumper and the front shock absorber boot.
The design of the front struts on the VAZ 2110: how to remove, bleed and replace
Struts are an important element of a car’s suspension, as they are responsible for damping body vibrations and providing a high level of adhesion between the wheels and the road surface.
But the service life of these elements is limited. Therefore, replacing the front struts of a VAZ 2110 is a completely natural and necessary procedure over time.
The average service life of struts installed on a “ten” is 30-40 thousand kilometers. The indicator depends on the operating conditions of the car and the manufacturer of the element itself.
There is no need to go to a service station, since you can do the replacement yourself.
Step-by-step instructions for replacing the front struts in a VAZ-2110
Replacing the front struts on a VAZ-2110 with your own hands always involves a preparatory stage, which consists of installing the car on a flat area, preferably asphalt, so that during the repair process you can be sure that the car will not move or sit in the ground.
Belaying is carried out using wheel chocks; the handbrake must also be applied. Armed with a jack, you should jack up the VAZ-2110 and remove the wheels. Replacing the front struts is impossible without dismantling the old model, which is done in the following sequence:
- Slightly unscrew the M19 nut going to the shock absorber rod, then get rid of the cup cap. Gradually loosen the 3 M14 nuts that secure the posts.
- Now inspect the stem. It may have a slot at the top or be made in the shape of a square. Hold the shock absorber rod with a wrench, slightly “undermine” it, and pry up the nut that secures it.
- To avoid defects and mechanical damage, the brake hose should be routed through the bracket on the rack; this hose must be equipped with a holder.
- Get rid of all the nuts that secure the strut to the steering knuckle.
- Disconnect the cotter pin located on the nut securing the steering joint to the strut.
- Now that the fixing nut is set aside, use a special press used in machine repairs to remove the tip from the socket in the form of a cone.
- Using a bronze drift, knock out the bolts that secure the block and connect it to the steering knuckle, move it along the cheek of the strut and locate it at the bottom.
- Place the suspension by passing it through the wheel arch, finishing with one on the outside.
- Replacing the front struts at this stage comes down to clamping the resulting strut in a garage vice with copper inserts.
- Mount the puller that is responsible for the tie and get rid of the suspension springs.
- Slowly tighten the springs, making sure there is even tension so as not to damage the part. Do this until the springs no longer create pressure on the support cups.
- Unscrew the nut and remove all the pad parts. Replacing a damaged shock absorber with a new one will take 5 minutes, and the assembly itself and installation in the space reserved for the front struts is carried out in the reverse order.
Choosing which ones to buy
It is impossible to say unequivocally which front struts are best to choose for the VAZ 2110. Some people choose factory ones . since they are not hard enough for them, others prefer their analogues for their softer and more comfortable behavior.
Someone even wants to install a sports version of struts . because they are the stiffest and the springs are the thickest.
Focus on what you want to get out of driving. But from the point of view of manufacturers, Samara CC20 devices have proven themselves to be excellent. If necessary, you can figure out how to pump up such racks.
The choice is between oil and gas (gas-oil, actually). The former are more affordable from a financial point of view, but they do not have such a wide temperature range, which is why the shock absorbers become stiffer in winter.
Gas analogues have a more complex design, a high price, but an excellent “tenacity” indicator.
Among the manufacturers, in addition to CC20, the following manufacturing companies can be distinguished:
All of them have approximately the same devices, so there should be no problems with selecting suitable parts.
Having decided on the choice of racks, collect a set of tools that will be useful to you when replacing them:
We begin the replacement process itself.
We should talk about disassembly and assembly in more detail:
It is noteworthy that replacing the rear struts does not have any effect on the wheel alignment, but when changing the front shock absorbers, significant changes can occur.
The work is fraught with certain difficulties, but doing it even with your own hands without the help of specialists is not as difficult as it seems at first glance. Try to be careful, follow the sequence of steps and choose only high-quality replacement parts. The better the quality of the new front strut, the longer you can drive your “ten”, forgetting about this problem.
The front struts of the VAZ 2110 are designed to absorb shocks and impacts on the car body. Their approximate service life is 60-100 thousand km. mileage, and it largely depends on operating conditions. If you notice that the car has become less stable on the road, replacing the shock absorbers will most likely solve the problem.
Removing and replacing the front shock absorber strut VAZ 2110, 2111, 2112
Various problems with the suspension are the most common reason for calling the service for diagnostics and repairs. Alas, Russian roads in some places of our Motherland are more like a tank training ground, or something that remains of a road in the usual sense of the word. In any case, you have to drive on any roads, which results in a number of suspension problems that any car owner faces.
In this article we will analyze in detail the removal and replacement of the front shock absorber strut on a VAZ 2110, 2111, 2112 with our own hands. The instructions include a step-by-step guide for repairing this suspension unit.
Typically, struts are changed at a mileage of 50-60 thousand km, but from experience we can say that these figures may not correspond to the realities in which the car is used. It’s one thing if the owner constantly drives on high-quality asphalt to and from work. And it’s a completely different matter when the car is used on different roads, most of which cannot be called roads. In the latter case, the suspension elements, including the front shock absorber strut of the VAZ 2110, 2111, 2112, become unusable at 30 thousand kilometers or earlier. Therefore, everything is individual. Carry out diagnostics periodically if you notice a deterioration in handling and overall suspension performance.
Lada Vesta WTCC took second place at the Russian stage of the World Championship
In addition, you need to decide on the type of shock absorbers:
- Gas is an expensive option. The car becomes very rigid and, as a result, maneuverable, with sharp steering. They are usually used on sports, tuned cars.
- Oil ones are also not cheap. The opposite of the previous ones. Soft, the car even feels like it's too rough. The unevenness of the Russian road is almost completely hidden.
- Ordinary shock absorbers. We will talk about this unpretentious and most affordable type of shock absorber strut in the article.
You will need: 13″, 19″ wrenches, a key to hold the rod.
So, instructions for replacing the front shock absorber strut of VAZ 2110, 2111, 2112.
Option #1
Using a wrench to hold the stem
Loosen the nut using wrenches.
Tighten these 3 nuts
Next, remove the hub, steering rod with ends, and finally the shock absorber strut.
Option No. 2
Mark the position of the adjusting bolt
Next, unscrew the top and bottom nuts.
We take out the bolts
We release the shock absorber strut by moving the fist to the side.
Unscrew the remaining upper bolts and remove the rack completely
We begin to assemble the ties for the springs
Disassembled suspension strut for VAZ 2110, 2111, 2112. We replace the necessary components. We collect.
Removing the front pillar of VAZ 2110, 2111 and 2112
Required . choose new shock absorbers. remove the wheels, prepare pliers, wrench “13”, “19”, mounting blade, hammer, special wrench for loosening the shock absorber rod nut, marker. It is more convenient to carry out the work on an inspection ditch or a lift, but you can get by on a flat platform.
Remove the rubber plug from the upper support. We hold the rod with a special key and loosen the connection.
Disconnect the tie rod end from the steering knuckle:
Source
Replacing shock absorbers
Tools and materials you will need
1. Straight screwdriver; 2. Special key for holding the strut rod; 3. Wrenches (open-end and ring) wrenches of sizes from 6 to 22 mm; 4. Heads sizes from 12 to 22 mm; 5. Special puller for ball pins of tie rod ends; 6. Special devices for compressing the front strut spring; 7. Rust solvent WD-40.
Replacing front shock absorbers
Front shock absorber replacement procedure:
1. Unscrew the nuts securing the upper shock absorber supports to the upper body cup in the engine compartment: 2. Release the upper supports; 3. We release the outer tie rod ends (using a special puller for tie rod ends); 4. Unscrew the bolts securing the lower part of the front strut from the steering knuckle; 5. Take out the stand; 6. Disassemble and assemble the stand; 7. We carry out assembly work.
We begin the work with the upper nut of the shock absorber rod, which can only be unscrewed using a special wrench for the rod or a 6 mm wrench. Without this counter key, the rod and nut will rotate inside the shock absorber cup. But often the “6” key doesn’t help, so it’s preferable to use the special one that you can borrow from a mechanic you know.
You should also ask the same mechanic friend for a special device to hold the strut spring during disassembly during the work. Or it could be a set of special clamps or grips. Without such a puller or set, all your work will go to waste; you will not be able to replace the shock absorbers on your VAZ-2110. After you have freed the shock absorber rod, you should release the upper support (bearing), it is held in place by three nuts on top of the body cup.
Before proceeding with the lower mount, the outer tie rod end must be disconnected from the strut. Often the ball pin of the tip is stuck, which is why you will need either a special puller, or that same WD-40 liquid and a heavy hammer. Mechanics also use a special drift made of soft metal so as not to damage the threads of the steering ball pin.
The lower fastening of the strut to the steering knuckle of the front hub axle consists of two bolts, one of which is eccentric; through it, in particular, the camber of the front wheels of the VAZ-2110 is adjusted in the car.
The freed rack is removed.
To replace the strut insert (the shock absorber itself), you just need a device or devices that will tighten and fix the strut spring in a compressed position.
Rear shock absorber replacement procedure:
1. Unscrew the nuts securing the upper shock absorber supports to the upper cup of the body in the passenger compartment (trunk); 2. Unscrew the lower bolts securing the rear shock absorbers to the rear beam; 3. Take out the stand; 4. Disassemble and assemble the stand; 5. We carry out the assembly work in reverse order.
The procedure is the same except for the need to compress and fix the spring. Using a 17 mm bent spanner, unscrew the top nut of the strut, holding the rod with a special counter wrench. Remove the spring and support washers and the upper rod cushion, and unscrew the bolt securing the strut to the rear beam from below. The stand is removed. We also inspect all rubber-to-metal connections and replace them with new ones if necessary.
After intervention in the design of the front suspension, the camber of the steered wheels of the VAZ-2110 should be adjusted. After intervention in the rear suspension design, wheel alignment inspection is not required.
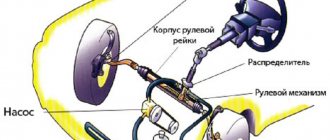
What racks are better to install on a VAZ 2110? How to change struts on a VAZ 2110?