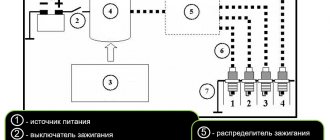
The UAZ distributor is considered one of the important components of the ignition system in a vehicle. Correct adjustment of this mechanism ensures optimal operation of the power unit as a whole. You can learn more about the principle of operation of the ignition system and how to set it up correctly with your own hands from this material.
Review of SZ on famous UAZs
What is the connection diagram for electronic or contactless ignition on a UAZ 417, how to convert contact ignition to contactless? Why does the coil heat up and how to adjust and adjust the advance angle? First, let’s look at the main points regarding the action and types of SZ.
Operating principle of SZ
Contact system diagram
The ignition system, or rather its correct setting, plays a big role in the operation and starting of a car engine. With correct adjustment, the combustible mixture will burn correctly in the power unit as a result of the supply of charge through the spark plugs. A spark plug is placed on each cylinder of the UAZ engine, each of which is turned on in a certain order, in turn, delivering a discharge to the cylinder after a certain time. It must be taken into account that any SZ makes it possible not only to deliver the required discharge, but also determines its strength.
Due to its technical characteristics, the car’s battery cannot produce the voltage and current required to ignite the mixture. This is due to the fact that the battery can only produce a current of a certain strength. And thanks to the correct operation of the system, the current value increases significantly, which allows you to successfully ignite the air-fuel mixture.
The operating principle of the system consists of several stages:
- First, the driver inserts the key into the ignition and turns it, electrical energy is stored in a coil.
- Then the coil converts the low-voltage voltage in the on-board network of 12 volts into high-voltage. As a result, the voltage value increases to 30 thousand V.
- After this, the discharge is distributed and supplied to one or another spark plug.
- The candle itself produces a spark that ignites the mixture.
Diagram of the UAZ contactless system
What types of SZ are there?
Domestic UAZ vehicles can use one of three ignition systems; let’s look at each of them in detail:
- Contact view. This type of SZ is outdated, however, it is used on most machines. In such a system, the principle of operation is to issue a certain impulse that is formed in a distributor - a distribution device. The contact system is considered one of the simplest in terms of design, which is an advantage, since if a malfunction occurs, the car owner will be able to independently check and repair the system. In addition, prices for structural parts of the contact system are usually affordable, which is good news. The contact SZ includes a coil, a switchgear, a breaker, a capacitor and spark plugs.
- Non-contact type, also called transistor type. Compared to the contact system, the contactless system has more advantages. The resulting spark has a higher power, which is achieved due to the formation of high voltage in the secondary winding of the coil. Also, contactless systems are equipped with an electromagnetic device, which makes it possible to achieve more stable operation of the engine. Ultimately, if the UAZ power unit is configured correctly, then by using a contactless system you can not only increase its power, but also achieve fuel savings, albeit insignificant. Also, such systems are easier to maintain. One of the main nuances in terms of maintenance is the need to periodically lubricate the distributor drive - at least every 10 thousand kilometers. One of the main disadvantages is the difficulty of repair. In practice, repairing a contactless SZ will be problematic, since diagnosing the system will require equipment that is usually available at a service station.
- The ignition system can also be electronic. This option is currently considered one of the most progressive and expensive; it is installed mainly on new cars. Compared with contact and non-contact systems, the electronic system has a more complex structure. The main advantage of this system is that, if necessary, the process of adjusting the ignition angle will be much easier. In addition, there are no contacts in the electronic system that are susceptible to oxidation. It should also be noted that in practice, the combustible mixture in the cylinders of a power unit with an electronic system almost always burns completely. But despite all the advantages, electronic repair systems also have their disadvantages, which relate to device repair. It is almost impossible to repair such an SZ with your own hands, since to perform this task, again, you will need equipment (video published by Nail Poroshin).
Coil device
Underwater ignition on a jeep
The UAZ 469 ignition coil has a complex design:
- screw-in terminal with high voltage;
- voltage output;
- lid;
- contact spring;
- low voltage clamp;
- gasket for sealing;
- fastening bracket;
- magnetic circuits;
- contact plate;
- primary and secondary winding;
- insulation gaskets;
- frame;
- insulator;
- iron core;
- insulating mass;
- additional resistor and its insulator;
- screw and plate for fastening the resistor.
The distributor performs the function of distributing and interrupting the ignition of the UAZ 469. It has vacuum and centrifugal regulators. The centrifugal changes the ignition angle of the UAZ depending on the frequency with which the crankshaft or camshaft rotates.
BSZ spark plugs are a very important element. With their help, the working mixture in the combustion chamber in the cylinders ignites and gives a good spark so that the car starts quickly. Most often they use A12BS spark plugs, which cannot be disassembled, so in case of a malfunction you need to have new ones in stock that can be quickly and easily replaced.
Wires for high voltage are made from PVL-1 wire. They connect the coil to the distributor, and the distributor to the spark plugs. The spark plugs are attached to the central electrode using special tips with resistors.
UAZ 3303 Camel › Logbook › Engine repair, Installation of camshaft drive.
The camshaft, crankshaft and connecting rods are installed. We bring the connecting rod of the first cylinder to the top dead center TDC. If the pulley is not installed, then look at the camshaft. The lobes on the camshaft should be visible. If the cams are not visible, then this is a working stroke.
It’s easier on the pulley: with the piston positioned at the top, the second mark along the pulley’s direction must match. The first, as in the photo, is the ignition installation.
Next, install the gasket and distributor drive according to the instructions.
We install the oil pump, washed from grease. Remove the mesh and fill the oil pump full of oil through the intake hole. We install the grid.
We straighten the dented pallet.
We install cork seals. cut off with a small margin of 2-3 mm.
We install the pallet. The bottom of the engine is assembled.
From the collection of “best practices”...
When installing the rear cover of the pushers, I encountered a problem: between the pin and the distributor drive, the cover did not fit. “Praise to the designers! Smart guys." Well, the idea came to remove the distributor drive. Installing the distributor drive was a complete dead end. During installation, the drive did not enter the oil pump. There was no oil pressure, and even when cranking the starter, a metallic clicking sound was heard (the drive was touching the block).
Next, it was necessary to drain the oil and remove the pan. Then, install the drive, pan and fill the oil again.
The reason was found: play in the drive (it “swings”, deviates from the longitudinal axis, not falling into the groove of the oil pump).
To secure it, I inserted wooden wedges. Later, they fall off on their own and are removed when the oil is changed. I turned the groove of the oil pump into the desired position using a cleaning rod. The distributor drive was easily inserted.
More “advanced users”, in this case, simply unscrew the pin, install the cover, and then the pin. But, without beer, I didn’t realize. “And experience, the son of difficult mistakes...”
Drivers, sometimes who have just received their license, enter the army. Little driving experience. In repair and maintenance, even less. The drives were “pushed” as best they could: both 180 degrees and 90. The position of the gears was incorrectly set. And, since there were also lazy people who didn’t want to rearrange... They went to the “grandfather”, and he set the TDC and threw the wires of cylinder 1 to the one where it fell. Further, in a circle. So the whole unit drove without problems, some with 3, some with 4...
source
The main reasons for poor starting
The list of reasons why a cold engine is difficult to start is quite wide. Before starting diagnostics, it is necessary to more accurately localize the fault. Make sure the battery is charged and the starter turns the engine smoothly (at the same speed). Additionally, it is worth excluding the possibility of refueling with low-grade gasoline.
Fuel supply
Problems with starting the engine can arise both as a result of the fact that there is no fuel supply, and due to failures in the process of its ignition in the engine cylinders. As for the fuel supply, there may be too little fuel to start. It is also possible that the spark plugs are flooded with excess fuel.
- It's worth starting the check by making sure there is an exhaust. If light smoke appears from the exhaust pipe after turning the starter, then this indicates that there is fuel supply to the cylinders.
- The next step is to remove the spark plugs. The spark plugs must be unscrewed after an unsuccessful attempt to start the engine. If the spark plug is flooded with gasoline, then this can often indicate problems with injector sealing or ignition. Check the integrity of the spark plugs themselves and the high-voltage wires, and also make sure that there is a spark at the spark plugs. A dry spark plug will indicate that fuel is not being supplied to the cylinder.
- Clogged coarse and fine filters, as well as faulty or heavily coked injection nozzles, can also hinder the normal supply of fuel to the engine. Fuel may also not enter the engine due to a sharp decrease in the performance of the fuel pump. This means that the fuel pump is not creating the required pressure. To find out the reasons, you will need to check the fuel pressure in the rail and the fuel pump itself.
Electronic sensors
The electronic injection system is equipped with special sensors, thanks to which interaction with the engine ECU is realized. Failure of individual electronic components can result in incorrect signals being sent to the control unit and the engine cannot be started.
If the engine does not start, then you need to check several sensors:
Ignition check
The engine may not start if the ignition distributor is faulty. This malfunction manifests itself in such a way that when the starter rotates, the so-called seizure does not occur, that is, there are no signs of single attempts to ignite the fuel-air mixture in the engine cylinders.
It is also worth paying attention to the setting of the ignition timing, timing belt and its drive. In some cases, it is worth checking the condition of the variable valve timing system (if equipped)
The ignition coil can be checked using a multimeter.
Expert recommendations on how to configure correctly
So, how to set the advance angle yourself in order to achieve proper operation of the UAZ engine:
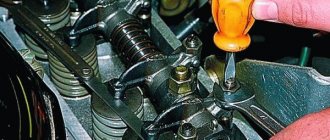
- First of all, you must lock your car in one place by pulling the parking brake lever. Rotate the crankshaft so that the piston of cylinder 1 reaches TDC (top point). In this case, you need to ensure that the hole on the crankshaft pulley coincides with the mark marked on the timing gear cover.
- After this, remove the cover from the distribution mechanism. After dismantling, you will be able to see the slider, which is located inside the cover itself, opposite the contact. If there is no slider, you should turn the crankshaft 180 degrees again, and then set the octane corrector to 0. Using a wrench, you will need to screw the pointer to the distribution mechanism housing so that it aligns with the middle mark. When these steps are completed, the fastening bolt with which the plates are attached to the distributor body must be loosened slightly.
- Then, holding the slider in one place with a finger to prevent it from rotating, you need to carefully rotate the housing itself, this will allow you to remove possible backlash in the drive. The housing must be rotated until you achieve alignment of the sharp end of the stator mechanism petal with the red mark located on the rotor device. After this, the plate itself must be secured to the body using the appropriate bolt.
- Once you have completed these steps, you need to replace the controller cover and check the high voltage cables. You need to make sure that these wires are installed in the correct sequence, taking into account the firing order of the cylinders. When you manage to correctly adjust the lead angle, you need to make sure that the entire procedure was performed correctly.
- To diagnose the correctness of the actions performed, you need to start the engine of your UAZ and wait about 5-10 minutes until the power unit warms up. The operating temperature of the engine is about 90 degrees; you can wait until the internal combustion engine warms up to 80 degrees. Then you need to drive onto a flat road and accelerate the car to 40 km/h, after which you should sharply press the gas. At this moment, the car will accelerate and if, when the speed increases to 60 km/h, a short-term detonation (metallic knock) is heard from under the hood, then this indicates that all actions were performed correctly. If the detonation is too long, the system will need to be adjusted. To do this, the housing of the distribution mechanism will need to be turned one notch or half, and it must be turned counterclockwise. If the diagnostics showed that there is no knocking of the “fingers” at all, then the advance angle should be increased. To do this, the mechanism should be turned in the opposite direction.
Photo gallery “How to adjust correctly”
What to buy
In fact, you don’t need to buy much, and if you have a working distributor and reel, then the list of purchases will be minimal.
So, you need to buy:
- Hall Sensor;
- High-voltage wires (preferably silicone);
- Switch from VAZ 08
.
Advice: If your UAZ is already many years old, then we recommend that in addition to the already indicated list, you buy a new distributor, a coil, and you will also need UAZ 31514 wiring with connectors for the switch.
For reconfiguration and operation, you will also need a new UAZ 31514 wiring diagram, which is shown in the photo below, and which you can print for convenience.
You can also make your ignition system more powerful by upgrading it with two kits at once:
- Two switches;
- Two Hall sensors;
- Two ignition coils.
With this approach, each subsystem will be responsible for sparking 2 cylinders at once:
- First and third;
- Second and fourth.
Most often, UAZ cars that take part in competitions or are used by professional fishermen and hunters are subjected to such serious modifications. The video below shows how an engine works with such a system.
Advice: if you use your UAZ 31514 in everyday life, not related to extreme sports, then it is enough to limit yourself to alterations with one set - it’s easier to maintain it. After all, it is used on domestic all-terrain vehicles.
A guide to replacing a distributor with an oil pump drive
Before installing a new distributor with a drive, you need to weigh your strengths, since it is not recommended to make mistakes when performing work.
So, how to replace and install the distributor:
- Turn off the ignition and remove the distributor cover; the tips and high-voltage cables are connected to it.
- Then you need to disconnect the wire connected to the switch from the distribution mechanism. You also need to disconnect the pipe connected to the vacuum regulator.
- Taking a 13mm wrench, unscrew the two nuts securing the device and remove the mechanism along with the oil pump drive from the power unit.
- After completing these steps, you will be able to see the gasket located under the drive. If as a result of these actions the position of the crankshaft has not changed, then simply install a new mechanism, making sure that the slider is located opposite the mark. All actions are performed in reverse order. When the installation is completed, the advance angle is adjusted.
- If, as a result, the location of the shaft has changed, then before installation it is necessary to move the piston of cylinder 1 to top dead center. You need to ensure that the marks on the pulley align with the pointer on the motor itself.
Rework
Actually, the work itself comes down to remaking the distributor, which will no longer have a high-voltage part - an electronic switch will generate high-voltage pulses for it
. The photos below show the location of two sensors at once.
Pay attention to the shape of the contact plate:
- It has curved ends - the sensors are located vertically;
- Flat – the sensors are mounted horizontally.
Both options are working, it all depends on the design of the distributor. In the future, you only have to adjust the ignition. The instructions are simple - you must remember that sparking begins when the edge of the plate is in the center of the Hall sensor.
The order is as follows:
- Rotate the crankshaft until the piston in the first cylinder reaches TDC;
- Rotate the distributor body until the contact plate is in the sensor slot;
- Carefully tighten all mounting screws to eliminate any play.
- Start the engine.
Engine 417 UAZ installation of distributor drive
Hi all . In general, the problem is this: they removed the distributor along with the drive and rotated the elbow a couple of times, but they did not put any marks on where the distributor was located and where the slider was directed.
I tried to set it according to the book, but either I’m doing something wrong or there’s some other problem, that is, it won’t start.
The distributor was set as follows: = placed the mark on the crankshaft pulley opposite the protrusion (pin) on the engine crankcase. OPTION 1: the piston of the first cylinder is at the top (the first cylinder is the one that is closest to the engine cooling radiator). There is a GAP on both valves of the first cylinder
. I set the distributor so that the slider looks at the first cylinder (look from the radiator). The slider is obtained between the two contacts of the distributor cover. I tried installing the spark plug wire for the first cylinder both before the runner and after the runner. The spark plug wires are connected to the distributor cap as cylinders 1-2-4-3 (count from the radiator)
OPTION 2: I turned the crankshaft another 1 revolution to match the marks on the engine crankcase and on the crankshaft pulley and tried the same thing again:
The piston of the first cylinder is at the top (the first cylinder is from the engine cooling radiator). There is NO CLEARANCE on both valves of the first cylinder
. I set the distributor so that the slider looks at the first cylinder (from the radiator). The slider is obtained between the two contacts of the distributor cover. I tried installing the spark plug wire for the first cylinder both before the runner and after the runner. The spark plug wires are connected to the distributor cap as cylinders 1-2-4-3 (count from the radiator)
Result: the engine does not start.
I read that the distributor slider should look specifically at the first cylinder.
If the slider is placed specifically on the first cylinder, then the contact of the slider in both the FIRST and SECOND variants is between the two contacts of the distributor cover, and if the slider is placed a little forward clockwise, then it is between the first and second cylinders.
In general, there are 4 settings: 1. the piston of the first cylinder is at the top. There is a gap on both valves of the first cylinder. The slider is for 1 cylinder.
2.piston of the first cylinder is at the top. There is a gap on both valves of the first cylinder. The slider is located between the first and second cylinders.
3. piston of the first cylinder is at the top. There is NO CLEARANCE on both valves of the first cylinder. The slider is for 1 cylinder.
4. piston of the first cylinder is at the top. There is NO CLEARANCE on both valves of the first cylinder. The slider is located between the first and second cylinders.
[B] IN THREE OF THE FOUR SETTINGS THERE WERE CHANGES: in one setting the engine seemed to jam sometimes when I turned the starter, as if the engine was recoil in the opposite direction, and in the other setting there were shots in the muffler. in the third setting the engine started but did not develop power, it smoked thick white smoke and as soon as you let off the gas it immediately stalls, and in the fourth setting the starter turns it stupidly and no changes occur. /B]
I don’t remember what setting I used and how the slider was set; I spent the whole day fiddling around and didn’t do anything, I just tried different options and didn’t remember where and how it worked.
When the engine was previously assembled after capitalization, there were also some problems with setting up the distributor, but not for so long. The engine was overhauled 2 years ago and I no longer remember how I did it.
Friends, tell me what I’m doing wrong and how to correctly place the slider on the first cylinder when there is a gap on the valves or when there is none (the mark on the crankshaft pulley was placed opposite the protrusion on the crankcase)?
source
The car does not start when the starter is working normally: possible reasons
Let's start with the fact that at the beginning of the test you should once again make sure that the starter is working. During its operation, when trying to start the engine, there should be no clicks, hums or other extraneous sounds. A working starter should turn the engine with the characteristic buzz of the starter electric motor, and do it smoothly, without skipping or malfunctioning. If during attempts to start the internal combustion engine the indicated signs are noticed, then the fault should be looked for in the starter.
After making sure that the starter turns, but the engine does not start, you need to move on to a detailed check of certain vehicle systems. You should start by diagnosing the engine power system, as well as checking the ignition system and some sensors in the electronic control system of the internal combustion engine. In other words, an engine with a working starter most often does not start as a result of the fact that fuel does not enter the cylinders or the fuel does not ignite for certain reasons.
Checking the fuel system
The fuel system must be checked step by step, thereby excluding malfunctions of the following elements:
- electric fuel pump;
- mechanical fuel pump;
- injector;
- carburetor;
- fuel filters;
- fuel lines;
One should also not exclude possible air leaks into the fuel supply system. In the case of a diesel engine in winter, there is a high probability of waxing (freezing of diesel fuel), which simply is not pumped through the system in this form.
On cars with an injector, after turning the ignition key, you can usually clearly hear the sound of the electric fuel pump operating for a couple of seconds, pumping gasoline into the power system. If the fuel pump does not hum, then the fuel pump motor is likely to fail or there is no electricity supply to the pump. In this case, it is necessary to check the fuel pump, fuse and fuel pump relay.
On cars with a carburetor, it is also necessary to check the fuel pump, which is structurally driven by the camshaft. Checking is carried out by removing the hose from the carburetor inlet fitting. You can also remove the hose from the fuel pump outlet. Next, you need to pump up the fuel using the manual pumping lever, which is located on the fuel pump. If everything is normal, then gasoline should flow.
Ignition system diagnostics
If the starter turns and gasoline is supplied to the engine, but the engine does not start, you should check the functionality of the ignition system. You can exclude spark plugs and high-voltage wires from the list, since all of these elements cannot fail at the same time.
For this reason, it will be enough to unscrew one spark plug from the engine and then check for the presence of a spark. This procedure involves removing the spark plug, after which the spark plug wire is put on it. Then the spark plug skirt is applied to the engine cylinder block, after which the engine turns over from the starter. The presence of a spark will indicate that the ignition system is working properly. The absence of a spark on the spark plug will indicate a malfunction in the ignition module of an injection engine or the ignition coil on an engine with a carburetor.
To check the ignition coil of a carburetor engine, you will need to remove the central wire and bring its end 5-7 mm. to metal. After this, the engine is cranked by the starter. The absence of a spark in this case will clearly indicate problems with the coil. If there is a spark, then the next step in the diagnostic process is to remove the distributor cover and assess the condition of the device.
We install and configure the ignition, change the distributor drive on UAZ vehicles
The UAZ distributor is considered one of the important components of the ignition system in a vehicle. Correct adjustment of this mechanism ensures optimal operation of the power unit as a whole. You can learn more about the principle of operation of the ignition system and how to set it up correctly with your own hands from this material.
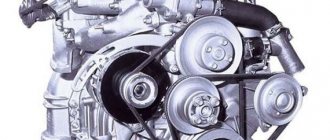
Transmission
The designers of the Ulyanovsk plant created the UAZ 31519 all-wheel drive transmission. It has a mechanical four-speed gearbox. The box is controlled by a lever installed in the car's interior.
The machine has a dry single-plate clutch. It connects the input shaft of the gearbox and the flywheel of the power plant. Resistance to clutch disc wear is ensured by friction linings. The clutch is hydraulically driven. The clutch is engaged and disengaged by pressing the pedal.
The front axle is connected by the transfer case. It has two rotation speeds. This has a positive effect on the vehicle's cross-country ability. The UAZ 31519 transfer case has one drawback. The gears inside the gearbox have straight teeth. When the gear teeth move, they hit each other, creating a high level of noise.
Torque from the transfer case to the wheel mechanisms is transmitted using planetary gearboxes. The UAZ 31519 gearboxes are equipped with a cross-wheel differential. The wheel mechanisms are connected to the gearbox by axle shafts.
Why turn on the ignition?
With the ignition set correctly:
- The engine operates efficiently, steadily and stably in all modes. Otherwise, the engine functions intermittently, knocking, and popping. Unstable engine operation causes many problems and reduces vehicle dynamics and speed characteristics.
- After correct ignition adjustment, starting a cold power unit is significantly improved.
- When the ignition is misregulated, fuel consumption increases. After adjustment it decreases significantly.
- Engine power also increases noticeably in a car after proper ignition adjustment.
General concept
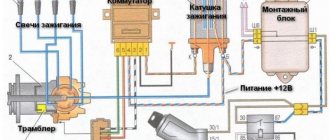
The contact ignition circuit itself is not bad, because humanity has been using it since the advent of the first car. But, of course, it is far from the capabilities of contactless ignition. Therefore, many UAZ owners, in an effort to improve the performance of the power unit, reconfigure it.
General ignition circuit for older UAZ models
And not only UAZs, but also other domestic cars, for example, the wiring of the Moskvich 2141 and a number of other brands and models are subject to alterations.
Effect of modernization
What is important is that the engine compartment and interior electrical wiring of the UAZ 31514 remains virtually unchanged, and the alteration itself is characterized by the installation of new elements under the hood.
Differences between ignition systems
The main difference between the two systems is the moment of sparking:
The electronic switch is often mounted in UAZ vehicles on the partition on the left side
Note! More powerful sparking promotes self-cleaning of the spark plug, because The fuel burns intensively, leaving no deposits.
Read more: Cost of servicing Opel Astra