Adjusting the ignition is one of the most common tasks faced by our compatriots. This procedure allows you to get rid of improper operation of the engine, thereby preventing wear of its structural elements. Find out more about how to set the ignition yourself and what methods exist in this material.
Reasons for disappearing factory settings
Even if your car has a button instead of a lock, sooner or later you will still have to adjust the ignition. Before you do everything yourself, let's look at the reasons why this need arises. First of all, the reason for this is the driver himself, who for various reasons could dismantle the ignition distributor. And with its further installation, the ignition timing (ignition timing) was not properly adjusted.
The reason why the ignition timing is set lies in the marks on the components. When dismantling the distributor, these marks are lost; accordingly, the car owner simply destroys the factory settings. So before carrying out any work related to the breaker, you need to note the location of all the marks.
Adjustment of the interrupter unit for setting the SOP
Terminology
Ignition distributor
- an electromechanical device that ensures timely supply of high voltage pulses to the spark plugs.
It is often called a distributor
.
Ignition advance
- ignition of the working mixture in the cylinder before the compression stroke ends.
Ignition timing (IDA)
— the angle of rotation of the engine crankshaft from the position corresponding to the appearance of a spark on the spark plug until the piston reaches top dead center.
Contact ignition system
- a system in which switching of the ignition coil is provided by a mechanical interrupter.
Distributor installation instructions
Setting the ignition angle is required for cars with a distributor; on other cars, the angle is set by the ECU.
If you set the ignition timing yourself, then, as stated above, you need to follow the special marks. Depending on the specific vehicle, adjusting the KSZ or BSZ on a diesel engine or gasoline unit may have its own nuances. For example, in domestically produced VAZ cars, the ignition timing is set according to the first cylinder. That is, to align the piston should be set to the TDC position, because this is where the compression moment occurs.
The ignition system is configured as follows:
- First of all, the spark plug of this cylinder is removed.
- Use a plug or finger to close the spark plug hole.
- The crankshaft must be rotated clockwise; you can use a socket wrench for this. This is done until the air pushes the plug or finger out of the spark plug hole.
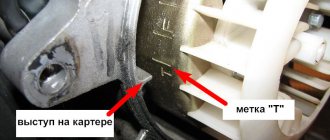
- The flywheel rotates further until the marks on its shaft coincide with the middle mark located on the timing cover. In this case, the ignition adjustment will allow you to set the angle to 5 degrees, and this is normal for a car running on 92 or 95 fuel.
- After these steps, you can install the distributor. The body of this device should be positioned in such a position that an imaginary line runs parallel to the axis of the power unit. As for the runner rotor, it should point towards the contact of the first cylinder on the cover. If everything worked out for you, then the car should start, and then you will need to adjust the angle (the author of the video is the Lty D channel).
When and why do you need to adjust the ignition?
First, a little theory. If the working mixture in the cylinders burned instantly, then there would be no problems with advance in principle. Set it on fire at top dead center and everything is fine. But the mixture does not burn instantly: it takes milliseconds. In this case, the actual rotation speed of the crankshaft is, of course, not constant. Therefore, you cannot stupidly ignite the mixture at the same time under different engine operating modes: it will burn either too early or too late. The result will always be disappointing - the engine pulls poorly, overheats, runs unstably, detonates, etc.
In particular, if you start “sparking” too early ( large
), then the gas pressure will increase sharply until the piston reaches top dead center, preventing its movement.
Because of this, the power will decrease and the efficiency of the engine will deteriorate, it will lose throttle response and will jerk at low speeds. With late sparking ( low CV
), the mixture will burn for a long time with an expanding volume, and therefore the gas pressure will be significantly lower than the calculated one. Power and efficiency will decrease, and the engine will overheat greatly, since the mixture will burn out throughout the entire expansion stroke.
There is only one treatment method - ignite the working mixture according to the speed and load on the engine. In addition, adjustment of the OZ may be required when switching to gasoline with a different octane number. By the way, on very ancient cars (at the beginning of the last century), the ignition timing was regulated by the driver: a special handle was provided. But it soon disappeared, because the engine acquired a distributor with a centrifugal mechanism inside.
The centrifugal regulator usually contained a pair of weights balanced by springs. As the rotation speed increased, the weights diverged to the sides and rotated the support plate on which the breaker was located. The higher the rotation speed, the more the weights diverge and the higher the SOP becomes.
The further pursuit of efficiency added a vacuum colleague to the centrifugal regulator as assistants. The fact is that as the load increases, the filling of the cylinders with the combustible mixture also increases, since the driver puts more pressure on the accelerator. At the same time, the percentage of residual gases in the working mixture decreases, which helps to increase the combustion rate. Therefore, the SOP must be reduced.
On the contrary, when the load on the engine decreases, the filling of the cylinders decreases, the content of residual gases increases, and therefore the working mixture will burn more slowly. In this case, the OZ needs to be increased. This problem is solved by a vacuum regulator that monitors the vacuum in the engine intake pipe. The higher the load, the lower the vacuum, and vice versa. In most classic engines, centrifugal and vacuum regulators work together.
If the octane number of the fuel does not correspond to the one that guided the designer when designing the engine, then even with optimal operation of the mentioned regulators, you should not expect normal operation of the engine. The most unpleasant phenomenon that can occur is detonation. Roughly speaking, this is an explosive combustion of the mixture, fraught with major repairs. To prevent detonation in classic engines of a bygone era, it was necessary to open the hood and manually turn the distributor housing in the desired direction. Filled with low-octane gasoline - if you please, delay the ignition...
It goes without saying that in modern engines the optimal SOP is set by the control controller. It monitors speed, load, octane number, temperature, etc.
Setting the spark advance angle
How to set the ignition with your own hands? When installing electronic ignition in your car, you can use several methods, one of them is adjusting the angle by spark. To do this, using the crankshaft, the piston of cylinder 1 is set to a lower TDC. In this case, the distributor should be directed towards the cylinder wire contact. If it faces the other way, you need to turn the flywheel again.
Next, the central high-voltage cable should be removed from the distribution unit cover, the contact of which should be placed approximately 0.5 cm from the car body or cylinder head. The distributor fastening should be loosened, after which the ignition will be activated. The body of the interrupter assembly rotates, and by the movements of the slider you should find the desired position at which a spark will appear between the contact of the high-voltage cable and the ground of the car. Next, the breaker moves counterclockwise (very slowly), and you need to catch the moment when the spark no longer appears (the author of the video about setting up an RCD using a special strobe device is Vladislav Chikov).
How to regulate OZ?
Aurally? By spark? By a light bulb? By strobe? Let's figure it out now.
Let’s say right away that we won’t talk about the strobe light. Firstly, the average driver simply does not have it at hand. And, secondly, it’s better not to mess with him. The fact is that the strobe light shows the ignition timing only when the engine is running, but at the same time, due to the centrifugal regulator, the OZ is shifted towards advance even at minimum idle speed. Therefore, generally speaking, there is no point in waiting for precise adjustment.
The correct adjustment recommendations are always contained in the specialized literature for a specific car model - they should be followed. Let's take for example the AZLK-2141 car with a UZAM engine and a contact ignition system. Please note that the slider on Ufa engines rotates COUNTERclockwise.
The sequence of operations for a Moskvich engine should be as follows.
- Loosen the distributor fastening.
- We determine the beginning of the compression stroke in the first cylinder. To do this, we turn out the spark plug of this cylinder, plug the hole with a suitable plug (even from crumpled paper) and turn the crankshaft with the starting handle until the plug pops out.
- We continue to turn the crankshaft until the first mark on its pulley aligns with the tip of the ignition installation pin pressed into the lower crankcase cover.
- We make sure that the slider is looking with its current-carrying plate at the contact of the distributor cover, corresponding to the wire of the first cylinder.
- We connect any low-power light bulb (for example, in a test screwdriver) with one end to ground and the other to the low voltage terminal of the coil connected to the breaker.
- Turn on the ignition and turn the distributor body counterclockwise until the breaker contacts close. The lamp shorted by the breaker should go out.
- Holding the slider, apply a small force clockwise to eliminate gaps in the drive mechanism, then slowly turn the distributor clockwise until the light comes on.
- Tighten the distributor fastening. Don't forget to return the candle to its place!
On cars like the VAZ-2108, which switched to electronic ignition, but at the same time retained both centrifugal and vacuum regulators, the procedure is completely similar - up to a different location of the standard marks. The slider rotates counterclockwise. However, the probe lamp must be connected between the switch and the ignition coil, and in no case to the Hall sensor.
What does the expression “set by spark” mean? Roughly speaking, the same as with a light bulb. In this case, instead of a light bulb, use a spark plug that has been unscrewed in advance, the threaded part of which must be connected to the engine ground. Instead of the light bulb lighting up, we catch the moment the spark jumps - that’s all.
Adjusting the ignition by light bulb
If you don’t know how to set the ignition correctly, and your car doesn’t use a spark amplifier, then there is another method - using a light bulb. To install the ignition in this way, it is necessary first of all to put the piston of cylinder 1 in the TDC position, we described this in detail above. Installing the ignition using a light bulb involves using any 12-volt lamp to the distributor and the car body.
When the ignition is turned on, the distributor body must be rotated in different directions until the lamp begins to light. At this moment you need to stop the distributor and secure it in this position. If the engine works well with large mismatches in the marks, this may be due to incorrect assembly of the power unit or stretching of the timing chain.
Checking the adjustment results
Let's move on to the last stage, we need to check the results obtained. The results are checked based on the car's behavior on the road. You need to warm up the engine, drive out onto a flat section of the road, pick up a speed of 40-50 km/h, engage fourth gear and sharply press the gas pedal . Within 1-2 seconds, characteristic knocking sounds similar to clattering will be heard, and the car will immediately begin to confidently pick up speed.
If no sounds are heard, then you need to turn the distributor counterclockwise one notch, this procedure must be repeated until a sound is heard.
The method of setting the ignition through a 12 V light bulb is one of the most common types of system regulation. It is ideal for setting up the ignition of all cars with contact SZ.
Basic aspects of different types of ignition, contact adjustment
Overall, installing an electronic ignition is not a particularly difficult task if you approach it wisely. If you have difficulty setting it up, you can use a device to set the ignition timing; you can find it for sale in any store. It should be noted that if your car is equipped with gas equipment, installing an ignition timing variator will help you.
You also need to take into account that regardless of the system - electronic or mechanical - the procedure for setting the angle looks identical. The only difference is that in the mechanical version, sparks appear as a result of opening the contacts.
So before adjusting, you should adjust the gap between the contacts:
- The crankshaft must be turned until the greatest distance appears between the contacts.
- Using a feeler gauge, you need to check the gap and compare it with the one prescribed by the car manufacturer.
- Using the plate, you need to set the appropriate gap and tighten all the screws.
How to install contactless (electronic) ignition
Installing electronic ignition is the easiest way to improve engine performance. Replacing with a contactless system provides the following advantages:
- Confident cold start;
- Stable engine operation at any speed;
- High reliability;
- Increases the service life of spark plugs;
- Powerful spark;
- No gap adjustment or centrifugal adjuster required.
The finished kit includes a distributor with a Hall sensor, a special ignition coil and a switch. It is possible to leave the old high-voltage wires.
The electronic ignition system includes: an ignition coil, a distributor, a switch and a set of wires
To install contactless ignition to replace the old one, we need a key for “13” and “10”, two screws for fastening the switch and a strobe for adjusting the advance angle.
The order of work performed:
- We bring the crankshaft pulley to the mark on the engine cover, the piston of the first cylinder should be at TDC.
- Disconnect the negative terminal of the battery.
- Remove the cover from the old distributor and note the position of the slider relative to the engine. This will help you quickly install and configure the new distributor.
- We disconnect the wire coming from the ignition coil, unscrew the lock with a key set to “13” and remove the distributor from the engine block.
- We install the new distributor according to the marks made, trying to align the marks on the body and the position of the slider. Do not tighten the fastening completely.
- We replace the ignition coil with a new one and install the switch under the hood. Place the electronic unit in a dry place, away from heated parts. For example, on the wing or engine shield.
- We connect the wiring according to the diagram in the instructions for the BSZ. We connect high-voltage wires.
- Close the distributor with the lid and tighten the fastening nut. The system is installed and ready to use. All that remains is to adjust the ignition timing.
Adjustment algorithm
ATTENTION! A completely simple way to reduce fuel consumption has been found! Don't believe me? An auto mechanic with 15 years of experience also didn’t believe it until he tried it. And now he saves 35,000 rubles a year on gasoline! Read more"
A 12-volt light bulb, a set of probes and a special wrench for rotating the crank shaft are all that is needed to ensure ideal ignition of the fuel mixture using this method.
Here's how to proceed:
- Remove the upper cap of the ignition switch;
- Use a fine file to process the contacts, trying to remove all metal oxides and bulges formed on the surface;
- Bring the contacts as close as possible to each other (they need to fit tightly, with their entire plane).
Advice. If the contacts do not sit on each other with their entire plane, then it is recommended to slightly bend the fixed contact. This is done only when absolutely necessary, after thoroughly cleaning the contacts from oxides and tubercles.
- Turn the crank shaft to a position where the maximum possible distance is formed between the distributor contacts;
- Loosen the screw that holds the entire contact system;
- Insert a 0.4 mm measuring rod between the contacts and secure the holder as before.
Attention. It is necessary to provide such a gap between the contactors so that the 0.4 mm probe moves in this place with some force.
The same is done with probes of 0.35 and 0.45 mm. The crank shaft rotates using a key, and if it is missing, then in no case through the starter. You can ask an assistant to slowly push the car in 4th or 5th gear.
Ignition of VAZ 2106: possible malfunctions and signs of problems
If the contact ignition system fails, this affects the operation of the internal combustion engine, namely:
- the engine does not start;
- uneven engine operation;
- when you press the accelerator pedal, the operation of the internal combustion engine does not become uniform;
- misfires;
- crankshaft speed is not equalized;
- The internal combustion engine does not develop full power.
Now let's look at the main causes of malfunctions in the ignition system of a VAZ 2106 car, as well as ways to eliminate them. First of all, incorrect operation of the ignition system is due to untimely ignition of the mixture in the combustion chamber, which leads to imbalance in the operation of the internal combustion engine and loss of power, increased fuel consumption, smoky exhaust, etc.
Causes of failures in the ignition system:
- wear of the contacts of the distributor cover;
- failure of the “runner”;
- distributor bearing failure;
- malfunctions in the operation of the mechanical drive of the distributor (the “pig” is faulty);
- failure of the distributor capacitor;
- breakdown of high-voltage wires or protective caps of spark plugs;
- breakdown of the spark plug skirt contact on the engine body;
- wear of contact elements of spark plugs;
- general breakdowns in the vehicle's power supply system (lack of charging of the generator, insufficient voltage in the vehicle's electrical system);
- installation of low-quality or defective spark plugs.
Maintenance of the contact ignition system includes removing oxide from contacting or rubbing contact elements, replacing mechanical hinge and bearing connections, as well as replacing spring-loaded contact groups (runner).
UOZ and UZSK
As you know, the dynamics and fuel consumption of carburetor cars are completely dependent on the UOZ and UZSK. The first abbreviation means the initial advance angle, and the second - the angle of the closed state of the group of contacts.
You should know that each car model has its own individual characteristics and its own adjustment values. That is, knowing how to set the ignition using a light bulb is not enough. You also need to understand the individual values and settings of a particular car. You should always try to bring both angle values to the maximum acceptable level.
The spark charge must be created with a certain advance, since this or that time is needed for the combustion of the fuel mixture. The engine has different speeds, therefore the advance angles must change in accordance with the amplitude of rotation of the crank shaft.
Having learned how to set the ignition through a light bulb, you can independently establish clear ignition of the fuel mixture of your car.
Forget about fines from cameras! An absolutely legal new product - Traffic Police Camera Jammer, hides your license plates from the cameras that are installed in all cities. More details at the link.
- Absolutely legal (Article 12.2);
- Hides from photo and video recording;
- Suitable for all cars;
- Works through the cigarette lighter connector;
- Does not cause interference to radios and cell phones.
What does the contact ignition system of VAZ cars consist of?
As you know, long-term and uninterrupted operation of the internal combustion engine of any car depends on many factors:
- operating conditions of the power unit and load;
- quality of fuel and lubricants;
- operation of the power system;
- proper operation of ignition systems, etc.
As for ignition, the contact ignition system is structurally simple, inexpensive to maintain, reliable and efficient. Main components using the example of VAZ 2106:
- distributor VAZ 2106;
- mechanical drive of VAZ 2106 distributor;
- high voltage wires;
- spark plug.
Step-by-step instruction
You can install the ignition on a VAZ 2106 in 13 simple steps:
- We remove the spark plug of cylinder No. 1, close the hole for the spark plug with a rubber plug and finger.
- Using a special wrench, turn the crankshaft. As you move, the compression stroke should begin in the first cylinder. At this moment, the piston will move upward, creating internal pressure. You will feel it when the rubber plug begins to squeeze out of the hole.
- At this moment we begin to monitor the progress of the mark on the pulley. It should ultimately align with the mark on the timing belt. If you are using fuel with an octane rating of 95 or 92, then you need to align it with the second mark (5 degrees). If the fuel used is 72 or lower (which happens very rarely today), then you need to strive for the third mark (0 degrees)
- Remove the cover from the distributor, having first unfastened the latches.
- Due to the movement of the crankshaft, the distributor rotor must face the first cylinder.
- Now it is important to ensure that the line of the distributor cover latches is parallel to the axis of the motor. If this condition is not met, the following procedures must be carried out.
- Remove the nut securing the distributor and turn it upward. Next, we twist the rotor axis and achieve its parallel position relative to the motor axis.
- We return the distributor to its place and screw the nut not all the way.
- Only now is the actual process beginning, thanks to which we will be able to correctly configure the contact ignition.
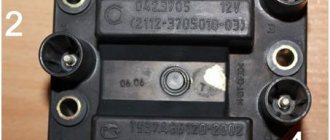
- We connect the volt-ohmmeter so that one end is connected to the coil terminal connected to the distributor cable with low voltage, and the other end is fixed to ground.
- Turn on the ignition. Carefully turn the distributor clockwise until the light switches off. If it doesn’t light up, then there’s no need to turn anything.
- Now we begin to turn the distributor in the opposite direction until the light bulb lights up. In this position, fix the distributor by tightening the nut tightly.
- The ignition adjustment is completed, you can turn off the ignition and return the distributor cap back.
Now we can verify whether the ignition was installed correctly. We start the engine and start driving. You need to accelerate to 45 kilometers per hour. Upon reaching the desired speed, engage fourth gear and sharply press the gas pedal. After a couple of seconds, the engine should begin to detonate (popping noises will be heard, “fingers” will begin to ring). As soon as the car reaches a speed suitable for the selected gear, the detonation will disappear.
If the detonation does not disappear, it means that you made the adjustment incorrectly and received the so-called “early” ignition. This means you need to slightly turn the distributor clockwise by half or one division. If detonation does not occur, then you have “late ignition” installed. In this case, turn the distributor counterclockwise by half or one division.
As soon as you were able to set the ignition on the VAZ 2106 correctly, make a reliable mark on the distributor body, which will serve as a good help for subsequent adjustments.
Checking the ignition angle while the vehicle is moving
It is best to check the functionality of the ignition system after any adjustment while driving. This is due to the design features of the distributor and the octane number of the gasoline used. It happens that the ignition angles set according to the marks do not provide sufficient dynamics and throttle response. Adjusting by ear according to the beginning of detonation will help:
- We accelerate the car to a speed of 45-50 km/h on a flat section of the road;
- We turn on direct transmission (fourth on the VAZ 2106) and press the gas pedal all the way;
- A characteristic ringing sound (detonation) should appear, which will disappear after 2-3 seconds, and the acceleration will be smooth and powerful without failures;
- If detonation does not disappear throughout the entire acceleration, then the ignition angle is “early”;
- The complete absence of ringing and sluggish dynamics indicate a delayed spark in the cylinders;
- We adjust the position of the distributor in place, turning it by 3-5 degrees;
- When the adjustment is completed, the position of the distributor body relative to the block is marked with a mark or paint.
Ignition adjustment work should be carried out regularly. The service interval for a simple contact ignition system is 15,000 km, for an electronic one - twice as long. The condition of the spark plugs and high-voltage wires is also regularly checked. All setup operations can be easily done independently; a garage is not needed for this. The skill of independently repairing the ignition of a VAZ 2106 will always come in handy on a long journey or in winter, when problems arise with starting.
If you find an error, please select a piece of text and press Ctrl+Enter.
Correctly setting the ignition on the VAZ 2107
If the torque setting is incorrect, there will be both a decrease in engine output power and increased wear of the gas distribution mechanism, increased vibration, various malfunctions, increased detonation, and increased noise. The mixture does not burn immediately, but a detonation wave appears that hits the cylinder walls, causing vibration. The figure shows the combustion chamber of a VAZ engine at the moment of top dead center, when operating pressure is created, the valve reliably closes the chamber. 1 – normal combustion zone, 2 – mixture detonation zone.
In what cases do you need to think about adjusting the ignition timing?
- detonation, “shaking” of the car for several seconds after turning off the engine;
- the appearance of a ringing sound in operation, giving off a “metal” sound, the so-called “knock of fingers” when driving a car on a flat surface without acceleration;
What are the types of ignition timing?
- Anticipatory, or early. In this case, a spark is supplied to the spark plug even before the mixture of air and gasoline is compressed to its maximum. Thus, the piston and connecting rod wear out faster, and carbon deposits appear.
- Retarded, late ignition. A spark is formed after the piston passes TDC (top dead center).
Preparing for correct ignition setting
First you need to make sure that:
- all the spark plugs are in good working order, the gaps in them are adjusted, no carbon deposits are formed, if there is carbon deposits, then the spark plugs need to be calcined. On the left is a candle with carbon deposits, on the right is a more normal one.
- spark plug wires have good contact and insulation;
- The contacts of the distributor are not burnt. If they are burnt, you need to replace the contact group.
- the quality of the wire from the coil and the contacts are good, the insulation is normal, the ignition coil is working;
- All dust and dirt should be removed from the coil, distributor contacts, and distributor cap;
- The adjustment must be performed with the engine fully warmed up; to do this, wait until the radiator cooling fan turns on.
Now let’s talk about how you can set the ignition on a VAZ 2107. The adjustment is carried out in a simple way, using a light bulb. You can also set the ignition using a spark or strobe. The sequence of actions is as follows:
- remove the spark plug from the first cylinder;
- insert a rubber plug of a suitable size into the hole;
- then rotate the crankshaft either with a gas wrench, or with a ratchet wrench, or with a special crankshaft wrench, slowly until the plug comes out. This means the piston is at or very close to top dead center;
- after this, carefully align the marks of the crankshaft pulley and the middle mark on the front engine cover; The middle mark indicates 5° ignition advance.
- after that, remove the ratchet wrench, screw the spark plug back in and install the wire;
- prepare a 12 V light bulb, one for the ignition coil output (plus), and the second for ground;
- determine the ignition timing - loosen the distributor fastening nut with a 13mm wrench;
- turn on the ignition, the light comes on;
- turn the distributor rotor clockwise until the light goes out;
- slowly turn the distributor rotor COUNTERclockwise until the light comes on again. This reverse stroke is a fine adjustment when the torque is set correctly.
- fasten the nut.
Now you need to check whether the torque setting is correct. To do this, you need to choose a straight section of the road, without ups and downs, and with a fully warmed-up engine, we drive in 4th gear at a speed slightly lower than usual, about 50 km/h, and then sharply accelerate. A characteristic “knock of fingers” appears. After the speed increases by 5 km/h, the knocking should stop on its own. This means that the ignition timing is set correctly. If the knocking noise does not occur at all, or lasts much longer, the angle setting is insufficient and the adjustment must be repeated.
comments powered by
You might be interested:
Troubleshooting the ignition warning light
The ignition warning light, sometimes called the no-battery light, is one of the most important lights on your instrument panel. Warns when the car alternator is not charging the battery.
Warning light circuit
In a typical circuit, the warning lamp is connected directly to a terminal on the rear panel of the generator. The wire runs from the alternator through the bulkhead to the dashboard mounted warning light. From there it goes to the ignition/starter switch.
In general, if the charging system is operating properly, the warning light should illuminate when the ignition is turned on and go out when the engine is started. But the light behaves a little differently depending on the type of alternator installed in your car.
If your car is equipped with a dynamo, flickering lights are normal. at idle speed, since this type of alternator produces little or no current at low engine speed. The indicator should go off as engine speed increases.
If your car has an alternator, the warning light should not come on when the engine is idling, as long as the idle speed is set correctly, since the alternator produces current even at low speeds.
Malfunctions
There are three main problems that the ignition warning light can cause. Firstly, the warning lamp may not light up when the ignition is turned on. is on and the engine has not yet started. (This is usually the easiest fix.) Second, the warning light may not go off when you increase the engine speed. Third, the light may behave normally at low speeds, but then come on at high engine speeds.
No lighting
If the warning light does not light up when the ignition is turned on, there are two possible reasons.
One of them is that the signal lamp simply burned out. This could be related to old age. Another possibility is a charging fault. circuit - if the generator is overcharging, it can cause the lamp to burn out. You can do a simple check to see what is at fault.
Warning lamp wire
To check, you need to locate the warning light wire into the engine compartment where it connects to the charging system. But first you need to know what type of charging system you have so you can identify the correct wire.
Dynamo-equipped vehicles have a warning light wire connected to a remote voltage regulator, often mounted on the bulkhead or inner fender. Look at the regulator cap for a terminal labeled either WL or IND—this is the wire you want.
If your vehicle has an alternator, the connection of the warning light wire depends on whether the alternator has an internal or external voltage regulator.
If the generator is equipped with an internal regulator, the correct wire is connected directly to the terminal on the rear panel of the unit marked WL or IND. If the generator has an external regulator, the signal light wire is connected to it in the same way as a dynamo. The terminal will again be labeled WL or IND.
However, some vehicles have an alternator that uses a separate relay for the warning light circuit. In this case, you should disconnect the wire from this relay.
Checking the warning lamp
Disconnect the warning light wire and touch ground. Turn the ignition on and watch the warning light. If there is a suspicion of charging wine. If I don't suspect it, a burned out light bulb or faulty wiring.
For a dynamo, the warning light wire always runs from the light to a separate voltage regulator. On a generator, the wire can go to an internal regulator, an external regulator, or a separate relay.
Alternator plugs
Many generators come with a multi-pin plug that snaps right into the back of the housing. The warning light wire is usually the smallest of the wires in the multi-plug. To remove the wire from the multi-plug, first disconnect the plug from the generator, then remove the clip at the back of the plug that holds the wires. Now you can pull out the wire and touch the ground to test the circuit.
Installing a new lamp
To replace the hazard warning light, you will need to access the rear of the dashboard.
On older cars this is usually quite simple, as the bulb can often simply be removed from its socket by reaching around the back of the dashboard with your hand.
On newer vehicles, the lamp is often located in the instrument cluster and is connected to the wiring via a multi-pin connector and printed circuit board.
When installing a light bulb into the cluster block, make sure it makes good contact with the metal strips on the circuit board - they are fairly easy to dislodge.
Examination
Checking the Warning Lamp Circuit
If the warning light does not work and the lamp has not burned out, you can test the electrical circuit using a test light. Turn the ignition switch on, connect one side of the tester to ground, and check the various parts of the circuit shown here. In all cases, the indicator lamp should light up.
Disconnect the warning light wire and make sure the terminal connections are clean and that the wire fits snugly. If the terminals look dirty or corroded, clean them with wet or dry paper, reconnect the wire, and check the light again.
If the indicator still does not light up, disconnect the wire again, turn the ignition on and ground it to the body or engine block.
If the light is now on, the problem is with the alternator or voltage. regulator If the light still does not come on, you may find that the warning light is burnt out or the wiring is faulty.
The warning light is on
If the warning light does not go off when the engine speed increases, the fault may again be in the alternator or in the warning light circuit.
A simple test you can do to determine the cause of the problem is to start the engine and turn on as many electrical components as possible. Now turn on the engine and look at the headlights. If the indicators become noticeably brighter, the charging system is working properly. and the problem is in the warning light circuit.
One possibility is that the pilot light wire is grounded somewhere along its length. Check this by turning the ignition on and disconnecting the warning light wire. If the signal light is constantly on, the wire is grounded. somewhere. Inspect the wire for friction against the body and repair it. electrical tape. If the wire is completely broken or badly chafed, it needs to be replaced with a completely new section.
Regulator checks
The warning lamp may be faulty due to problems with the voltage of the regulator unit. Make sure that the plastic cover of the regulator is not cracked - this could allow moisture to enter the device - and that the regulator is not corroded or damp where it attaches to the body.
High durability
The third possible problem with the warning light is that it goes out when normal when you increase the engine speed a little, but comes back on when the engine speed is further increased.
If the warning light is just dim, it usually means there is a high resistance problem somewhere in the warning light circuit.
Test this by turning on more and more electrical accessories after the light starts to glow. If the problem is high resistance, the warning light will become brighter.
Carefully go through the entire charging system looking for loose or dirty wiring connections causing high resistance. Disconnect the wires and clean the terminals if they are dirty. Remember to check that the battery wire connections and the engine ground wire are still good.
Don't forget to also check the bolts securing the generator to the engine. They provide an earth path from the alternator to the engine and body, but due to their open position in the engine bay they can become oily and provide only a poor ground connection.
Check this connection by unscrewing the mounting bolts. Clean off all traces of oil and dirt, then install the mounting bolts, making sure they are tight.
Installing a new wire
Pull out the ends of the old wire and secure them with tape. Solder the appropriate connectors (tag here) to the ends of the new wire.
Use electrical tape to secure the wire to the existing loom.
Disconnect the old wire from its terminals at both ends. Strip back the insulation from the new wire and place the bare ends into the terminal connector, then apply solder.
Once the solder has cooled, reinstall the wire next to the existing loom, taping it at regular intervals. Make sure he cannot touch hot or moving parts.
High speed faults
If the warning light comes on at full power at high engine speeds, then the fault is more serious.
There are several possible reasons. On a dynamo, this could be a damaged brush, a worn commutator, or possibly faulty internal windings.
With a generator, the problem can be caused by a faulty rectifier, which is usually located inside the generator block. The block will have to be removed from the engine so they can be disassembled so they can be replaced where possible.
Check with your dealer to see what generator replacement parts are available - it may be cheaper and more convenient to buy an exchange unit.
Generator wiring
Pull each wire from the voltage regulator in turn, or disconnect the wires from the solenoid and clean the terminals with wet or dry paper. If the warning light stays on above idle speed, you should check the charging circuit wiring for loose connections causing high resistance. Disconnect the battery cables to avoid short circuit. Next, check the battery terminals to make sure they are clean. Carefully check the battery ground wire where it connects to the body, as well as the main ground strap from the engine to the body. The generator is grounded through the engine, and a poor connection here will affect its performance. If any of the wires are corroded, they should be replaced. Check the electrical connections to the back of the alternator, then follow the wires to the regulator box or starter solenoid. Pull each wire from the voltage regulator one at a time, or disconnect the wires from the solenoid and clean the terminals with wet or dry paper. When replacing alternator wires, remember that the connecting terminals must be soldered to ensure a good connection. To eliminate the possibility of overheating, the new wire must be the correct thickness. Consult your repair manual or ask your dealer if you are not sure what size wire you need. If a faulty wire runs through the loom, it is easier to disconnect it at both ends and run a new wire along the loom, securing it with tape. .
What's the result?
Although there are several options for setting the ignition on a VAZ 2106, the method discussed above is the most correct and accurate. Moreover, all stages of the work performed are quite simple.
If you have the tools and skills, even a novice car enthusiast can handle setting the ignition. If problems arise with ignition adjustment, you can always seek help by using the services of qualified technicians at a service station.
Finally, we note that the most important criterion when setting the ignition is not engine power and fuel consumption, but the maximum possible exclusion of engine detonation.
We also recommend reading the article on how to determine whether ignition is early or late. From this article you will learn about the signs that indicate that the ignition is earlier or the ignition is late, as well as why and what ignition adjustments are needed in this or that case.
For this reason, after adjusting the ignition, it is important to check the operation of the engine not only with a strobe light, but also in all modes to ensure there is no detonation and normal operation of the power unit under load.
How to change a light bulb
How to change a light bulb |
Tutorial Videos, DIY, Lifestyle Tips and Tricks Changing a light bulb is one of the easiest things to do. Let us show you how to do it.
Replacing a light bulb is as easy as doing it yourself. But for those of you who have just moved into a new home and don't know how to do it, we have everything you need.
What do we have to do
- Turn off the power First, make sure the power is off. The safest way to do this is to turn off the big red power button on the fuse box.
- Allow to cool Allow the lamp to cool before touching it.
- Use a stepladder. Make sure you can reach the light bulb safely with a stepladder.
- Remove the light bulb Remove the light bulb from the socket. How you do this will depend on whether your lamp has a bayonet mount or a threaded connection:
Bulb with bayonet mount
- Bayonet mount (two pins, UK standard): Grasp the bulb lightly but firmly, gently push up and twist counter-clockwise until it comes out of the socket.
Edison screw lamp
- Screw fitting (most common in Europe): Gently turn counterclockwise until the bulb comes out of the socket.
- Replace the light bulb Lightly but firmly insert the new light bulb into the socket. Depending on the type, turn it clockwise until it locks into place, or continue to turn it gently clockwise until it stops moving any further.
Restore power Once the light comes on, turn the power back on and turn on the light.
- Dispose of the old lamp Dispose of the old lamp carefully as the glass is fragile and very sharp. Use the packaging from the new lamp to wrap the old one for safe disposal.
As always, safety is critical when dealing with electrical or wiring faults.
Remember:
- Check the wattage of the used lamp and replace it with a lamp of the same wattage
- Dispose of the lamp out of the reach of children
- Do not stick your fingers into an open light socket.
Still won't turn on after replacing the bulb? You may need to repair your light switch.
Laura Rudd
Proud mom of two boys and an avid craft and interior design enthusiast, Laura is always busy writing ways to make everyone's lives easier - be it a quirky tutorial, a life hack, or general home inspiration.
No result
View all results
This website uses cookies. By continuing to use this site, you consent to the use of cookies. Visit our Privacy and Cookie Policy. Accept.
Why is this light flickering?
A flickering light bulb is the electrical equivalent of a dripping faucet. At first it didn't seem like such a big deal. Of course, there is nothing to be upset about! This positive attitude will last about a day. Maybe two. After this, the flickering will begin to undermine your sanity. Next thing you know, you'll be throwing the flickering light bulb out the window. Along with the lamp... and the table it was on... and the piece of drywall it was set into...
It's a dark vision of the future, but it doesn't have to be your future. Not if you can stop the hellish flicker before it's too late. To do this, you need to figure out what causes the flickering in the first place. Once you do this, you will be able to see if you can solve the problem yourself. To figure out why your lights are flickering, try answering the following questions:
Is it free?
This is the most common and easily fixed reason why your light bulb may flicker. If a light bulb is not inserted into the socket correctly, it will periodically disconnect from the power source. When a light bulb flashes quickly and intermittently, it is constantly being connected and disconnected from the lamp's power source. If the light flickers whenever you push the bulb, the bulb is probably not working.
Fixing a loose light bulb is as easy as it sounds: just tighten it. Regular light bulbs are screwed into the lamps. Once they are fully tightened, the lamp receiver is securely connected to the lamp power source. To tighten the bulb, simply rotate the bulb clockwise in the socket. Allow it to cool before touching the light bulb! You should also be careful not to apply too much force to the glass of the bulb. Don't try to tighten it too much; If it is not easy to turn, then there is no need to tighten it.
2. Malfunction?
If the light does not wobble, but is constantly blinking, it may simply not be working properly. Incandescent light bulbs can stop working correctly for a variety of reasons. Contact problems, faulty wire connections, worn sockets, or a bad filament can cause flickering. Often these problems occur as the light bulb ages. They can also occur as a result of wear, incorrect voltage, or poor wiring inside the appliance.
If a faulty light bulb is indeed causing your flickering problem, replacing that light bulb should solve the problem. Replacing light bulbs is easy and relatively cheap. First turn off the lights. Wait for the bulb to cool, then unscrew the bulb from the fixture. Make a note of the wattage indicated on the light bulb so you can replace it correctly. Then simply discard the faulty bulb and replace it with a new one. If you have properly tightened the new bulb, your flickering should stop immediately.
Is this a light switch?
If you followed steps 1 and 2, the problem may not be a faulty bulb at all. In this case, the next thing you should troubleshoot is the light switch. A poor connection in your appliance's DIP switch can cause irregular flickering. Try gently moving the switch back and forth a few times. Just turn the switch enough to move the switch, but not enough to turn the light on and off.
If the light dims or flickers when you move the switch, the problem has been identified. If you have a bad light switch, the only way to stop the flickering is to replace the switch. How easily you can do this depends on the problem switch. If the switch connects directly to the lamp, repairing the lamp may help. If the switch is mounted to a nearby wall, the wiring will need to be rewired or repaired.
4. Is this a device?
If the switch and bulb work fine, the problem may be with the fixture itself. Try removing the bulb from the flickering fixture and try in a different fixture. If possible, you should also move the flickering light itself. Connect it to another power source and see if it continues to flicker. If the device flickers wherever you take it, then this is the problem. The lamps flicker if the internal wiring is faulty.
Again, how to solve this particular problem depends on the specific fixture. If the fixture is not directly connected to your home, then you can probably take it in for repair. For example, a lamp repair technician can repair the lamp's internal wiring with relative ease. However, if the appliance is connected to your home, you will need the help of a professional electrician.
This is not a complete list of reasons why your light bulb may be flickering. Incorrect home voltage, a faulty switch, or even poor wiring in the home can also cause infernal flickering. We've focused on these four possible causes because they're the easiest (and safest) to check for yourself.
Flickering light bulbs are not only annoying, but can also be dangerous. If none of the above problems explain why your light bulbs keep flickering, there may be something seriously wrong with your home's electrical system. If this happens, call Mike Diamond immediately. Our licensed electricians will quickly find and fix your problem.
.
What do we need
If you want to adjust the ignition timing of a VAZ 2106, then you do not need any special tools. Of the devices we will need to have:
- key to 13;
- spark plug key;
- voltmeter (as an alternative, you can take a 12 Volt light bulb).
Next, let's get down to the work itself.
Video advice on adjusting the ignition of the VAZ 2106:
