What is a tachometer for?
The tachometer is designed to measure the crankshaft speed. In essence, it acts as a kind of rotation counter, indicating their number to the car owner by moving the scale cursor to a specific angle. With its help, the driver, while behind the wheel, can observe the order in which the VAZ-2106 power unit functions. In addition, he sees whether there is excess load on the car or not. Based on the received data, it is easier for the driver to select the desired speed. Meanwhile, the tachometer is useful when adjusting the carburetor. Its parameters are taken into account when adjusting the idle speed, as well as the quality of the fuel.
Advantages of contactless systems
For an ignorant car enthusiast, the main argument in favor of BSZ is the fact that at the moment not a single manufacturer produces cars with a contact-cam spark generation system. Foreign brands abandoned it in the distant 80s of the last century, and in the Russian Federation mechanical ignition lasted until the 90s. The reasons for the refusal are quite clear:
- sparks constantly flashed across the contacts, causing them to burn and require frequent cleaning;
- the contact group wore out quite quickly, on average it was enough for 15-20 thousand kilometers, after which the element had to be replaced;
- the wear of the bearing on which the contacts were located made itself felt, which caused unstable operation of the power unit;
- the springs of the balance weights were stretched.
Non-contact ignition produces a powerful spark, which makes fuel burn better
All of the listed malfunctions appeared one by one, haunting the owner of the “classic” Zhiguli. Due to an imperfect design, the spark power of the spark plugs was constantly decreasing, engine performance was deteriorating, and fuel consumption was increasing. New BSZ systems are free of such disadvantages; they are characterized by durability and stable sparking. The spark power also increased, since the output pulse voltage increased from 16-18 kV to 24 kV, which contributes to better ignition of the fuel.
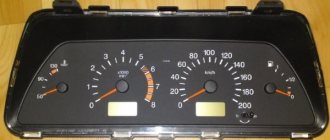
What tachometer is equipped with the VAZ-2106
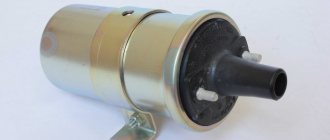
Domestic 2106 models were equipped with the same tachometer as the VAZ-2103. The sample was designated TX-193. Stability, clarity, excellent sporty style made it, in some way, an ideal automotive device. Such devices, which is not at all surprising, are now installed by many car owners in the form of auxiliary devices. In addition, they are equipped with motors in motorcycles and boats. In Zhiguli, VAZ models can be equipped with tachometers without modifications: 2103, 21032 and 2121.
How a tachometer works: principle, device
The “six” TX-193 includes:
- body in the form of a cylinder made of plastic with a glass holder;
- a scale divided into areas with dangerous/safe modes;
- backlight lamp;
- printed circuit board;
- milliammeter with a fixed pointer on the shaft.
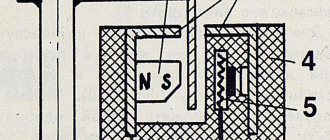
The structure of the TX-193 tachometer is based on electromechanics. Its operation was established by measuring the number of electric current pulses in the initial (low-voltage) circuit of the VAZ-2106 ignition circuit. An important point is that in the “six” engine, for one rotation of the distributor shaft, corresponding to 2 crankshaft revolutions, the contacts in the breaker close and open exactly 4 times. These pulses are removed by the device from the final output of the initial winding of the electrical device, that is, the ignition coil. Moving through the elements of the electronic board, their sinusoid-like appearance changes to a rectangular one with a constant amplitude. So, the voltage goes from the board to the mA winding (milliammeter), and depending on the frequency of the pulses, it decreases or increases. The device cursor reacts precisely to these changes. Thus, the higher the current strength, accordingly, the more significantly the arrow moves to the right and vice versa.
How to replace the instrument panel, also known as the dashboard, on a VAZ 2104, VAZ 2107?
Removal: 1) First, disconnect the terminal with the “-” value from the battery. (If you don’t know how to do this, then look at point “1” in the article entitled: “Replacing the battery”)
2) Next, use a screwdriver to pry off the three handles that are located on the interior heating control lever.
3) Then, by hand, unscrew the nut that secures the odometer reset handle. After unscrewing the nut, remove it, and also remove the washer that is located behind it. Once the nut and washer are removed, carefully push the protruding reset handle into the inside of the panel.
Note! In the photo above, the handle nut is indicated by a red arrow, and the tip of the handle itself is indicated by a blue arrow!
4) Next, using a thin flat-head screwdriver, pry out the cover of the panel mounting screw.
5) After the plug is removed, use a Phillips screwdriver to unscrew the screw that secures the instrument panel to the dashboard bracket.
6) And then move the far right part of the panel as far as possible, and then try to remove the left part of the panel, in this regard you will get maximum access to the entire rear part of the panel.
7) When the panel is retracted, unscrew the knurled nut of the speedometer drive cable by hand and then disconnect the cable from the rear of the panel.
 Now, from the econometric fitting, disconnect the vacuum supply hose by hand.
9) Next from the interior heating button, disconnect the wire connectors, two in number.
10) Then disconnect the three colored wire blocks from the harnesses located on the back of the panel.
11) Finally, remove the instrument panel from the car.
Installation: 1) Installation of a new instrument panel is carried out in the reverse order of removal.
Additional video clip: You can find more detailed instructions for removing and installing the instrument panel in the video clip below:
Connecting a carburetor-type tachometer: diagram
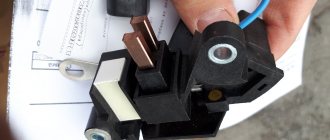
The electrical circuit of the rotation counter of carburetor VAZs is quite simple. The device itself has three main connection wires:
- directed to the “+” terminal of the battery through the contact link of the ignition switch (color red);
- to the mass of the vehicle (white wiring with a black stripe);
- to terminal “K”, which is on the ignition coil, combined with the breaker (color brown).
In addition, there are auxiliary wires that are intended for the following purposes:
- supplying current to the backlight lamp (white);
- linking with battery indicator relay (black);
- contact with the oil pressure regulator (color gray with a black stripe).
The wires are connected using the connector or separately. This is influenced by the year of manufacture of the device and its manufacturer. In turn, in a VAZ-2106 car (carburetor), which has non-contact ignition, the tachometer connection diagram itself is identical. An exception is when pin “K” is combined with contact “1” of the switch, and not with the breaker.
How to remove and replace the fuse box
Such an operation may be necessary to carry out repair work on a mounting block with fuses or when replacing an old design with a new mounting block. Removing this device does not seem to be a difficult procedure, so the task can be completed even by a novice driver. Difficulties may arise when you need to disassemble this unit.
Tools
To remove the fuse box, no special keys or tools are needed; a set of standard tools is sufficient.
To complete the work you should prepare:
- 10 mm socket wrench or socket;
- a Phillips-blade screwdriver;
- the same screwdriver, but with a flat blade.
In some cases, you may need a liquid like WD-40 or similar, rags, and pliers.
Step-by-step instruction
Before removing the fuse box, disconnect the battery and remove the air filter housing.
Next, the procedure will be as follows:
- Disconnect the connectors with wires that are connected to the bottom of the fuse box housing. The connectors are colored, so it is impossible to mix them up during assembly. If you have difficulty disconnecting, you can pry them off with a flat-head screwdriver.
- Now the front of work moves into the interior of the car. You need to detach the shelf under the front panel glove compartment. After this, remove the bottom of the glove box.
- The visible colored connectors with wires are disconnected from the fuse block.
- The housing is secured to the engine compartment with four bolts. They should be unscrewed using a 10 mm socket wrench or socket. If they do not budge, the bolts must be treated with WD-40 or similar.
- Now you can remove the fuse box housing into the engine compartment.
Installing a new or repaired unit is performed in the reverse order. Replacing the old VAZ 2107 fuse box with a new one is carried out similarly to the described example.
How the tachometer is connected to the VAZ-2106 using the injection type
In “sixes” equipped with engines with distributed injection, the connection will be slightly different. There is no switch, no ignition coil, and no breaker. According to the scheme, the device receives fully processed information from the ECU (electric engine control unit). It is the latter that reads data regarding the number of crankshaft rotations from a special sensor. In this case, the tachometer is connected to the power circuit via the ignition switch, vehicle ground, electrical control unit, and also the crankshaft position controller.
Mismatch between the TX-193 device and the contactless ignition circuit
Old samples of TZ-193 devices are designed purely for a contact system. Car owners of VAZ model 2106, who personally converted their cars to a contactless system, had difficulties with the tachometer. The reason is the different shape of electrical pulses that arrive at the device from the breaker (contact) and the switch (contactless system). The simplest solution to the problem is to install a capacitor in the section of brown wiring directed from the breaker. However, here you will need to empirically select the required capacity, otherwise the tachometer will show incorrect values. Therefore, if you are not eager to engage in experiments of this kind, simply purchase a device for a contactless system.
Where is the fuse box on the VAZ 2107, its diagram and replacement
The mounting block with fuses VAZ 2107 contains fuse links and electromagnetic relays. It provides protection for electrical consumers from damage in the event of short circuits in the circuits. The VAZ 2107 fuse diagram differs from the configuration of the same devices in earlier VAZ 2101-2106 models. Owners of this vehicle will benefit from learning about the location and maintenance of the advanced unit.
Location and diagram of power supply unit
How to remove and replace the fuse box
How to replace fuses
Comments and Reviews