The belt is the weak link of any transmission. Constantly rotating between the pulleys and transmitting torque, the element gradually wears out and its tension begins to weaken. Over time, slippage and accelerated abrasion of the rubber product occurs, leading to its breakage. Engine oil or coolant (or both) that has gotten onto the working surface can loosen the belt prematurely.
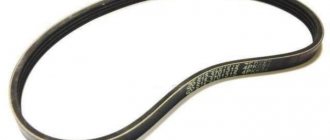
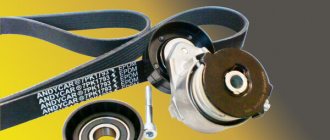
Reference. In different brands of passenger cars, 3 types of alternator belts are used - standard V-shaped, multi-ribbed and toothed.
When it is necessary to check and tighten the belt drive:
- It is worth checking the belt at every opportunity when you open the hood of the car. On the vast majority of machines this will not be difficult - just reach out and press on top of the rubber product.
- If when the engine is running, especially after pressing the accelerator pedal, a loud, unpleasant squeak is heard from under the hood. The sound clearly indicates the belt drive is slipping on the pulleys.
- You should check the tension of the alternator belt when the red battery charging indicator on the dashboard periodically lights up.
- After disassembling and repairing the power unit, which involves removing this unit.
Slipping or breaking the belt does not have fatal consequences, but significantly reduces the battery life. When the generator shaft rotates intermittently or does not rotate at all, the on-board network receives voltage from the battery. Since decent power is needed to spark and power the systems, it discharges to zero quite quickly. Restoring the charge of a completely dead acid battery is quite difficult, and often impossible.
On some car models, a belt drive is used to rotate several pulleys at the same time - the generator, power steering pump, air conditioning compressor and water pump. Consequently, its slippage or breakage will affect the operation of these units. The danger is that the pump stops (the engine may overheat) and the power steering pump - the driver will not have time to adapt to the sharp increase in load on the steering wheel and may get into an accident. Therefore, it is better to check and tighten the alternator belt in a timely manner.
Guide on how to tighten or loosen the alternator belt
To ensure high-quality operation of the generating device, you need to regularly check the tension and know how to tighten the generator belt and how to loosen it, depending on the condition of the product.
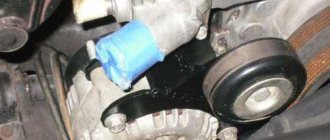
The order of work depends on the design of the vehicle. Below we consider the adjustment process on VAZ models, where the strap is tensioned by the tensioner bolt. In many modern car systems, an alternator belt tensioner is installed for this purpose. In this case, the order of work is different. This is discussed briefly after detailed instructions for VAZ models.
Set of tools
To adjust the tension of the electric generator drive, you need tools, the composition of which depends on the design of the installed drive.
Most often you may need the following tools:
- a set of keys;
- ratchet;
- set of heads;
- knob;
- extension;
- mount.
Sometimes it doesn’t hurt to have an assistant, since nuts and bolts are sometimes difficult to unscrew yourself.
Stages
Adjusting the drive of the generating device consists of the following steps:
- First you need to loosen the nuts securing the electric generator.
- Using a “10” key, turn the screw of the tensioner mechanism, with which the tension is adjusted. In this case, the housing of the electric generator should be shifted toward the front of the car if the strap needs to be tightened, and in the opposite direction if it needs to be loosened.
Drive Tension Adjustment
- By rotating the tensioner screw, you need to control the deflection of the strap. As soon as it meets the standards of the generating device installed on the machine, you need to tighten the nut on the adjusting rail.
- After tightening the fastening nut, you need to turn the crankshaft a couple of turns and check the deflection again. If everything is normal, you should start the engine and listen to how it works. There should be no extraneous sounds. The strap should rotate without deflection or shifting.
These instructions are intended for adjusting the tension on VAZs such as Lada Kalina. On a car with a tension roller installed, the adjustment scheme is slightly different.
Scheme with tension roller
Tensioning and loosening is carried out using a tension roller. Having placed the key on it, you need to turn it clockwise to pull the generator belt tensioner to loosen it. If it is necessary to tighten, then turn the roller counterclockwise.
Adjustment is a simple procedure and can be performed even by a novice driver; you just need to know how to tighten the alternator belt and how to loosen it. If you carry out repairs yourself, this will allow you to save time and money on visiting a car service center. In addition, you gain invaluable experience that will be useful along the way. Unpleasant surprises on the road will not take you by surprise.
Signs of a faulty alternator belt tension roller
First, make sure that the alternator belt tensioner pulley needs to be replaced. Signs of its malfunction are listed below:
- the generator does not fully charge the on-board network or it does not receive electricity at all;
- from the side where the belt is located, a sound similar to squeaking is heard;
- a hum is heard;
- the roller or belt vibrates a lot when the power plant is running;
- there is play in the video;
- The belt is worn on one side.
Some of these symptoms may indicate a problem with the components that drive the roller. A hum and squeaking noise may indicate wear on the bearings of the power steering pump, air conditioner or compressor. The malfunction may lie in the generator itself.
If the belt is not tensioned correctly
If the belt is loose
It often happens that the belt becomes loose during use. In this case, with weak tension, it will slip in the grooves of the pulleys. And, if the belt slips, then there is nothing to rotate the generator shaft, no one is forcing it. And, if the generator shaft rotates slowly or has stopped altogether, then it will not generate electric current. Hence the lack of energy for the power supply system of the car’s electronic devices, which are becoming more and more numerous every decade. There are all sorts of sensors that are not currently available in modern cars and trucks.
When slipping occurs, both the generator and the belt suffer. The belt heats up due to friction, gets peeled, and scuffs, scratches, and cracks appear. From this we conclude that the service life of the product depends on the method of operation.
If the belt is overtightened
If the alternator belt tension is strong, the belt wears out even faster than if it is weak. The belt, okay, is worn out, replaced, but an overtightened belt wears out the crankshaft and generator shaft bearings even more. In this case, the service life of the belt will not reach the declared one. If little or more current is supplied to the battery, then the problem is in the voltage regulator relay. The check is easy to do.
Tension using adjusting bolt
Adjustment with a bolt on a VAZ-2110
This method is more progressive and is used in most modern machines. It is based on the use of a special adjusting bolt , by turning which you can adjust the position of the generator relative to the engine. The algorithm of actions in this case will be as follows:
- loosen the generator, its upper and lower fastenings;
- Using the adjusting bolt, we change the position of the generator;
- fix and tighten the generator mount.
The belt tension level in this case can be determined during the adjustment process.
Is it possible to continue driving if it is torn?
In principle, the car will continue to move without the alternator belt. But you won’t be able to go far in such a car. Indeed, in this case, all electrical equipment is powered by a battery, and its reserves, even if it is super-powerful, will not last long.
However, there are engines in which this part drives not only the generator rotor, but also the pump. The operation of such motors in the event of a break is strictly prohibited, since stopping the pump stops the water circulation in the engine cooling system, and this will lead to its overheating and failure.
An overheated engine can seize, have bent valve pins and even damaged pistons. In any case, it will have to be overhauled.
Checking, adjusting and replacing drive belts
During use, the drive belts gradually stretch under the influence of the generator, water pump and fan (if equipped). In addition, the condition of the belts depends on their age and the degree of curl.
Operating principle of drive belts
The belt is attached to a V-groove pulley and drives the generator and water pump/fan by transmitting rotational motion from the crankshaft.
Stretched belts often slip and jump off the pulleys. Cracked belts will eventually break. It is necessary to check the tension and general condition of the belts at least once a month.
A broken belt is usually indicated by an ignition warning light or a stoppage of the generator.
An overheating engine or a suddenly discharged battery may indicate that the belt is sagging or has slipped off the pulley.
As a rule, the belt slips when the generator is heavily loaded - for example, when the headlights and rear window heater are turned on at the same time. In this case, the warning light does not come on, but the battery does not charge to its full capacity and eventually wears out.
Overheating caused by belt slippage interferes with the operation of the water pump and fan.
In addition, under the influence of excess temperature, the belt itself wears out much faster. As a rule, its inner surface cracks first.
On the other hand, excessive belt tension increases the load on the generator and pump gears, which causes premature failure.
Before checking the belts, remove the ignition key to prevent possible injury from the engine suddenly turning on.
During the initial check, carefully inspect the belt and feel its inner surface to identify damage. For a more thorough inspection, remove the belt and bend each section one by one to expose possible cracks.
If cracks, abrasions, tears or bulges are found, the belt must be replaced. The V-grooves on the pulleys also need to be inspected. Make sure they are not causing damage. The grooves must be clean, smooth and level. Make sure that they are completely aligned with the belts and do not twist them.
Any discrepancy usually means that the generator was not secured correctly.
Intermediate wheel tension mechanism
Some cars have an auxiliary mechanism that allows you to quickly and accurately adjust the degree of belt tension. Loosen the nut on the adjusting screw and turn it until the belt is tensioned to the desired degree. Fasten the nut and check the tension.
Typically, a sagging or slipped belt produces a high-pitched squeal. This sound changes depending on the engine speed.
Do not try to fix it by lubricating the belt with oil. This may cause unexpected damage and breakdowns. Additionally, a sticky and wet belt will still squeak even after adjustment.
A broken belt, indicated by the ignition warning light, can severely damage other parts.
For example, its dangling ends often touch electrical wiring elements, cut hoses, or even pierce the radiator. If you suspect a rupture, turn off the engine as quickly as possible.
Composite pulley
Where the generator is attached to a fixed support there is usually a composite pulley that allows you to remove or adjust the belt. The design includes two concave disks fastened together and several spacers (washers).
The illustration shows the outer half of the pulley with the nut, spacer, and extra washer.
Checking belt tension
Find the middle of the belt by measuring the distance between the pulleys using a ruler.
Find the middle of the belt by measuring the distance between the pulleys using a ruler. Grasp the middle with your index finger and thumb and move the belt from side to side.
Notice how much it deviates from its original position.
The normal deviation is approximately 13 mm. If the deviation is greater, the belt should be tightened; if it is smaller, it should be loosened. If necessary, check your vehicle's manual.
Adjusting the Drive Belt
To tighten the belt, move the generator away from the engine using a piece of wood or a tube.
Adjustment is usually made using a bolt located where the generator is attached to the engine.
The mount is movable, so the generator can be moved to the side. However, it should be remembered that the trajectory of movement is limited by a metal plate screwed to the free edge of the generator.
The belt is adjusted by unscrewing the mounting bolts and the plate that ensures free movement of the generator.
Loosen the bolts on the generator and adjusting plate.
Place a strong piece of wood (such as a hammer handle) under the generator, and then tighten the belt.
After this, tighten the bolts on the plate, holding the generator in position. Check the belt. If it is tensioned correctly, tighten the bolts on the alternator.
Check the belt tension by holding the generator in the desired position. If it is tensioned correctly, tighten the bolts.
If you need to loosen the belt, unscrew the bolts on the generator a little so that it can be moved away by hand. Gradually move the alternator towards the engine until you feel the belt is sufficiently tensioned.
After this, tighten the bolts on the generator and plate.
Some cars have a tension mechanism that presses the belt to the wheel. In this case, it is necessary to remove the adjusting bolt, turn the wheel and check the belt tension. As a rule, this method is less difficult than moving the generator.
Adjusting the belt on a compound pulley
Remove the nut or nuts that hold the pulley parts together.
Remove the front part, remove or install washers to narrow or widen the gap between the pulley parts.
As the gap narrows, the belt moves away from the center toward the shoulders of the pulley and tightens. As the gap widens, the belt moves toward the center and the tension weakens.
Remove the front piece and use one washer to tighten the belt. If you need to loosen the tension, add one washer.
Be careful not to pinch the belt between the pulley parts when reassembling.
Install the front pulley piece and secure it with the nut.
Tighten the nut a little, turn the engine a third of a turn, tighten it again, etc. until the parts fit tightly enough.
After this, check the belt tension.
Replacing the drive belt
The new belt is bent on the upper pulley. Don't try to pry it off with a screwdriver.
Shops and service stations that sell fans and drive belts always have lists of spare parts suitable for the most popular brands of cars. Buy a belt of the right size and quality.
Alternator belts are usually stronger and more expensive than dynamo belts, but if you try to use the wrong belt, it will quickly wear out and break suddenly.
If the belts you need are not available, contact your supplier for advice. Don't forget to bring your old belt with you for comparison. When purchasing a different belt than an old one, make sure that its specifications match the requirements of your vehicle.
If the pulleys are located in the front of the car, replacing the drive belts is not particularly difficult. If the engine is located at the rear (as, for example, in a Mini), the work becomes more complicated, because access to the belt is blocked by the fan casing or other parts. In some cases it is necessary to remove the casing (at least partially).
To remove the old belt, loosen the fastening on the generator support and move the generator as far as possible towards the engine.
After this, you will most likely be able to remove the belt from the upper pulley (at the water pump). Remove the belt from the pulleys at the generator and crankshaft and lift it above the fan. If the fan has a shroud, try to slide the belt between it and the fan blades.
If the fan has viscous clutches, rotate the crankshaft pulley to release the belt.
To install a new belt, perform the steps in reverse order. In some cases, the belt needs to be pulled over the top pulley.
Place the fan belt on, making sure it fits snugly into the grooves on the lower pulleys. Pull the belt as tightly as possible over the top pulley, and then slowly turn the fan while pressing down on the edge of the pulley with your thumb. Be careful not to pinch it with your belt.
If your vehicle has an electric fan with viscous clutches (see How the Engine Cooling System Works), you may have to turn the engine a little to tighten the new belt because With this design, the fan pulley does not rotate the crankshaft pulley, and it is impossible to tension the belt by other means.
If the fan has viscous clutches, rotate the crankshaft pulley to release the belt.
Typically, the engine can be turned using a wrench on the crankshaft pulley.
Do not use screwdrivers or similar tools to guide the belt onto the pulley. If the belt cannot be tensioned using the normal method, it is too small and you will need to look for another one.
If you need to remove the belt from the compound pulley, use the method described in the adjustment section. When installing a new belt, first install all the necessary washers, then check the tension and remove the unnecessary ones.
When first used, all new belts stretch, so it is recommended to re-check after 300 km (or in accordance with the manufacturer's recommendations).
Replacing the tensioner and tension roller
If during the inspection it is possible to establish the cause of the symptoms described above, you should proceed directly to the repair and replacement of worn-out mechanisms.
The first immutable rule is that during a planned replacement, it is necessary to diagnose the bearing; in normal condition, the tensioner roller rotates quietly, easily, without play or jerking. If it is clear that the life of the roller is exhausted, it is necessary to change this unit.
Actions necessary to independently replace the alternator belt or tensioner, which do not require special devices and tools:
- de-energize the car body by disconnecting the terminals from the battery;
- secure the crankshaft against possible rotation using the necessary devices or a simple pry bar;
- Having unscrewed the bolt responsible for the tension force, loosen the generator belt;
- remove the belt and tensioner pulley, if a bracket is provided, unscrew the bolts securing this mechanism;
- replace failed components and install new components in the reverse order.
The tension force of the newly installed belt after repair should be given special attention. If it turns out to be overtightened, then the load on the bearing will contribute to its rapid wear. The required tension can be checked using a suitable device or manually. In the case of manual testing, the belt should turn ninety degrees without force, with lateral influence.
On some brands of cars, instead of several belts that facilitate operation (hydraulic booster, air conditioning, generator, etc.), there is one installed, the load on which is regulated by an automatic tensioner. In this case, not only the degree of charging of the generator, but also the operation of the cooling system and the condition of the power steering depend on the condition of the belt and its tension. In this automatic tensioner, the main element is a spring that maintains a certain degree of tension. When the time comes to change the belt, you should replace the entire automatic tensioner, regardless of the condition of the bearing, since this unit cannot be repaired.
I opened the hood and heard a creak coming from the alternator belt, I thought it was all screwed up! =) I called a friend and he told me to spray it with WD. I took out WD-40 and sprayed it on the alternator belt tension roller, and the sound disappeared! I think, okay, a little dirt flew in, but after 2 days the sound began to be heard again. Moreover, the funny thing is that the creaking was only when the engine was cold started; after warming up, the creaking almost completely disappeared. Unfortunately, I didn’t have time to record the video, but I found a very similar sound on the Internet, or rather exactly the same! =)
I drove like this for two weeks, then I stopped by a friend who is experienced in this matter, KaSHkon =)
And so let’s begin: Since I have a 16 valve engine with air conditioning, it’s very difficult to crawl up to replace the roller.
After you have loosened the belt you need to (just loosen the belt, no need to remove):
-assemble everything in reverse order.
Conclusion: -The reason most likely for such dirt in the video was that the previous owner drove daily from Khomutovo to work in Irkutsk, a distance of 20-25 km, muddy puddles, bad road. Plus, the most important thing I think is the LACK of engine protection!
Well, the play is clear that this is a consequence of dirt. -Although there is another option that the roller is bad (Chinese), and one of the bearings is overexpanded...
But still, buy protection without hesitation! =)
Price: 250 ₽ Mileage: 36900 km
Alternator belt tension
All parts of a car’s design have their own specific lifespan, which depends on the quality of the material and manufacturing technology. The drive for the generator is a belt. An optimally tensioned belt will last longer. When purchasing a belt, its service life is usually indicated, but if it is overtightened or short, the service life will be less than expected, and besides, an incorrectly tensioned belt will quickly break the rollers, crankshaft bearings and the shaft bearings of the generator itself.
articles:
If the belt is loose
It often happens that the belt becomes loose during use. In this case, with weak tension, it will slip in the grooves of the pulleys. And, if the belt slips, then there is nothing to rotate the generator shaft, no one is forcing it.
And, if the generator shaft rotates slowly or has stopped altogether, then it will not generate electric current. Hence the lack of energy for the power supply system of the car’s electronic devices, which are becoming more and more numerous every decade.
There are all sorts of sensors that are not currently available in modern cars and trucks.
When slipping occurs, both the generator and the belt suffer. The belt heats up due to friction, gets peeled, and scuffs, scratches, and cracks appear. From this we conclude that the service life of the product depends on the method of operation.
If the alternator belt tension is strong, the belt wears out even faster than if it is weak. The belt, okay, is worn out, replaced, but an overtightened belt wears out the crankshaft and generator shaft bearings even more. In this case, the service life of the belt will not reach the declared one. If little or more current is supplied to the battery, then the problem is in the voltage regulator relay. The check is easy to do.
Checking the tension of the generator belt
Each make and model of car has its own optimal alternator belt tension values. In the repair and operating instructions for a particular machine you can find information on what value to use to set the correct tension. There are plenty of manuals in electronic form, for those who don’t have the book.
THIS IS INTERESTING: How long does it take to change the pads?
Not only the operation of the generator, but also additional equipment, for example, air conditioning, power steering, etc., depends on the tension of the belt.
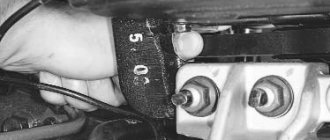
For most machines, the formula for determining the correct tension is as follows: press the middle of the belt between the pulleys with your hand with a force of 10 km. In this case, the belt can only be pushed down 1 centimeter.
For example, a VAZ 2115 has a standard generator 37.3701 and sometimes a generator 9402.3701 is installed. If the generator is code 37.3701, then with a force of 10 kg on the middle of the belt, the belt should bend from 1 cm to 1.5 cm. And, if the generator is 9402.3701, then with the same force, the belt should bend from 6 mm to 10 mm.
Why does the belt whistle?
Many people have probably heard the sound coming from under the hood of a car. This is exactly the same sound that the generator belt makes when slipping along the grooves of the pulleys. Some cars will notify the vehicle with signals on the instrument panel, for example, a low battery light may come on.
From time to time you need to open the hood and inspect the condition of the engine and other structural elements in the car body. By visual inspection and by touch, if the belt is hanging or overtightened, depending on the make and model of the car, you need to correctly tension the belt yourself using an adjusting bar or an adjusting bolt.
How to tighten the belt with the adjusting bar
The unit design with a bar is an outdated model. Old VAZ cars have such a bar for tensioning the belt.
In this case, the generator is secured using an arc-shaped strip. This bar has a slot, allowing it to move relative to the bolt.
Sequencing:
- Loosen the nut.
- Using a pry bar or something like that, we move the generator.
- After setting the desired tension, tighten the nut and the arc-shaped bar is fixed.
- After tightening the nut, check the tension again.
How to tension a belt with an adjusting bolt
This is the most common design for mounting the generator and belt tension. The work sequence is as follows:
- Loosen the upper and lower fastenings of the generator.
- By unscrewing or tightening the adjusting bolt, we move the generator and set the desired belt tension.
- Tighten the generator mounting bolts.
- Check the tension again.
How to tension a belt with an adjusting roller
Some designs have a special roller for adjusting tension. It makes adjustments faster.
As an example, let's look at how to tighten the belt on a Lada Priora with air conditioning and power steering.
Tools:
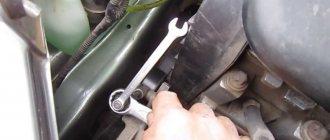
- An open-end or socket wrench size 17 is required to loosen and tighten the roller.
- Special key. Who has seen how the separator cones are unscrewed to separate milk from sour cream, the key is exactly the same in shape. The distance between the teeth of a special curved key is 18 mm.
First, use a 17mm wrench to unscrew the bolt and loosen the roller. Then use a special wrench to loosen or tighten the belt. Then we fix the video.
After adjusting the tension of the generator belt, you need to start the engine, turn on the car electronics and observe whether there is a whistling sound from the belt, whether all devices are working (is there enough current being generated by the generator).
How long does it take to tighten the alternator belt?
Basically, the belt should be tightened every 15 thousand kilometers. And the alternator belt should be changed every 60 thousand kilometers. The belt gradually stretches by microns as it is used.
Belt tension on Nissan, Chevrolet, Kalina, UAZ, Gazelle, Renault, Granta, Toyota, Ford Focus, Opel, Mazda, Niva, VAZ 2107, VAZ 2110 cars is carried out using the methods discussed above, only some cars have automatic belt adjustment using built-in springs .
How to change the alternator belt tensioner pulley?
As an example, consider the Chevrolet Lacetti. This car is quite popular in Russia. It can be found on many trading platforms. In addition, this car has a typical design compared to other cars. The Chevrolet Lacetti is equipped with a self-adjusting tension roller with a bracket.
To replace the roller, you will need the following set of tools: a set of open-end wrenches and sockets with gates. The installation sequence is presented below:
- The air filter housing is removed from the engine. This is done to provide access to the belt.
- The power steering pump is unscrewed. After this you can get to the video itself. To get to its mounting bolts, it is necessary to remove the exhaust manifold protective screen from the engine.
- After the screen has been removed, the power steering pump bolts are unscrewed. The pump moves to the side to provide access to the roller. After unscrewing, you can remove the belt from its pulley. The pipes going to the pump do not need to be removed.
- Before unscrewing the roller, it must be brought into the mounting position. To do this, the roller moves, overcoming the force of the spring before the locking holes on the bracket body are aligned. Next, the roller is locked in the same position using a bolt or splitter installed in the hole.
- The bolts securing the bracket and roller are unscrewed. The roller is removed. The new element also needs to be moved into its installation position. After this, it is installed in the structure and secured with bolts.
- The power steering pump together with the protective screen are secured and installed in place. The belt is put on the pulleys. To do this, use a photo with the correct position of the belt.
- The locking bolt or cotter pin is removed. This is done so that the spring produces the necessary belt tension.
On other models, replacing the alternator belt tensioner pulley may be slightly different. Most often, on cars with eccentric rollers, tensioning is carried out using a special key. With this wrench, the roller is rotated around the pin for tension purposes.
Tensioning the alternator belt: diagram of how to check how to properly tension the belt
Incorrect alternator belt tension can cause a lack of charging. The ability to determine the correct tension force will be useful both for do-it-yourself repairs and if the low battery level indicator lights up on the dashboard.
What does tension affect?
Excessive force will lead to rapid failure of the generator bearings. A breakdown in the initial stage manifests itself as a hum from the generator. When replacing a belt, it is advisable to check the condition of the bearing. To do this, unscrew the pulley by hand. Rotation should occur evenly and silently. If a hum still appears during engine operation, you can remove the belt, and then for 10-15 seconds. start the engine. This way you can determine whether the noise is coming from the alternator bearing or timing rollers.
Insufficient tension leads to belt slippage and accelerated wear. The first sign of such a malfunction manifests itself as a squeak when cold or when wet. Excessive stretching will result in no charging. This is why it is important to know how to check the tension of the alternator belt.
Types of construction
There are two types of generator drive:
- individual - the generator is connected to the crankshaft pulley by a separate belt drive. The tension is carried out using a special adjusting bolt, the rotation of which will move the generator away or closer. In other cases, the force is regulated by the position of the body;
- common - one service belt is used for the generator, crankshaft, cooling system pump and power steering pump. In this case, the force is set automatically by the tensioner, which is fixed with a special roller.
How to determine the correct tension level:
- Using a ruler, the difference between the resting and tensioned positions is measured. In this case, the applied force, the measuring point, as well as the standard difference are indicated in the vehicle repair and operation manual. The photo shows a diagram for a Chevrolet Niva. You can measure the tension at points A and B, that is, in the middle between the pulleys in the most convenient place for you. The measured value for point A should not exceed 10-15 mm, and for point B – 12-17 mm. The applied force (98.1 N, that is, 10 kgf) can be measured by tensioning the belt using a hand-held spring scale;
- twist test. If you do not have accurate information about tolerances, you can use the traditional method. It is considered that the generator belt is tensioned correctly if it cannot be twisted around its axis by more than 90º in the middle of the generator pulley and the crankshaft. The degree of effort exerted is difficult to describe, but with experience this feeling comes automatically;
- using a frequency meter. Owners of VAZ cars have probably heard about the Lada Norma-Pinar device. The device is designed to measure vibration frequency. The data obtained allows us to determine the degree of tension. To check, you need to bring the sensor to the belt, and then run your finger along it, like along a guitar string. The automaker regulates the normal frequency for each internal combustion engine model. This method is used infrequently, since purchasing a device for repairing a personal car is impractical. But such a device can be built with your own hands.
Tension
Let’s look at how to properly install a car’s alternator belt using the example of two types of construction:
- loosen the tensioner bolt by unscrewing the locknut. Rotating the bolt itself will tighten and loosen the belt. After setting the tension, secure the tensioner bolt with a wrench and tighten the locknut;
- loosen the bolts securing the generator to the brackets. Place a pin between the generator housing and the engine. Pull the belt using lever force, after which you can tighten the generator fastenings;
- in systems with a single service belt drive, tensioning can be carried out automatically. The design contains a special tensioner, to loosen it you need to loosen the roller bolt and then remove the tensioner using a wrench.
In the case of a ripple belt, start and stop the engine before making a final check of the tension level. This will ensure that the belt is in the correct position in the pulley grooves.
We recommend: What to do if the sound signal on the VAZ 2106 does not work
Consequences of incorrect tension
If you do not tighten the drive belt in time and it becomes loose, this will lead to a decrease in the battery charging current parameter. If the charge strength is low, the battery consumes its own resource, as a result of which the service life of the device decreases. As a result, destruction of the internal plates or a short circuit occurs. If the battery is maintenance-free, then it will have to be replaced; it cannot be repaired.
This is interesting: What kind of oil and how to fill it in the power steering: useful tips and recommendations
Too weak a tension will cause voltage surges in the machine’s on-board network. For older cars this problem is not critical. But in new models equipped with many electronic devices and systems, electrical equipment will fail. In particular, the engine ECU will break, and repairs will be expensive. An insufficiently tensioned drive belt will jump off the shaft when rotating at high speed, and can sometimes puncture the hood.
With a strong tension, a high load is placed on the rubbing units and components of additional units. The constriction can be indicated by a hum that is uncharacteristic of the functioning of the motor; usually the noise is made by the tension roller. Sometimes the noise comes from the bearings of the generator set, the air conditioning compressor, or the hydraulic power steering system. The source of the noise may be the bushing of the water pump device.
What happens if you drag
Not all motorists know what will happen if drivers overtighten the belt during tensioning. Increased load increases wear on the unit. It manifests itself in the form of a characteristic hum from an electrical appliance. The main noise comes from bearings and rollers, which will create increased tension. Due to pinching, it will be more expensive to repair the water pump or air conditioning compressor involved in the circuit. It is worth paying attention to the special marks used by manufacturers to monitor tensioner wear and timely replacement of the belt.