Do-it-yourself replacement of generator brushes on a Priora
For electrical problems, basic differential diagnosis is necessary to separate brush wear from diode bridge failures, wiring shorts, faulty air conditioning or other equipment.
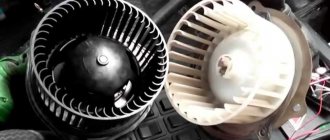
The brushes of the Priora generator are located in the voltage control unit and are responsible for regulating the on-board network current. Gradually they wear out and need to be cleaned or replaced.
Changing the generator brushes, process sequence
It is quite possible to replace the alternator brushes on a Priora that have worn out without removing it. But, according to experts in their field, the process is simplified if replacing the generator is preceded by removing it from its usual location.
Important! When carrying out any work on the generator (replacement, repair, etc.), be sure to disconnect the battery.
After removing the generator on the Priora, replacement is carried out as follows:
- Use a screwdriver to remove the plastic cover, which is designed to protect the device. Having done this, you gain access to the brushes;
- disconnect the connecting plug from them;
- slowly unscrew both fasteners (they are located along the edges of the elements that are inspected);
- Take the above key and unscrew the locking bolt. Do this in the center of the element;
- Having unscrewed all the fasteners, remove the brushes, inspect them, assess their condition and replace them with new ones, connect the wires.
What are the signs that indicate that the generator brushes have become unusable?
The following external “signs” will help with this:
- if, upon examining this element, you find that its length is less than 5 mm, it certainly requires replacement;
- if the brushes are worn unevenly, this will also negatively affect the functioning of the generator, so they need to be replaced.
There is no need to skimp on buying new brushes. If you find a cheap option, it is highly doubtful that they will last long. It is more likely that such savings will lead to the need to re-replace the above-mentioned components.
What signs will indicate that the generator brushes are faulty?
The following external signs will help you understand that the generator brushes have become unusable on a Priora with power steering or air conditioning:
- length of the element being inspected;
- if upon inspection it is discovered that the length of the brushes is less than 5 mm, they must be replaced;
- Replacement will also be required if the appearance of the brushes indicates uneven wear, that is, one element is heavily worn out, and the second is brand new. Uneven wear of these elements will certainly negatively affect the operation of the generator, so experts recommend replacing them without fail.
The cost of new components for the Priora does not exceed 150 rubles; of course, you can also find cheaper brushes for the generator, but it is unlikely that such elements will serve faithfully for a long period of time, and such savings will lead to a repeated procedure for replacing these components.
Once high-quality brushes have been purchased (it is advisable to give your choice to well-known manufacturers), you can begin assembling the entire element and installing the generator in its original place. But as was said earlier, such a process can be carried out without removing it, which, of course, must be decided by each car owner independently. These operations, as many understand, are performed in reverse order, and after the final stage it is necessary to check whether the entire generator is working efficiently.
How to stabilize voltage
We ourselves are to blame, but there are certain complaints about the standard voltage regulator. He, poor thing, cannot take into account the mass of tasks that we pile on his little head in the process of improving the car and adding various devices. A new solution has appeared, especially relevant in VAZ cars of the tenth family and above. Not because these cars are most often stuffed with additional devices, but because the generator and relay regulator are designed close to the rated current consumption.
The three-level voltage regulator VAZ 2110 works in close conjunction with the generator. There is no need to remind that the generator produces an electrical direct current of variable value. That is, the higher the engine speed, the greater the output voltage the generator would produce, and this is not useful for all devices. If there were no voltage regulator, it would jump in the on-board network from 10 to 16 volts and higher, and this is unacceptable for most instruments and devices.
How to change the brushes of a Priora generator without removing
Often, replacing generator brushes on a Lada Priora is done with your own hands. First of all, this is due to savings. Many car services charge a significant fee for this procedure. With the average cost of replacing this part on other VAZ models being 400-500 rubles, for Lada Priora they will charge 2500-3000 rubles for such a service. This is explained by the fact that the generator needs to be removed, and sometimes other parts in the engine compartment will have to be unscrewed. So it turns out that replacing generator brushes on a Priora at a service station costs as much as half a new generator , which is not very cost-effective.
The process of replacing brushes without removing the generator
So, if you decide to replace the brushes with the regulator yourself, then the algorithm of actions is as follows:
- Disconnect the battery.
- Remove the power wire from the generator.
- Disconnect the control lamp input.
- Remove the plastic cover of the generator by unlatching the three latches.
- Unscrew the two fastenings of the voltage regulator with brushes.
- We change the node.
- Putting everything back together.
- Optionally, you can check the battery charging voltage and compare it with the values shown by the on-board system.
Priora generator brushes: how to replace correctly and do it yourself
If the owner of the Priora notices that the charge from the battery is disappearing, first of all, he needs to check the condition of the generator brushes. Of course, at first the charge decreases insignificantly, but if the problem is not corrected in time, the charge will very soon disappear altogether. Replacing the brushes of the Priora generator, which are clearly worn out, will help correct this problem.
Important! The brush mechanism of the generator on the Priora cannot be repaired. If any breakdown occurs, only a replacement along with the brushes will be required.
Since this process is not so complicated, you can do everything yourself. You just need to take into account the recommendations of professionals.
Replacing Priora generator brushes
- 831 13 700k
- 258 1 252k
Current to power conversion calculator
Convert how many amperes a kW has online. Calculator for converting ampere current to watt power The generator cannot be called the weak point of the Lada Priora. In fact, at intervals of about 150,000 kilometers, only the brushes need to be changed. The nuance is that it is impossible to replace the brushes themselves in the Priora. And depending on the vehicle’s configuration, this procedure can be either quite simple or very complex. Or it will require removing the generator altogether.
Therefore, in the article we will look at what brushes are used on the Priora, and how they are changed in cars with and without air conditioning, as well as without removing the generator or dismantling it.
Types of generator brushes
Brushes differ by generation of Lada Priora, type of generator, presence of air conditioning, type of engine (16 or 8 valves). The more consumers of electricity (climate system, electric power steering, heating), the greater the current strength the unit must support, therefore the critical characteristic of the device is its amperage. There are 14V versions:
The popular choice of Prior owners are:
- BATE 90 A;
- KZATE for 115 A;
- "Bosch" 120 A;
- developed by VAZ for 115-120 A.
Each model has its own brush units, although some are compatible within the family.
Brushes for the Priora generator 16 cl. Photo source: https://www.drive2.ru/l/497298115200549291/
For example, a regulator with article number K1216EN1 is suitable for VAZ 2170 generators:
It is also suitable for some other modifications.
There is also a new type of relay on sale with the index number 3202:
How to replace brushes on a Priora generator without removing it
All dynamos installed on Russian Priors are convenient in that the brush mechanism can be replaced without removing the unit itself from the car. This is not a very complicated operation, accessible to almost any car owner who knows how to hold tools in his hands. The replacement is carried out in several stages.
- Battery disconnection.
- Removing the power wire with a 10mm wrench from the generator.
- Disconnecting the test lamp input from the connector.
- Removing the rear plastic cover with snaps.
- Using a screwdriver or wrench, unscrew the 2 bolts or nuts securing the brushes.
- Replace the brush mechanism with a new one, connecting the wires.
- Reassemble in reverse order.
After replacing the generator brushes, be sure to measure the flow of charging current to the battery with a voltmeter and compare it with the readings on the Priora instrument panel. We need to make sure that its work is objective.
In the video you can watch a repair involving the replacement of a relay with brushes on a Priora generator:
Replacing brushes with removing the generator on a Priora with air conditioning
Removing the generator through the headlight
In the case of a Priora equipped with air conditioning, one nuance arises - the compressor of this very air conditioner interferes with dismantling the generator. This complicates the process and makes it more energy-intensive and expensive (if done at a service station). This also explains why many choose the procedure without removal - because removing the generator on cars with air conditioning is quite difficult. Otherwise, the replacement algorithm is no different.
An alternative replacement option without removing the air conditioning compressor is to dismantle the generator and remove the headlight. To do this, you need to remove the protection over the optics, loosen the bumper fastenings, dismantle the headlight and thus gain access to the Priora generator to remove it.
How to change the generator on a Priora?
The generator in the car allows the battery to charge while driving and powers the entire on-board network; if it malfunctions, the car will only drive until the energy reserve in the battery is used up. As soon as this happens, the car will stall, so if a fault is detected in the generator, you should immediately go to a service center or park the car near the house to figure out how to change the generator on a Priora. This is easy to understand; everything will be immediately displayed on the battery charge lamp; if it lights up on the panel, this is a clear signal that it’s time to go for repairs. Or - do everything yourself. If all else fails, you can contact a car pawnshop)))
Changing the generator brushes, process sequence
It is quite possible to replace the alternator brushes on a Priora that have worn out without removing it. But, according to experts in their field, the process is simplified if replacing the generator is preceded by removing it from its usual location.
Important! When carrying out any work on the generator (replacement, repair, etc.), be sure to disconnect the battery.
After removing the generator on the Priora, replacement is carried out as follows:
- Use a screwdriver to remove the plastic cover, which is designed to protect the device. Having done this, you gain access to the brushes;
- disconnect the connecting plug from them;
- slowly unscrew both fasteners (they are located along the edges of the elements that are inspected);
- Take the above key and unscrew the locking bolt. Do this in the center of the element;
- Having unscrewed all the fasteners, remove the brushes, inspect them, assess their condition and replace them with new ones, connect the wires.
What are the signs that indicate that the generator brushes have become unusable?
The following external “signs” will help with this:
- if, upon examining this element, you find that its length is less than 5 mm, it certainly requires replacement;
- if the brushes are worn unevenly, this will also negatively affect the functioning of the generator, so they need to be replaced.
There is no need to skimp on buying new brushes. If you find a cheap option, it is highly doubtful that they will last long. It is more likely that such savings will lead to the need to re-replace the above-mentioned components.
How to remove a generator on a Priora with air conditioning? Step by step method
- The first step is to remove the protection from the engine;
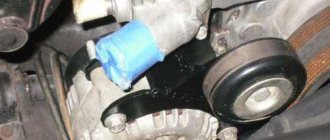
- The tension roller of the generator drive belt is slightly loosened;
- First, the top bolt that secures the generator is unscrewed;
- From below, the process will take longer and require some power and technical skills: the fasteners are located very inconveniently. However, with the help of a 13mm socket, a ratchet wrench and Russian verbal folklore, this is quite possible;
- Next, the bolts are removed that secure the air conditioning compressor that is interfering with our work;
- Now carefully remove the belt that goes to both the generator and the compressor;
- The required generator is pulled from its position and slightly moved to the right, in the direction of the battery. This frees up access to the topmost bolt that holds the air conditioning compressor;
- After unscrewing the last fastener, the compressor is hung. There is no need to secure it in any additional way: it is securely supported by the surrounding parts - it will not fall, and the tubes leading to it are quite strong. And, as it turned out, it is not at all necessary to drain the coolant from this device;
- The bolts that secure the generator to the holder are screwed together;
- Its terminals are disconnected, and the generator is pulled straight down.
Reassembly
After purchasing high-quality brushes (it is advisable that your choice falls on a well-established manufacturer), you can begin the general assembly of the element, and then install the generator itself in its place. However, as mentioned above, the last procedure can be performed without removing the generator. Which, however, is decided independently by each car owner. All operations performed should be performed in reverse order. After completing the work, the operating efficiency of the entire generator must be checked.
You should use a voltmeter to check whether the charging process is moving, as well as what the panel displays. Make sure its work is objective. Indicators that correspond to each other are evidence that the remaining elements can be installed in their places and the generator repair has been completed successfully.
If the replacement of failed brushes was carried out correctly, and the battery was discharged precisely because the main elements of the car’s electrical system were worn out, the car owner will solve this problem without the help of service station workers. And in this case, you will save a lot on such a service. The replacement process is really quite simple. However, if you encounter any difficulties during the repair work, you can watch the help video. It is provided by specialists. On the Internet resource you can, among other things, find out:
- about design features - generator 2170;
- how to check the generator for operability, what you should pay special attention to;
- how to change wipers on a Priora and so on;
- What other possible problems can occur with the power generator?
How to Priora generator brushes
If the owner of a Priora sees that
the battery , then first you need to check the condition of the generator brushes . Priora with air conditioning. Do not rush to remove the gene to replace brushes, oil change +. In what cases is it necessary to replace the charging relay? The opposite of removing the relay from the VAZ 2107 generator. It is worth noting that at first the battery charge will decrease slightly, but if the problem is not corrected in a timely manner, the battery charge will soon disappear altogether. Alternator belt Kalina 2 with air conditioning and at. the worn brushes of the Priora generator correct this problem . And since this process is not so complicated, you can carry out such work yourself, taking into account advice from professionals in your field.
Relay-regulator connection diagram
According to the diagram, the HL 4 LED will light up if a plus from the ignition switch comes to connector pin 21 and diode VD 1 passes the minus from the LED through connector 32 to the positive brush of the regulator relay, where through the armature winding and the minus brush the LED finds a minus and lights up. In my case, there was no contact on the positive brush due to the fact that it was worn out and jammed in the seat, in short, it froze. I just changed the relay regulator with new brushes and charging appeared. I'm lucky. It was more difficult if the LED or VD 1 diode burned out and would have to be replaced.
Priora generator does not charge
Several times I found myself in an unpleasant situation when the prior generator did not charge, and at the most inopportune moment, due to the battery being discharged, I could not start the car.
The content of the article:
At the same time, the control light did not light up while driving, but the fact that it did not light up and when I turned on the ignition, I did not pay attention to it. The generator was not charging. When you turn on the ignition, a lot of warning lights come on and it’s very difficult to see that any are off, and you almost never pay attention to them.
The car started, the pressure light went out, and the rest did not affect the speed. Yes, and it’s built into the subconscious if the charge is lost, then the battery sign will light up.
Relay-regulator connection diagram
According to the diagram, the HL 4 LED will light up if a plus from the ignition switch comes to connector pin 21 and diode VD 1 passes the minus from the LED through connector 32 to the positive brush of the regulator relay, where through the armature winding and the minus brush the LED finds a minus and lights up. In my case, there was no contact on the positive brush due to the fact that it was worn out and jammed in the seat, in short, it froze. I just changed the relay regulator with new brushes and charging appeared. I'm lucky. It was more difficult if the LED or VD 1 diode burned out and would have to be replaced.
Fault diagnosis
In any case, it is necessary to connect the circuit from the VD 1 diode to the connector on the generator relay regulator. The easiest way to do this is to remove the connector from the generator that receives the plus for the excitation winding and connect it to ground
When the ignition is turned on, the indicator light with a picture of the battery should light up. Everything is most likely the same as in my case, the problem is in the brushes.
When the engine starts and the light goes out, this means that the electronic unit supplies the generator excitation current to the relay brush, diode VD 2 passes the positive signal, but diode VD 1 closes due to its property of passing current in one direction and the LED goes out
Replacing Priora generator brushes
The relay regulator is made together with brushes. At first I removed the generator to replace the relay regulator, but this task turned out to be quite labor-intensive due to the inconvenience of its location, especially the Priora with air conditioning and the hose prevents me from doing this. The second time I did not remove the generator.
Disconnected the wires. I took off the back cover, it is secured with three latches on the sides, you just push them out and the cover can be easily removed
Removing the regulator relay was also not difficult; you just need to unscrew the two mounting screws and disconnect the connector from the regulator relay contact.
Putting everything back together wasn't too difficult either. The photo shows the relay regulator after I trimmed the contacts with sandpaper and then put it in place. It turned out to be in working order, but I had already purchased a new relay regulator. For some reason, brushes often fail, especially when you encounter this problem in winter, apparently this is due to high energy consumption due to the heater and loads when starting a cold engine.
And now when the prior generator does not charge, I first check the brushes
Generator replacement
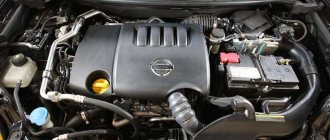
Taking into account that the Lada Priora is equipped with a large number of electrical appliances, it is necessary to install a powerful generator that can cope with all tasks. Characteristics of a suitable device:
- marking 5102.3771;
- power 80 Ampere or 115 Ampere. For lovers of good music, the power should be 170 Amps.
First, you need to remove the old generator. This should be done in three steps, shown in the photographs:
- Remove the terminal from the battery and the belt placed on the generator and crankshaft pulley (there is no need to lift the engine mount).
- Disconnect the three wires going to the generator. The first is in the form of a connector, the other two are in the form of terminals under a protective cap, which must be bent and the fastening nut unscrewed to disconnect the wires.
- Use a wrench (a socket wrench size “13” will do) to unscrew the nut of the bolt for the lower mounting of the generator, and then carefully remove the bolt. If necessary, use a hammer to knock out the bolt. Then completely unscrew the nut securing the generator to the upper bracket. After removing the adjusting bolt, you need to remove the generator from the car.
Secondly, install a new suitable generator. It is mounted in the same order in which the old mechanism was removed. It is necessary to take into account that installing a generator with a power of 115 Amps from Priora Lux on the Lada Priora requires connecting a new D+ wire connector, which has different parameters. It can be bought at any car dealership. Finally, you should connect the remaining wires to the generator.
As you can see, replacing the generator with a new one according to the above scheme is not difficult.
If you find an error, please select a piece of text and press Ctrl+Enter.