How to remove a Gazelle Business stove fan
In general, the stove had been asking for a long time, howling on the waves, squealing on the bumps, and then one day it started howling all the time... it was decided to change it myself (the toad would strangle 7 thousand to give for a replacement) plus make a noise on the engine shield... I decided to try to film the whole thing, climbing a bunch of videos and I couldn't find any data on the forums.
The biggest problem was that it was very difficult to find a garage for such a crocodile, so having stocked up on a 220V heater, I went to open it with spare parts to replace the stove motor... I also purchased: 4 sheets of STP AERO PREMIUM (2.5 was enough) 2 sheets of BIPLAST A 15 (1 was enough ,5) Below are pictures with the positions of the bolts! Attention, you will need to remove: - Brand from the battery - side pillars - plastic sheets with places for standard speakers - side panel covers - dashboard - middle part (xs as the name) between 4.5 and 6.7 - lower glove compartment - right cup holder - pry off a plastic screwdriver under the windshield (what’s the name)…
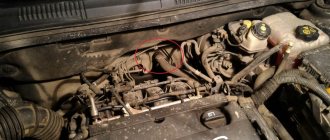
If everything worked out, move on, open the hood and look
Unscrew it, go to the salon, the panel should be loose. You need to unscrew the heater radiator pipes in the salon.
It is difficult to imagine a modern car without an interior heater. It makes the trip not only comfortable, but also safe. When driving in the cold season, moisture condenses on cold windows, and movement becomes difficult or completely impossible. To avoid this, warm air from the stove is directed onto the glass, which causes them to heat up and prevent moisture from condensing on them.
Replacing the heater motor on an old gazelle.
We change the heater motor without removing the problem.
How to replace the motor (fan) of the Gazelle Business stove
It is difficult to imagine a modern car without an interior heater. It makes the trip not only comfortable, but also safe. When driving in the cold season, moisture condenses on cold windows, and movement becomes difficult or completely impossible. To avoid this, warm air from the stove is directed onto the glass, which causes them to heat up and prevent moisture from condensing on them.
Loan 9.9% and installments 0%
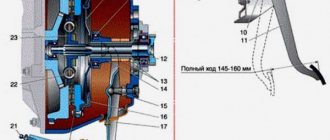
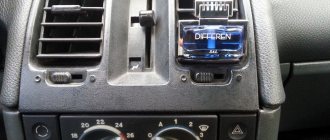
Operating principle
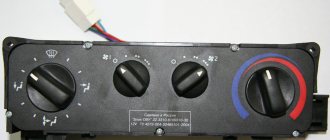
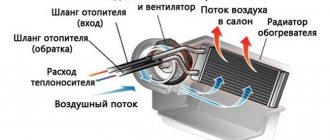
Heating of the interior of the Gazelle Business, as in many other cars, is carried out using the heat generated by the car's engine. Heat in the engine is released during fuel combustion and from rubbing surfaces. To remove heat from heated parts, a cooling system is built into the engine. It removes heat through coolant. To heat the interior, heated liquid is used, which is supplied through pipes and lines to the radiator, due to which it heats up. To distribute heat throughout the cabin, an electric motor and impeller pass cold air through a heated radiator. After which the heated air enters the cabin through the deflectors. By controlling the dampers, you can direct hot air to the right places. To control the air temperature, a heater tap is installed, which can be used to regulate the amount of coolant passing through the radiator. To change the fan speed, a rheostat is installed. All controls are electronic. From the control unit, the signal is sent to the gear motor, which in turn opens or closes the dampers.
Diagnostics
Replacing a Gazelle stove motor Business is a very long and labor-intensive process. And in order for this work not to be in vain, it is necessary to make sure that it is necessary.
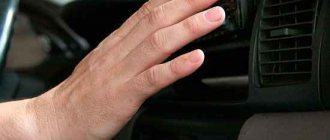
- With the engine off and the ignition on, turn the levers and check all modes. When switching, clicks should be heard from the gear motor. If you do not hear any responses, you need to check the power supply to the control unit.
- Next, you need to try changing the position of the motor rotation speed knob. If it does not work in all modes except the fastest, then the resistor has failed. If there is no rotation in any of the positions, then you need to check the power to the motor itself.
- You need to check the hoses leading to the heater radiator: when the engine is warm and the handle is set to hot air, they should be hot. If they are cold, then you need to check the faucet or drive.
The problem with the old panel and the advantages of the new one
Improvements in the automotive industry bring many positive changes, including improving weaknesses, eliminating factory defects, and improving technical and operational characteristics.
In fact, there are not many complaints about the Gazelle with the old-style panel. Quite functional, informative and of high quality for its time and cost. But if the question concerns such a unit as the heater electric motor, which needs to be removed and replaced with a new one, then the car owners have serious problems.
Compared to the updated version, when it comes to the new panel, it was extremely simple to replace the heater motor if it does not work or does not function correctly. You will clearly see this in the next section.
As for the old panel on the Gazelle, changing the stove motor will be objectively problematic.
In fact, there are two options available.
The first replacement method involves completely removing the entire torpedo. Yes, the work ahead is extremely serious and lengthy. You will need to remove literally everything, including the dashboard, steering wheel, center console, glove box, and disconnect many terminals and wires. The task is not easy, and it is not recommended for a beginner to take it on. This requires the help of one more person.
In the case of an old-style stove, only a few decide to take on the task of replacing an electric fan. Therefore, they often go to specialists with this question, who will change the unit for a certain fee.
At the same time, there is a high probability that the craftsmen themselves will decide to change your faulty electric motor in a somewhat roundabout way. It is not provided in the official instruction manual, but it significantly saves time and effort.
Repair
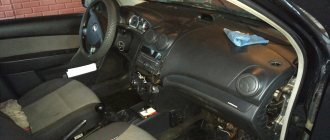
After everything has been checked and we can say with complete confidence that the faulty element is the heater motor, then only after that should we begin to dismantle the instrument panel, since in order to remove the heater, we need to dismantle the entire dashboard assembly. For this operation we need a set of heads and screwdrivers. To get to the heater, you need to dismantle the entire instrument panel.
- First of all, let’s secure the workplace by disconnecting the positive cable from the battery.
- Remove the side plastic covers.
- Get the speakers in the dashboard.
- Disconnect the instrument panel.
- Remove the side panel covers on the left and right.
- Unscrew the heater control unit with deflectors.
- Remove the deflector located under the windshield.
- Unscrew and remove the glove compartment, which is located below, on the passenger side.
- Next, unscrew the bolts that secure the heater to the car from the engine side.
- Drain the coolant from the engine into a clean container.
- Remove the pipes through which coolant from the engine enters the heater radiator (there will be residual coolant in them; measures must be taken to prevent coolant from leaking into the passenger compartment).
- Then put marks on the electrical wiring terminals (so as not to confuse them during assembly) that fit the devices, and disconnect them.
- Next, unscrew the fasteners that secure the steering column to the dashboard, after which it will rest freely on the driver’s seat.
- Then remove the torpedo (an assistant will be needed for this procedure), removing it from its place, carefully make sure that there are no undisconnected terminals; if any, they need to be disconnected.
- And put the panel on something soft so as not to scratch it.
- Next, we dismantle the iron frame, which is located behind the removed torpedo, and also, together with an assistant, remove it.
- Then we will disconnect the air ducts that come from the stove (it is better to mark or photograph them so as not to confuse them during assembly).
- Now you can start “halving” (unscrew the screws and remove the brackets).
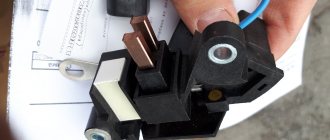
- We take out the electric motor with the impeller. Now you need to check it and understand whether the element is repairable or not. In this case, replacing the motor would be more advisable, since it is impossible to say with certainty how long the repaired motor will last. And if it fails, you will need to do all the above work again.
- After repairing or replacing the motor, we assemble everything in the reverse order. And before final assembly, we check its operation in all modes, and if everything works, we complete the work.
These are the recommendations that can be given if the Gazelle Business stove motor does not work. Of course, it’s unpleasant that because of such a small thing as an electric motor, you have to disassemble the entire dashboard, but without heat in the cabin, driving is uncomfortable and unsafe. You can, of course, contact a service center where they will replace and repair it. But if you have time and experience, then you can carry out all the repairs yourself.
How to Remove the Gazelle Heater Motor
Content
How to replace the motor (fan) of the Gazelle business stove |
It's hard to imagine a modern car without a heater. This makes the trip not only comfortable, but also safe. When driving in the cool season, moisture condenses on cool glasses, making movement difficult or completely impossible. To avoid this, warm air from the oven is directed into the glass, which causes them to heat up and moisture does not condense on them.
Loan 9.9% and installments 0%
How does it work
Internal heating is turned on Gazelle Business, like many other cars, is driven by the heat generated by the car's engine. Engine heat is released during fuel combustion and from grinding surfaces. A cooling system is built into the engine to remove heat from heated parts. Removes heat, cooling the water. Heating the cabin uses a heated fluid that is fed through pipes and pipes to the radiator, so it gets hot. To distribute heat throughout the cabin, an electric motor with a wing blows cool air through a heated radiator. After this, the heated air enters the cabin through the partitions. By controlling the dampers, you can direct hot air to the right places. To control the temperature of the air heater, a mixer is installed, with which you can regulate the amount of coolant passing through the radiator. A rheostat is installed to change the fan rotation speed. All controls are electric. From the control unit, the signal is sent to the gearbox, which in turn opens or closes the dampers.
READ How to Remove Exhaust Manifold Ford Focus 2
diagnostics
Replacing the engine the Gazelle Business oven . This is a very long and lengthy process. And so that this work is not in vain, you need to make sure that you need it.
- With the engine off and the ignition on, turn the levers and check all modes. When switching, the sound of the gearbox may be heard. If you don't hear anything, check the power supply to the control unit.
- Next, check to change the position of the engine speed controller. If it does not work in all modes except the most live one, the resistor fails. If there is no rotation in any position, check the power of the motor itself.
- It is necessary to check the hoses suitable for the heater core: when the engine is warm and the handle is in hot air, they should be hot. If they are steep, then you need to check the faucet or drive.
replacement motor plate 2005 Gazelle NOT business
An easy and quick way to replace the motor plate
on
Gazelle
.
Replacing the Gazell Furnace Motor
GAZTEC.ru. Repair, painting, gas equipment, spare parts for GAZ, UAZ. Website: Our VC group:.
Repair
Once everything has been checked and you can confidently say that the furnace motor is the faulty item, only then should the dashboard be removed as the entire torpedo assembly must be removed to remove the heater. For this operation we will need a set of sockets and screwdrivers. To get to the dispenser, you need to remove the entire dashboard.
- First of all, we will make the work area safe by disconnecting the positive cable from the battery.
- Remove the side plastic covers.
- Insert the speakers into the dashboard.
- Disable the dashboard.
- Take off side covers cover the left and right.
- Unscrew the partition heating control unit.
- Remove the deflector under the windshield.
- Unscrew and remove the glove located at the bottom of the passenger side.
- Then remove the bolts that secure the heater to the car on the engine side.
- Drain the engine coolant into a clean container.
- To dismantle the pipes that carry coolant from the engine to the heater core (they will contain residual coolant), measures must be taken to prevent coolant from entering the cabin.
- Next, mark the wiring terminals (do not mix them up when reassembling) that go to the devices and disconnect them.
- Next, we unscrew the fasteners that are attached to the dashboard, and then it rests freely on the driver’s seat.
- Then remove the dash (you will need an assistant for this procedure) by lifting it from its place, making sure there are no disconnected terminals, if there are any, they should be disconnected.
- And place the pillow on something soft to avoid scratching.
- Next, disassemble the iron frame, which is located behind the removed torpedo, and, together with an assistant, remove it.
- Next, disconnect the ducts coming out of the oven (it's best to mark or photograph them so they don't get mixed up during assembly).
- Now you can start in half (unscrew the screws and remove the brackets).
- We get an electric motor with a wing. Now you need to test it and see whether the item is repairable or not. In this case, replacing the engine would be more appropriate since it is impossible to say with certainty how long the engine will take to be repaired. And in case of failure, all of the above work will have to be done again.
- After repairing or replacing the engine, we reassemble everything in the reverse order. And before the final assembly, we check its operation in all modes, and if everything works, we finish the job.
READ Replacement of cylinder head gaskets VAZ 2109 Injector
These recommendations can be given if it doesn't work. engine Gas stove Business. Of course, it’s unpleasant that because of such a small thing as an electric motor, you have to disassemble the entire dashboard, but without heat in the cabin, driving is awkward and dangerous. Of course, you can contact a service where they will be replaced and repaired. But if you have time and experience, you can do all the repairs yourself.
The best prices and conditions for purchasing new cars
Types and repair of gazelle stove
There are two types of stoves installed on Gazelle cars:
- Old ones, which can be found on Gazelles 3302 and 2705, that is, on cars preceding the Business generation. The design of these stoves is extremely simple, and repairs do not take much time. The radiator in these cars is located behind the small and easily removable central panel of the dashboard, therefore, there is no need to disassemble half of the interior in order to gain access to the stove.
- The new Gazelles of the Business generation and older have two radiators - a front (driver's) radiator and an additional radiator in the cabin. In order to gain access to them, much more extensive work will have to be carried out.
Replacing a gazelle stove fan business video
How to change the motor (fan) of the Gazelle Business stove
It is difficult to imagine a modern car without an interior heater. It makes the trip not only comfortable, but also safe. When driving in the cool season, moisture condenses on cool windows, and movement becomes difficult or completely impossible. To avoid this, warm air from the stove is directed onto the windows, which causes them to heat up and prevent moisture from condensing on them.
Below are pictures with the positions of the bolts! Attention, you will need to remove: - Brand from the battery - side racks - plastic with places for standard speakers - side panel covers - dashboard - middle part (xs as the name) between 4.5 and 6.7 - lower glove compartment—right cup holder
— pry off the plastic under the windshield with a screwdriver (what’s the name?)
If everything worked out, move on, open the hood and look
We unscrewed it, we go into the salon, the panel should be loose. You need to unscrew the heater radiator pipes in the salon
If you promptly replace damaged components and also clean the stove, it will work successfully for many years. However, car owners often greatly shorten its service life by not cleaning it within the prescribed period.
There are two types of stoves installed on Gazelle cars:
- Old ones, which can be found on Gazelles 3302 and 2705, that is, on cars preceding the Business generation. The design of these stoves is extremely simple, and repairs do not take much time. The radiator in these cars is located behind the small and easily removable central panel of the dashboard, therefore, there is no need to disassemble half of the interior in order to gain access to the stove.
- The new Gazelles of the Business generation and older have two radiators - a front (driver's) radiator and an additional radiator in the cabin. In order to gain access to them, much more extensive work will have to be carried out.
One of the most common causes is poor coolant circulation. It can be caused by several factors:
- air entering the system, which may be due to problems with the electric pump;
- clogging of the rubber pipes through which the liquid circulates. If the pipes are damaged, pieces of rubber often enter the system, which causes the following malfunction;
- clogging of the heater radiator, which can be caused by dirt entering the system from the outside, or particles from a damaged pipe;
Other possible problems with the Gazelle stove include:
- failure of the furnace tap;
- damage to cable tips, which often simply fly off on new modification stoves.
Gazelle commercial vehicles are very popular in Russia. These are fairly cheap, relatively easy to maintain vehicles that do not require large financial investments for their maintenance.
The ease of repair is quite conditional, since it largely depends on what specific unit you are dealing with, as well as what version of the Gazelle we are talking about.
The Gazelle is offered in pre-restyling and restyled versions. The latest version has been produced since February 2010 and is called GAZelle Business. We must not forget that since the spring of 2013, the production of a new generation, called GAZelle Next, has been launched.
This material will review the first generation with the new and old panels. This feature significantly affects how the Gazelle stove motor is replaced and how many problems the electric fan will cause its owner.
Improvements in the automotive industry bring many positive changes, including improving weaknesses, eliminating factory defects, and improving technical and operational characteristics.
In fact, there are not many complaints about the Gazelle with the old-style panel. Quite functional, informative and of high quality for its time and cost. But if the question concerns such a unit as the heater electric motor, which needs to be removed and replaced with a new one, then the car owners have serious problems.
Compared to the updated version, when it comes to the new panel, it was extremely simple to replace the heater motor if it does not work or does not function correctly. You will clearly see this in the next section.
In fact, there are two options available.
The first replacement method involves completely removing the entire torpedo. Yes, the work ahead is extremely serious and lengthy. You will need to remove literally everything, including the dashboard, steering wheel, center console, glove box, and disconnect many terminals and wires. The task is not easy, and it is not recommended for a beginner to take it on. This requires the help of one more person.
In the case of an old-style stove, only a few decide to take on the task of replacing an electric fan. Therefore, they often go to specialists with this question, who will change the unit for a certain fee.
At the same time, there is a high probability that the craftsmen themselves will decide to change your faulty electric motor in a somewhat roundabout way. It is not provided in the official instruction manual, but it significantly saves time and effort.
If you need to replace a stove fan that for one reason or another does not work, does not perform its functions well, or simply burnt out, you will have to carry out a set of measures.
In this case, the official manufacturer recommends performing a complete dismantling of the entire panel, dashboard, center console and other elements. Usually this work takes at least 3-4 hours. Reassembly is even more difficult, since you need to remember or mark the location of all connectors, elements and wires. It is extremely easy to make a mistake at the stage of disassembling the panel if you are doing this for the first time. There are even more chances to collect everything differently than it was.
In order to change the electric heater motor on a Gazelle with an old panel with minimal time and energy costs, you need to take into account the following nuances:
- To dismantle the electric motor without removing the entire dashboard, you should know that the main obstacles are the glove compartment and the right air duct of the windshield.
- The glove box, that is, a niche or pocket, on a Gazelle with an old-style panel is held in place using 2 screws.
- But the main problem or obstacle lies in the 7 solder joints. It is them that will have to be broken in order to go around.
- The solders break off quite easily. To do this, you need to take a thin but strong screwdriver with a flat blade and insert the tool into the gap between the glove compartment and the panel.
- Having applied a certain force, gradually all 7 solder parts need to be broken. After this, the glove compartment niche can be safely removed and temporarily removed.
- Figuring out how to reattach the glove box panel won't be too difficult.
- You can make several holes for a bolt and nut and fix the elements together.
- The second obstacle is the air duct or a kind of windshield sleeve. Like the glove compartment, it is located on the front passenger's side in the area of his left leg when sitting in the seat.
- The right windshield air duct on a Gazelle with an old-style panel is held in place by one self-tapping screw and a pair of bolts.
- The only self-tapping screw is located directly next to the stove. Unscrewing it will not be difficult. After unscrewing the fastener, do not forget to save it and remember its location. After all, you still have to reassemble it.
- A pair of bolts are unscrewed with a 10mm head. The bolts are located on the left and right sides of the right slot of the windshield air duct.
- The main difficulty is that these bolts can only be accessed from below, from under the panel.
- Here you will need to move the passenger seat completely back, or dismantle it, conveniently located under the glove compartment.
- The right bolt is completely unscrewed. But the left one can only be loosened without removing it from its seat.
- The right bolt is extremely easy to get to. In the case of the left, there are two ways. The first option provides for flexible arms and good lighting. In the second case, you will have to remove the radio. Now decide for yourself which option suits you best.
Having removed literally a couple of elements that interfere with access to the electric motor, all that remains is to dismantle the faulty electric fan of the stove itself.
Typical malfunctions of stoves on Gazelle cars and their causes
One of the most common causes is poor coolant circulation. It can be caused by several factors:
- air entering the system, which may be due to problems with the electric pump;
- clogging of the rubber pipes through which the liquid circulates. If the pipes are damaged, pieces of rubber often enter the system, which causes the following malfunction;
- clogging of the heater radiator, which can be caused by dirt entering the system from the outside, or particles from a damaged pipe;
Other possible problems with the Gazelle stove include:
- failure of the furnace tap;
- damage to cable tips, which often simply fly off on new modification stoves.
How to dismantle the radiator on Gazelles?
In order to diagnose a malfunction of the stove, you must first gain access to the radiator inside the car. On older cars, this operation is extremely simple - in order to remove the radiator, you need to dismantle the central panel of the dashboard, drain the coolant and unscrew two bolts.
On Gazelles Business and older, the sequence of actions is as follows:
- Remove the front passenger seat for maximum access;
- Drain the coolant;
- For an additional stove in the cabin, remove the protective casing and dismantle the radiator;
- For the driver's radiator, unscrew the glove compartment and unscrew the radiator through it.
Sequence of diagnostics and repair of malfunctions of the Gazelle stove
In any case, troubleshooting begins with monitoring the condition of the radiator. To do this, you must:
- connect it to hot water - you need two rubber hoses of the appropriate diameter;
- If there is a strong pressure, check the uniform heating of the radiator. If any of the zones does not warm up enough, this indicates a blockage.
- If there is a blockage, the radiator is spilled before it is cleaned. In particularly severe cases, the housing will need to be disassembled. At the same time, clean the installation site of the radiator from dust and other existing contaminants.
- Upon completion of cleaning, the radiator is installed and assembled, after which the operation of the stove is tested again.
Gazelle stove motor repair
The heater motor is one of the most vulnerable components on new Gazelles of Business and older models. The reason is that a motor speed resistor is installed in the stove body, which inevitably becomes covered with dust during operation. After a few years, the resistor invariably burns out, often completely disabling the stove motor.
In this case, all that remains is to replace the radiator, which burns badly and usually cannot be restored. If the motor is seriously damaged, it will also need to be replaced.
This operation is quite labor-intensive due to the design of the car. So, in order to gain access to the motor, you need to:
- Completely disassemble the car dashboard, disconnecting all the wires passing there;
- Dismantle the stove body and literally saw it in half (you will need a workbench);
- After replacing the damaged components, the housing is assembled and installed in place.
It is advisable to trust this operation to professionals, since during disassembly and reassembly it is easy to damage the wires running under the dashboard. If any repair work has previously been carried out or, for example, additional power windows have been installed, the wires are often too short and have to be cut. In order to avoid problems with the operation of other components in the future, it is extremely important that the technician has high qualifications and experience in performing the relevant work.
After this, the necessary elements are treated with sealant. Then coolant is poured into the system and the engine cooling system is bled - to do this you will need to unscrew a special bleeder screw.
Replacing a heater motor on an old panel
If you need to replace a stove fan that for one reason or another does not work, does not perform its functions well, or simply burnt out, you will have to carry out a set of measures.
In this case, the official manufacturer recommends performing a complete dismantling of the entire panel, dashboard, center console and other elements. Usually this work takes at least 3-4 hours. Reassembly is even more difficult, since you need to remember or mark the location of all connectors, elements and wires. It is extremely easy to make a mistake at the stage of disassembling the panel if you are doing this for the first time. There are even more chances to collect everything differently than it was.
Therefore, folk craftsmen have found workarounds to solve this problem. They simply use an alternative dismantling option. Yes, some elements will need to be intentionally broken, but this will not significantly affect the quality of the reassembly and the subsequent condition of the Gazelle with the old-style panel.
In order to change the electric heater motor on a Gazelle with an old panel with minimal time and energy costs, you need to take into account the following nuances:
- To dismantle the electric motor without removing the entire dashboard, you should know that the main obstacles are the glove compartment and the right air duct of the windshield.
- The glove box, that is, a niche or pocket, on a Gazelle with an old-style panel is held in place using 2 screws.
- But the main problem or obstacle lies in the 7 solder joints. It is them that will have to be broken in order to go around.
- The solders break off quite easily. To do this, you need to take a thin but strong screwdriver with a flat blade and insert the tool into the gap between the glove compartment and the panel.
- Having applied a certain force, gradually all 7 solder parts need to be broken. After this, the glove compartment niche can be safely removed and temporarily removed.
- Figuring out how to reattach the glove box panel won't be too difficult.
- You can make several holes for a bolt and nut and fix the elements together.
- The second obstacle is the air duct or a kind of windshield sleeve. Like the glove compartment, it is located on the front passenger's side in the area of his left leg when sitting in the seat.
- The right windshield air duct on a Gazelle with an old-style panel is held in place by one self-tapping screw and a pair of bolts.
- The only self-tapping screw is located directly next to the stove. Unscrewing it will not be difficult. After unscrewing the fastener, do not forget to save it and remember its location. After all, you still have to reassemble it.
- A pair of bolts are unscrewed with a 10mm head. The bolts are located on the left and right sides of the right slot of the windshield air duct.
- The main difficulty is that these bolts can only be accessed from below, from under the panel.
- Here you will need to move the passenger seat completely back, or dismantle it, conveniently located under the glove compartment.
- The right bolt is completely unscrewed. But the left one can only be loosened without removing it from its seat.
- The right bolt is extremely easy to get to. In the case of the left, there are two ways. The first option provides for flexible arms and good lighting. In the second case, you will have to remove the radio. Now decide for yourself which option suits you best.
Having removed literally a couple of elements that interfere with access to the electric motor, all that remains is to dismantle the faulty electric fan of the stove itself.
To do this, illuminate the disassembled area with a flashlight or a carrying lamp and find the location of the electric motor of the Gazelle heating system. Next, you need to remove the rubber seal if present, disconnect the heater fan connector and remove the problem unit.
Assembly is performed in strict reverse order. Reinstall the new fan, connect its electrical connector, and put the negative battery terminal back on.
Just at this stage, do not rush into reassembly. First, start the heater and check whether after replacing the electric fan, the problem really went away and the heater began to function normally again.
If all is well, return the windshield air duct and glove compartment niche to their place. The latter, deprived of solder after dismantling, is usually fixed simply with a few self-tapping screws. But you can get confused, make holes for the bolted connection and tighten it with nuts. Now decide for yourself.
What is better: repairing the stove yourself or entrusting it to our specialists?
At first glance, the design is not particularly complicated, and therefore a car owner who has an understanding of the structure of the car can easily cope with the repair on his own. In practice, dismantling the stove without sufficient experience can easily damage adjacent components, thereby causing expensive repairs. Our specialists have already repaired hundreds of stoves on Gazelles of various models, so by contacting our service, you are guaranteed to protect yourself from such troubles.
And an insufficiently cleaned system, firstly, will significantly reduce the effectiveness of repairs, and secondly, it will very quickly lead to repeated breakdowns. Our service center has all the necessary equipment and, of course, high-quality original spare parts for repairing the stove on your Gazelle.