Almost every Volga driver, when mentioning the abbreviations GTSS and RTSS, instantly flashes through his brain the thought How, Again! Well, damn it, I’m already losing my nerves... piiiiii...
After all, it is these two nodes that drip brake fluid onto our nerves with enviable regularity.
At the same time, when you replace it with a new one, you are not happy that you fixed everything, but mentally begin to count down the time until its next failure. So my three-letter top hats also took turns reminding me of their existence, and as soon as I forgot about them, they immediately went on strike and demanded negotiations. I got the car with Fenox clutch cylinders. The only merit of this company is that I learned where these cylinders are installed and how they work. Moreover, they worked according to their mood, and I was forced to adapt to this duet. But one day, when cold weather set in, I pressed the clutch and couldn’t engage the gear. I looked under the hood and everything was fine there. The reservoir is full of brake fluid, and there is no puddle under the car either. Knowing the operation of this hydraulic system, I came to the conclusion that it was bypassing the main circulation system. After working hard on the pedal, I somehow put the gear into gear and went for the new GCS. The seller, with the pride of a pioneer leader, thrust the GCS into my hands in an orange package, with a huge inscription ORIGINAL
and
GAS car parts
. Well, I think if he praises it so much, it must really be a miracle cylinder and I immediately bought the RCS in the same orange packaging.
At the same time I bought 1 liter of RosDot 4 brake fluid to top up when replacing. I rushed home, quickly pulled out the old GCS and installed a new one. I filled the reservoir, pumped the pedal and the clutch worked very well. I didn’t even know that it could work so well on the Volga. I didn’t change the slave cylinder, because to do this I had to crawl under the car, and it was winter. Well, I think I’ll ride the old one until spring, and when the weather warms up I’ll replace it. However, after driving for a couple of days, I again found myself without a clutch. All the symptoms repeated, but the liquid did not leave the tank again. Not understanding how this is possible, I decide to go to the service center and change the RCS. After all, the new master cylinder couldn’t immediately break down. Somehow I got to the service station. I drove the car onto the lift and went to wait in the cafe, watching on the monitor as the mechanic, at a snail’s pace, worked out the allotted time to replace the control unit. After 30 minutes, the car was lowered to the ground and handed over to me, and I gave an amount 4 times higher than the cost of the RCS itself. But there was nowhere to go. In the end, everything worked great. I happily forgot about these three letters. But a month later the picture repeated itself.
I also saw on the display case GCS and RCS from Gazelle a business manufactured by Sachs (Germany).
Then I carefully drilled the inner hole to the diameter of the copper brake pipe so that it fits in with force.
I lightly chamfered both sides of the connector and inserted the cut 20cm tube, lightly coating it with PoxiPoi glue on both sides. I immediately removed the excess glue and bent the tube smoothly 90 degrees so that it would not rest against the body.
After this, the free end of the tube was flared in the Planet of a piece of iron and a connecting coupling was screwed onto it.
The only thing left is the brackets. Many sellers heard about them from other seekers, but could not help. And suddenly, far from Moscow, luck smiled at me again, and I found the GCS Gazelle Business Transition Plate.” I immediately removed the Remoff GCS (which worked surprisingly well) and began trying on the plate with the Sachs cylinder. I had to sharpen it on one side because the VUT bracket was in the way. In order not to grind too much, I additionally cut out a gasket from dense rubber.
The studs for the plate were twisted from the old GCS and placed on a thread locker. I also replaced the stock steel clutch tube with a copper one. This is a hemorrhoid, but there is nowhere to go, because I have a new place for its connection to the GCS, and the steel tube cannot be bent like that. After that everything was installed.
The nipple was cut off from the Bosch GTZ, which was waiting for its time and connected these two systems with a Gates 8mm hose.
All that's left to do is bleed the system. I got into the car and started pumping the clutch. Unlike the native GCS, the business one does not have an internal spring, and the piston return is carried out by the hydraulic system itself and the pedal springs. I had to forcefully tighten the pedal with my foot. After half an hour I realized that I would rather bleed my leg than my clutch. I started to figure out where I made a mistake. After analyzing everything, I realized that I laid the copper pipe unevenly and without the correct slope. I straightened it as much as possible by tilting it towards the control center to allow air to escape into the gas turbine tank. Then I went with the tried and tested method of pumping. I tightened the fitting from the control center and began to wait for the brake to start running. But she was just dripping and didn’t want to run away. I realized that due to the lack of a GCC tank, the system was sealed, such as a capillary effect, and the pressure of the GCC tank was not enough. Then I removed the filling hose from the main circulation pump and forcibly pumped it with a syringe so that the brake fluid flowed out of the working cylinder in a trickle. After that, I quickly collected everything and pumped the pedal a little more. Everything worked, but the pedal began to work perfectly only after two days of constant use. Stiffness appeared and the pedal began to return under the influence of the hydraulic system.
PS after some time of use I can say that the clutch is pleasantly softer and the operation has become clearer. However, due to the difference in the sizes of the old and new RCS cylinders, the new one does not have enough volume to fully squeeze out the old RCS.
Therefore, for now we have to squeeze it to the floor while waiting for the installation of the Sachs RCS. But most importantly, for some reason, for the first time, I am calm and do not think about when the GCS will break.
Device characteristics
Using the clutch, it is possible to prevent sudden changes in load, which ensures a smooth start of the car from a standstill. The clutch also protects the entire gearbox from the loads of inertial moments that appear as a result of a sharp slowdown in the rotation of the crankshaft with the engine running at the moment when the driver changes gear. On Gazelle cars, a hydraulic clutch system is installed. It has gained wide popularity on many models of modern cars. The design of the hydraulic mechanism is based on the clutch master cylinder. Gazelle “Business” is also equipped with it. The main problem that the cylinder solves is the transmission of impulses from the pedal to the working element of the system. With the help of this unit, the machine starts. The mechanism also makes it possible to switch up and down gears.
Below we will look at the design of the clutch master cylinder. The Gazelle is a commercial vehicle, so at times it requires servicing. What problems happen with the clutch, how to repair, maintain and, if necessary, change this unit? Let's tell you about everything in order.
Which Gazelle clutch to choose?
Today you can find products from various manufacturers on sale. However, some clutch kits are soft and smooth, but may have a shorter service life, while others operate more harshly, but handle loads better and last longer.
First of all, comfort is affected by the number of damper springs (they affect the angular stiffness). The driver has the opportunity to select a clutch taking into account the stiffness that is characteristic of a particular clutch package, depending on the manufacturer.
Different manufacturers independently determine the number of springs. The material used to make the friction linings may also differ, there may be unique manufacturing features for the release bearing, etc.
If we talk about the clutch manufacturers themselves, SACHS, LUK and VALEO are considered to be the market leaders. The Sachs clutch is traditionally considered reliable and durable, but some complain about being too stiff.
The LUK company is famous for its high-quality baskets, which allows full transmission of torque and ensures sufficient softness of the mechanism. The VALEO clutch is soft, the comfort is high, but the service life is somewhat reduced.
If you separately take into account the operating features of the car, and also pay attention to the characteristics and design of a particular clutch kit, you can easily select the most suitable solution.
Let us also add that when designing a clutch assembly, the world's leading manufacturers separately take into account the power of the internal combustion engine, the operating features of the gearbox, the drive axle gearbox, etc. At the same time, cheaper analogues from unknown manufacturers may be of significantly worse quality or manufactured without taking into account certain characteristics and indicators.
For this reason, it is better to choose clutches from well-known brands, even taking into account the high cost. Otherwise, the mechanism may fail, for example, after 15-20 thousand km, and not after 80-90 thousand.
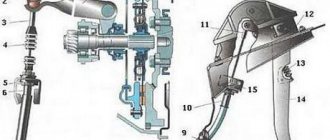
Hydraulic drive device
Among the main components that are included in the design of the element, a pusher can be distinguished. With its help, the pedal communicates with the mechanism. This is also the cylinder itself, the piston, plugs and the return spring. How is the clutch master cylinder constructed? “Gazelle” is equipped with a unit with 2 halves, which are divided by a special partition. The upper part is created for working water, which in the process comes from the tank. There, in the upper part, a certain supply of water is stored. If the clutch and hydraulic drive are adjusted normally, then its level should be no less than three-quarters of the volume.
The lower half contains the work area. In the usual initial state, the cylinder piston is pressed by a spring against the wall dividing the cylinder into two zones. There is a gap between the piston and the pusher. Due to this, the liquid enters the working part. When the driver presses the pedal, the pusher moves and closes the gap. Liquid can no longer flow from the upper zone to the lower zone. The piston moves and the force is transferred from the driver's foot directly to the working cylinder. Due to the fact that the sizes of the piston and the outlet hole are different, the hole increases. This is completely enough for the clutch to work. This design simplifies the effort placed on the pedal. This force is completely enough to disconnect the internal combustion engine from the box. When the pedal is released, a spring will act on the piston. Also, due to the pressure in the hydraulic system, the pedal will be able to return to its basic initial position. The pusher will also move to this position. Because of this, the liquid will again seep freely into the lower container of the cylinder.
Liquid leak
Replacing the clutch master cylinder on a VAZ 2101-VAZ 2107
Do you want to find out more thoroughly about how to change the clutch master cylinder?
on VAZ 2101-VAZ 2107? And also enthusiasm.
Replacing the clutch master cylinder on a VAZ (classic Lada).
in this video I change the clutch master cylinder
The master
is replaced in the same way ...
Repair may be useful if a shortage of working water is found. The reasons may be breaks or damage in the cylinder cuff, or a violation of the tightness of the connections. In this case, it is recommended to check whether the level in the expansion tank is sufficient. If there is not enough water, then add it. Then from time to time the level is inspected during routine maintenance or technical inspection. From time to time, the usual addition of working water may not help. Then a thorough inspection is carried out, the location of the leak is identified and then the tightness is ensured. In this case, you don’t have to repair it, but simply change the clutch master on the Gazelle.
Air in the system
Another typical malfunction is air in the system. Such a discrepancy can lead to complete inoperability of the node. The clutch will not be fully depressed, and pedal operation will be accompanied by a corresponding crunching or vibration on the gearshift lever. Among the circumstances by which air gets into the system and specifically into the cylinders, one can highlight various destruction of hoses and natural wear of parts. Do not exclude water leakage in places where sections of the hydraulic drive are connected to each other. master cylinder repaired in this case ? The Gazelle is placed on a flat surface, the warped hoses are replaced and the system is pumped again.
Operating principle of the clutch system
To transmit torque to the driving wheels of the vehicle from the engine crankshaft, a transmission is provided, since direct transmission of torque from the engine to the wheels is unprofitable. The car will not be able to move without a clutch, and the operation of the power unit itself will be ineffective.
For convenient operation of the power plant, the torque removed from the crankshaft must first change in the gearbox (gearbox). After this, it switches to the drive axle. Since changing gears causes the gearbox gears to rotate, which hit each other with force, it can be difficult to change gears. If the box is constantly connected to the power unit, in order to completely stop the vehicle, you will also need to stop the engine.
Clutch operation in a Gazelle car
The principle of its operation is the same for any brand of car. It eliminates the possibility of rapid wear of components and parts that connect the power plant and transmission.
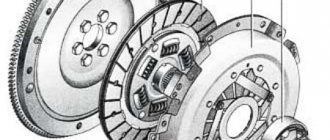
The clutch pressure plate, attached to the housing, presses the driven disc against the flywheel. The disc hub attached to the input shaft must be able to move freely along it. The hub body is equipped with damper springs, which act as vibration dampers and ensure smooth running.
To create the required pressing force, a spring with petals is provided, which are exposed to the release bearing. It is the connecting link between the drive and the clutch, onto which the fork with the lever is attached. Another lever or cable is attached to its end, leading to the clutch pedal.
Pumping fluid through the cylinder
There is also one more malfunction - in this case, the cylinder can pump working fluid through itself. The cause of the defects is the cuff, which is most likely damaged. Perhaps there is wear due to natural wear of the piston. All these faults can be removed using a clutch master cylinder repair kit. In this case, the Gazelle can be quickly returned to working condition. The set includes all the elements that often fail. The process of replacing the cuff and other parts is not particularly difficult for drivers of these cars.
If the first signs of cylinder defects are observed, it is necessary to diagnose and service the clutch system. This will help avoid the need to replace the cylinder completely.
Dismantling and deflation
The first step is to remove and disassemble the cylinder. You can find it in the left rear corner under the hood of the car. Then, after the assembly is disassembled, all components are washed with brake fluid - do not use aggressive solvents for this. The cylinder is then inspected for scoring. Check the condition of the mirror and rod. If minor areas of corrosion or scuffing are noticeable, these defects can be removed with fine sandpaper. But such damage may indicate a large gap between the cylinder and the piston.
Next, the worn components that are provided in the repair kit are replaced. Before assembling the clutch master cylinder , the Gazelle must be put on the handbrake. Every part must be lubricated with brake fluid. Apply a little grease to the surface of the piston that will be in contact with the pusher. Next, the cylinder is assembled, installed in its place and pumped.
Removing the hydraulic drive working cylinder
Drain the working fluid from the hydraulic drive.
Using a 17mm wrench, loosen the tension on the tip of the hydraulic drive hose.
Using a wrench or a 12mm socket, unscrew the two bolts and disconnect the slave cylinder from the clutch housing.
Rotating the cylinder around its axis, remove it from the threaded part of the hose tip.
A copper sealing washer is installed under the tip.
Replace the copper washer to ensure the tightness of the hydraulic drive
We install the cylinder in the reverse order, making sure that the clutch release fork has not moved from the support.
Fill in fresh working fluid and pump the hydraulic drive.
Replacing the clutch master cylinder
"Gazelle" requires this operation for the same reasons as in the previous case. These are leaks, natural wear, and improper operation of the clutch mechanism. As already noted, this cylinder is located on the left rear corner under the hood of the car.
Before the replacement itself is carried out, it is necessary to drain the brake fluid from the system. To do this, the hose is connected to a special fitting. The latter is located on the working cylinder. Next, disconnect the clutch pedal from the cylinder. To carry out this operation, remove the part of the dashboard located under the steering wheel. Then remove the retaining bracket, which can be found on the pedal, and pull out the pin on the cylinder pusher.
Once the fluid supply tube from the master cylinder is disconnected, you can begin to unscrew the two nuts that hold the clutch master cylinder itself. "Gazelle-3302" continues to stand on the handbrake. After the nuts are unscrewed, the cylinder can be removed and a new one installed in its place. The installation process is carried out in reverse order. After assembling the system, it is necessary to bleed the drive.
Removing the driving and driven clutch disks of a car with an engine model ZMZ-405, ZMZ-406
We use a core to mark the relative position of the casing and flywheel.
1. While holding the flywheel from turning with a screwdriver or a spade, a wrench or a 12mm socket, unscrew 6 bolts
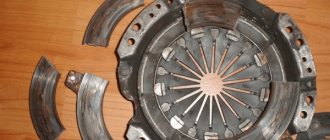
2. Remove the drive disk assembly (basket) and driven disk
After disassembling, the clutch parts should be washed in kerosene and inspected.
Cracks, burrs and deep grooves are not allowed on the surface of the drive discs.
If present, replace the flywheel and basket assembly.
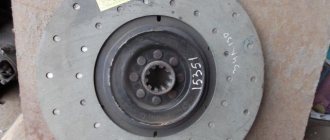
We replace the driven disk with linings worn to the rivets, warped, cracked, oiled and burnt.
The protrusion of the ends of the diaphragm spring petals is controlled using a spacer.
When moving the ends of the petals 8.5 mm down, the pressure plate offset must be at least 1.3 mm, otherwise we replace the drive disk (basket) assembly.
Any cracks or breaks are not allowed on the crankcase.
During assembly, we coat the rubbing surfaces of the fork, coupling, pushers and shaft splines with CV joint-4 lubricant.
Install the disks in the following sequence
We insert the centering mandrel into the engine flywheel bearing.
We put the driven disk on it.
On one side the disc hub protrudes less than on the other. This side should be facing the flywheel.
We attach the basket to the flywheel and fasten it with 6 bolts (the holes match only in one position).
After tightening the bolts, remove the mandrel
Dismantling the clutch of a car with an engine model ZMZ-402
We carry out the work in an inspection ditch.
We remove the gearbox.
We remove the hydraulic clutch slave cylinder (see article - Replacing the master and slave cylinders of the clutch of a Gazelle car
1. Using a 10mm wrench, unscrew the fastening bolt
2. Remove the clutch release fork along with the protective cover.
3. Remove the clutch release bearing (release bearing).
4. Using a 12mm wrench, unscrew the two lower bolts
5. Using a 14mm wrench, loosen the two upper bolts securing the clutch housing amplifier.
Similarly, loosen the amplifier mount on the other side of the engine.
6. Using a 12mm wrench, unscrew the four bolts securing the lower part of the clutch housing
7. Squeeze out with a mounting spatula and remove the lower part.
A cardboard gasket is installed between the pan and the crankcase.
In order not to disturb the joint balancing of the flywheel and the clutch drive plate when assembling the unit, we mark their relative position with a chisel or punch
9. While holding the flywheel from turning with a mounting blade, use a 12mm wrench to unscrew the six bolts securing the “basket” to the flywheel.
Semicircular plates are installed between them.
To facilitate access to the bolts, periodically rotate the flywheel.
11. Remove the “basket” and the driven disc of the clutch
We install the clutch parts in reverse order, centering the clutch driven disc with a special mandrel.
If there is no mandrel, you can center the clutch driven disc using the gearbox input shaft.
To do this, when installing the clutch “basket”, we only tighten its fastening bolts, leaving the driven disk free to move.
Having installed the box and tightened the nuts securing it, rotate the flywheel, evenly tightening the bolts securing the “basket”.
How to remove air?
After any repairs to the hydraulic part of the clutch, the system must be pumped. To do this, the liquid is poured into the tank literally to the brim, and the fitting must be unscrewed until it stops. Next, press the pedal several times. This is done to ensure that the brake fluid gets into all the pipes. Then the pedal is fixed. Next, tighten the fitting and again squeeze the pedal several times, and then fix it. Next, put a tube on the fitting. It is dipped into a bottle of liquid. The fitting is unscrewed to bleed air. All these steps must be repeated until there is no air left in the system.
If necessary, liquid should be added to the tank. It should be replaced in the clutch lines at least once every 2 years. Brake fluid is hygroscopic. This means that corrosion can form inside the system.
Instructions: How to properly bleed the clutch yourself
Diagnostics and repair of a car clutch involves removing it entirely or partially from the car, disassembling and disconnecting various parts. This causes air to enter the hydraulic system of the control mechanism. Therefore, any master knows that after repairs it is necessary to bleed the car’s clutch, removing excess air from it. When repairing a car clutch on your own, or when symptoms of air entering the system appear, the driver must know how to bleed the clutch on his own.
When is it necessary to bleed the clutch?
As noted above, the clutch bleeding procedure is necessary when the hydraulic system is depressurized, which is most often caused by repair or diagnostic work. At the same time, air can also enter the hydraulic system over time when the machine is used if the connections of the clutch mechanism units have not been tightened properly. In addition, cracks in the pipeline or other malfunctions can cause air to enter the clutch.
There are several symptoms that indicate that the clutch needs to be pumped:
- The car jerks when driving;
- The clutch pedal “beats”;
- The required result is not achieved when squeezing the clutch, only after one and a half or double squeeze.
Driving a car with a faulty clutch is extremely dangerous, both for the driver and for the units. You can bleed the clutch without contacting a service center by following the instructions below.
What is required to bleed the clutch?
The clutch bleeding process can be done in the field or in the garage as it does not require many tools. To bleed the clutch alone you will need:
- New brake fluid;
- Empty container for draining brake fluid from the system;
- Automotive tool set (standard);
- Rubber hose that fits the diameter of the drain fitting;
- A device that allows you to fix the clutch is most often a “gas stop,” but other tools can be used.
Please note: You can do without a clutch locking device if you have a friend who can take on this task.
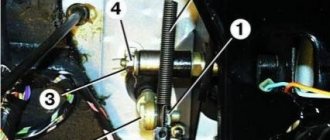
Pedal adjustment
After master cylinder has been repaired or replaced with a new one, the Gazelle requires adjustment of the pedal. It's a simple process. A ruler is required for this operation, but the first step is to carry out a diagnosis. If, when trying to start moving the car, the pedal falls down, various sounds are heard during the switching process, bumps and jerks are observed while driving, you need to start the engine, release the clutch slowly and try to move off smoothly. If the car is in no hurry to move, this indicates that the pedal is set incorrectly. Her stroke is greater than normal. Next, use a ruler to measure the distance from the floor to the pedal pad. It should be no more than 14-16 cm. If it is higher, then the pedal must be adjusted. To do this, you should find a bolt with a locknut under the hood. It is located where the cable ends. The nut is turned. In this case, the desired pedal travel is achieved. To increase the stroke, the nut must be tightened. If the stroke needs to be reduced, it is unscrewed. After adjustment, check the pedal again. Re-measure the distance with a ruler. The adjustment continues until the desired result is achieved.
Adjusting the stroke of the clutch fork pusher
To do this, use pliers to disconnect the tension spring from the fork. Then the spring is completely removed. Next, use a ruler or square to measure the free play. The square is placed so that it can rest against something.
When the element is installed correctly, press the fork forward until it stops and fix it in this position. Next, remember the position of the square relative to the fork. The latter is released and the free movement is checked. If it is less than the passport norm, then the plug is adjusted again.
First of all, you need to hold the adjusting nut with one wrench. Use the second wrench to loosen the locknut. Next, pliers are used to secure the pusher from turning. Then the locknut is loosened and the correct free play of the fork is achieved by rotating the adjusting nut. If everything is correct, the pusher is again held with pliers and the locknut is tightened.